How to Integrate WooCommerce with Event Tickets Plus for Effortless Event Registration

Estimated reading time:
1 minute
It’s challenging enough to get your event up and running. Why not make at least one part of the event planning process a little bit easier? With WooCommerce, you can collect payments right on your WordPress site and help simplify the management of your events. With a few clicks, you can also keep track of all your attendees so that you know who’s coming, issue a refund, and even resend a ticket email.
Using WooCommerce to create registrations is also a great way to save time. With it, you can add registration forms and generate registration reports right from the backend.
Luckily, Event Tickets Plus comes with WooCommerce installed, so setup couldn’t be easier. With these two powerful plugins working together, you can create custom registration forms, include multiple ticket types, and manage attendees, all without incurring any third-party ticket fees.
Below, we’ll show you some key strategies to make this integration work in your favor.
Enable Event Tickets Plus on all post types
With Event Tickets Plus, you can add a registration form to any custom post type—like a page, a post, or an event. You can then customize the registration page to your liking. To find this setting, look under Tickets > Settings > Ticket Settings.
Start off by adding a new page or post. Don’t forget to first populate the page with information about your event. You’ll want to include an event description, featured image, and other event details. Once you’ve finished adding all of your event content, add a ticket block. This is where you’ll build your registration form.

Pro tip: With Events Calendar Pro, you can use a shortcode to embed your events anywhere on your site. Users can then register for your event from any number of locations.
Get to know your attendees in WordPress
With Event Tickets Plus, you can customize registration forms. Once you create a ticket, click +Add next to Attendee Information. There, you’ll see lots of options to collect different types of attendee information.
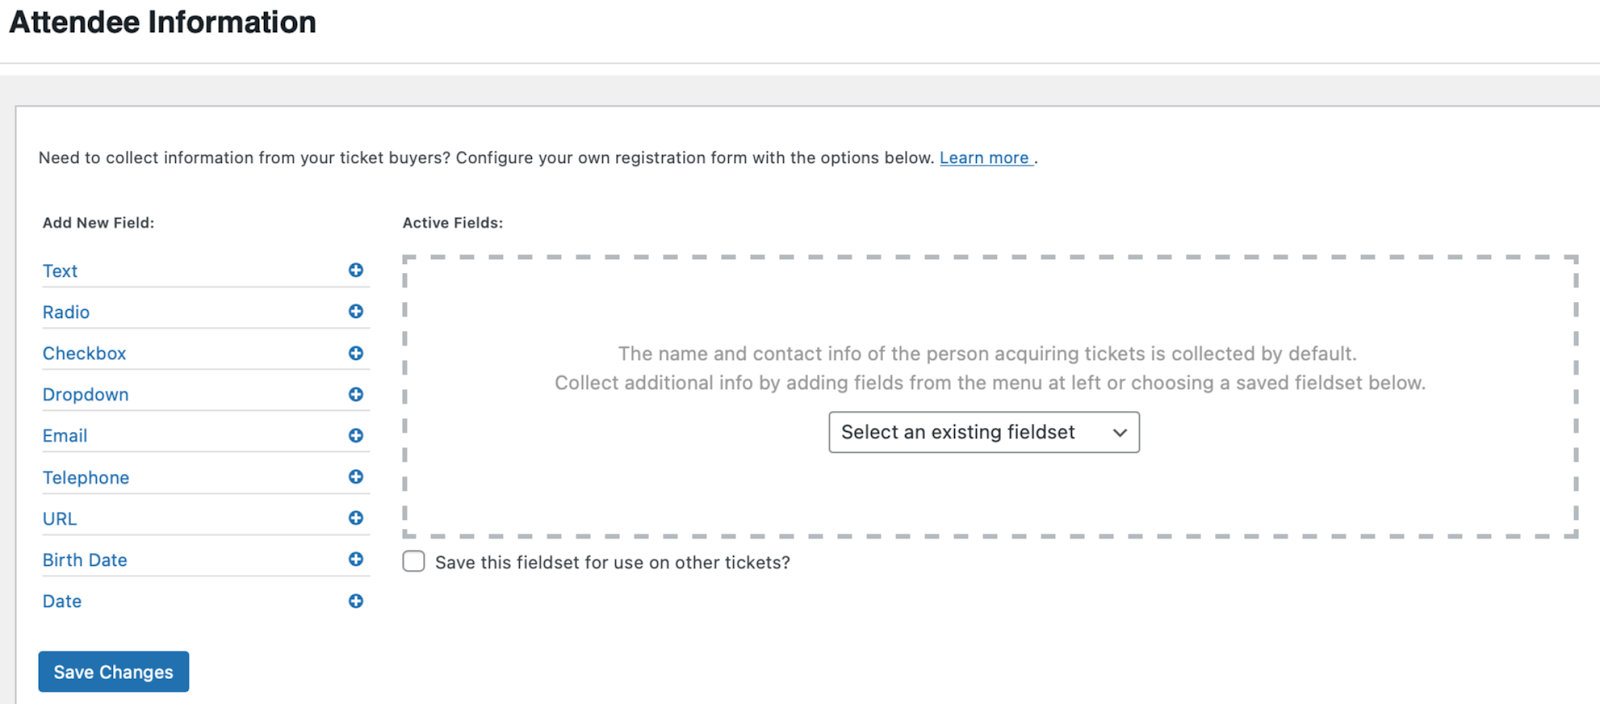
Use this information to personalize your event, your emails, and the overall experience for your attendees.
You can then manage all of your registrations directly from the WordPress backend. There, you can see customers’ orders, track sales, and generate reports.
Email notifications with WooCommerce
Now that your registration form is set up, make sure to have your WooCommerce settings configured so that attendees receive their registration details. To do this, head to Tickets > Settings > Integrations > WooCommerce Support. Here, you can decide when to generate attendee records and ticket emails for customers.
We recommend enabling stock management under WooCommerce Settings > Products > Inventory for optimal functionality.
Pro tip: You can take your emails to the next level with our email marketing service, Promoter. With Promoter, you have the ability to send unlimited custom and automated emails to your event attendees.
Extended functionality with WooCommerce
If you’d like even more added functionality with WooCommerce, use WooCommerce’s extensions to enhance your registrations and ticket sales even further. With a few simple adjustments, WooCommerce can also help to boost your search engine optimization. By leveraging the power of WooCommerce with Event Tickets Plus, you’re well on your way to getting the results you want from your event ticket sales.

Jaime
View author page