7 Strategies to Nail Your Event Registration Process
Estimated reading time:
1 minute
Your event registration process has a tremendous impact on RSVP and ticket sales. The easier the process, the more likely attendees will make it all the way through checkout.
All of the attendees that want to register for your event have to go through the same first step: registration. Make a positive impact by nailing these basics in the event registration process.
1. Mobile Friendly Is Mandatory
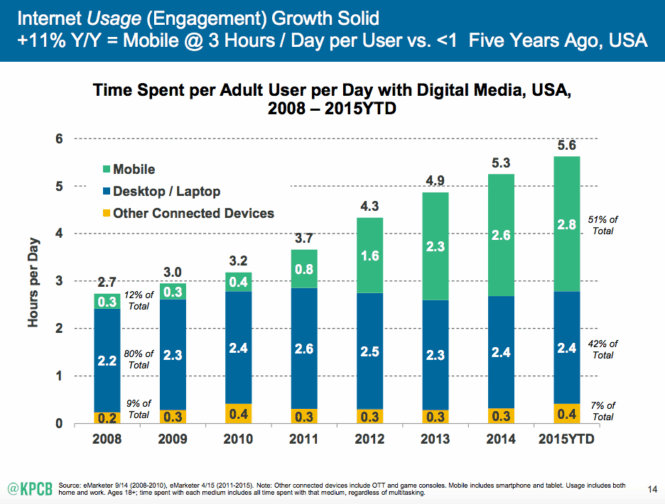
Your attendees are using mobile devices to access information about your event more than ever. In her annual “State of Mobile Marketing” update, Mary Meeker shared key findings from the latest KPCB mobile technology trends.
Mobile internet usage now makes up the largest sector of digital media consumption, averaging 2.8 hours per day.
What does this mean for your event listings and registrations? For event listings, it means you need a mobile-responsive calendar to list your events so they are accessible from a variety of mobile devices, such as smartphones, tablets, and Smart TVs.
Similarly, your registration process needs to be mobile-friendly. Ease of use and continuity of experience are essential – if your event details are viewable from mobile, your event registration forms should be as well.
2. Stay On Brand & On Site
Your registration page should match the look and feel of your event website. Plugins like Event Tickets and Event Tickets Plus enable adding your registration form right to your event listings. It’s easy to make basic font and color changes with CSS, as well as stylesheet and page template tweaks to further customize your events to match your brand.
Most importantly, with these plugins guests are never redirected to an outside site during the registration process. Users are often wary of submitting information online. Keeping them on your site through checkout helps build trust, especially when it comes time to process their payment.
3. Keep It Short & Sweet
Keeping your registration form short and sweet means collecting only the details you really need. Going back to the mobile-friendly piece – no one wants to fill out a lengthy form on their cell phone. Using a short registration form decreases the chance of cart abandonment before the registration process is complete.
Ask yourself if the information you collect is essential to your event. For example, do you really need attendee phone numbers? If not, eliminate that field from your form. You might also consider eliminating the shipping address field if you do not need to mail tickets.
4. Collect Essential Information
True story – I once sold tickets to a 300 person conference where we were providing lunch but forgot to collect information about dietary restrictions during the registration process. We scrambled to get that information the best we could and made some fairly educated guesses when it came time to place our final catering order, but we would up wasting a lot of time and money in the process.
Lesson learned: Always collect essential attendee information during the registration process. This is the one time you are guaranteed to have everyone’s attention.
Your ticketing system’s “custom attendee data fields” option can be used to create questions that need to be answered for each attendee. Important information may include:
- Meal preference
- T-shirt size
- Company name
- Twitter handle
- Accessibility accommodations needed
If you host frequent events, it’s a smart idea to save your custom fields so they can be reused each time you open registration for a new event.
5. Upsell & Cross-Sell Thoughtfully
There are two easy ways to integrate upselling & cross-selling into your event registration without bogging down the process.
- Add additional ticket types.
- Include a question in your custom attendee data fields.
Adding additional ticket types is a popular way to upsell tickets for your event. For example, let’s say you’re hosting an author book signing at your bookstore. You could set up different ticket types for the event to upsell book purchases:
- Free RSVP ticket – for those wanting to bring their book and get it signed
- Paid Book + Signing ticket – for those that haven’t bought the book yet
- Paid Book + Shipping ticket – for those that can’t attend the event, but still want to receive an autographed copy
For cross-selling, including questions in your custom attendee data fields is an excellent way to gauge audience interest in related products or services. Just remember to keep it simple – a question such as “would you like to hear more about ____” opens the door for you to follow up with the attendee after they’ve finished registering for your event.
6. Provide Multiple Payment Options
Getting back to the nuts and bolts of the registration process – make sure you provide multiple payment options during checkout. Many of our users run Event Tickets Plus with WooCommerce, a popular free WordPress e-commerce platform that allows you to accept payments via PayPal, Stripe, Amazon Payments, and more.
Your e-commerce provider should cover the basics like credit cards and PayPal. If you have guests attending from overseas, you may want to look into the process of accepting foreign credit and debit cards.
7. Offer Group Registration
Group registration can provide a powerful boost to ticket sales. It enables one person to pay for a group of tickets, such as a parent registering their entire family for an event or a business paying for multiple employees to attend a workshop.
One note about group registration – make sure you understand how your system manages orders and attendees. If you need to collect individual attendee information such as name and meal preference, you’ll want to use a ticketing system like Event Tickets Plus that includes attendee data functionality for group ticket sales.
Bonus Strategy: Leverage Your Thank You Page
Your registration thank you page is typically generated by your e-commerce provider (such as WooCommerce). This page can (and should!) be customized to include targeted messaging for your attendees, as well as social share buttons.
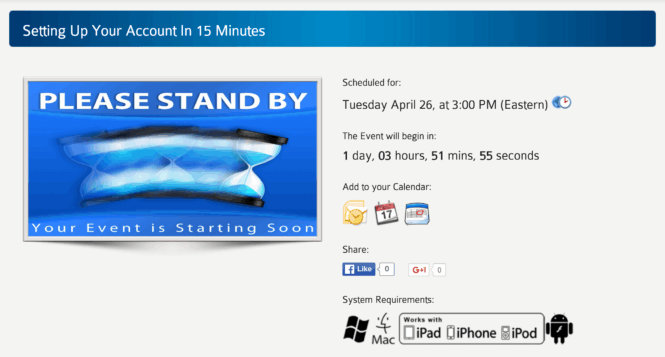
Aweber currently uses a simple “confirmation page” for their free webinars. They include the webinar name, date, and time, as well as a countdown and buttons to add the event to your calendar. While they do include two social buttons, they could leverage this page further by adding specific calls to action, such as a “tweet this” button to encourage attendees to share the event with their friends.
Event Registration: Nailed It!
The best way to nail your event registration process is to refine it with your attendees in mind. Think about how they use your site, what kinds of expectations they have, and how you can make the process easy and efficient for them. The better you cater to your attendees’ needs, the more likely they are to share your event and encourage others to attend.

Jaime
View author page