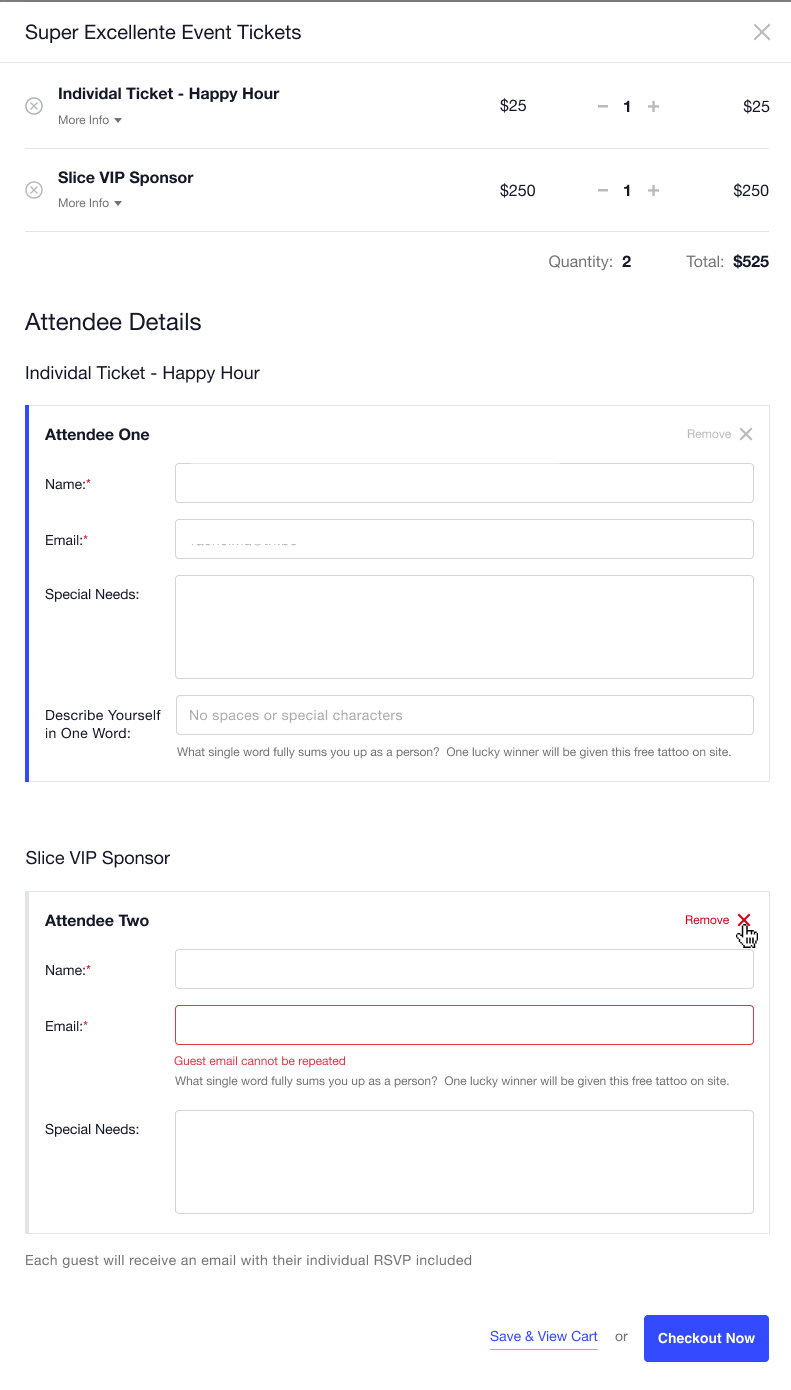
Collecting information about your attendees — such as their names and email addresses — can give you insights about who is coming to your event, how to communicate with them, and even create personalized experiences for them.
With Event Tickets Plus you can choose to collect additional information from people who RSVP or buy tickets to your events. By default, RSVPs collect the user’s name and email address. People who purchase tickets are required to fill out their contact and payment information. You have a few options to adjust the Individual Attendee Collection settings.
What is Individual Attendee Collection (IAC)?
Individual Attendee Collection (IAC) is a feature in Event Tickets Plus that allows enabling attendee information to be collected on each ticket when multiple tickets are purchased together. Without IAC, the tickets only enable attendee information about the individuals purchasing the tickets. IAC changes that by allowing information to be entered for each ticket on an individual basis.
As such, you can reliably gather and record the name and email address of all attendees in a way that allows exporting, searching, sorting, and API access.
Enabling Individual Attendee Collection (IAC) Globally
The feature can be enabled in the plugin settings, located at Tickets → Settings → Attendee Registration
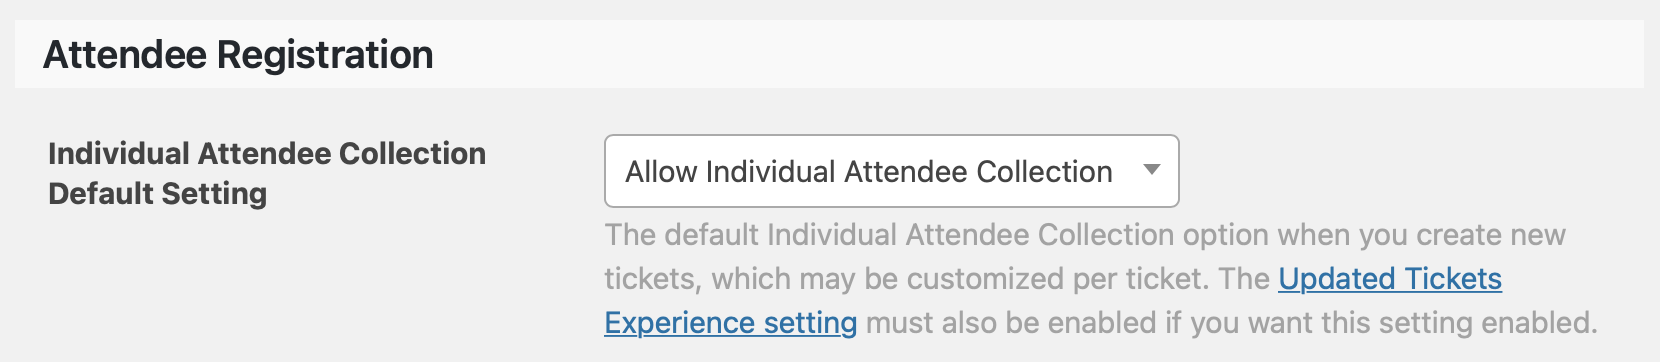
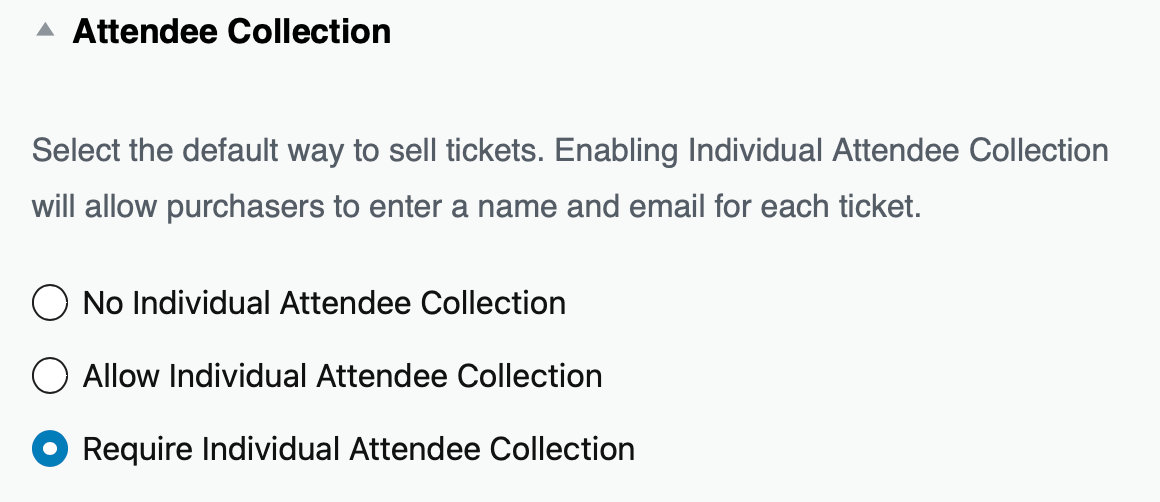
- Allow Individual Attendee Collection: IAC is enabled, but option for the person purchasing tickets.
- Require Individual Attendee Collection: IAC is enabled and the person purchasing tickets is required to provide information for each ticket before proceeding.
- No Individual Attendee Collection: IAC is disabled.
Once saved, this is the default setting for all new tickets. You can still override the setting on a per-ticket basis in the WordPress editor.
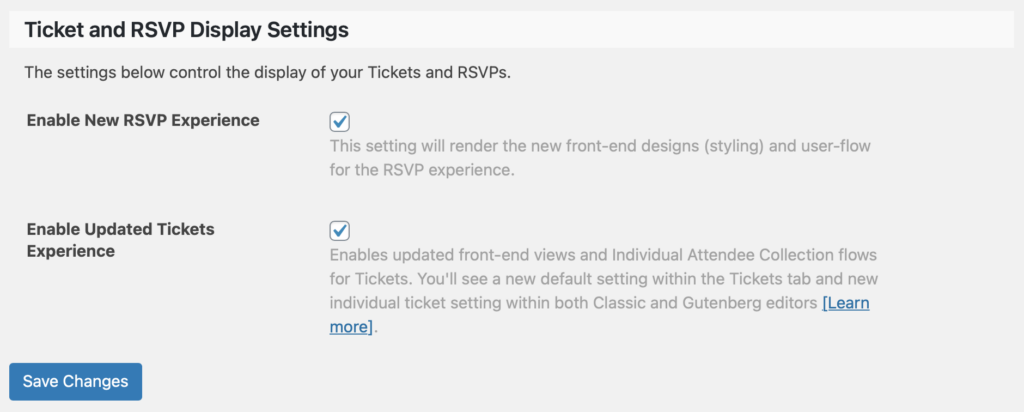
👋 Heads up! Individual Attendee Collection requires the updated ticket and/or RSVP experience to be enabled on sites already running Event Tickets. You can enable the updated experience from Tickets → Settings → General → Display. For new installs (since version 5.0), this experience will be enabled automatically and you will not see these setting options.
Enabling Individual Attendee Collection (IAC) in Editor
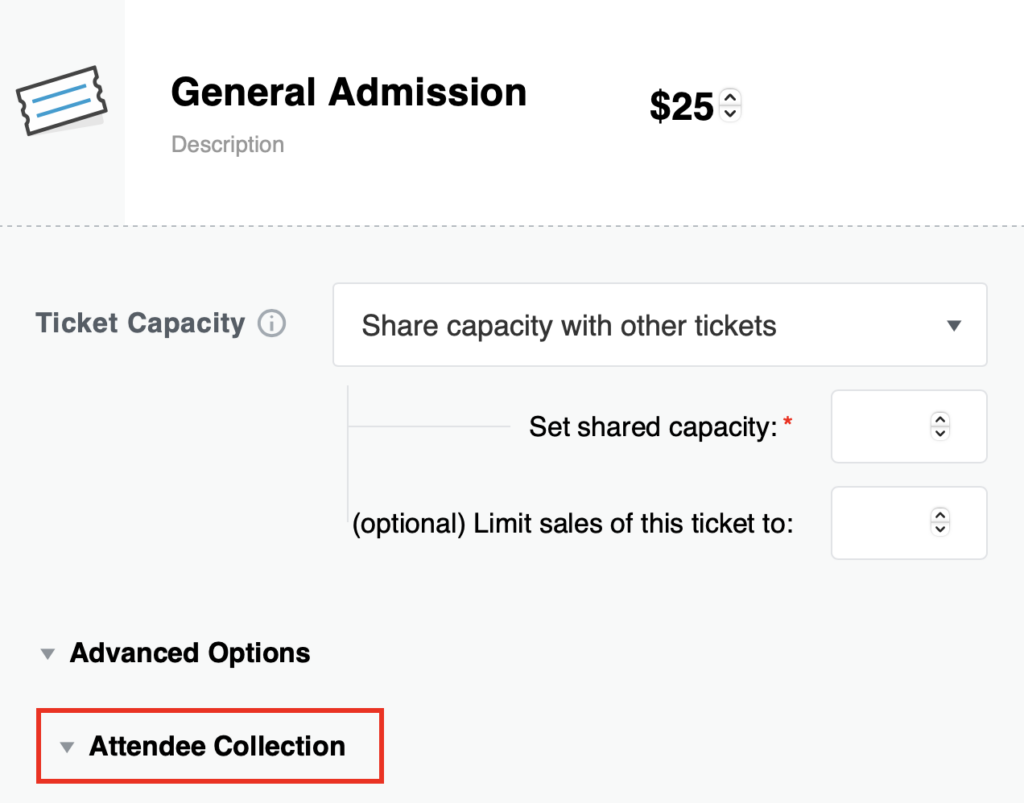
No matter what IAC you set for the default in the plugin settings, you can still manage the IAC for individual tickets in the WordPress editor directly in the Ticket block. Add a Ticket block to the post, and select the “Attendee Collection” option to expand the IAC settings for that ticket.
Enabling Individual Attendee Collection (IAC) Programmatically
In addition to using the plugin settings, the default IAC setting can be programmatically set to any of the three possible settings with the following function:
<?php

add_filter( 'tribe_tickets_plus_attendee_registration_iac_default_setting_for_all_tickets', 'my_custom_iac_setting_for_all_tickets' );

/**
 * Filter the Individual Attendee Collection setting for all tickets.
 *
 * @param string $default_iac_setting The default IAC setting for all tickets (none, allowed, required).
 *
 * @return The default IAC setting for all tickets (none, allowed, required).
 */
function my_custom_iac_setting_for_all_tickets( $default_iac_setting ) {
  // Set the default as allowed.
  return 'allowed';
}
The filter hook used in the example above updates IAC for all tickets at once. To control IAC setting on a per-ticket basis, tribe_tickets_plus_attendee_registration_iac_setting_for_ticket filter hook can be used.
Available IAC Configurations
Depending on how you want to collect attendee details, IAC can be configured in a few different ways. The sections below outline the available options and how each one behaves.
No Individual Attendee Collection
This is the out-of-the-box default setting and is the only Attendee Collection setting available in Event Tickets Plus versions prior to 5.1.0.
This setting means that any Attendee (and ticket) generated will use the Billing Purchaser’s name and email address. In the same breath, only the Billing Purchaser will receive an email containing all tickets purchased.
Allow Individual Attendee Collection
We consider this as the middle-of-the-road compromise between No individual attendees and Require individual attendees ticket sale options. This setting also places control in your Purchaser’s hands as they initially purchase each ticket, including if they choose to update their Attendee tickets post-purchase.
As folks select to purchase tickets to your upcoming event, the experience this setting provides includes:
- The option for your purchaser to either leave themselves (the Billing Purchaser) as the Attendee name and email address, or
- To add a different name and email address (other than themselves) to any given ticket.
Post-purchase: the Billing Purchaser can log into your website, head to the Event page > My Tickets, and update (e.g. change) the ticketing information for a given Attendee.
The information used within tickets that have “Allow Individual Attendees” is that the same information is allowed to be reused for multiple tickets, and/or default to the Billing Purchaser’s name and email.
Note: Any Attendee that the Billing Purchaser adds a unique (different) email address to, will receive their own individual ticket confirmation email and the Billing Purchaser will receive the standard ticket email confirmation, which contains all tickets purchased.
Require Individual Attendee Collection
There is a strong case in which “Requiring” Individual Attendee Collection for a ticket is beneficial for your upcoming event if enabling attendee information is important to you. By using this ticket sales option, the Billing Purchaser will be required to add a unique name and email address for each attendee.
For example: the ticket’s Billing Purchaser selects 4 tickets to an upcoming event. Prior to completing their purchase, they must add a unique (different) name and email address for each of the 4 Attendees. None of the Attendees need to be the Billing Purchaser’s information either. They can simply purchase the tickets on behalf of the Attendees. By doing so, each individual Attendee will each receive their own individual ticket confirmation email and the Billing Purchaser will receive the standard ticket email confirmation, which contains all tickets purchased.
As folks select to purchase tickets to your upcoming event, the experience this setting provides includes:
- The requirement for the Billing Purchaser to add a different name and email address (other than themselves) to every Attendee’s ticket prior to completing their purchase.
Post-purchase: the Billing Purchaser can log into your website, head to the Event page > My Tickets, and update (e.g. change) the ticketing information for a given Attendee, however, it must be different from all other Attendees for that set of tickets purchased.
When modifying the name or email address on the My Tickets page for an attendee ticket with Individual Attendee Collection required, any email can be used even if the email address is used for another attendee already.
Attendee registration settings
Head to Tickets → Settings → Attendee Registration to configure your event registration settings.
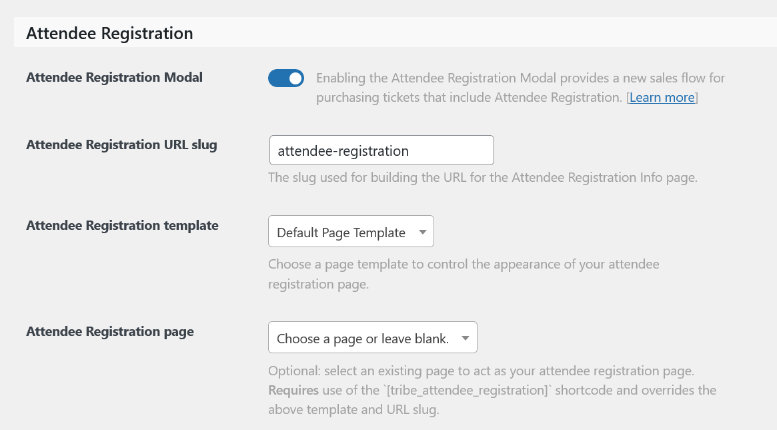
Attendee registration modal: when this is checked, it will enable a modal popup on your site just before reaching the cart checkout. You can also remove an attendee from this screen as well.
Attendee registration template: Attendee information is collected during the checkout process. You can change the look of this page or modal using the attendee registration template.
Attendee registration page: If you’d like to have full control over designing the registration page to perfectly match your website, with methods to show sidebars, footers, or other page elements, using the Attendee Registration Page is the route to go. Use the [tribe_attendee_registration] shortcode to display the attendee information fields to users on any WordPress page or post.
Set what information to collect during registration
When creating a ticket or RSVP, click the “Attendee Information” option to define what information you want to collect during registration. We call these “custom registration fields” and they are a feature included with Event Tickets Plus.
Note: Attendee Collection does not need to be enabled in order to collect Attendee Information (aka custom registration fields). With this method, only one email will be sent to the purchaser’s email address that contains all the tickets. If you’d like emails sent to each of the attendees, you’ll want to enable Attendee Collection.
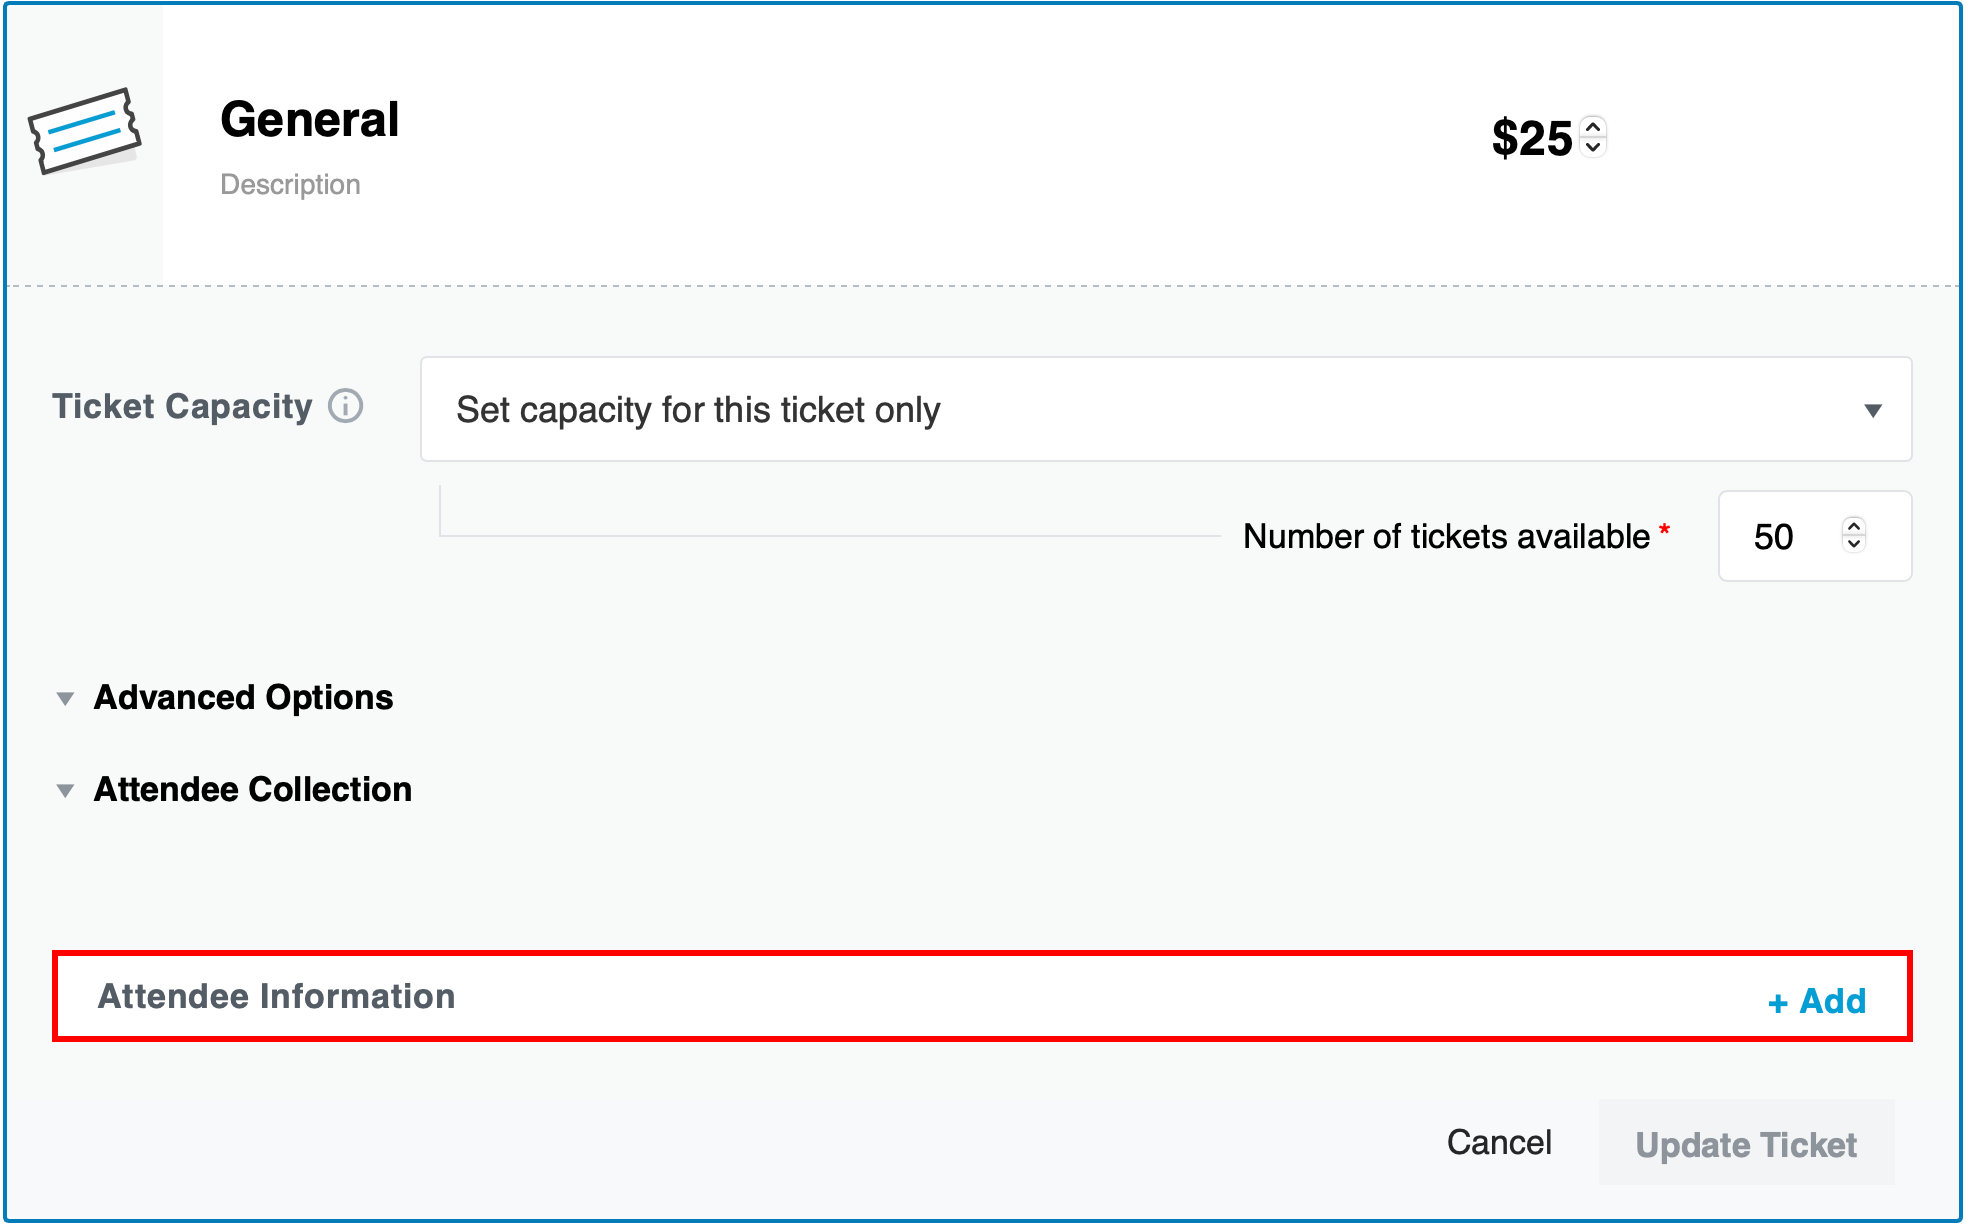
Once you are done adding custom fields to the event’s registration form, save your changes and anyone purchasing a ticket will see the form during registration, based on which option you have chosen in the previous section.
With Event Tickets Plus (5.2.4 or above), we have enabled placeholder support for the following attendee registration fields: text, email, URL, and telephone.
Note that you can save your custom registration options as a “saved fieldset” that can be used on other tickets you make. Select “Save this fieldset for use on other tickets” when saving your custom registration fields. To use a saved fieldset, click the “Start with a saved fieldset” option and select the fieldset you want to use before adding any fields to the form.
You can view the custom fields that have been added when using the Classic Editor, like this:
💡 Tip: If you’re working with required checkboxes, ensure that at least one option is selected. If the value is empty, the modal will not proceed to checkout, since it expects the required checkbox to have a value. This helps ensure that the attendee registration process runs smoothly.
Viewing attendee information
Go to Events, locate the event you want to view information for, and then click the “Attendees” link that is displayed when hovering over the event.
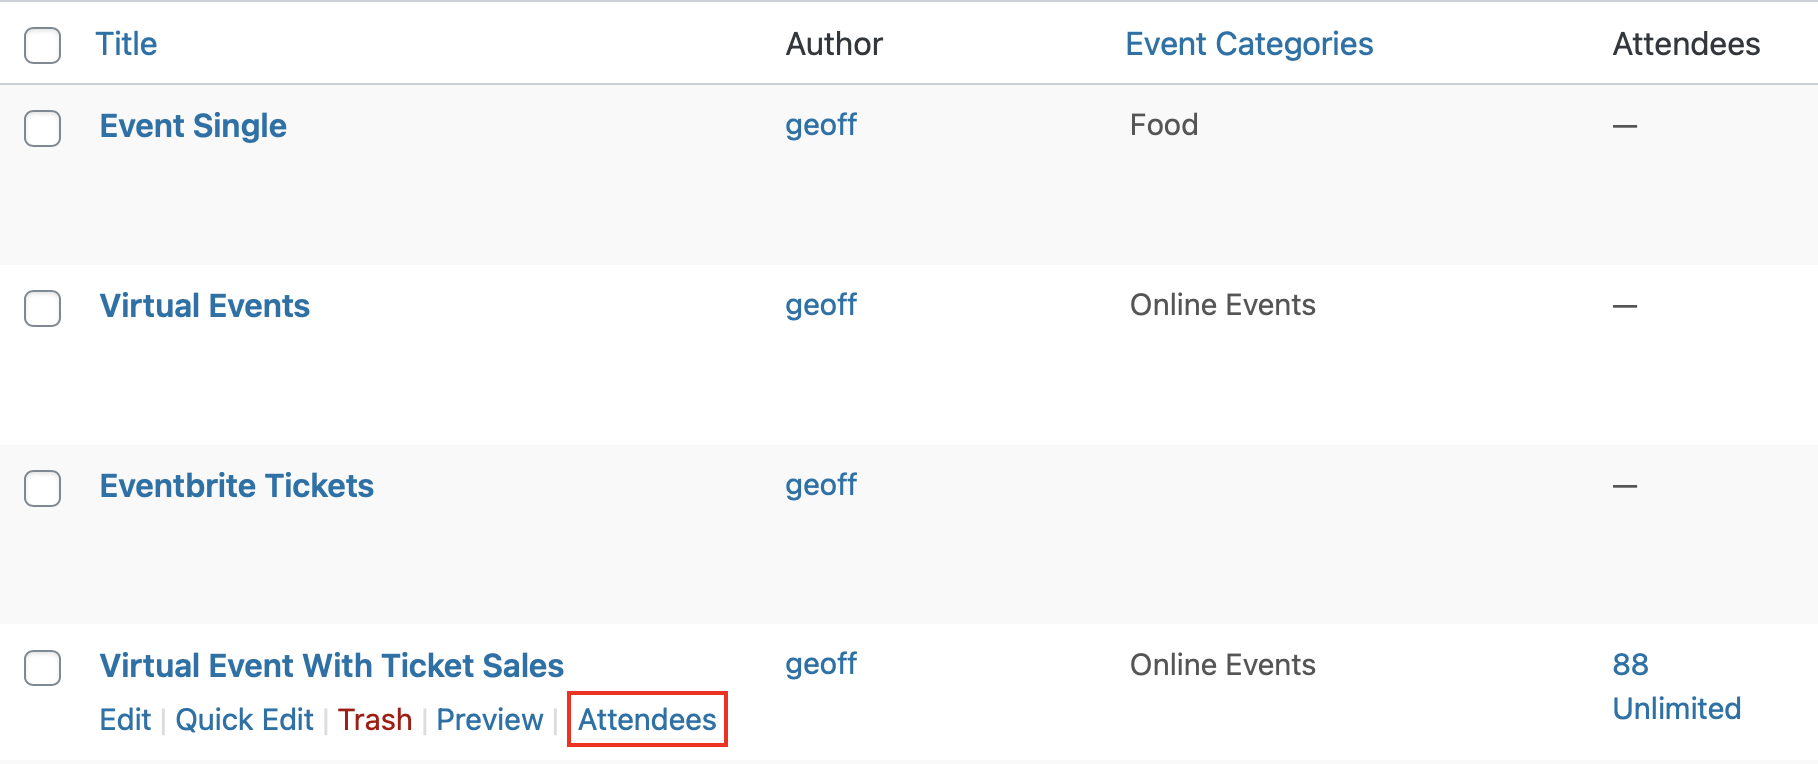
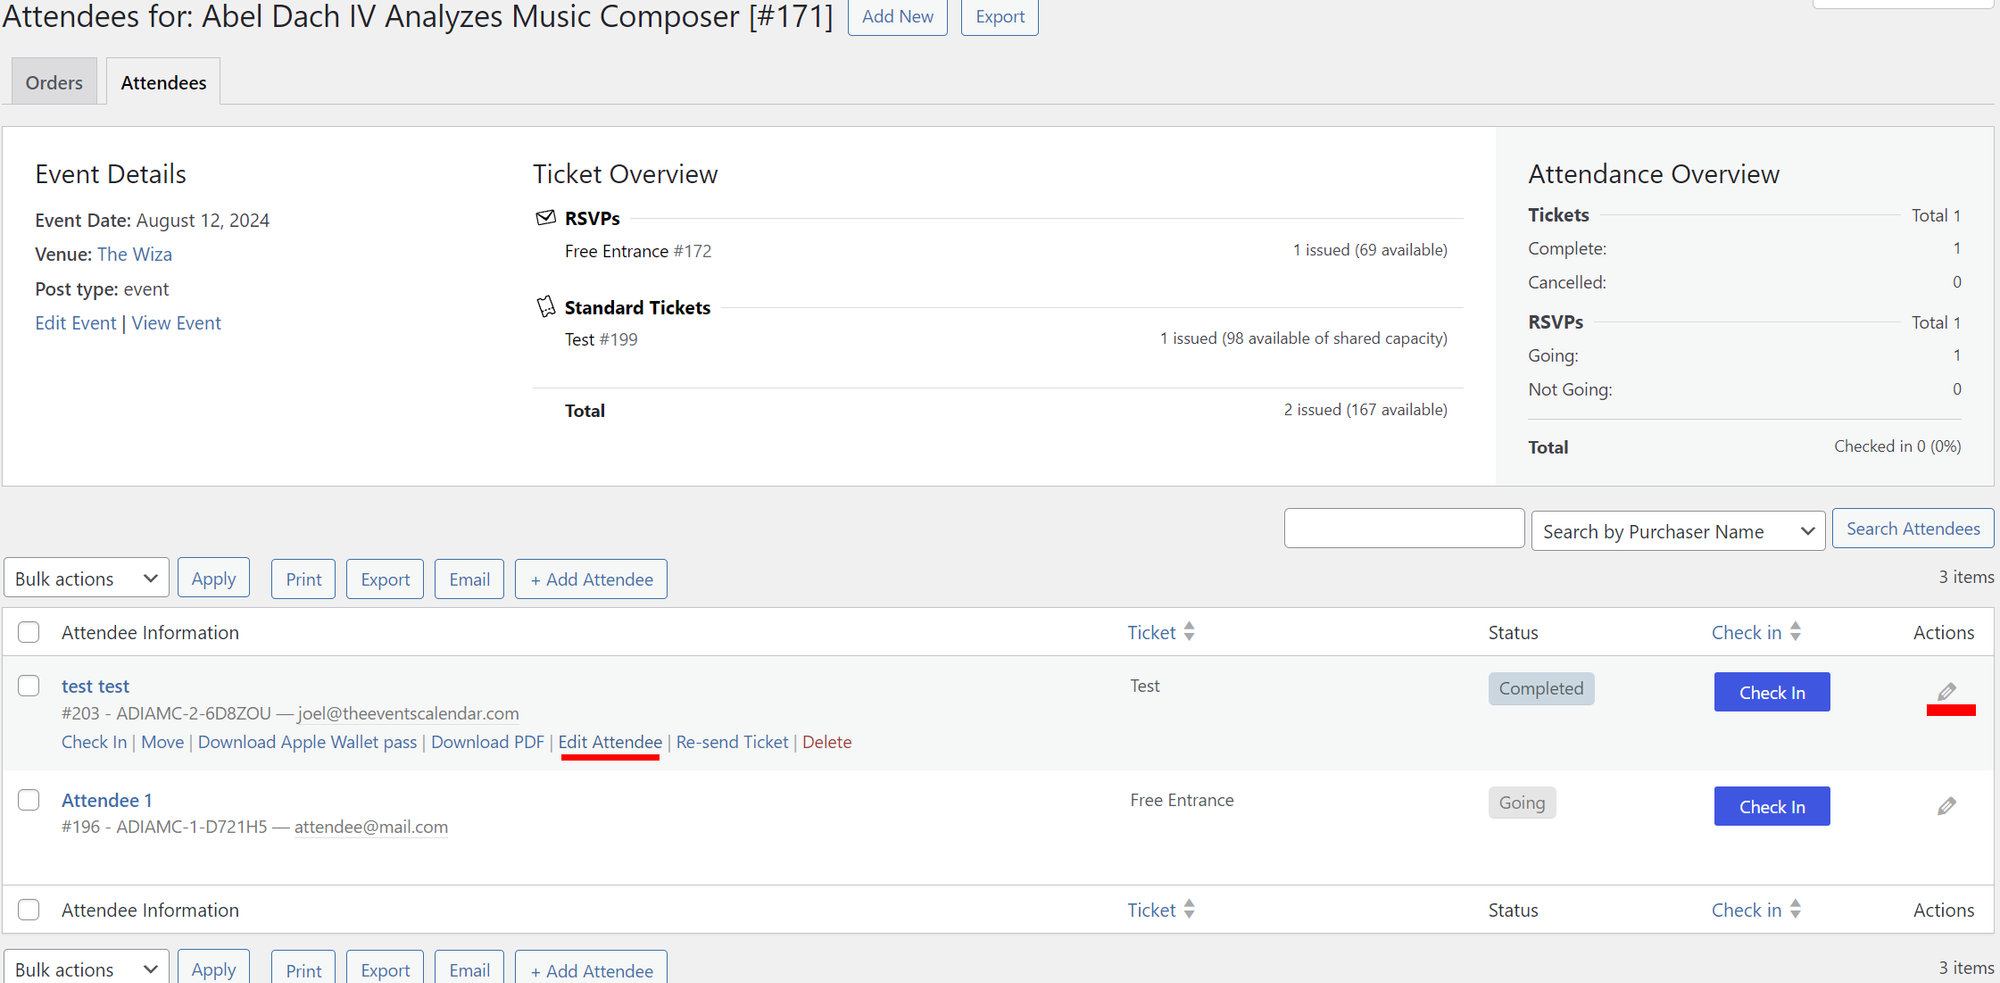
Clicking the “Attendees” link will take you to a screen that contains a list of everyone who is registered for the event.
Click the “View Details” link on any attendee to view their responses to the registration fieldset.
Editing or Deleting Existing Ticket Fieldsets
If you need to remove or make changes to existing fieldsets, follow the steps below.
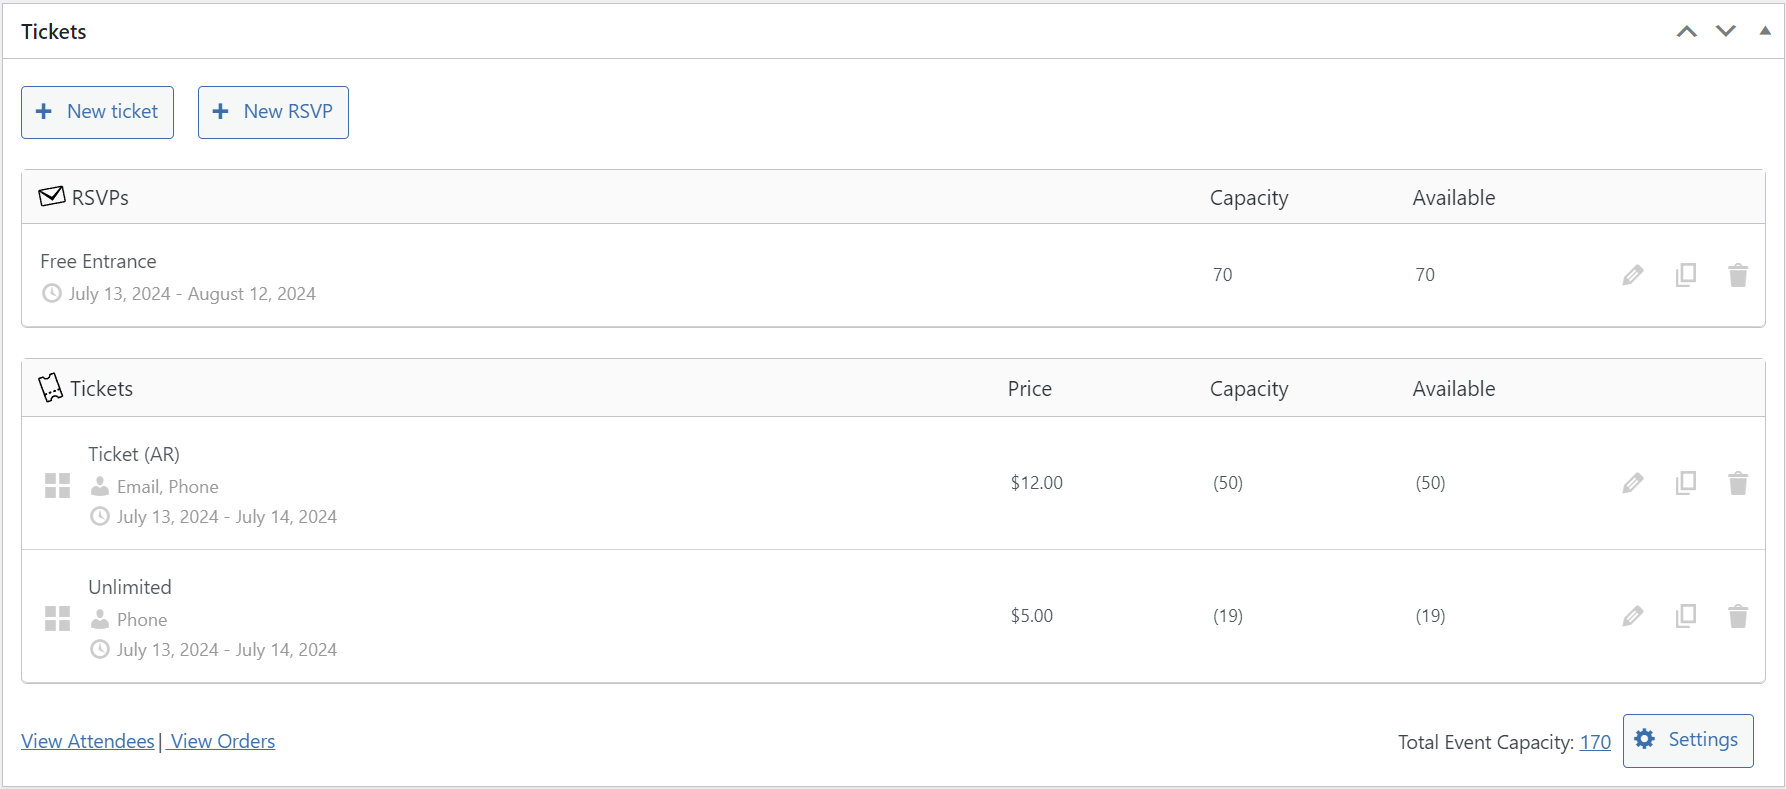
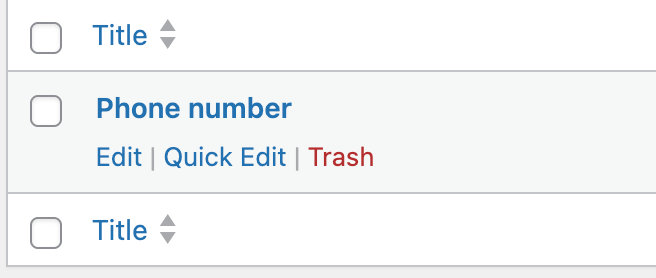
- Go to your WordPress dashboard and navigate to Tickets > Ticket Fieldsets.
- Hover over the fieldset you want to remove and click Trash.
- To edit a fieldset, click Edit on the one you want to modify.
- To delete it permanently, go to the Trash, hover over the fieldset, and click Delete Permanently.
By following these steps, you can easily manage, edit, or remove existing fieldsets as needed.
Resending Tickets
The Event Tickets Plus system keeps checking for when Billing Purchaser updates (e.g. changes) an Attendee’s email address. When such an action takes place (post-purchase), a checkbox will appear allowing the user to select to resend the ticket email upon saving the new updated information.
Enabling attendee information with Individual Attendee Collection provides flexibility in the way your Event Attendees are generated.
As the default, only the Billing Purchaser is listed as the Attendee to an event. If they purchase multiple tickets, their name and email address will be listed as the Attendee.
Individual Attendee Collection provides you with two additional ticket sales options:
- “Allow” Individual Attendee Collection
- “Require” Individual Attendee Collection
The goal of the Individual Attendee Collection project is to adjust the system so that you can reliably gather and record the name and email address of all attendees in a way that allows exporting, searching, sorting, and API access.
Note: You can enhance your ticket sales by using both Individual Attendee Collection and custom Attendee Registration Information fields. Let Individual Attendee Collection collect and organize your Attendees and use the power of Attendee Registration Information to gather even more custom information!
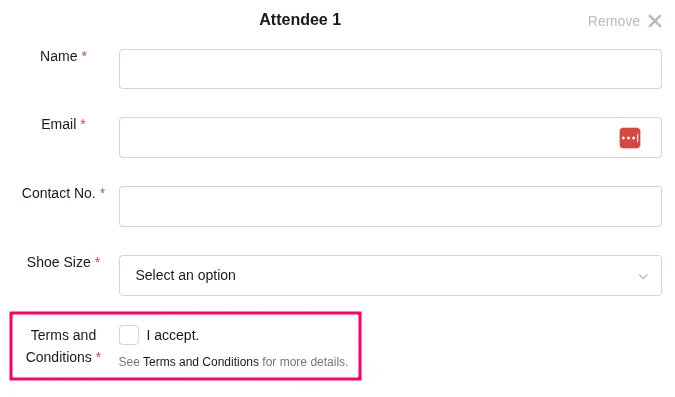
Add an “Agree to Terms” Checkbox
You can use the Attendee Information feature to require users to agree to your terms before completing a registration. This is handled by adding a specific field to your ticket’s fieldset.
Step-by-Step Guide
- Edit Your Ticket
- Go to the event or page where your ticket is published.
- Click Edit on the ticket you want to add the checkbox to.
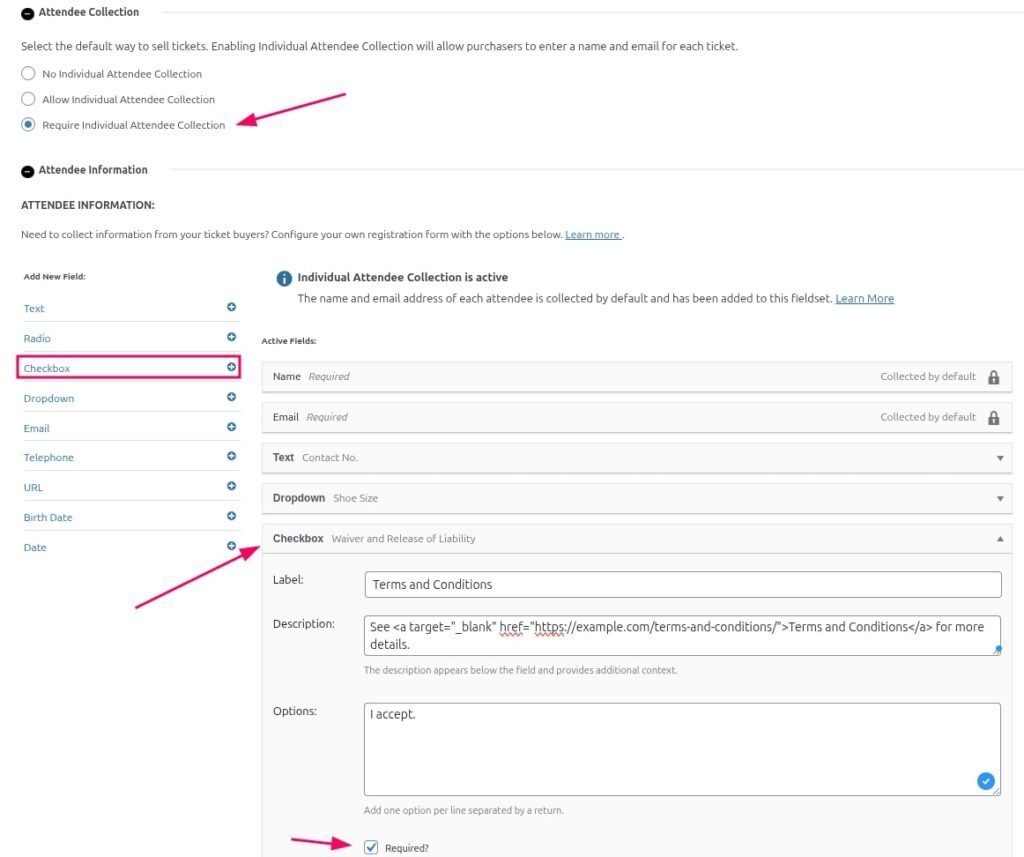
- Enable “Require Attendee Collection” under the Attendee Collection section.
- Enable Attendee Information
- Scroll down to the Attendee Information section.
- Click Add Fieldset.
- Enter a label like Terms and Conditions.
- Add a Checkbox Field
- Set the Field Label to something like:
Terms and Conditions - (Optional) Include a link in the label to your full terms in the Description area, such as:
See <a href=”https://example.com/terms-and-conditions/” target=”_blank”>Terms and Conditions</a> for more details.
- Set the Field Label to something like:
- Make It Required
- Check the Required box to ensure attendees cannot complete registration without checking the box.
- Save and Update the Ticket
- Save the fieldset.
- Update the event or page to apply changes.
When a visitor selects a quantity of tickets and clicks Get Tickets, the form will display the checkbox along with any other attendee fields you’ve created. They must check it before submitting the form.
Best Practices
- Use clear, concise language for the checkbox label.
- Link to your actual terms or waiver page, so attendees can review it before agreeing.
- For legal compliance, ensure the wording of your terms matches any organizational or regional requirements.