How to Build a School Website Using WordPress

Estimated reading time:
1 minute
Nowadays, schools of all types need good, informative websites in order to operate successfully. A website is the ultimate communication tool and allows you to display information for faculty, students, parents, and supporters in the community. Building a school website using WordPress is one of the most cost-effective ways to get your school online. WordPress is a powerful system that provides the opportunity to create a scalable website without necessarily needing to hire a website developer.
A key benefit of using WordPress is that you’ll be building on a platform that’s been trusted by millions of users. As of 2021, approximately 40% of the internet is running on WordPress. It’s a no-brainer if you’re on a budget since WordPress is free and one of the most powerful examples of open source. Themes that are suitable for your school can be found for free and can be set up in minutes. In addition, you’ll find many plugins that will help you extend the functionality of your website, many of which are also free.
In this tutorial, we’ll provide you with all of the steps you need to build your school’s website, and recommend several plugins that most schools can benefit from.
What makes WordPress the best option?
Whether you’re building for an elementary school, or you’re launching a site for a college or university, there are many reasons why WordPress is the best option.
- WordPress is simple. Although major companies like Home Depot and Reuters depend on WordPress, it’s also used by small organizations and individuals because of its simplicity. Since it’s so popular, there are thousands (if not millions) of pre-made templates and themes on the web that make it easy to create a professional-looking website.
- You don’t necessarily need a developer. While hiring a developer may be helpful in future, the basics that will get your school live online can be done by a beginner.
- You’ll be up and running within minutes. WordPress has a 5-minute install, so getting started is nearly effortless. Plus, if you use a managed hosting service, this becomes ten times easier.
Getting Started
The first thing you’ll want to do is choose your domain name and hosting provider. There are many domain registrars and hosts to choose from, and we recommend using Nexcess for both.
Registering a domain name
When picking a domain name, choose something that represents your institution. Preferably, your domain should be your school name; however, you also want to keep it short and sweet to make it easy to communicate. If your school’s name is long, consider abbreviating your domain to make it more marketable. The domain will also be the back end of your email address, so something like [email protected] will be difficult for users to type without errors.
There are various options in domain extensions you can choose from including domains specific to your country (.co, .uk, .co, .au), and even domains related to specific disciplines (.biz, .name). Research your options as you decide which is best for your school. If you’d like to use a .edu domain name, you’ll want to register it at EduCause which is the exclusive registrar for the .edu extension. If you decide to use a public extension, head over to Nexcess.com to see what options are available, then go ahead and register your domain.
Choosing a hosting provider
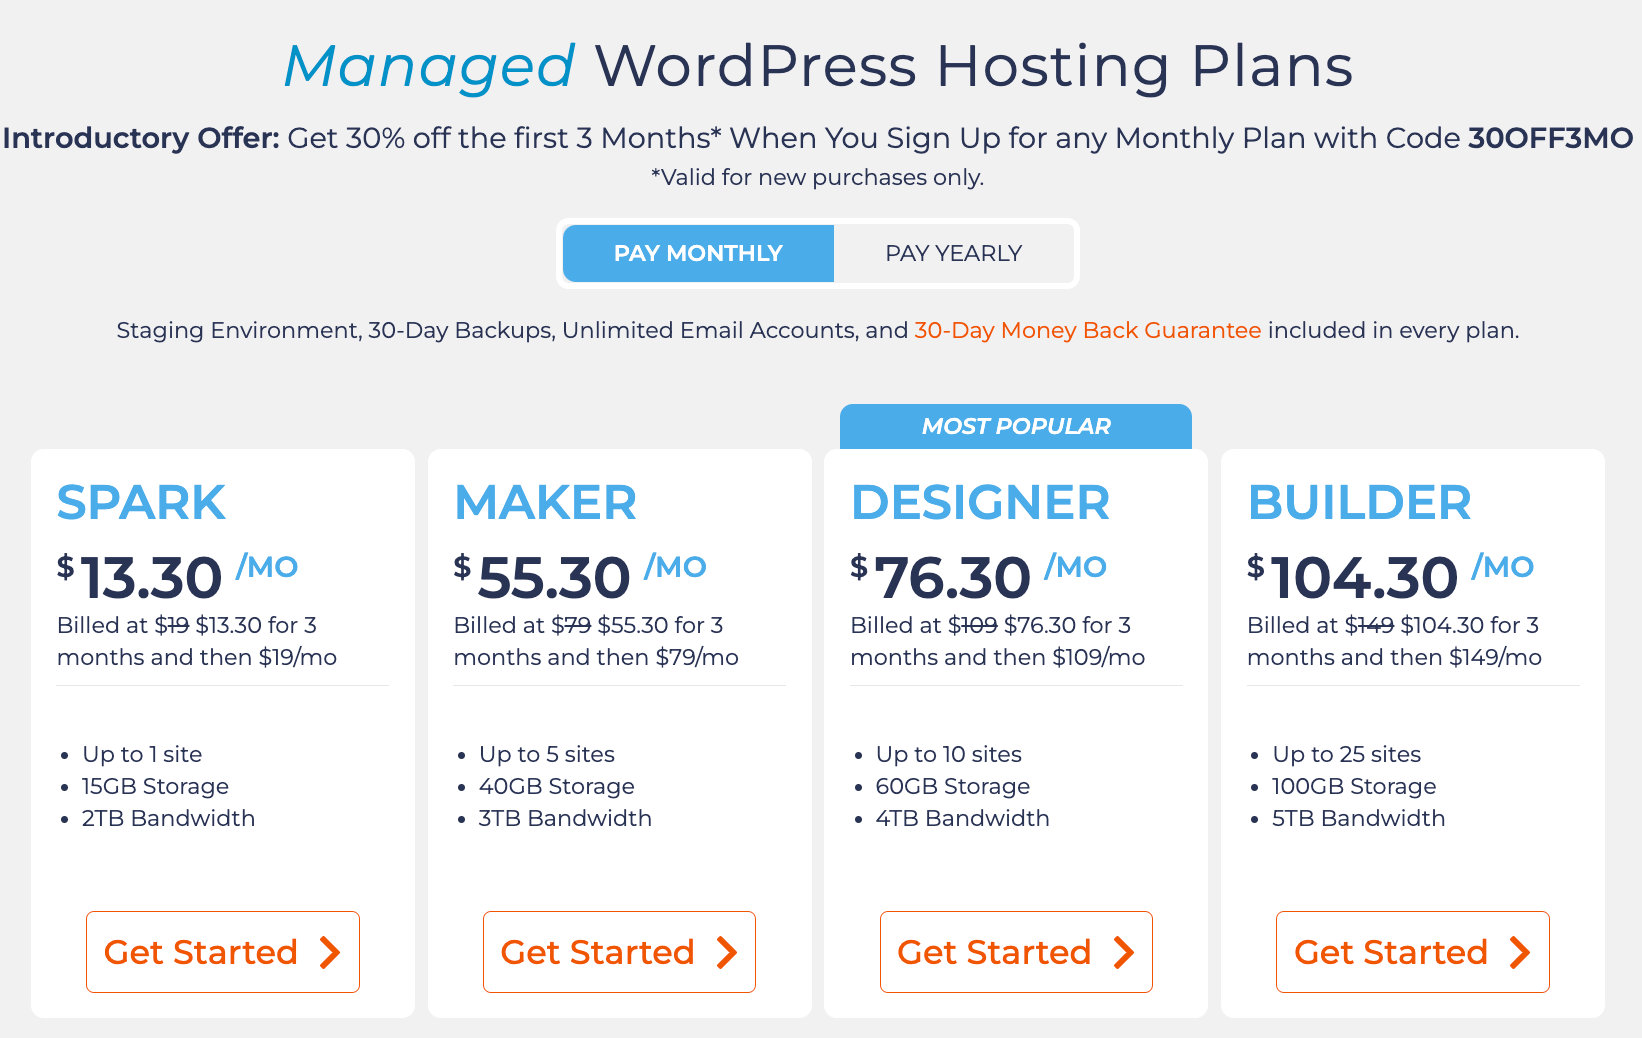
In order to display the contents of your website on the Internet, you’ll need a web hosting service. There are many different hosting providers to choose from, each offering multiple plans with varying levels of security, storage, and other features at different price points.
No matter which hosting company you choose, we suggest using a fully managed WordPress host. These come with built-in resources to make WordPress maintenance less overwhelming and time-consuming.
We’ll be using Nexcess in this tutorial. However, you can easily follow the same steps with any hosting provider. To get started, simply select the plan you’d like and you’ll be ready to roll.
Once you create an account, you’ll be able to enter your domain name and begin putting together your WordPress site.
Installing WordPress
Now that your website has a place to live on the Internet, you can install WordPress and make your website dreams a reality. To install WordPress, you’ll start off by logging in to your Nexcess Control Panel. From there, select Create New Site in the top right corner of your screen and fill out the requested information. Follow the step-by-step instructions, then when your installation is complete, enter your credentials to launch the WordPress Dashboard.
Choosing a theme
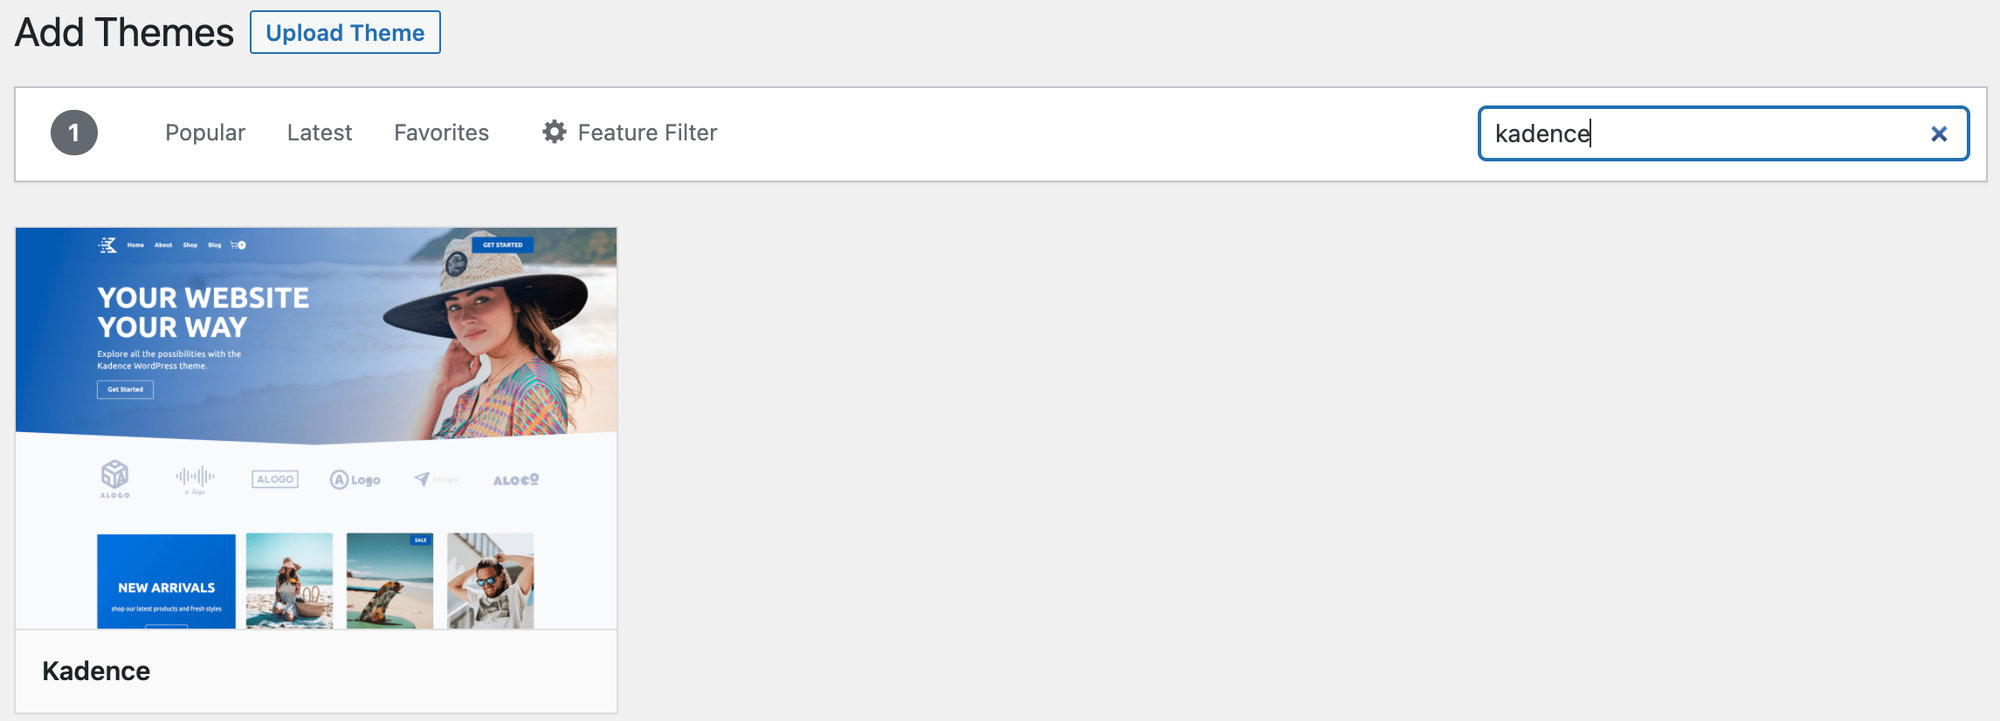
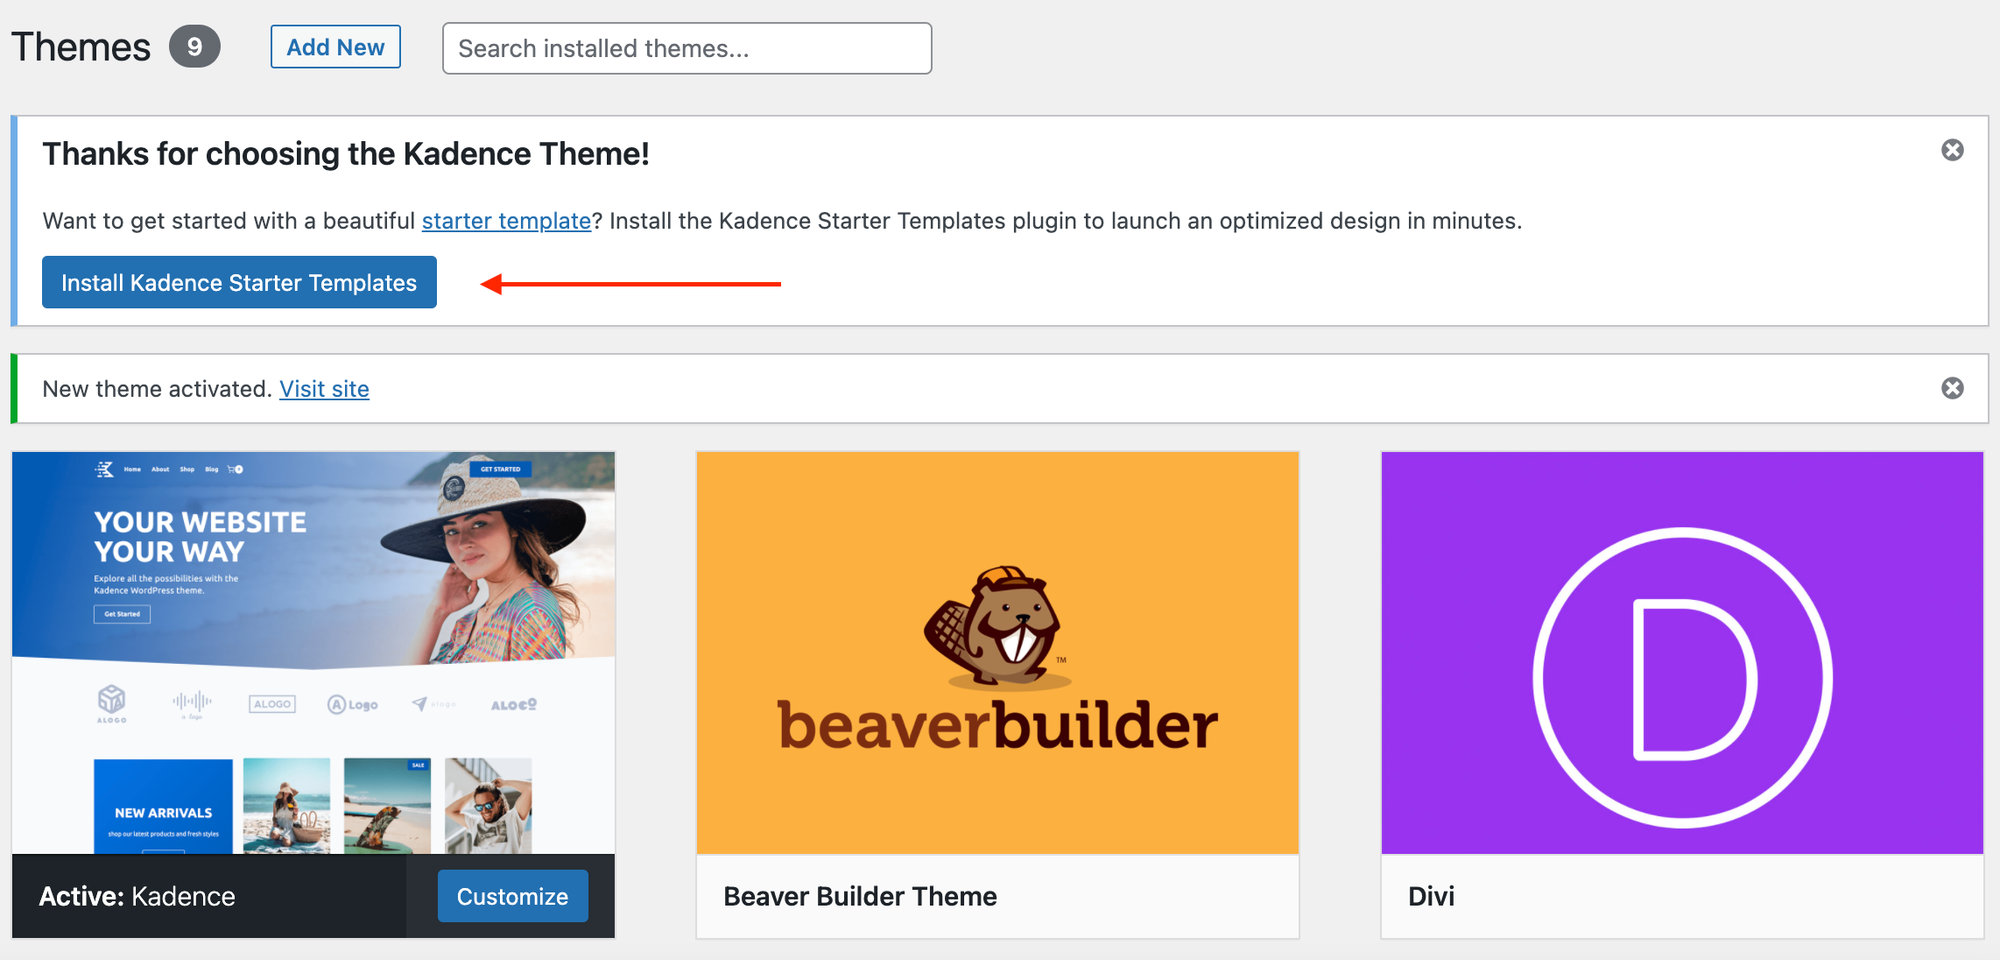
Depending on what type of school you run, you’ll likely want to select a theme that looks clean and professional. There are lots to choose from, and for this tutorial, we’ve chosen to go with the Kadence Theme. Kadence comes with beautiful (and free!) starter templates that are ready to go as soon as you install them. You can choose from any design and simply replace the default content with your own to create a professional website instantly.
To install the theme, go to Appearance > Themes > Add New and type ‘Kadence’ into the search bar to add this theme. Hover over the theme and click Install. Then click Activate.
From there, you’ll be prompted to add Starter Templates, so go ahead and click that button. Starter templates provide your website with all of the tools you need to create your website design in minutes. Once you select a starter template, you can import all the content of that template then customize it from there.
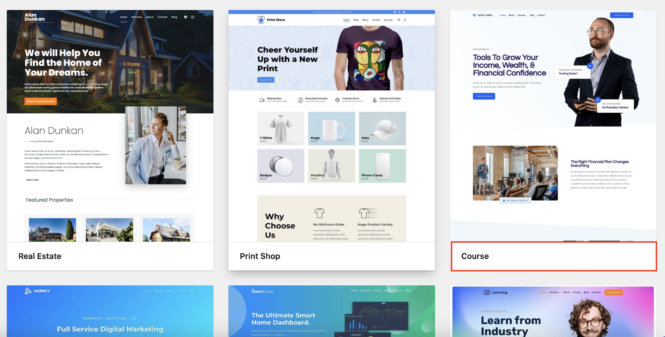
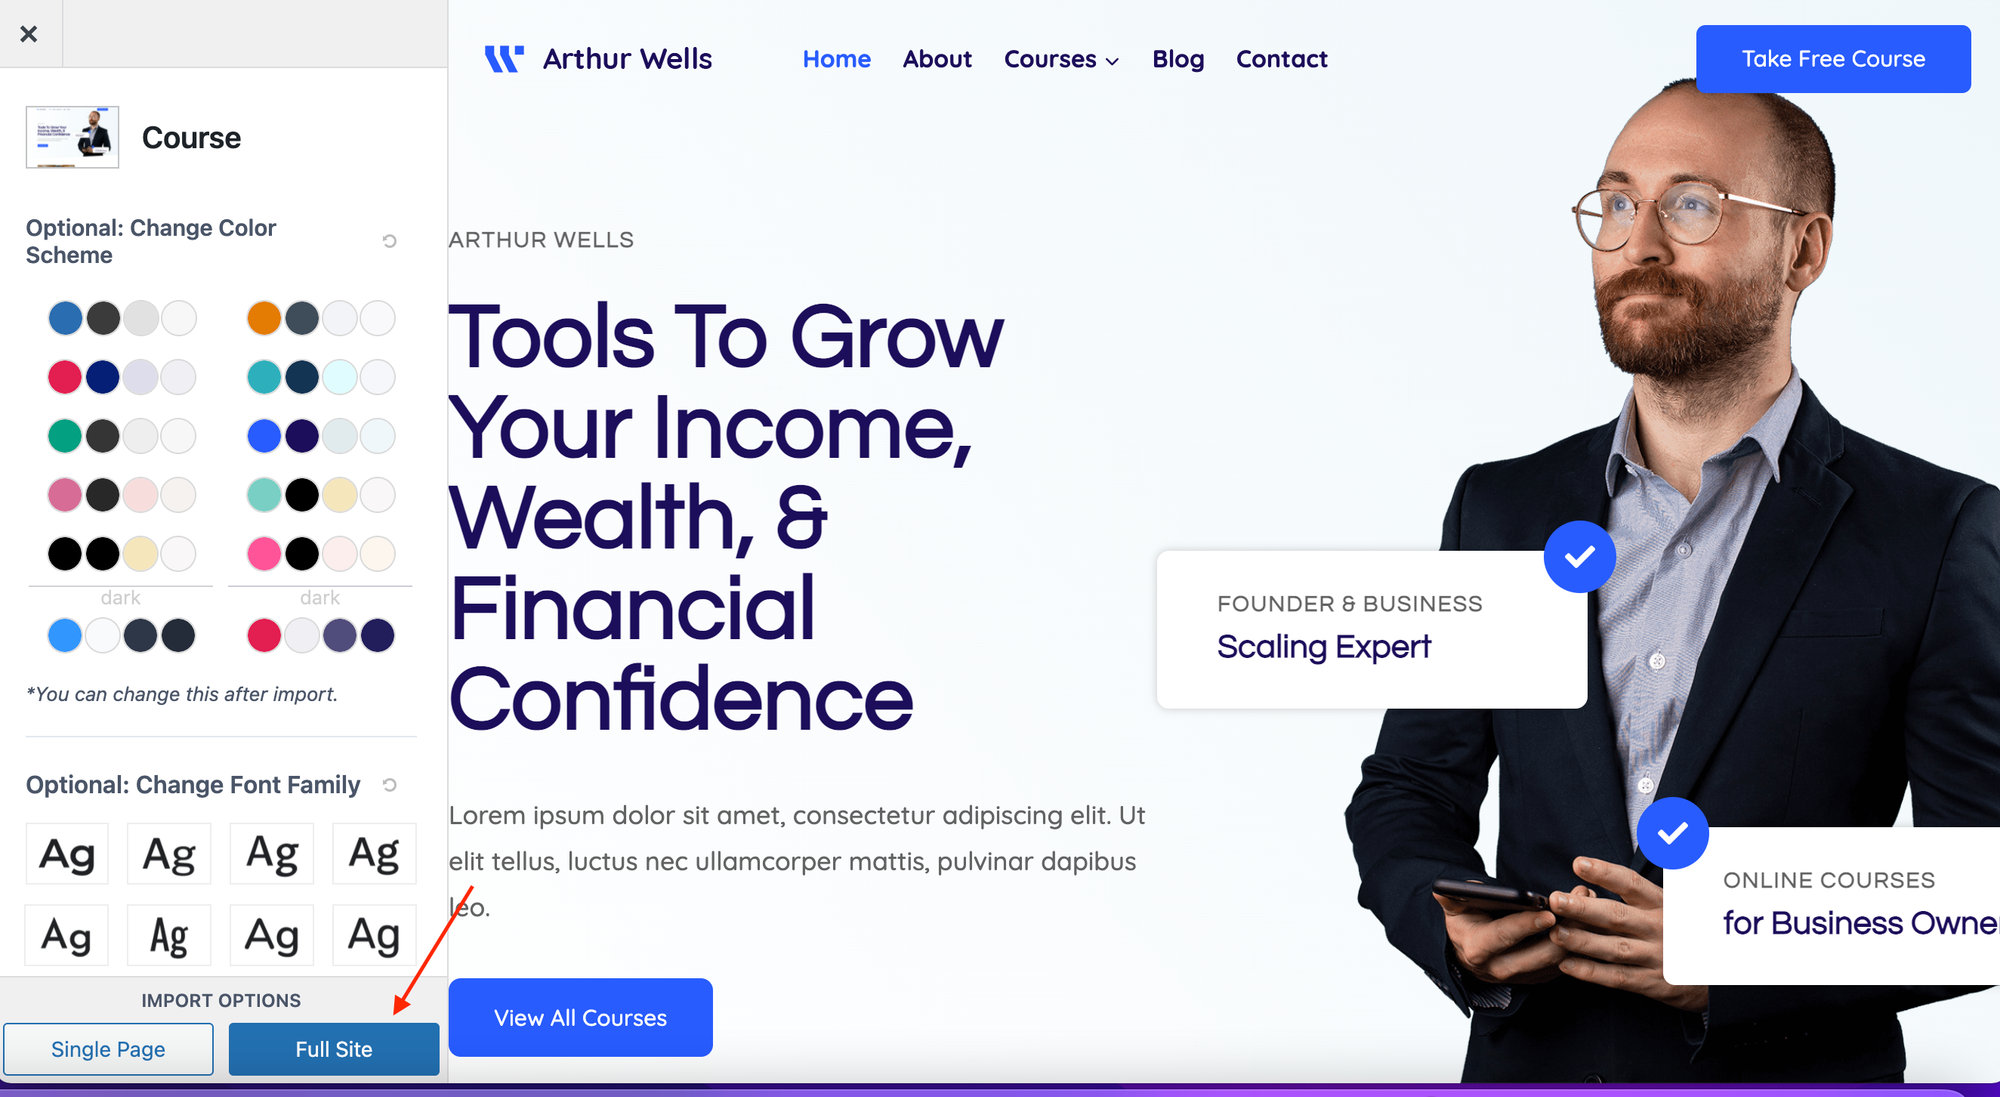
For a school website, you have a few starter template options, but we’ll choose the “Course” template for this tutorial.
Once you select the template, you can choose the colors and font styles (which you can always change again later). Then choose the “Full Site” option to import the template and its sample content (which is essentially a full website). If there are any required Kadence plugins that you need, they will be automatically installed for you at this step.
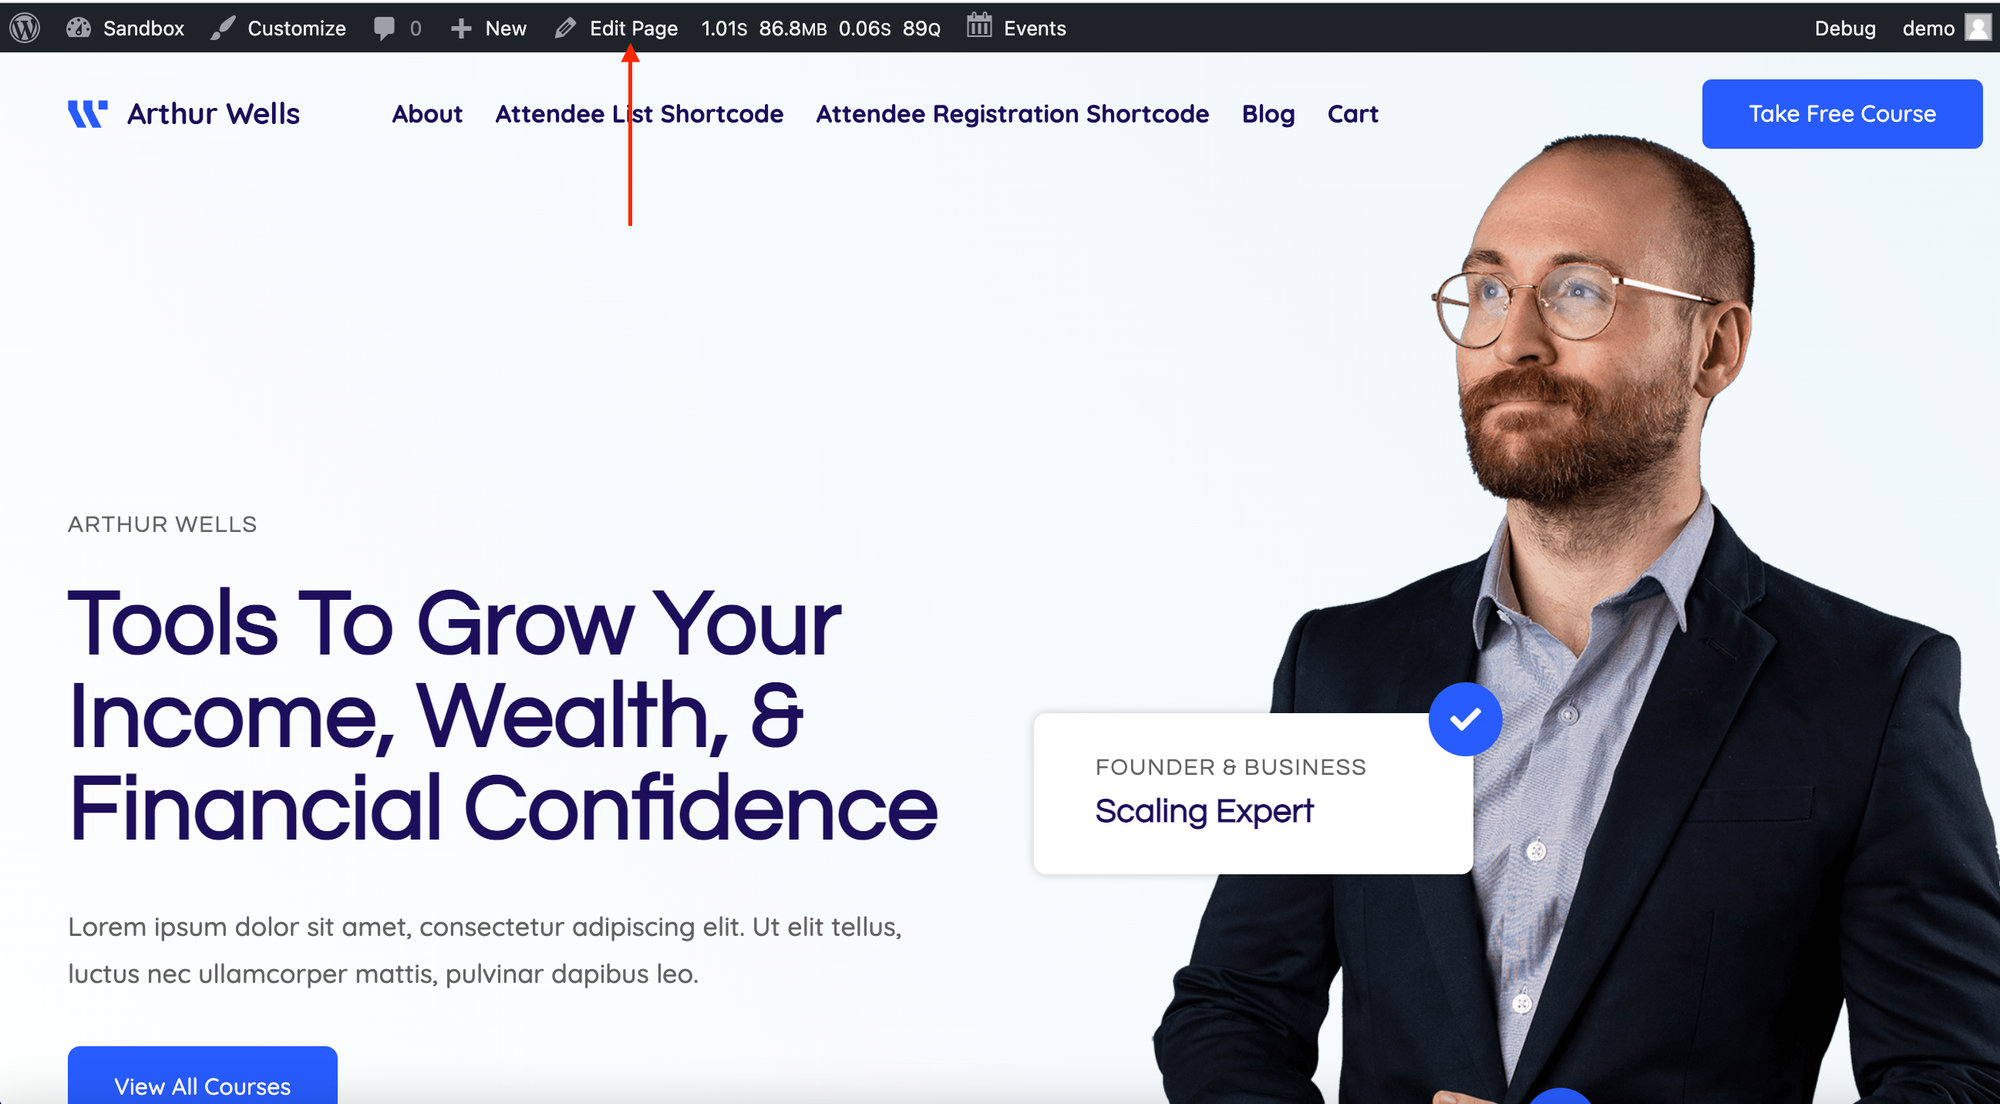
Now that the template has been imported, you can begin to replace the content with your own. To do this, click on Edit Page, located in the toolbar at the top of the page when you are logged in as an administrator.
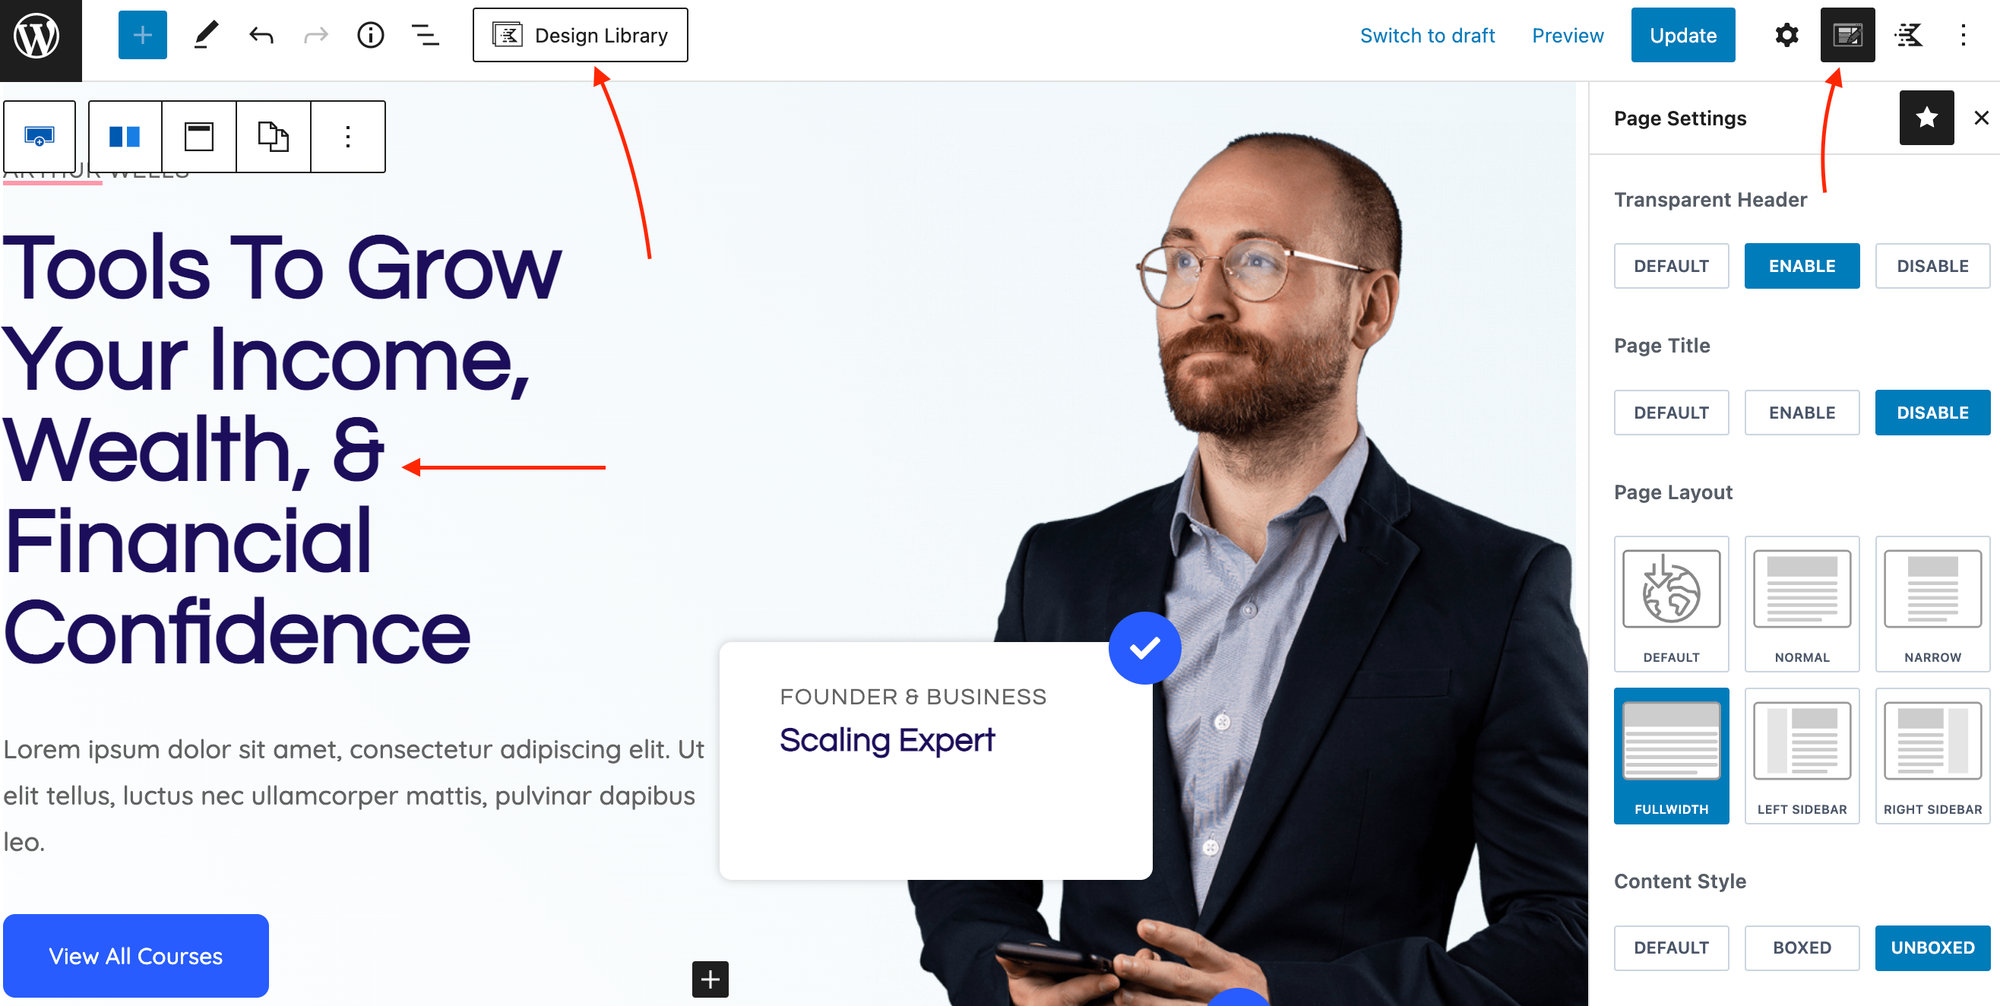
Click on any text to change it, use the Design Library to swap images in and out, and use the Kadence Page Settings to make further changes to the appearance of the page.
You’ll find lots of documentation on customizing the theme to your liking on Kadence’s website.
Installing WordPress plugins
Now that you have your theme in place, the next step is to choose which plugins you’d like to install. Plugins are packages of code that add a specific type of function or service to your WordPress site. Each plugin you choose will add some unique functionality to your WordPress site.
To install a free WordPress plugin, go to Plugins > Add New and use the search bar to find the plugin that you’re looking for. From there, select Install Now and then Activate.
For more information on installing free and premium plugins, check out this Knowledgebase article or watch this video:
Plugins We Recommend for Schools
The best way to make a school website function is to add plugins that provide you with the features you need. There are many plugins available and it’s important to only choose those that improve your school website’s usability and align with your goals as an organization. Below are plugins that we recommend for schools, including some that we offer here at The Events Calendar.
1) The School Management System
The School Management System is a WordPress plugin designed to help you to manage your school and all of its facets, such as classes, sections, students, ID cards, teachers, staff, fees, invoices, noticeboard, and much more. It works primarily by adding shortcodes to WordPress pages and posts where you’d like to display its various features, like inquiry forms, account management, and a fees submission form using the Stripe or PayPal payment gateway. Plus, there’s a School Dashboard where you can access all of your school-related information in an easy-to-use interface.
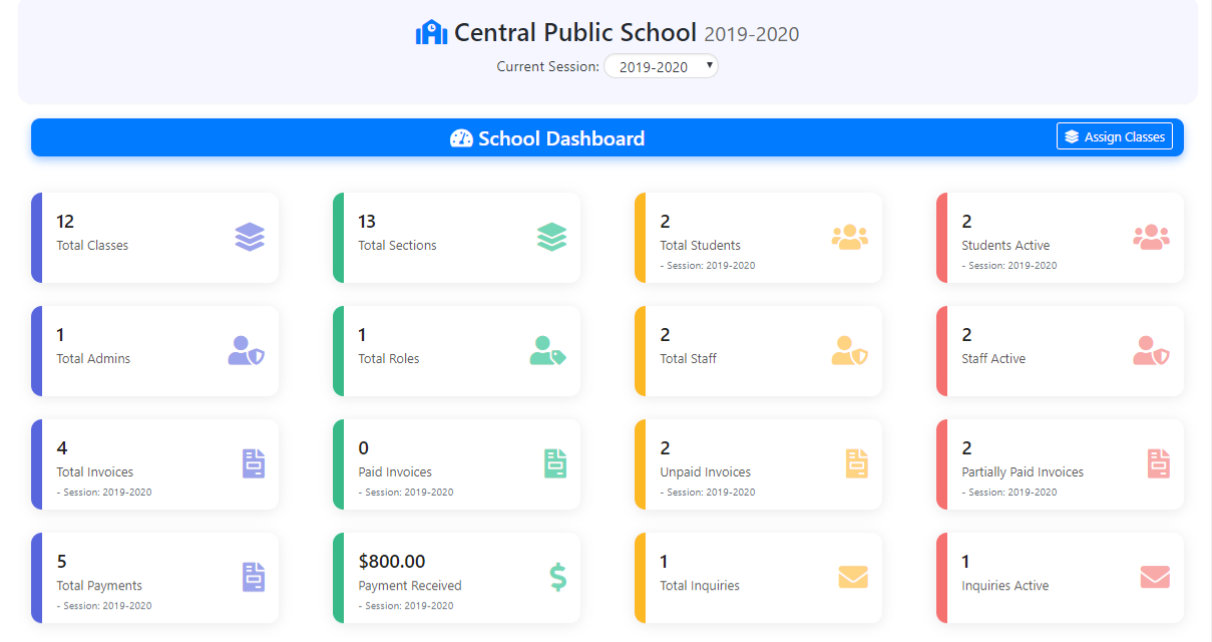
All of these features come standard with the free version of the plugin. And you can unlock even more features with the paid Pro version like multi-school support, roles and permissions for different types of users, and library management to issue books to students and generate library cards.
2) The Events Calendar
The Events Calendar is our free flagship product, and we can’t deny how useful it can be for your school website. Put simply, with The Events Calendar, you can add a calendar of events to your school’s website. With a calendar on your website, you can present students, faculty, and parents with all of your upcoming events in one place. The calendar provides your users with a landing page to quickly scan through everything your school has coming up. And you can choose from several views, like List, Day, and Month views.
Another great aspect of The Events Calendar is that users can subscribe to the calendar. Parents can add your school calendar to their personal Google Calendar or iCalendar to check in on upcoming days off from school. Or students can see when there are testing days on the horizon. If you make any changes to the calendar on the school’s WordPress site, these changes will be automatically reflected on the subscriber’s personal calendar. Pretty cool right?
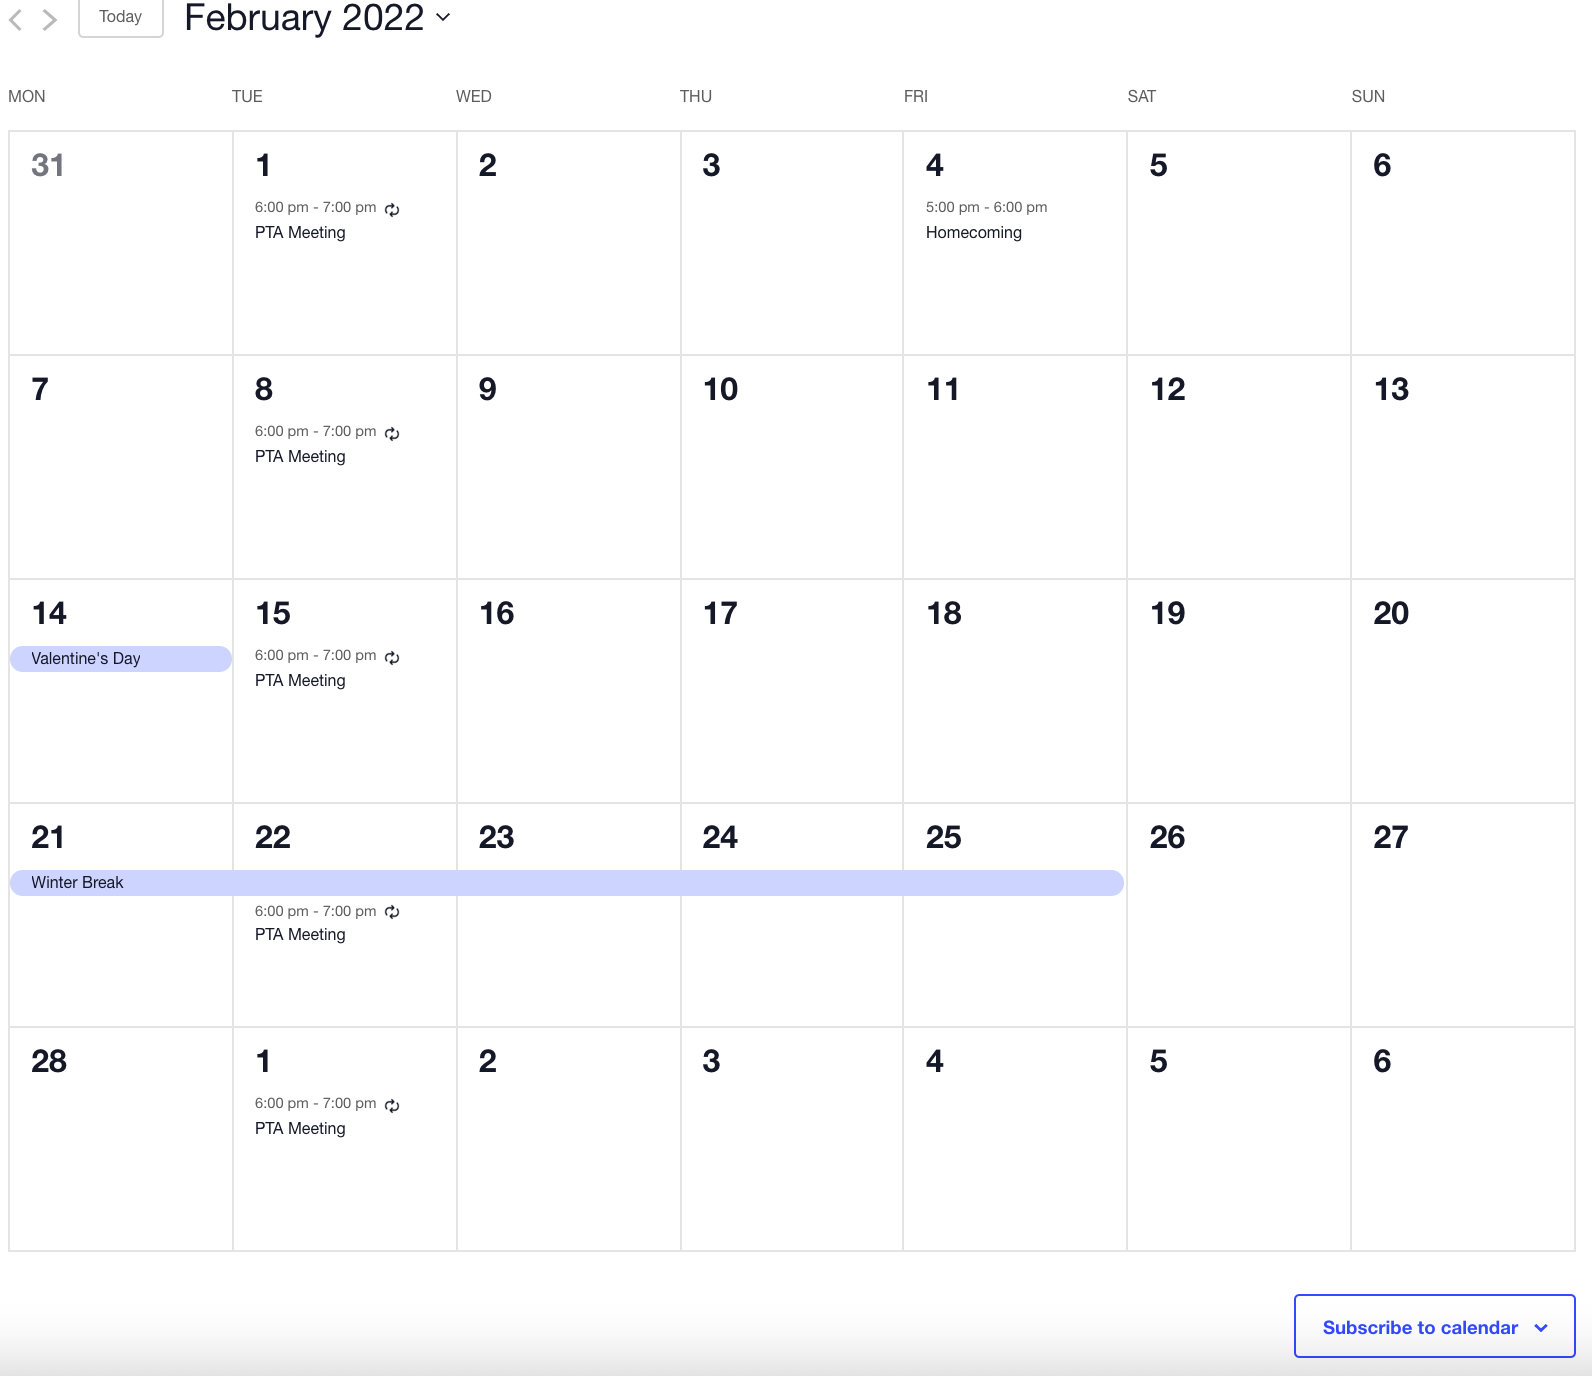
You can even compose individual category calendars for different types of events by using event categories. Set up separate categories for each sports team, days off from school, and PTA meetings. Add links to each of these calendars in your dropdown menu on the homepage to make navigation a breeze. To make things even easier, we’ll be launching a new series event type with The Events Calendar 6.0, so stay tuned!
3) LearnDash
Having a Learning Management System on your school website can be beneficial in many ways. With the move towards online learning, an LMS like LearnDash adds the ability to put course content to your website. This is great, especially for colleges and universities wanting to offer online classes in addition to their regular in-person offerings.
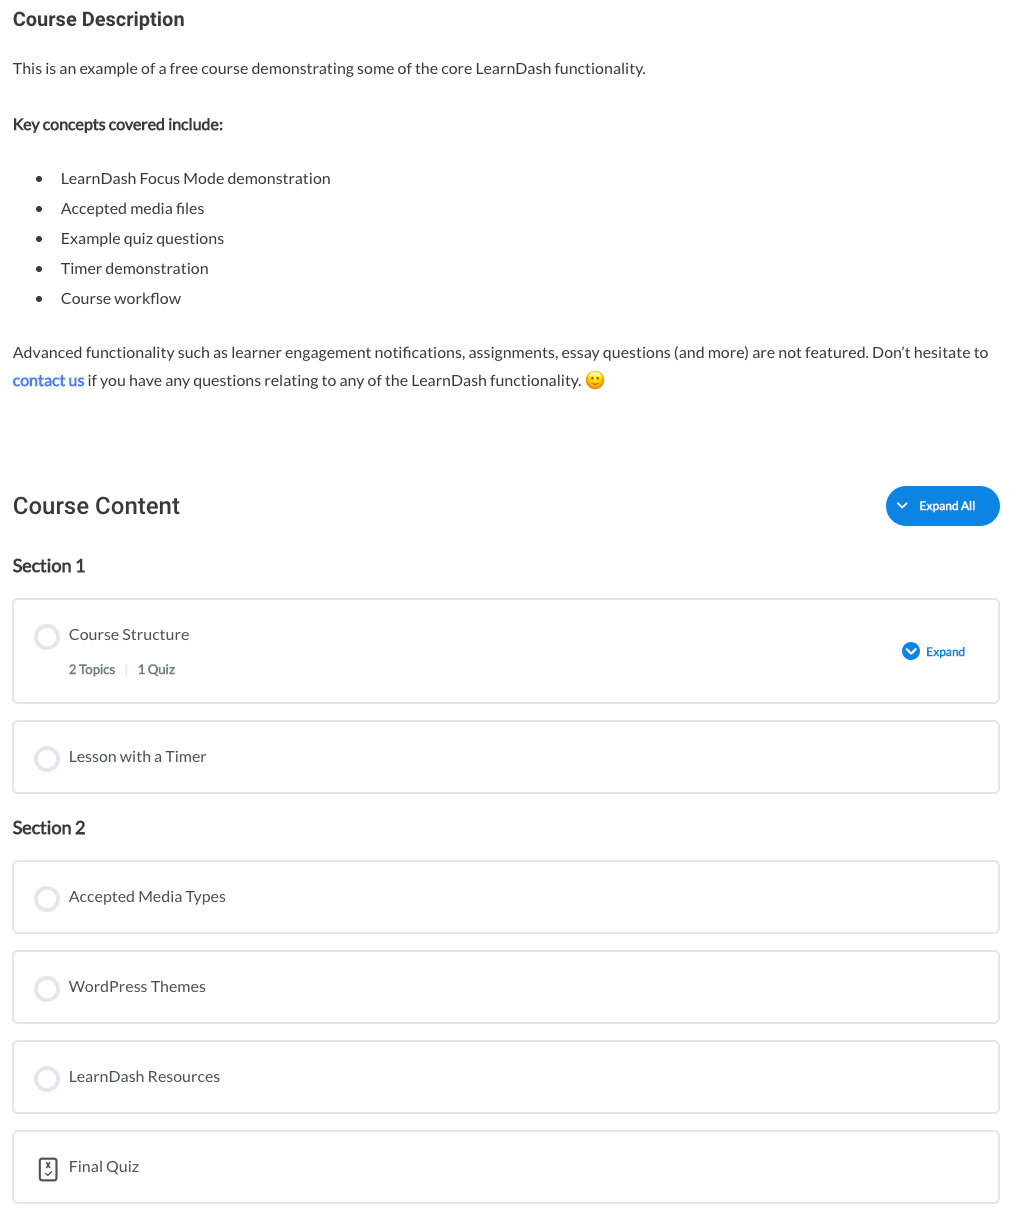
Features include integrations with other plugins like Restrict Content Pro so that you can keep your course content protected and available only to those registered for your course. LearnDash also includes a grade book, flexible prerequisites, and drip-feed lessons so that students will only get the lessons that they’re up to, rather than providing them with all of the content at once. LearnDash is the perfect solution to the online learning trend that will only continue to grow.
4) Event Tickets
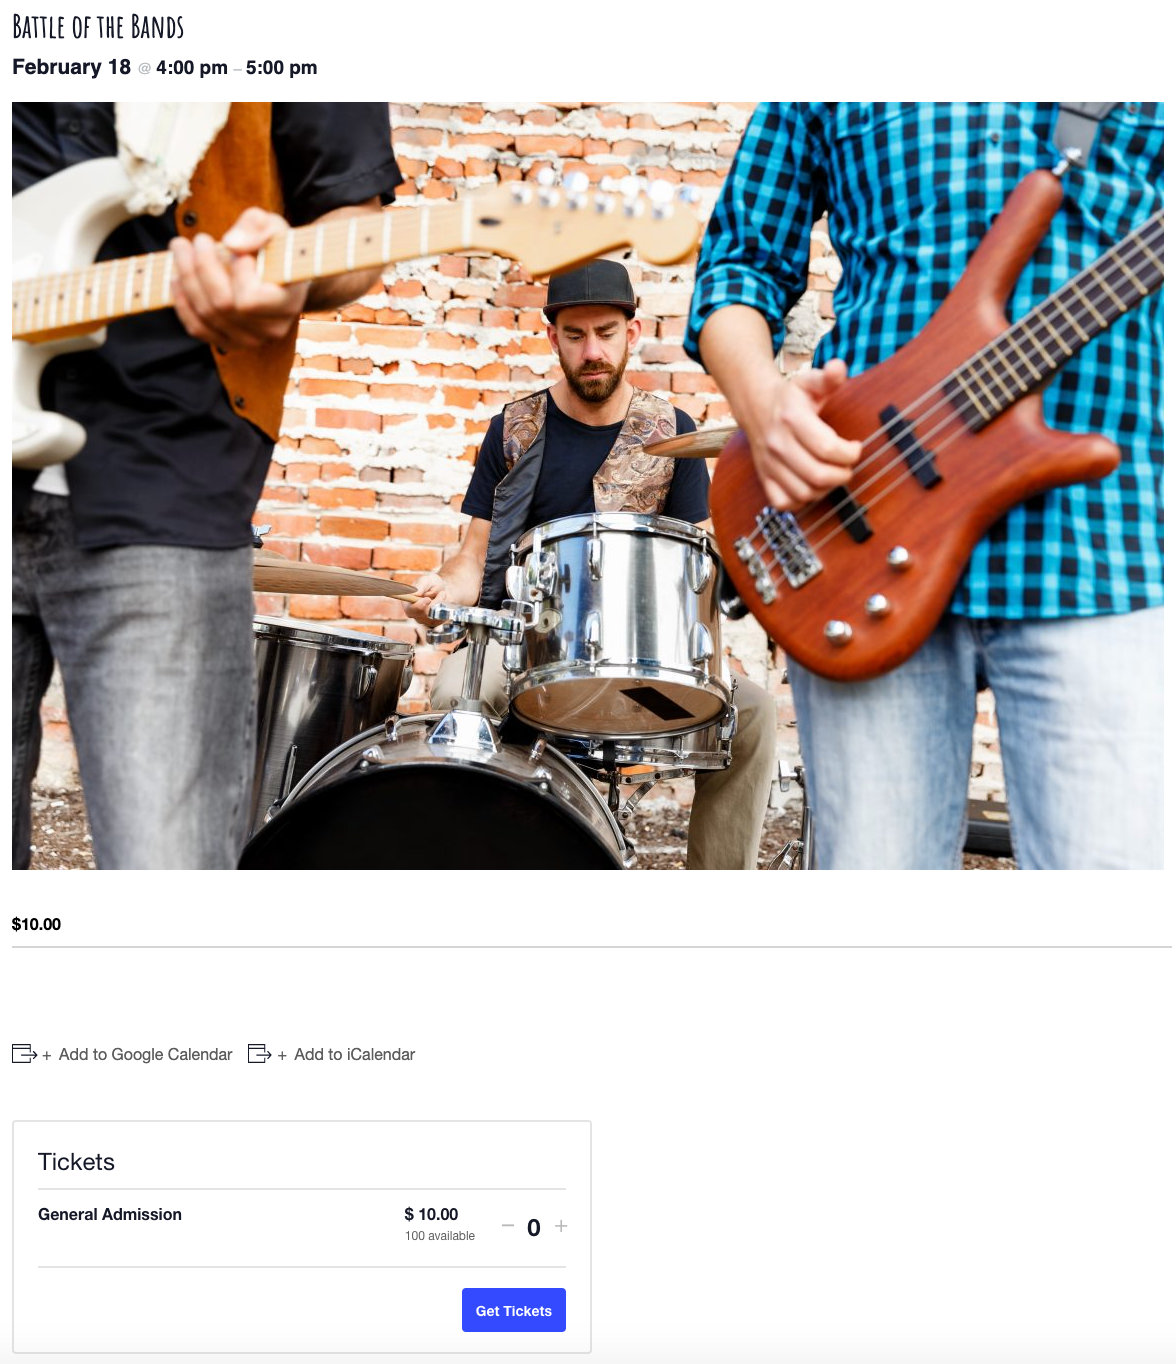
Another free plugin offered by The Events Calendar team, Event Tickets, is key if you’d like to sell tickets or add RSVPs to your events on your school website. You can use Event Tickets to enable online payments for all of your school events. By using our eCommerce solution, Tickets Commerce, you can easily accept payment for school events through your WordPress site. Construct tickets for everything from school performances, to sporting events, and even get creative by using Event Tickets to collect testing fees.
Once you collect payments, you’ll be able to view and manage all of your payments directly from the backend of the WordPress site. Track revenue, check-in attendees, and easily refund parents who can’t make it at the last minute.
5) Restrict Content Pro
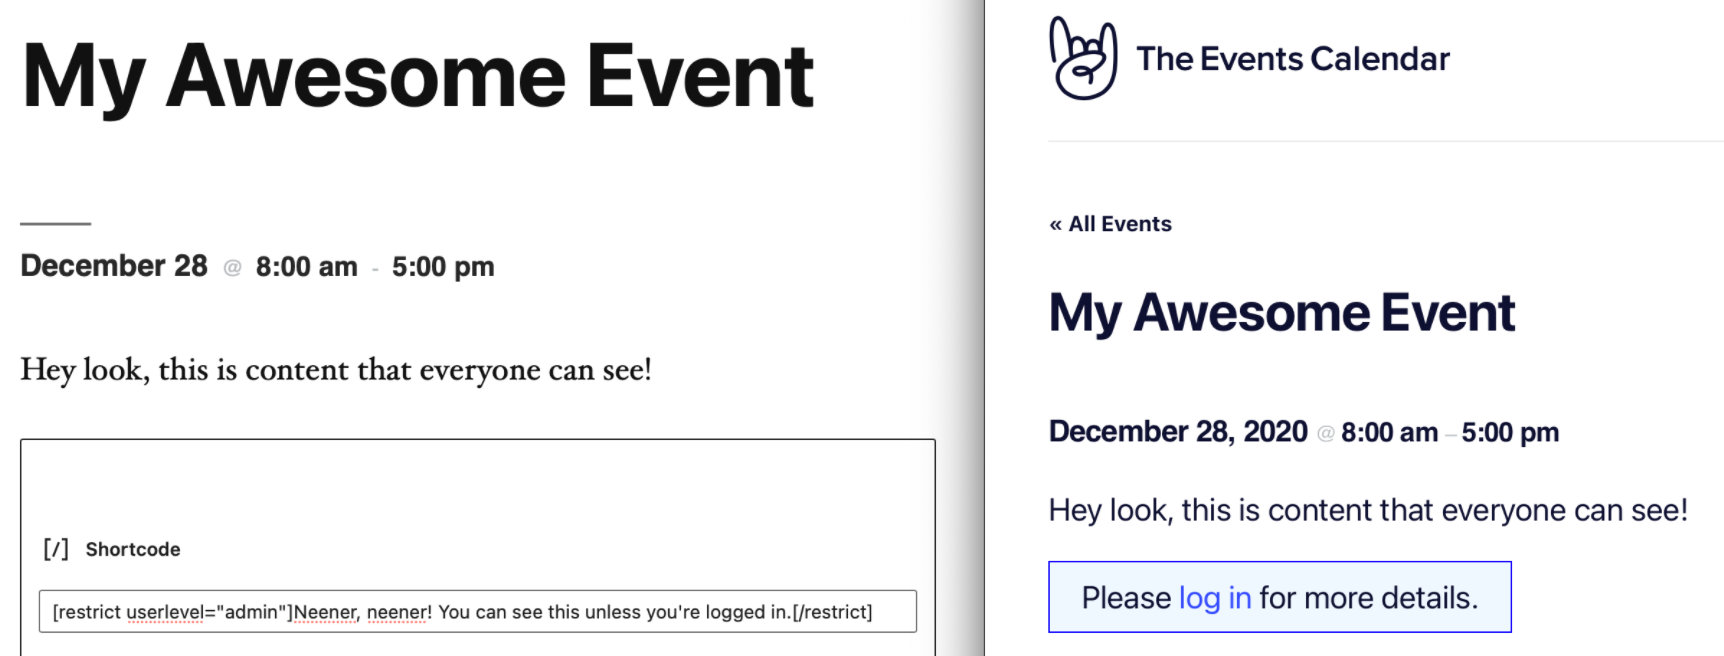
Suppose you’d like the ability to enable your school to make certain content only available to specific users. In that case, you’ll want to implement a membership plugin, like Restrict Content Pro, on your school’s website. With Restrict Content Pro, you can create pages available to your faculty members, like memos, school calendars, and parent-teacher conference dates. You can also direct students to pages that only they can see such as course materials, grades, and other academic information. Parents-only pages can contain report cards, disciplinary information, or additional confidential information specifically for them.
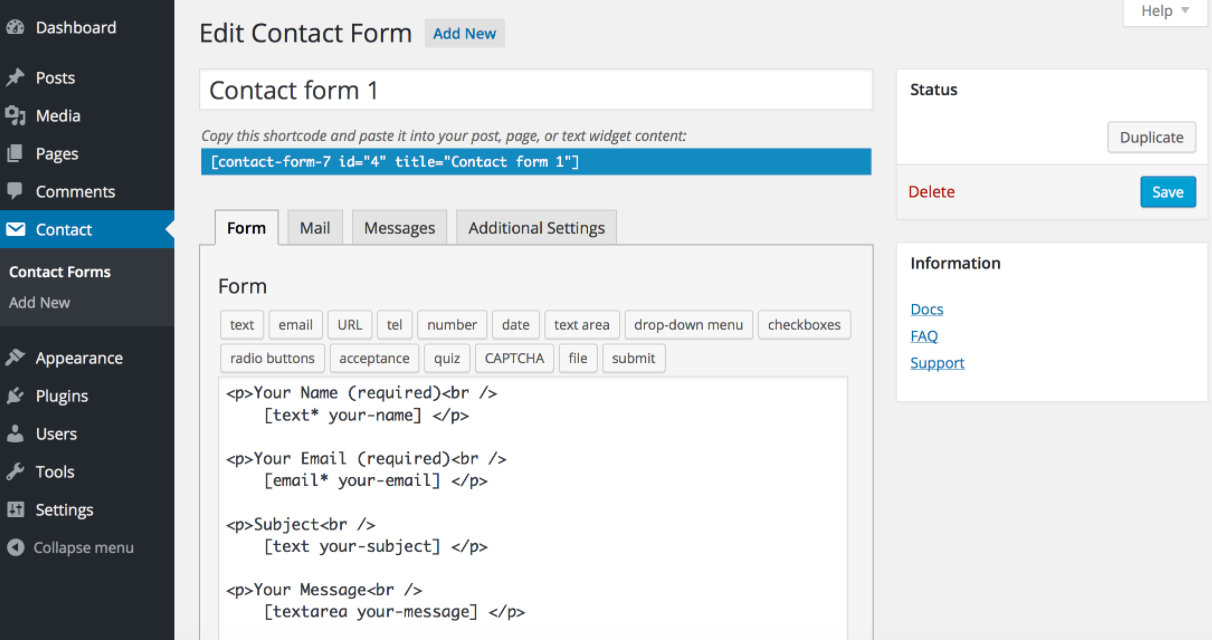
6) Contact Form 7
Inserting a contact form onto your school’s website is a great way to make sure that parents, prospective families, and other inquirers can get in touch with your school. With Contact Form 7, you can create multiple forms and customize those forms using simple markup. You can choose an email address to send form submissions to, add a Recaptcha, and include spam filters in your form.
7) Community Events
File this one under “nice-to-have,” Community Events gives you and your faculty the opportunity to add events from the front end of your website. You typically add events from the backend as an administrator, but adding events via the frontend grants others access to event creation without providing access to everything else available in the backend. Use the community events form to let department managers submit events through your website. From there, you can approve, edit, and publish those events to your main calendar. The community events form comes pre-made, so you don’t have to worry about making it from scratch.
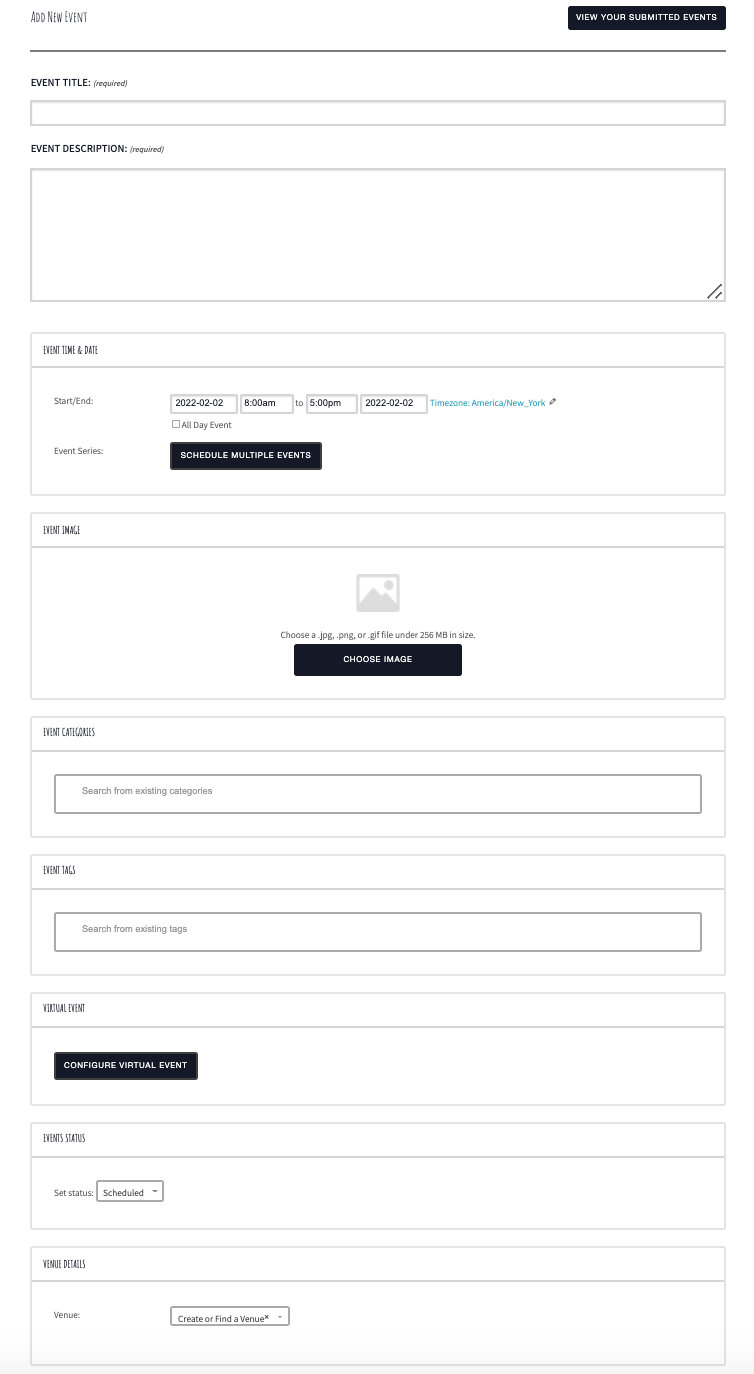
You can even provide parents with access to your community events page so that they can submit ideas for fundraising or PTA events. Or use the form for students to send in ideas for the prom theme. Since the events aren’t published right away, you can review all submissions and choose which to publish.
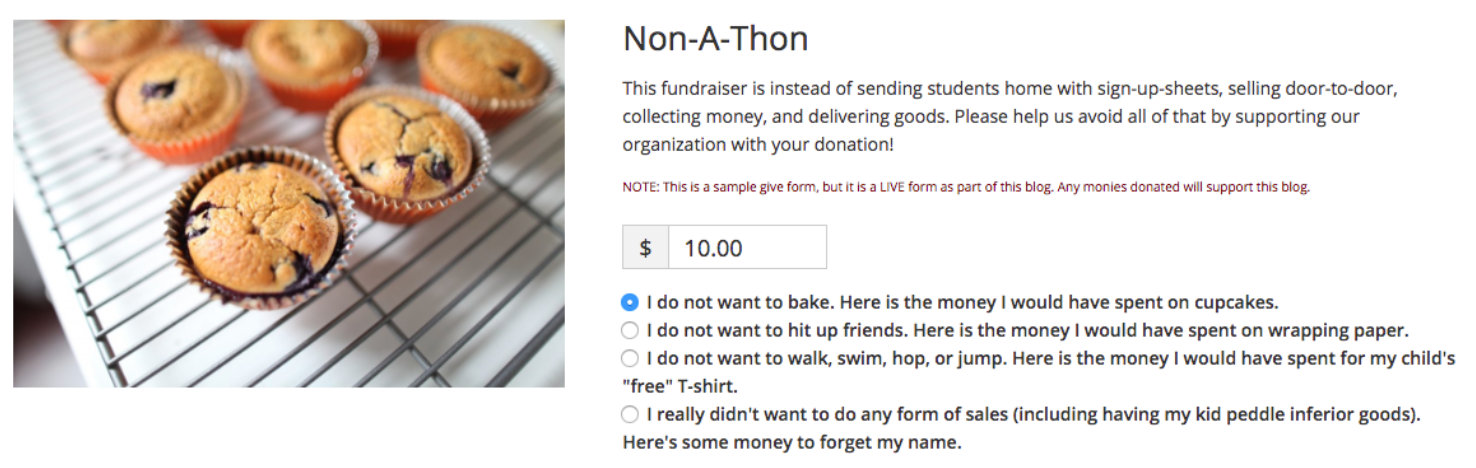
8) GiveWP
Add fundraising features to your school’s WordPress site with GiveWP. This plugin makes it easy to kickstart your school’s fundraising efforts and makes the giving process super simple. Easily set up donation forms, embed them directly onto your event pages, and customize forms to include relevant information and eye-catching photos. No fundraising ideas? No problem, GiveWP has plenty of ideas to get your fundraising juices flowing.
Preparing the content for your website
Most people don’t realize that the bulk of the work required in building websites is in preparing the actual content that will go on the site. A website is like a restaurant, and the content is the actual food users come to consume. Although the code behind the website may be outstanding, if the quality of the written and visual content isn’t optimal, a website will not have much value for an audience.
We won’t cover content thoroughly in this tutorial, but we can’t help but emphasize the importance of spending lots of time preparing the content for your site. A website is all about information, so start by deciding what exactly you want to share. Whip up some good old-fashioned pencil and paper or fire up a blank Google Doc to start brainstorming together with your team.
Outlining Your Website’s Navigation
Start by outlining the pages you need. This will, in turn, become the main navigation for your website and the guide for what content you will need to prepare. An example menu might be:
Home
About
- History
- Staff
- Our School Mascot
- Our Creed
- Contact
Future Students
- Enrollment
- K-12 Programs
- Extracurricular Activities
- Apply
Current Students
- Meal calendar
- Order Uniforms
- Report Card
Sports
- Basketball
- Soccer
- Football
- Tennis
- Golf
Contact Us
Login
Once you have a good idea of the navigation structure of your website you can begin the rewarding process of putting together the content. The great thing about this process is that it helps you reflect on your organization and discover gaps that may need to be filled.
Gathering the Content
One idea you may want to consider is making this a project for your students. It can be a fun learning experience for them to participate in drafting the copy, collecting photography, adding events to the school calendar, and filming or collecting videos.
Learning to create a website and content are useful skills, and teaching kids how to implement a website early on benefits both you and them in the long run!
Adding Content to Your Website
And now, the moment you’ve been waiting for has finally arrived. Armed with your content and your fresh WordPress installation, you’re now ready to start plugging in your text, images, videos, and other elements that make up your website.
Pages
WordPress pages are designed for content that will likely be more static. For example, staff bios, an About Us page, and a student code of conduct are all great uses for WordPress pages. To add a WordPress page, head over to Pages > Add New in the WordPress Dashboard.
Posts
WordPress posts can be used for blog articles, important and timely announcements, and things happening on any given day. To add a post, go to the WordPress Dashboard and select Posts > Add New.
Adding Plugin Content
In addition to adding pages and posts, the rest of the website building process will consist of adding content within the plugins. Each plugin you’ve installed will have its own way of adding the content that’s relevant to its functionality. Below are two examples using The Events Calendar, and Event Tickets.
Events
Once you have The Events Calendar installed and activated on your website, you can add new events from the backend by going to New > Event at the top toolbar or by going to Events > Add New in the left-hand sidebar of the WordPress Dashboard. For more information on crafting events, check out our Knowledgebase article.
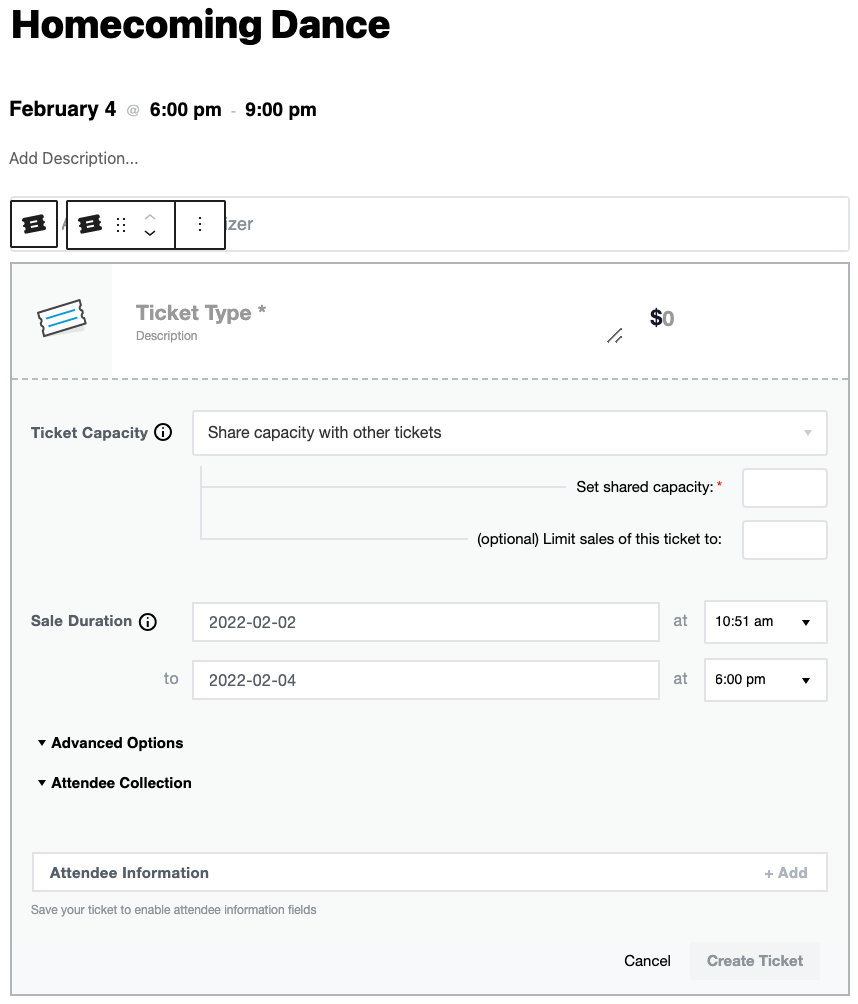
Tickets
To add tickets to your school website with Event Tickets, head over to one of your events and look for the Tickets block. Click on that block to configure your ticket. Learn more about adding tickets here.
Wrapping up
If you read through this tutorial and followed along, congratulations, you now know how to make a school website with all the necessary components. You can continue customizing the site to make it your own while adding content as you see fit. Once you’re finished, you can launch your website, and begin sharing it with the community through social media, newsletters, and other forms of advertising.
The process covered in this article can be used to build a website for any organization, so from here, you can even start making websites for small businesses, large enterprises, or for your friends and family.
If you’ve liked using The Events Calendar products that we’ve recommended, feel free to check our add-ons and bundles to add even more functionality to your WordPress site.

Jaime
View author page