Creating tickets with Event Tickets and Event Tickets Plus is easy and fast. This page walks you through the process of making tickets for your site’s posts, pages, or events. Before getting started, make sure you review your settings. The article is divided up into two main parts:
- Setting up basic tickets – creating basic tickets with a specific or unlimited capacity
- Shared Capacity – creating two or more tickets that pull from a shared capacity for the event
You can get a quick overview of using Block Editor with Tickets in An Introduction to Tickets Blocks.
With Event Tickets and Events Calendar Pro you can also create a pass ticket that gives attendees access to an event Series (a group of multiple events). Find out more about this amazing new ticket type, Series Passes.
Setting Up Basic Tickets
Tickets can be added to posts, pages, or events. In the Classic Editor, you will find the Tickets meta box below the main content of the post type:

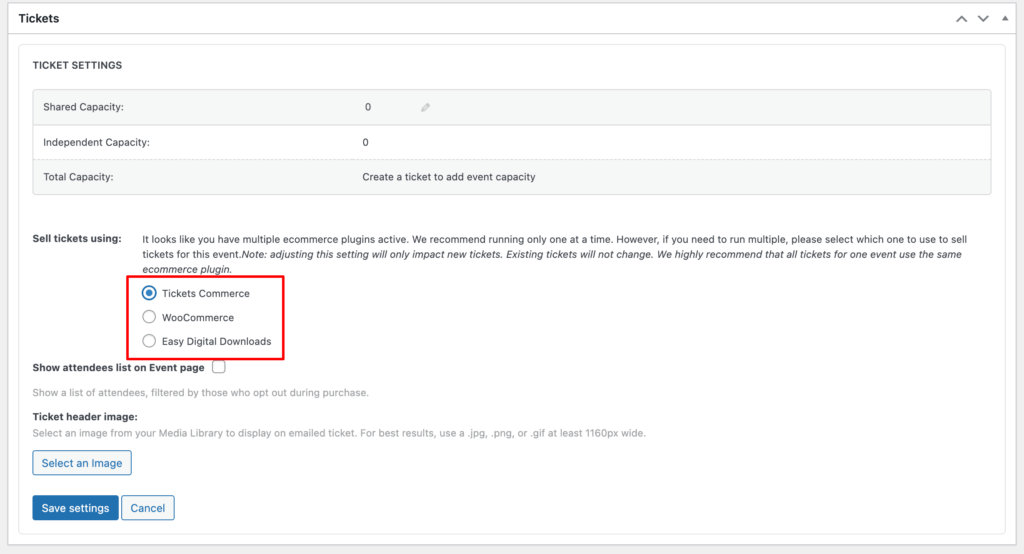
The Ticket Settings option provides control over which ecommerce provider is used to manage ticket sales for an event. When your site has multiple ecommerce integrations enabled—such as WooCommerce, Easy Digital Downloads (EDD), or others—this button allows you to specify the provider that will handle ticket creation, checkout, and order management for that specific event.
Selecting the appropriate ecommerce provider ensures that tickets are processed using the correct store system, reflecting the settings, payment gateways, and reporting features associated with that integration.
This option is particularly useful for sites that use more than one ecommerce solution, allowing event organizers to manage ticketing flexibly without changing global settings.
When using the Block Editor, the available options become visible upon selecting the ticket creation block.

If you have another ecommerce solution, you may want to disable Tickets Commerce to prevent accidental ticket sales through it. Tickets Commerce becomes the default ticket ecommerce provider when enabled via WordPress Dashboard > Tickets > Settings > Payments.
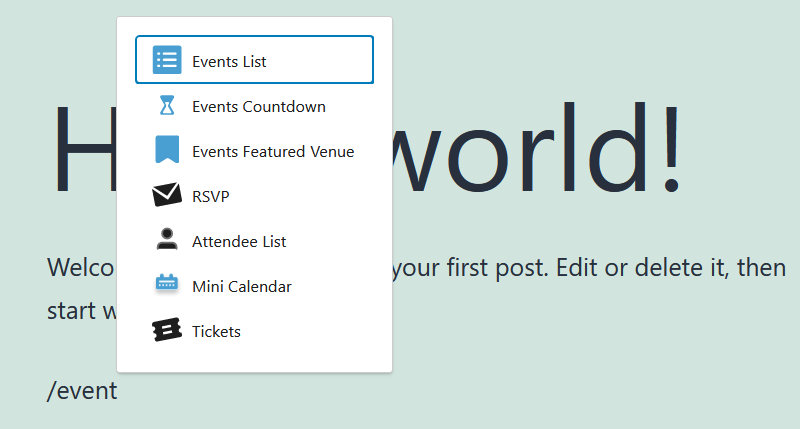
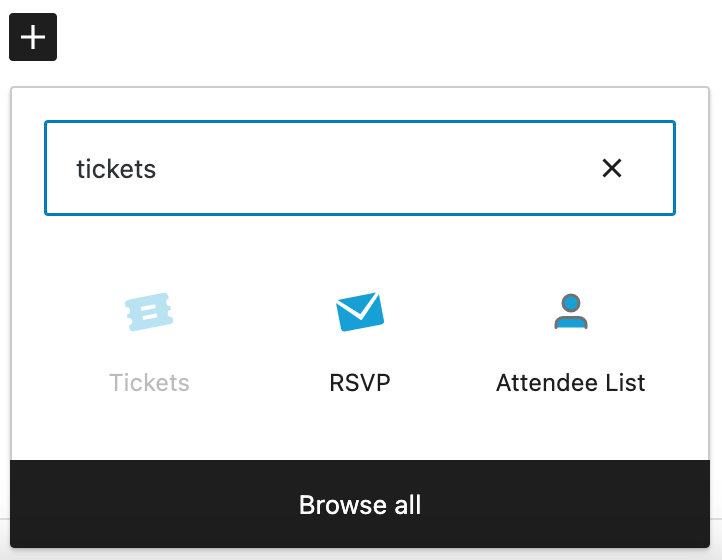
In the Block Editor, default Ticket blocks or RSVP blocks may appear if you are creating an event. Otherwise, you can add a Ticket and RSVP blocks to the main content:
We’ll create a basic ticket with a capacity for this ticket only for this example. (Using a shared capacity for two or more tickets is discussed in another section below.)
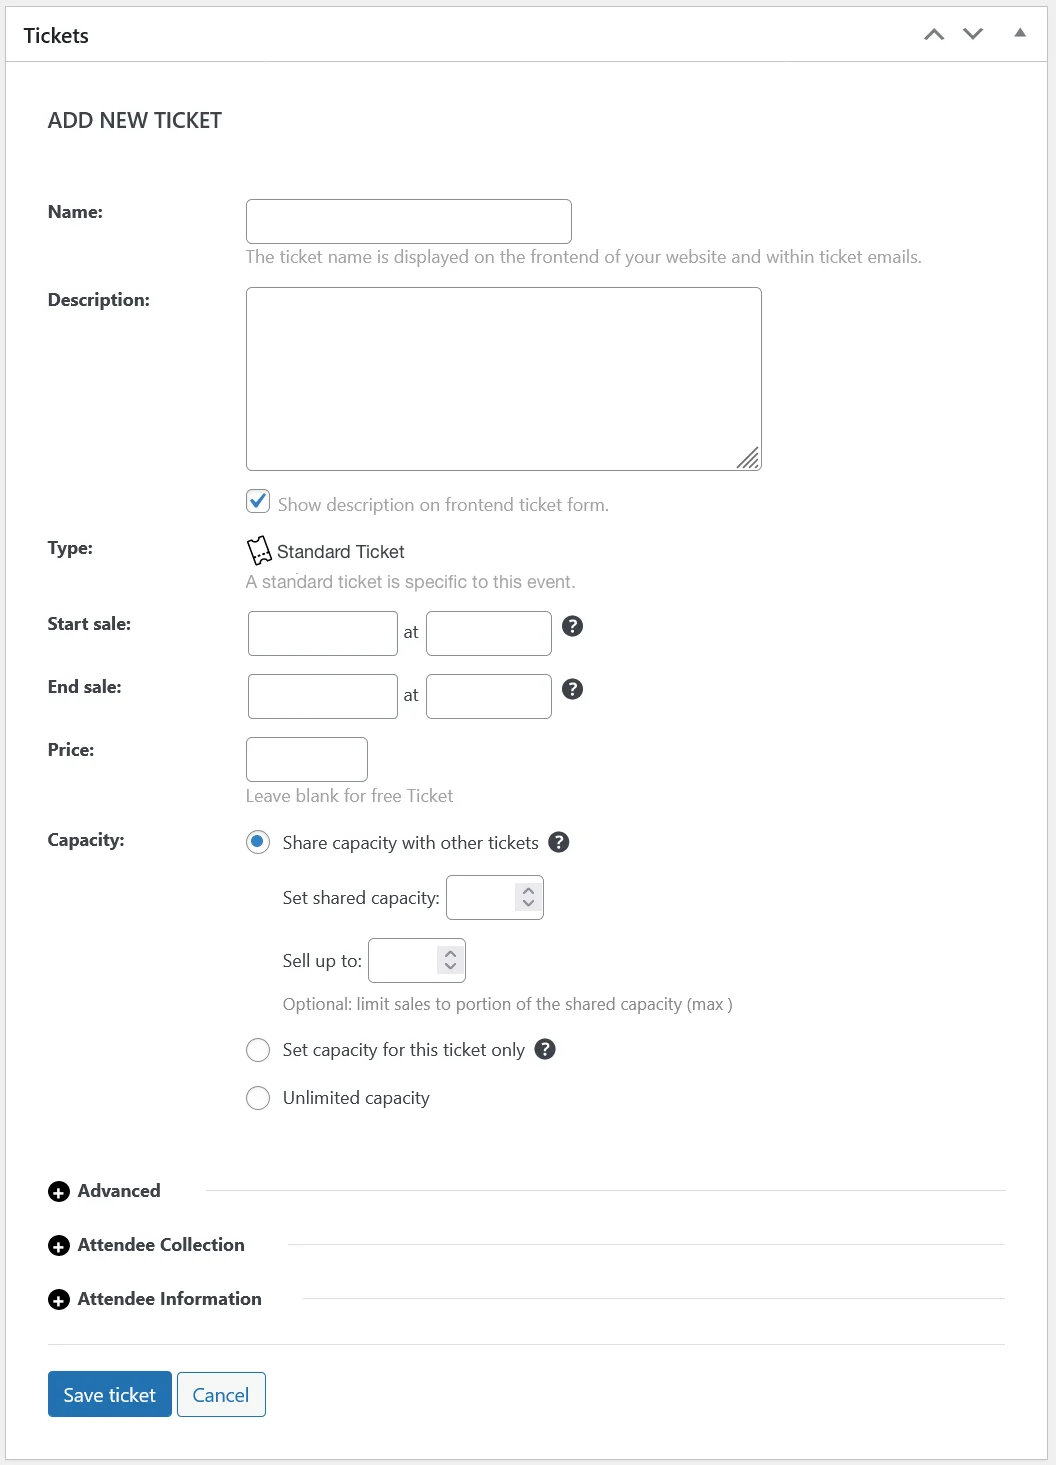
When clicking on the + New ticket button you will be presented with some additional options:
In this example, we are using Event Tickets Plus with WooCommerce. Since we want to make a purchasable ticket, we click + New Ticket. If you want to collect attendee RSVPs without selling tickets, you can click + New RSVP instead – in which case you’ll want to read over our RSVP tutorial instead.
If you are using only Event Tickets with Tickets Commerce, then you will only see one capacity option as shown on this screen.
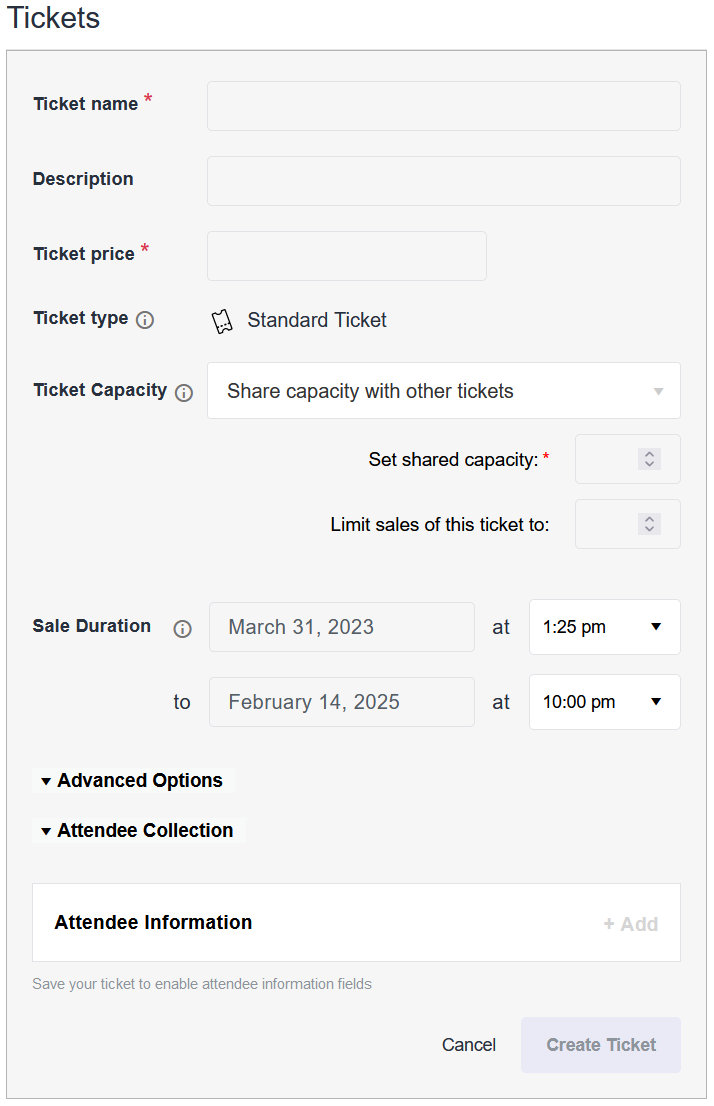
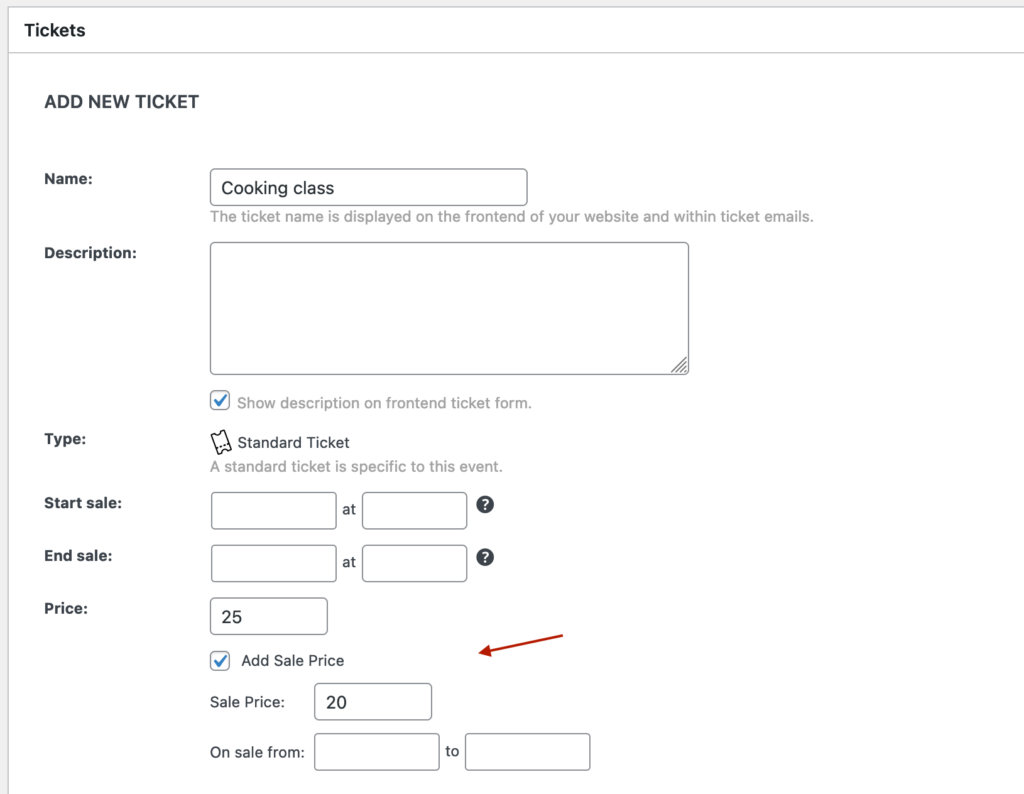
When creating tickets with Tickets Commerce, you will also have the option to add a sale price, and the dates for the sale price.
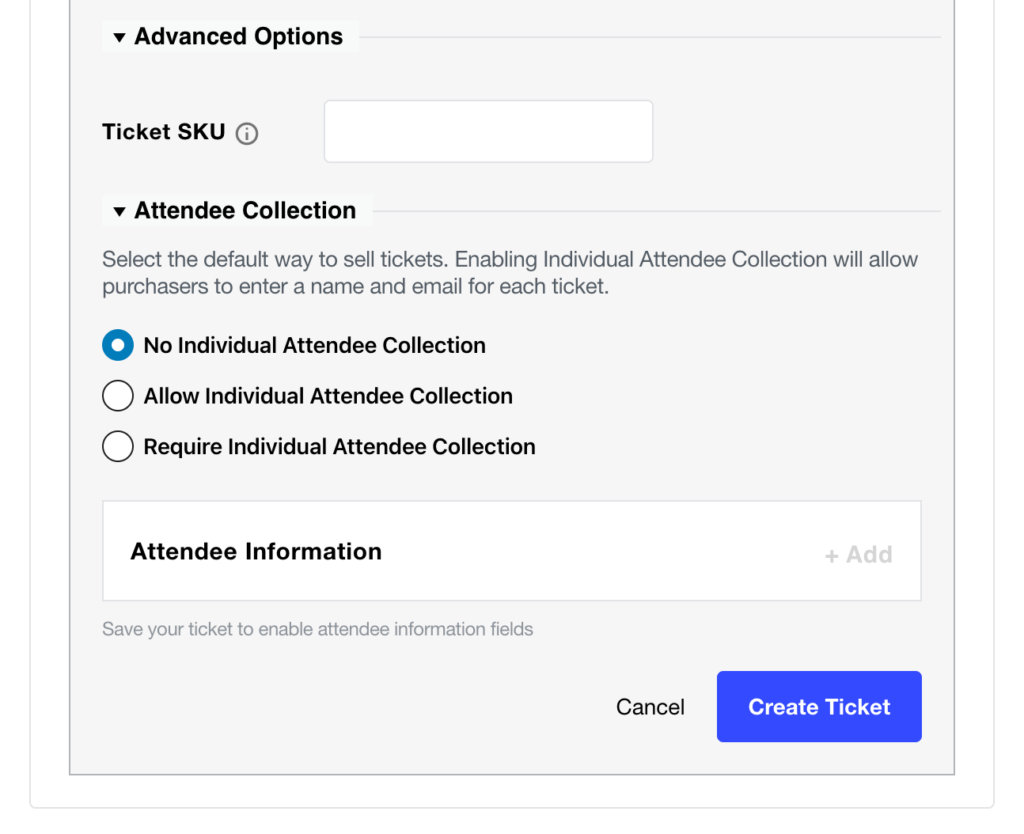
Clicking on Advanced will show the following additional field.

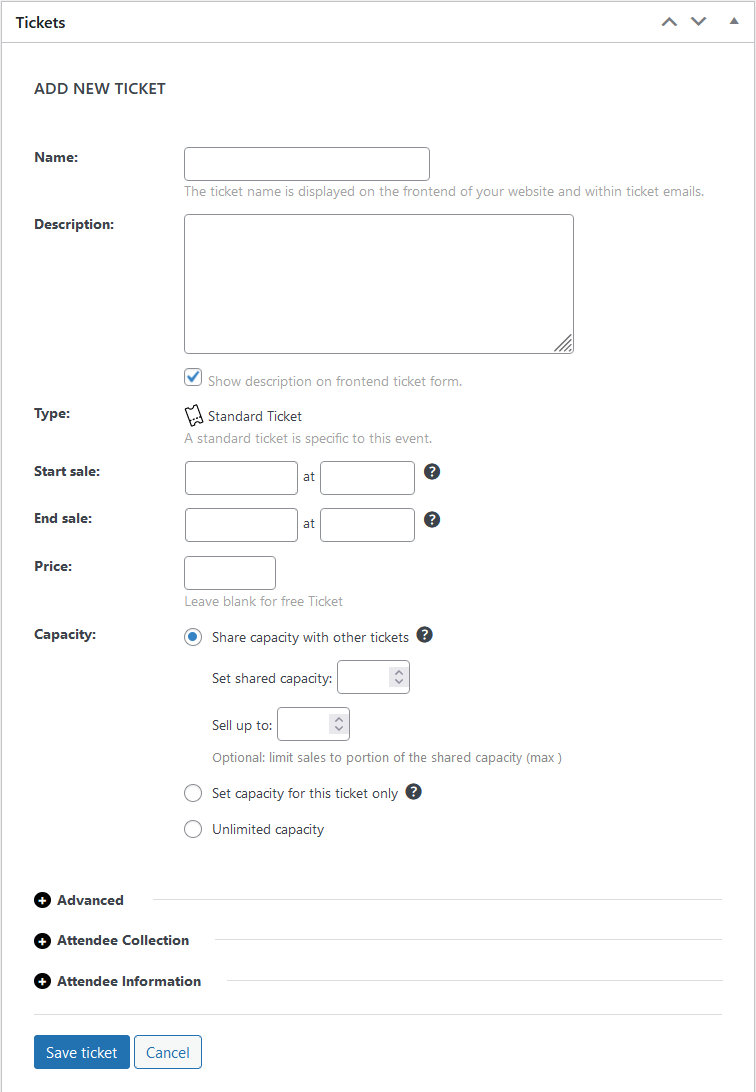
Many of the fields in the tickets meta box are self-explanatory, but let’s run through each just to be sure.
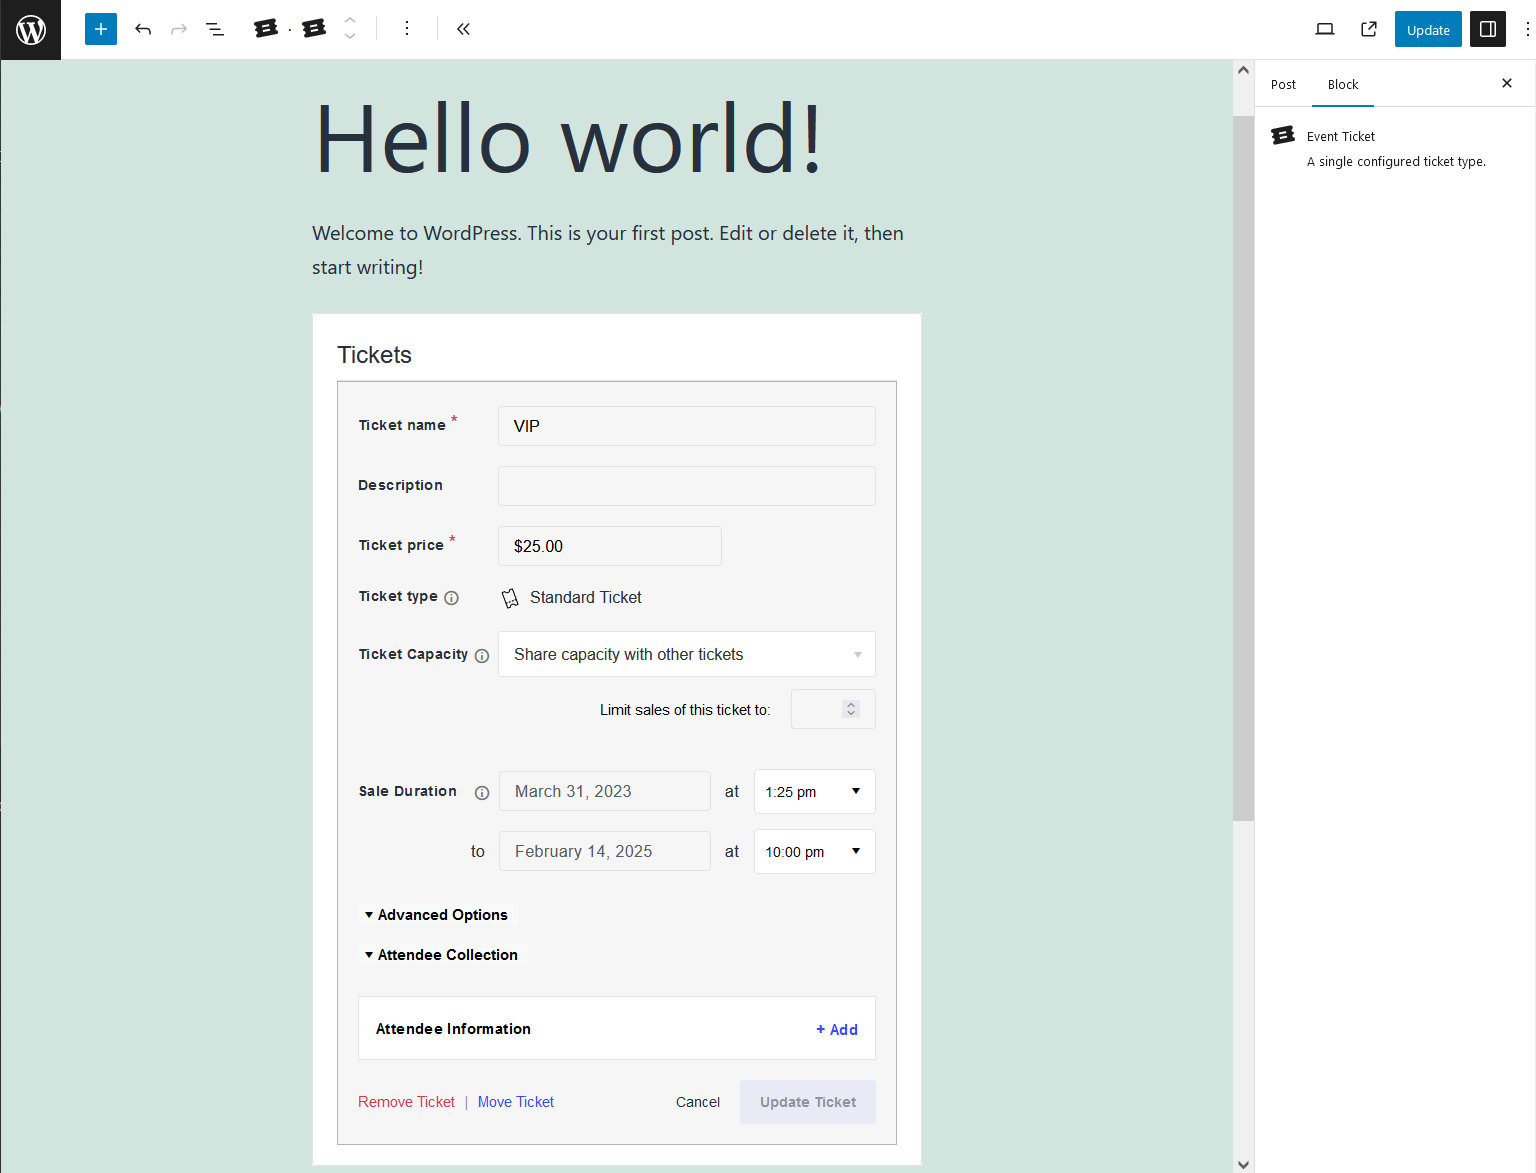
- Name lets you set a unique name for the ticket – which might be something like Standard, Adult, Concession, etc.
- Price controls the price of each ticket. If the tickets are not going to be sold – but rather you are going to give them away for free – you can leave this field blank or set it to 0.
- Sale Price: This option is only available if you’re using Tickets Commerce
- Capacity is the number of tickets that are available: if you leave this blank it is assumed that there is no limit and customers can buy as many as they would like. If you have a limited number of spots for your event, you’ll want to make sure to set this accordingly.
Advanced:
- Ticket description is optional, but it’s a good space to add any information customers might be interested in, such as bring waterproof jackets or not recommended for children. You can choose to show or not in the front-end ticket form.
- Start sale dictates when the tickets are available for sale. If you’re making tickets on a post or page, this field is required. If you are making tickets for an event, you don’t need to set this field – by default, sales will start when you publish the event or ticket.
- End sale does the reverse – you can set this to a date after which the tickets should no longer be available for customers to buy. As with the start sale field, setting this is optional for events and the default is to stop sales when the event itself starts.
- SKU lets you set a unique code to help identify the tickets. This is another optional field and is of most use to merchants with an existing stock-keeping unit system.
By default, the name and contact information of the person buying the tickets is collected during the purchase process. If you want to collect additional information (such as names of all attendees, t-shirt sizes, etc.) then you can implement the Attendee Information feature (Available only with Tickets Plus) by clicking + Attendee Information. This feature is explored in another article, and this walkthrough assumes that you do not need to collect additional information.
As soon as you’re ready, simply click on Save/Update Ticket and you’re done … and never fear, if you make a mistake you can correct it by clicking on the edit link (pencil icon) later on:
If you’d like to delete a ticket when using the Classic Editor, simply click on the trash icon located below the pencil icon on the right side of your ticket.
You can duplicate a ticket when using the Classic Editor by clicking on the middle rectangle button. This will prompt a copy of the ticket to appear directly below the one you’ve duplicated.
Note
If the tickets are for sale but just sold out, then the form will still show. But purchasing tickets won’t be possible, and there will be an “Out of Stock!” message as shown in this screenshot.
What about if the tickets are not sold out but are only going to be sold between certain dates, and a website visitor views the event page outside of that time window? In this case, the ticket form will not show up at all. A simple “Tickets are not yet available”-type message will be displayed instead, as shown in this screenshot.
Event Ticket Types
Different ticket types allow you the flexibility to sell tickets to various kinds of events. Users with Event Tickets have access to one ticket type: standard ticket. If you also have Events Calendar Pro, you can also use the Series Pass ticket type. In the future, we’ll be adding additional ticket types to further expand the functionality (read more).
Standard Tickets
Standard tickets are the default option for single events, posts, or pages, granting access to one specific date and time. They can be created directly within the WordPress editor and are ideal for most standalone occurrences. While these support Assigned Seating for venue-specific layouts, please note that they cannot currently be added to recurring events.
Series Passes
Available with Events Calendar Pro, a Series Pass grants access to all events within a specific Series, including both single and recurring events. These are managed from the Series admin page and can be purchased from the main Series page or any individual event included in that Series. Unlike standard tickets, Series Passes do not support Assigned Seating.
Series Passes can be purchased from the Series page and from any event in that Series. Series Passes are perfect for multi-day events, events with multiple venues or stages, or any time you want to up-sell attendees to more events.
Ready to get started with Series Passes? Learn more in this article.
Shared Capacity and Ticket Settings
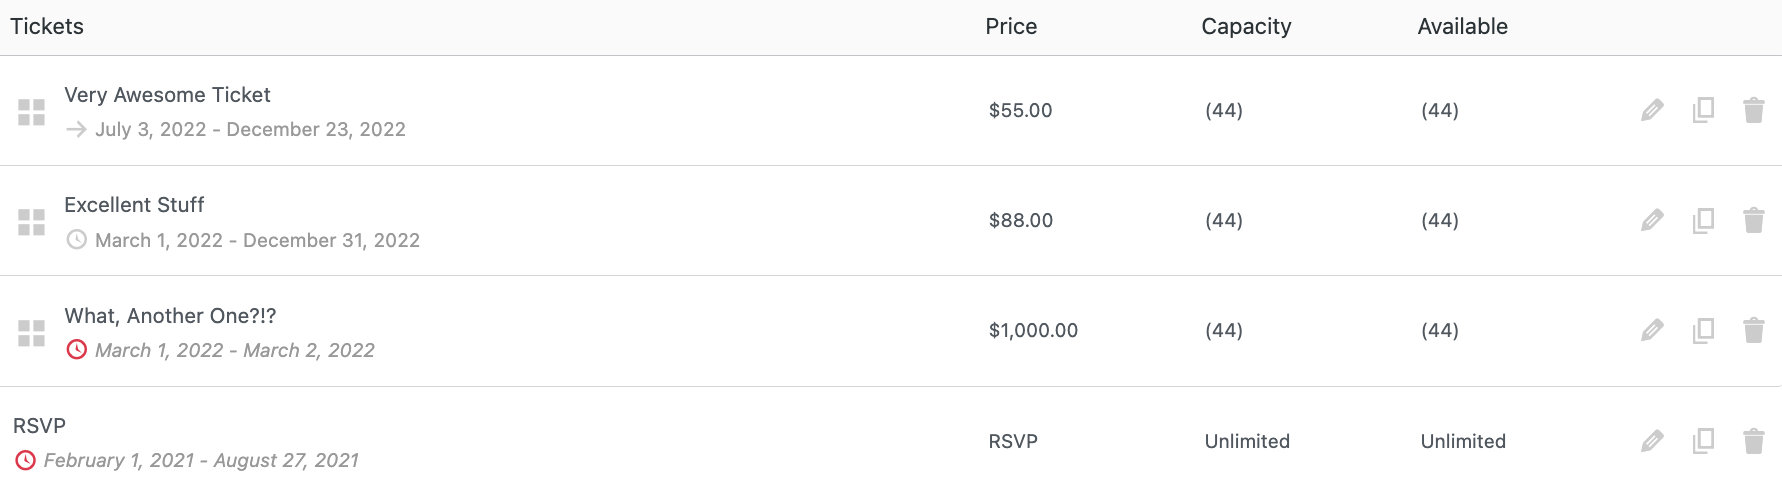
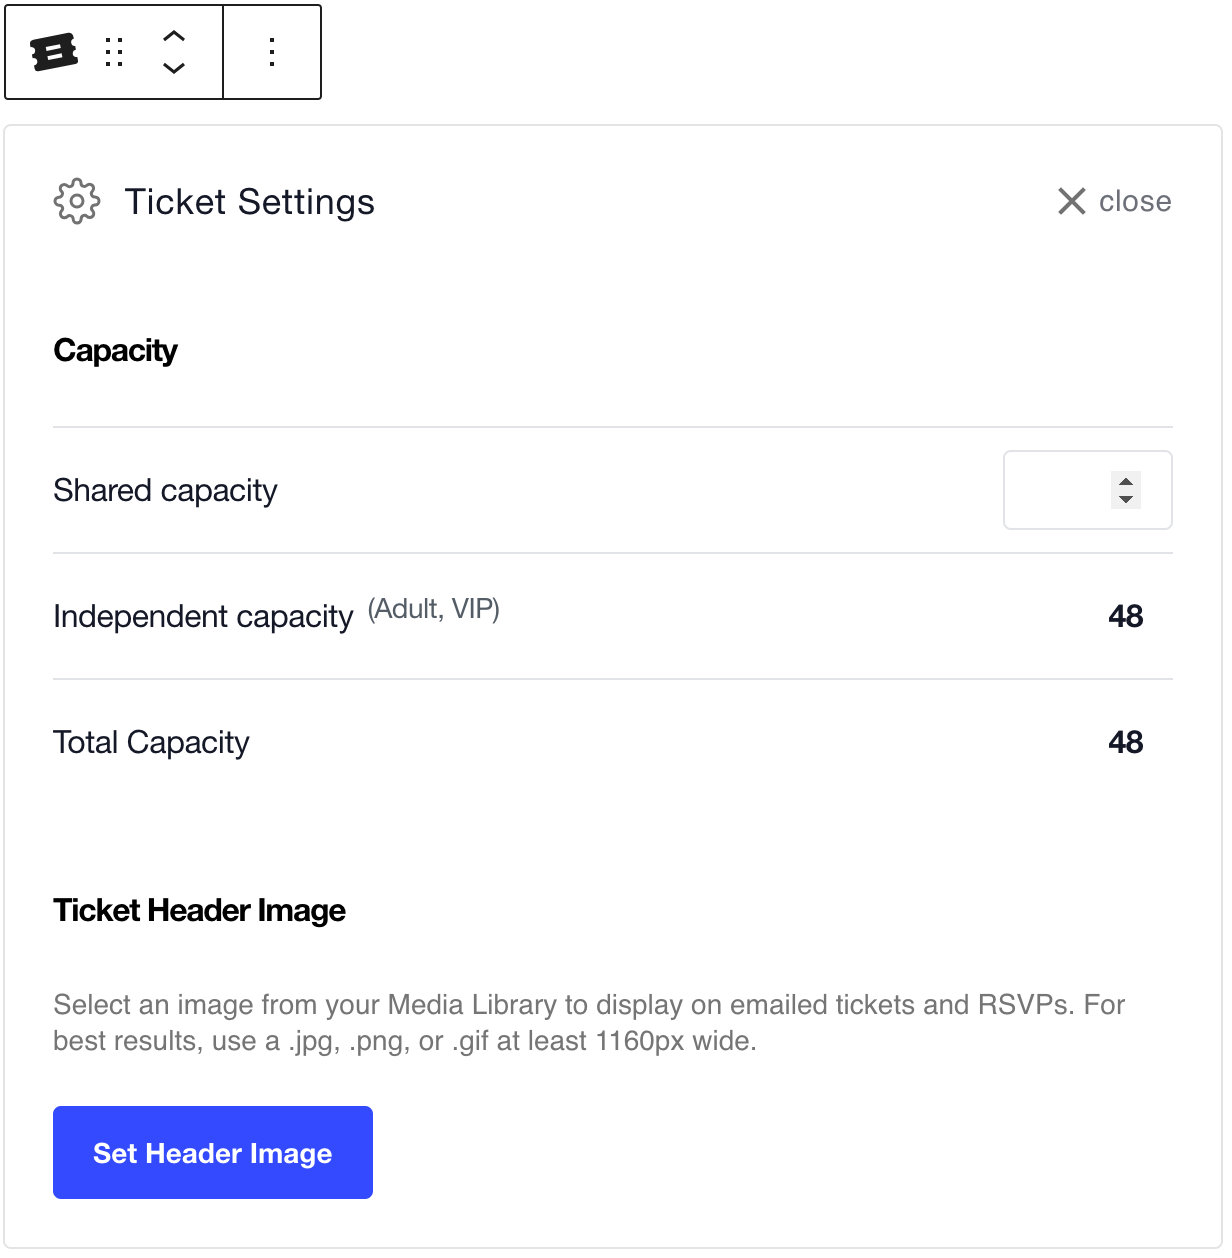
The shared capacity feature allows you to create multiple tickets that all come out of one pool of stock. For example, say you have a venue that has 100 seats, and you are selling three different priced tickets for children, adults, and seniors. If you listed the capacity of each ticket at 100, you might accidentally sell over 100 total tickets and run out of seats. Instead, you can set a Shared Capacity of 100 for the event. Your attendees can choose to buy any of the three tickets, but only up to 100 individual ticket sales.
To enable the shared capacity for your event, click the Settings button in the tickets meta box. A field will appear for Shared Capacity. Edit that number to your event capacity. In the example described above, that number would be 100.
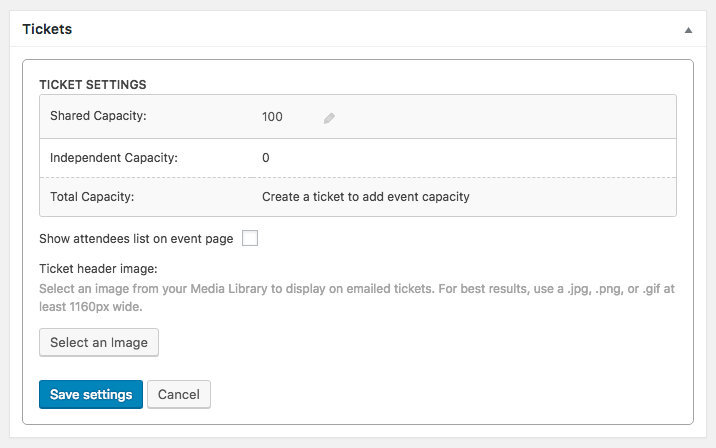
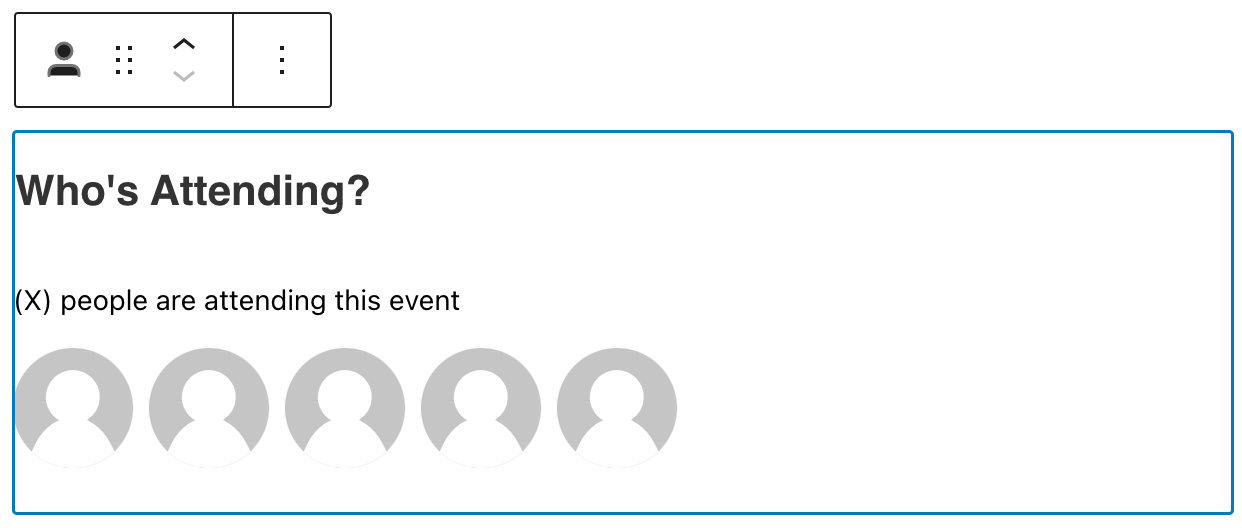
If you check the Show attendees list on event page checkbox in the Classic Editor, attendees who purchase tickets will have their Gravatar displayed in a Who’s Attending feature on the event page.
If you display attendees on the front of your site, attendees can participate in the Public Attendees List. We are excluding users from the Public Attendees List if the attendees are not displayed on the front of your site. If you are displaying attendees, the default option for users is to be excluded (opted-out), to adhere to GDPR regulations.
When you click + New Ticket the new ticket fields will display. In addition to the basic options outlined in the section above, you’ll see the Capacity options.
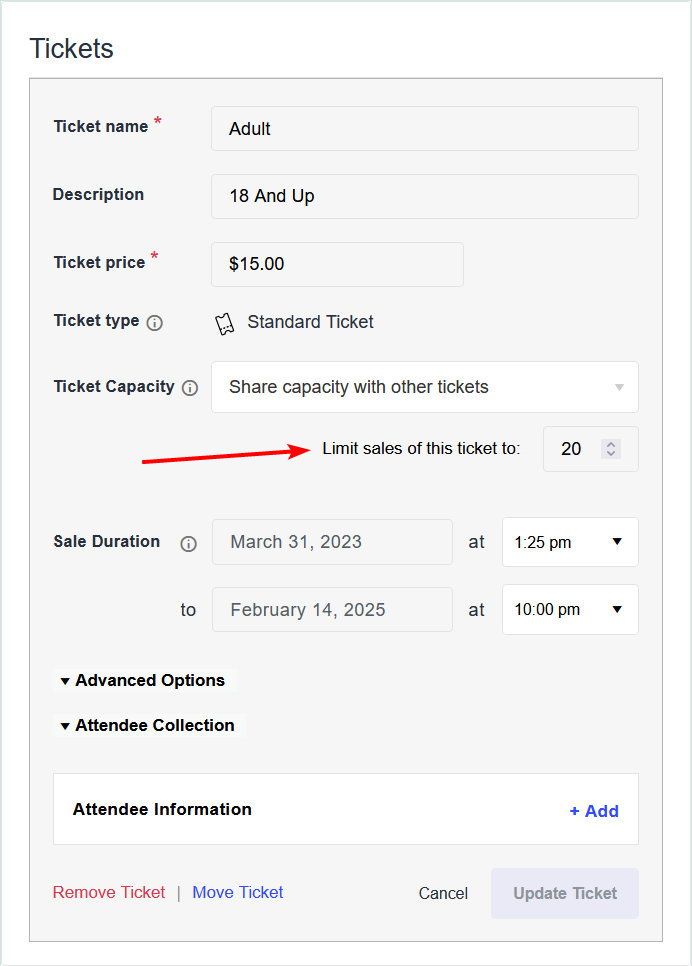
If you want your ticket to share the capacity for your event but also impose a sales limit on it (for example, if you want to only allow up to 50 children at your event out of your shared capacity of 100 attendees) you can Sell up to a certain number of tickets.
Once you’ve configured your ticket, hit the Save Ticket button and you’re all set. As your tickets start to sell, the stock for all tickets in global stock will decrease accordingly.
Note: We recommend running only one e-commerce functionality at a time. If you need to run multiple, we highly recommend that all tickets for one event use the same e-commerce platform, which you can select from the ticket editor settings.
Next up we recommend that you learn about managing ticket orders and attendees as well as reviewing How Event Tickets are Calculated. If you have any further questions please don’t hesitate to connect with the team via our help desk.
See Common Stock Issues for help troubleshooting.
Using Seating with Event Tickets
If you are using our Seating add-on, you can enable assigned seating with tickets. The capacity for each ticket will be defined by your event’s Seat Layout and your ticket’s Seat Type. This tool allows your attendees to choose from a visual seat layout when they’re purchasing tickets, so they can pick their perfect spot and have a specific seat assignment for the event. Read more about using Seating with Event Tickets.
Linking to the Tickets Form
Event Tickets Plus has a built-in anchor link so that you can link users directly to the ticket sales form on a single event page. (⚠ Please Note: This is only true for tickets being used on the “event” post type—tickets on “posts”, “pages”, and other post types will not have this anchor link at this time.)
The default link to the ticket form is yoursite.com/[event-slug]/[event-slug]/#buy-tickets. For example: yoursite.com/event/rock-concert/#buy-tickets.
If you’re not sure how to construct the link, go to your event’s page and add #buy-tickets to the URL. Then copy the full text of your browser’s URL field, and that’s the link to the tickets form.
Related Articles
- Charging Fees with Event Tickets
- Creating Coupons for Event Tickets
- Using Attendee Registration Forms with Event Tickets
- Saving Time with Ticket Presets
- Creating Waitlists for Event Tickets
- Sell Event Tickets with Tickets Commerce
- Sell Event Tickets with WooCommerce
- Creating Tickets with Assigned Seating