💡 The ability to create virtual events is included within our Events Calendar Pro plugin.
In order to create a virtual or hybrid event, start the same way you do when you create any other event with The Events Calendar. Click New → Event from the WordPress admin bar at the top of the screen or select Add New → Events from the WordPress admin menu when logged in.
The page will look exactly as it does with your other events, so fill in all of the information that you need, like the event title, description, dates, and times.
Keep scrolling down the editor screen and you will find a section called Virtual Event. Click “Configure Virtual Event.”
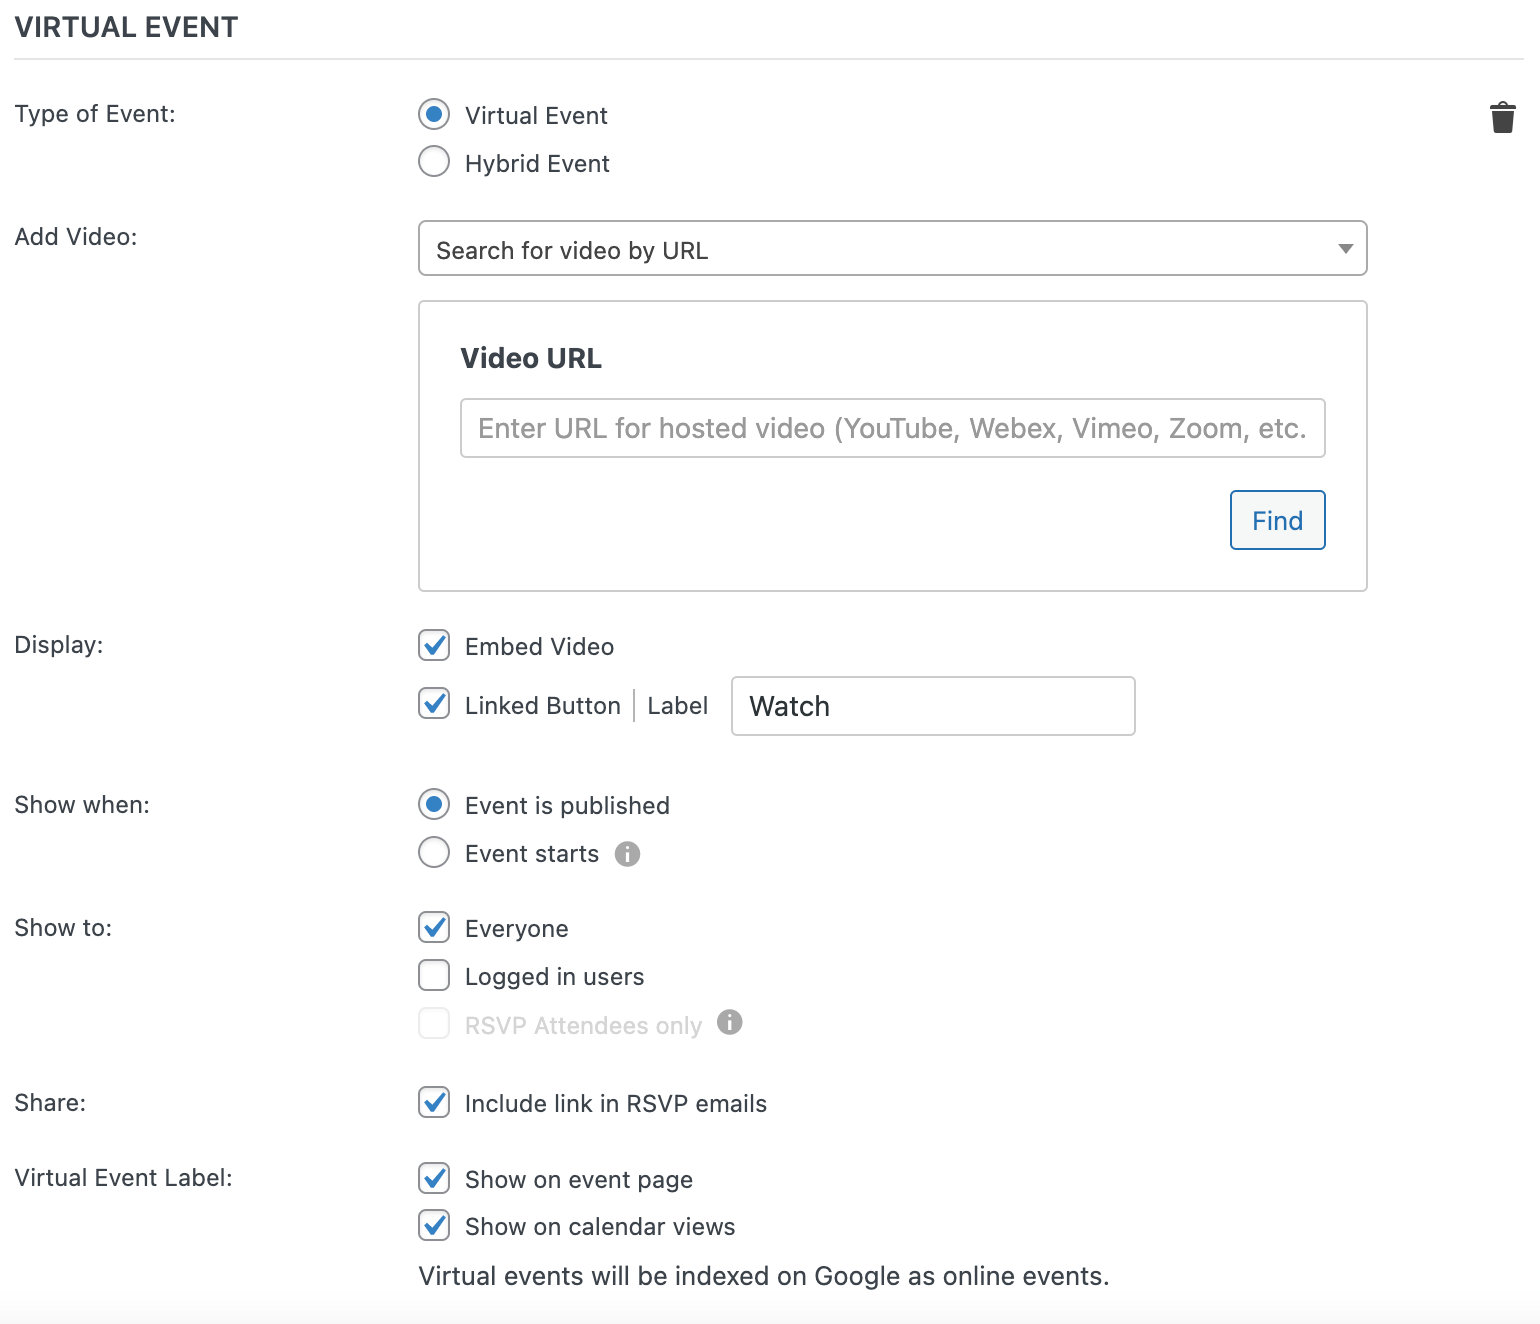
Your first option is to choose whether this is a strictly virtual, or hybrid event.
💡 If you are using Community Events with Events Calendar Pro, Virtual Events will display as an option when submitting an event as well. Zoom connection and link generation are disabled for all non-admins on the front, but you can generate links as an administrator from the front or within the Event Editor itself.
Add or Create Virtual Event Source
You have the option to attach a video to the event by adding a link to the “Add Video” field. You can also search for a video by URL to locate it. If you want to embed the content on your event page, you’ll want to use one of these WordPress-supported sources. Supported sources include YouTube, Facebook videos, Vimeo, and more. If your event source is not one of the supported options, you can still enter the URL in the field, but embedding may not work as expected. In that case, you can use a button that links to the video source instead (which we’ll cover in the next section).
You also have the option of generating a meeting or webinar, once you’re connected to your source under Events Settings > Integrations. Supported video sources include Zoom, Webex, YouTube Live, and Google Meet. Once that’s done, you’ll have the option to create unique links right from the Virtual Event editor with the click of a button.
You can also protect your meeting links from public viewing and create more secure links. Read more about how to do that here.
Supported Sources
Learn more about each of our supported video sources here:
Virtual Event Settings
Display
Once you’ve added a URL or a meeting link, you can decide how to display the video content on your event page.
If you have added a video source, you will see the option to display the embedded video or use a Linked Button… or both. Choosing the “Linked Button” option will display only a button that will, when clicked, open the embedded video in a new window for your users. The field next to the option allows you to change the button label, which is “Watch” by default.
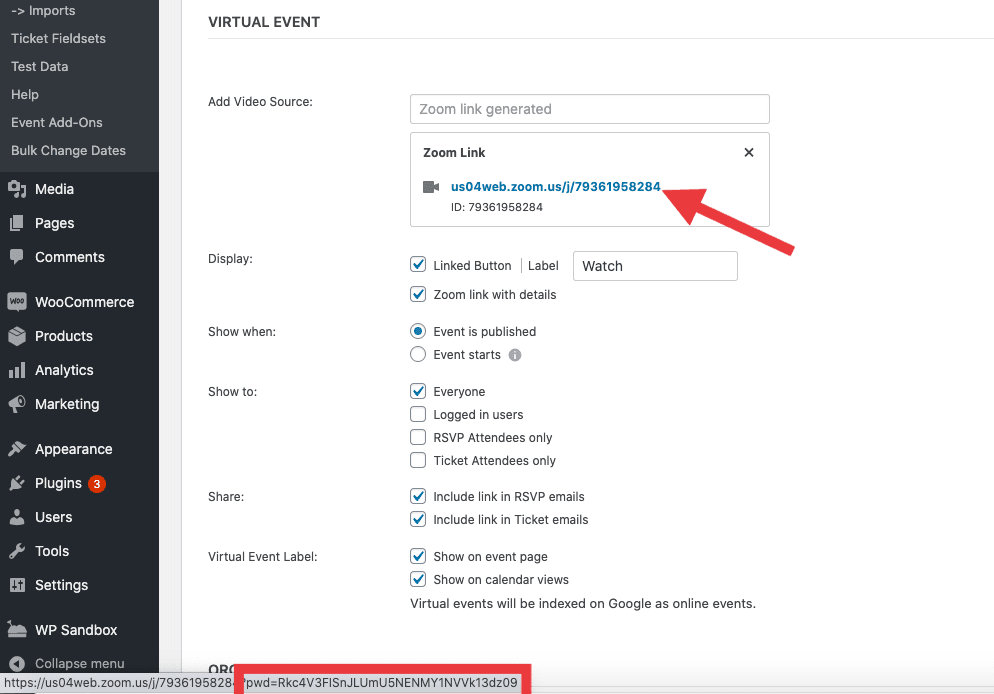
If you have added a generated meeting link, you will only see the Linked Button option. In this case, a button that connects to your link is added to the event page, which you can either use instead of the meeting ID or display it in addition to the link. Clicking this button will launch the meeting for your users. You are also able to change the default button label next to the option. Below that, you can check or uncheck the option that displays the link with the conference details as well.
Show When
This option allows you to either show the video source or the link right away or hide them until the start time of the event. Note that if you choose the latter option, the video or link will display 15 minutes before the event start time to give your attendees a chance to join on time.
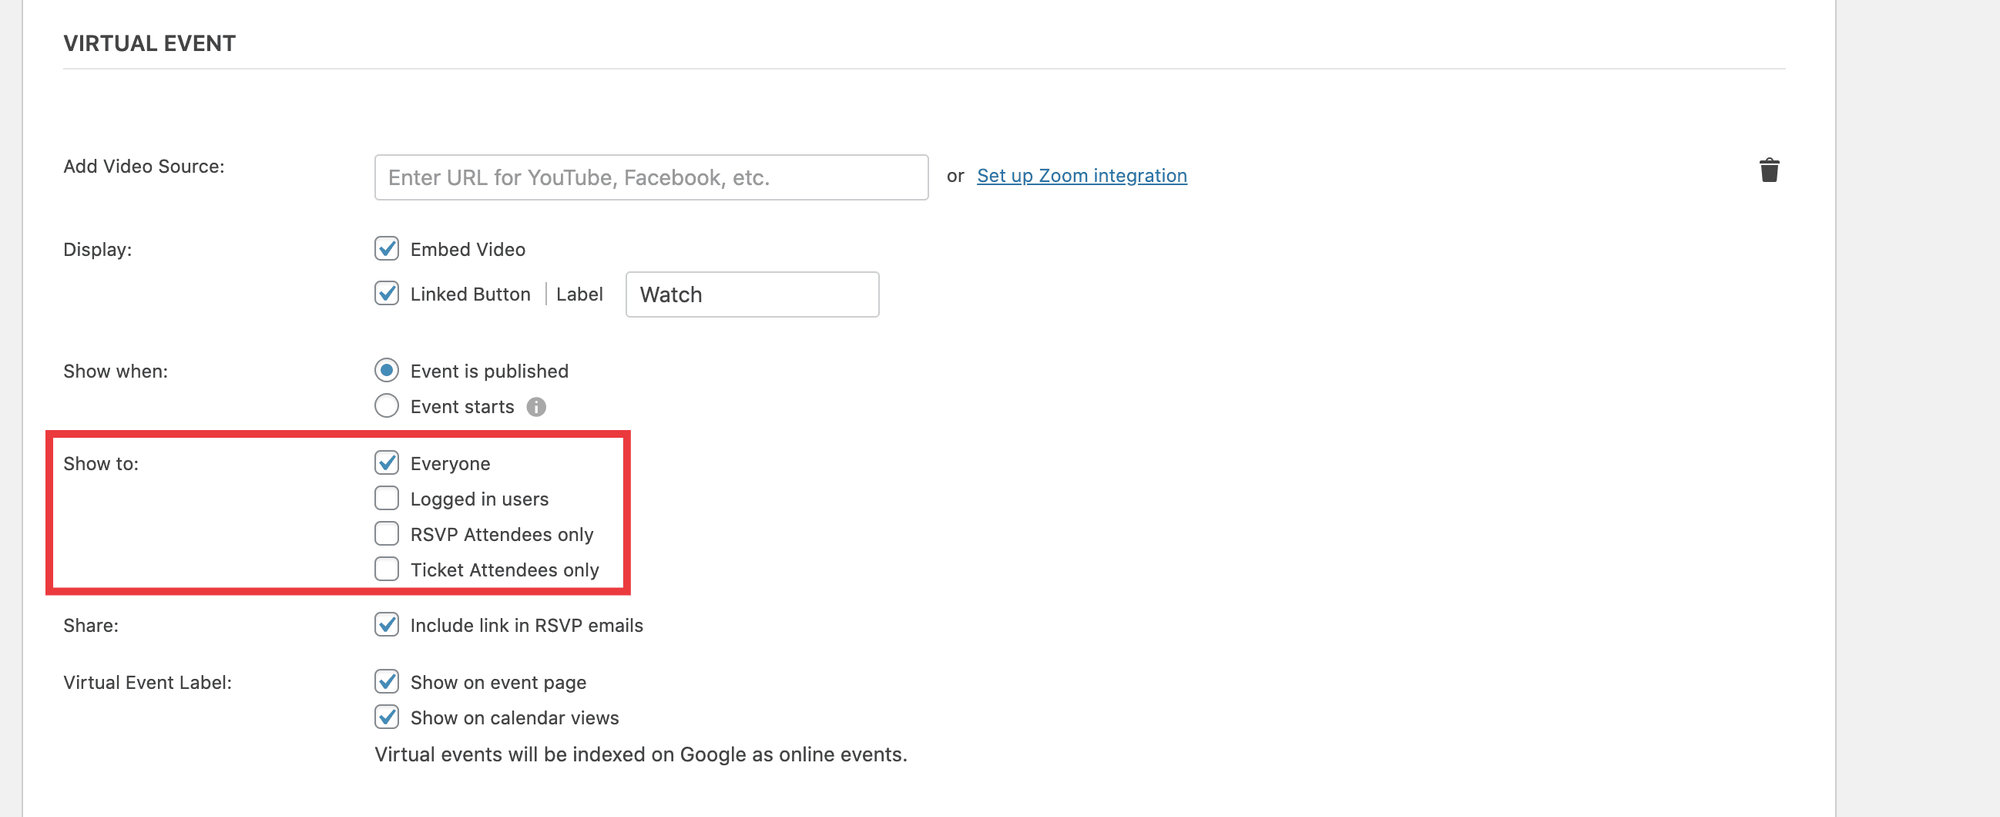
Show To
The Show to: option allows you to hide your virtual or hybrid event content from anonymous viewers. For example, you can choose to only show the content to registered, logged-in users. This can be combined with user settings to limit virtual event content display to your invited users or, if combined with third-party membership tools, to put your virtual event content behind a paywall.
If you have Event Tickets, you can use the Show to: option to hide virtual event content until the viewer has RSVPed or purchased a ticket to the event. In order to take advantage of this option, you’ll need to turn on the Login Requirement option under Events > Settings > Tickets.
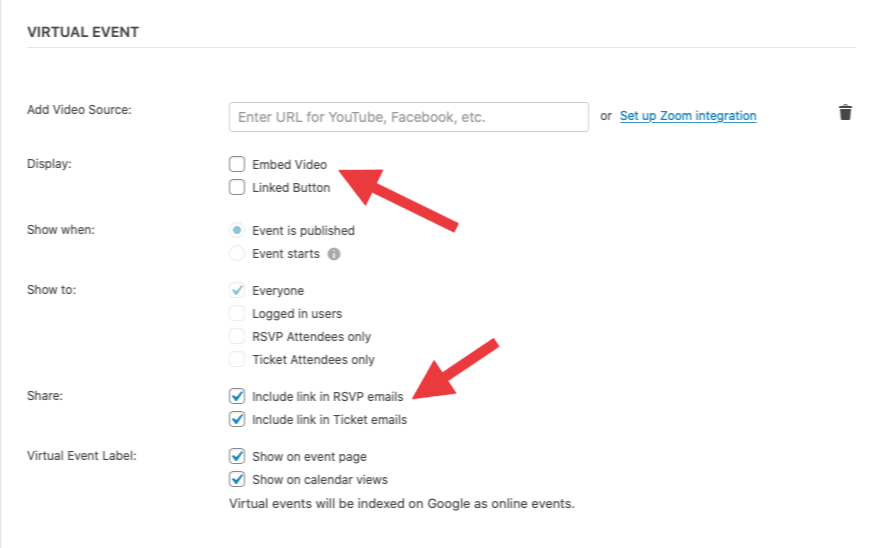
Share
If you have Event Tickets, you can use the Share option so that the video or meeting link is only provided with users who RSVP as Going or purchase a ticket. You’ll want to then either use the Show to: option to limit content visibility on the event page itself or de-select the Display options so that the virtual event content is only available through the email and never displays on the event page.
Note: If using the “share in tickets emails” option with a Series Pass, only the link for the first event in the Series will actually be included in the email.
You can add an additional level of security by using the Login Requirements options under Events > Settings > Tickets to require users to log in before RSVPing and/or purchasing a ticket.
Virtual and Hybrid Event Labels
This option lets you decide whether to display a label on the event that identifies it as a virtual or hybrid event. This can be especially useful if your calendar has physical, virtual, and hybrid events allowing your users to see the difference between them. The options here are to display the label on your event page and on the calendar views.
The labels look like this:

Security and Protected Content for Virtual Events
Our virtual events provide options for limiting content access and are designed to keep your virtual and hybrid events secure. This article offers an overview of the built-in functionality you can use to meet your calendar goals.
There are three basic ways to keep your virtual content protected:
- Limit content visibility to registered users and/or attendees
- Share event links via RSVP or ticket emails
- Generate Zoom meetings with passwords
These options can be used alone or combined to meet your needs.
Generate Zoom meetings with passwords
Starting with Virtual Events 1.0.2, Zoom meetings are generated with an embedded password to meet Zoom’s new security measures. This means that there are essentially two versions of the Zoom Join link. The basic, limited-access link will prompt the user to enter a password before joining the meeting. The all-access link with an embedded password will allow the user immediate access to the meeting.
This requires that the Have a minimum password length setting is enabled under Admin → Account Management → Account Settings → Security in Zoom.
When a logged-in user views a virtual event page with a Zoom meeting, they’ll see buttons and/or links with the embedded password. An anonymous (not logged-in) visitor will see the buttons and/or links with the limited-access link, so they’ll be prompted for a password if they try to join. As a site admin, you’ll be able to see the embedded password if you hover over the meeting link in the dashboard.
To provide meeting access, you’ll need to use one or more of the following methods:
- Create user accounts for participants
- Allow open WordPress user registration (least secure)
- Manually give the password with your participants
- Use the Share options to send the full access link to RSVPed or ticketed attendees (see above).
Note: Zoom meeting links shared via RSVP or ticket emails always include the full access link with the embedded password. Attendees who receive the link via email will be able to access the meeting without being prompted for the password.
Adjusting Zoom Password functionality
You also have the option to customize the default functionality to suit your needs. These filters can be added to your site to customize the Zoom password functionality. You can add and modify any one of the following to your theme’s functions.php file:
/**
 * Add a specific password to be used for all newly-generated Zoom meetings.
 */
add_filter( 'tribe_events_virtual_meetings_zoom_meeting_password', function () {
	return 'PASSWORD';
} );
/**
 * Display the full access Zoom Join URL with embedded password with everyone, including anonymous site visitors.
 */
add_filter( 'tribe_events_virtual_meetings_zoom_meeting_include_password', '__return_true' );
/**
 * Display the limited access Zoom Join URL without the embedded password with everyone. All users will be prompted for the password when they try to join.
 */
add_filter( 'tribe_events_virtual_meetings_zoom_meeting_include_password', '__return_false' );
/**
 * Generate Zoom meetings without an embedded password.
 */
add_filter( 'tribe_events_virtual_meetings_zoom_meeting_password', function () {
	return '';
} );
/**
 * Generate new Zoom meetings with a 6 digit numeric embedded password.
 */
add_filter( 'tribe_events_virtual_meetings_zoom_password_requirements', function ( $requirements ) {
	$requirements = [
		'password_length'                        => 6,
		'password_have_special_character'        => false,
		'password_only_allow_numeric'            => true,
	];	return $requirements;
} );
Create protected online course content
You can add your LearnDash online course content to virtual events and only display that content to registered users if you’d like. Check out the step-by-step instructions in this Knowledgebase article to learn how to set up this integration.
Working with Recurring Events
You can use the Virtual Events options on a recurring event. The virtual event elements (e.g. video or links) will show on all occurrences of that event. If you add a Zoom or WebEx meeting to a recurring event, only one meeting will be created in your account. That meeting will match the date and time of the first instance of the recurring event. The link to that meeting will then show on all occurrences of the event.
Note: If you have a series pass ticket with a virtual event element (e.g. Zoom connected), the link would not appear in the ticket email. Our development team is aware of this and is actively working on integrating the feature into future updates.