LearnDash is a WordPress Learning Management System (LMS) that lets you add online course functionality to your website. And with a few extra steps, you can integrate LearnDash with your events and tickets seamlessly.
We’ll take you through these steps so that you can connect your LearnDash courses to the events in your calendar and sell tickets to grant access to those courses using The Events Calendar and Event Tickets Plus. So let’s get started!
What you need
- The Events Calendar (free)
- Events Calendar Pro (optional)
- Event Tickets (free)
- Event Tickets Plus (premium add-on)
- WooCommerce (can be configured with Event Tickets Plus)
- WooCommerce for LearnDash integration add-on (free add-on available with LearnDash)
- The Events Calendar and LearnDash integration add-on (free add-on available with LearnDash)
Getting started
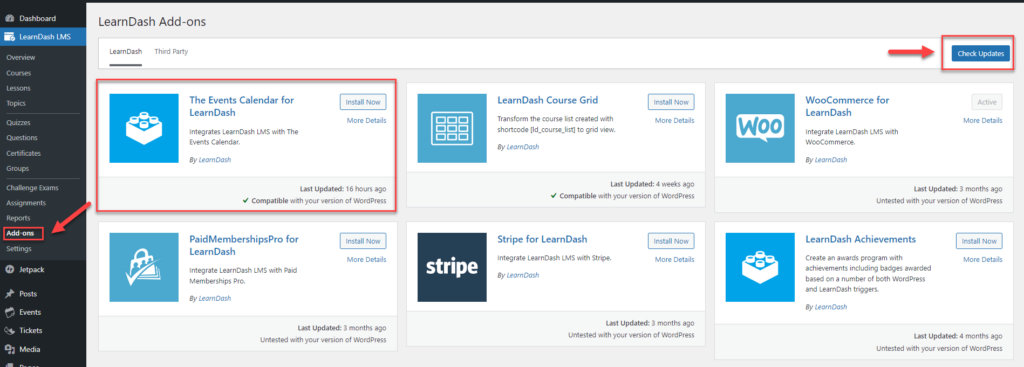
Once you install and activate The Events Calendar, Event Tickets, Event Tickets Plus with WooCommerce, and LearnDash, you’ll want to install and activate both the WooCommerce for LearnDash add-on and The Events Calendar and LearnDash integration, which you can find under LearnDash LMS > Add-ons.
If you don’t see it there immediately, make sure that you check for updates, and then it should appear.
Note: Although this integration allows you to sell some of your LearnDash courses exclusively via The Events Calendar (should you want to), a more profitable application would be to use it as an additional sales channel for your courses.
TL;DR you don’t have to change your current LearnDash sales flow. This integration allows you an additional way to also use events to sell courses or bundles at a price of your choosing (e.g.: during a webinar).
Changes to the settings
Next, there are a few settings that you’ll want to make sure you have unchecked to make this integration work seamlessly.
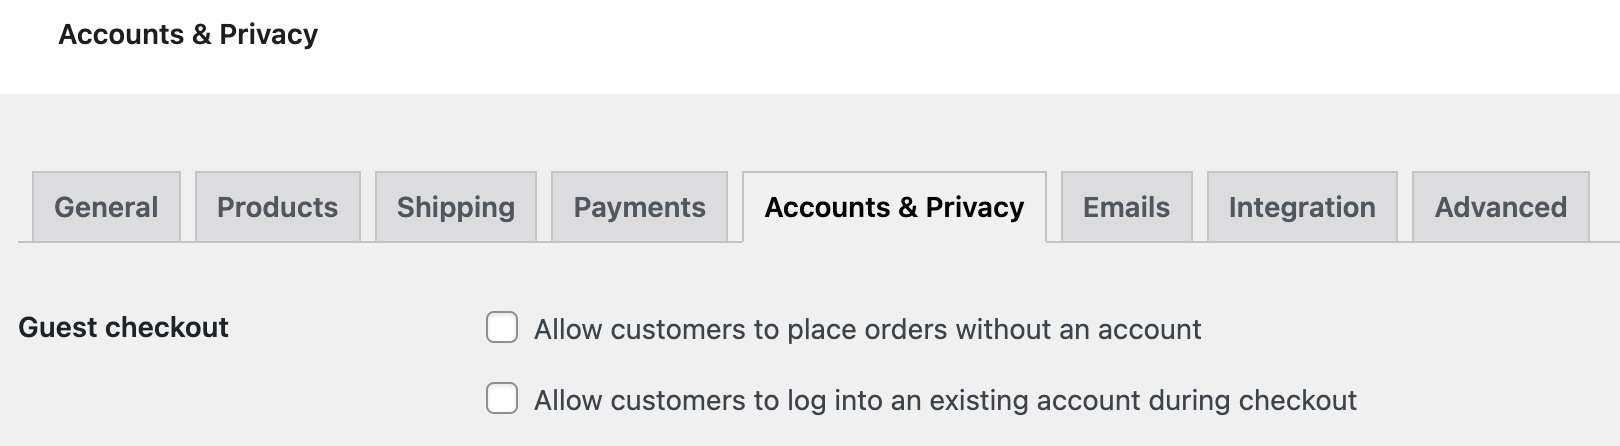
Under WooCommerce Settings > Accounts and Privacy, uncheck the two “Guest Checkout” options that Allow customers to place orders without an account and Allow customers to log into an existing account during checkout and click Save Changes.
Similarly, you’ll want to head over to Tickets Settings > General and check the options under Login Requirements to Require users to log in before they RSVP and Require users to log in before they purchase tickets and Save Changes.

Create a course
The steps to create a course with this integration are identical to the way you create a course in general with LearnDash. So if you’re already familiar with creating LearnDash courses, you’re in luck! For more information on creating LearnDash courses, check out their documentation.
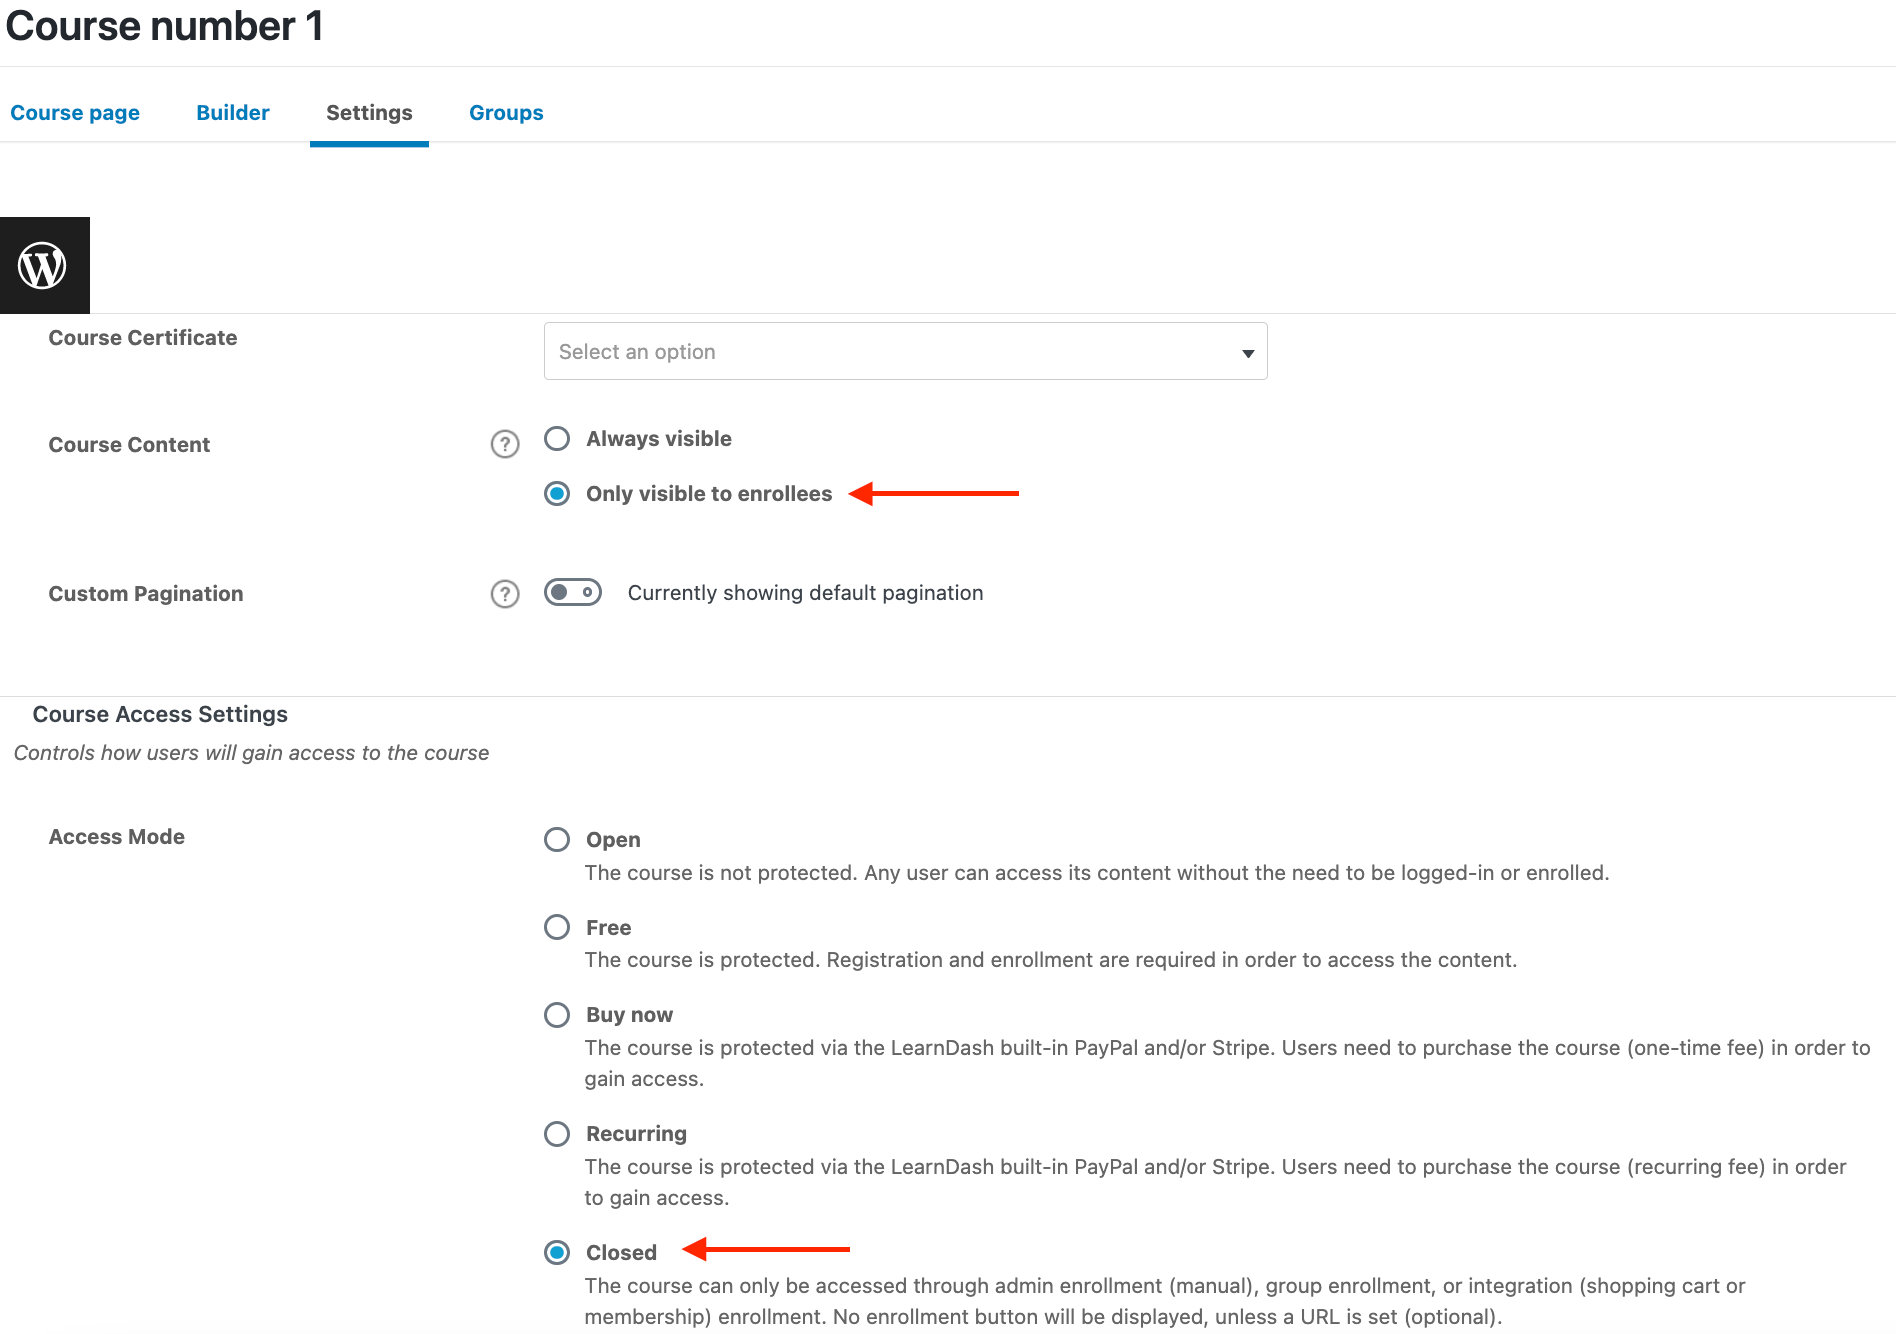
One important thing to note is that under your Course Settings, check the option to make the course Only visible to enrollees, and set the Access Mode as Closed.
Create an event with a ticket
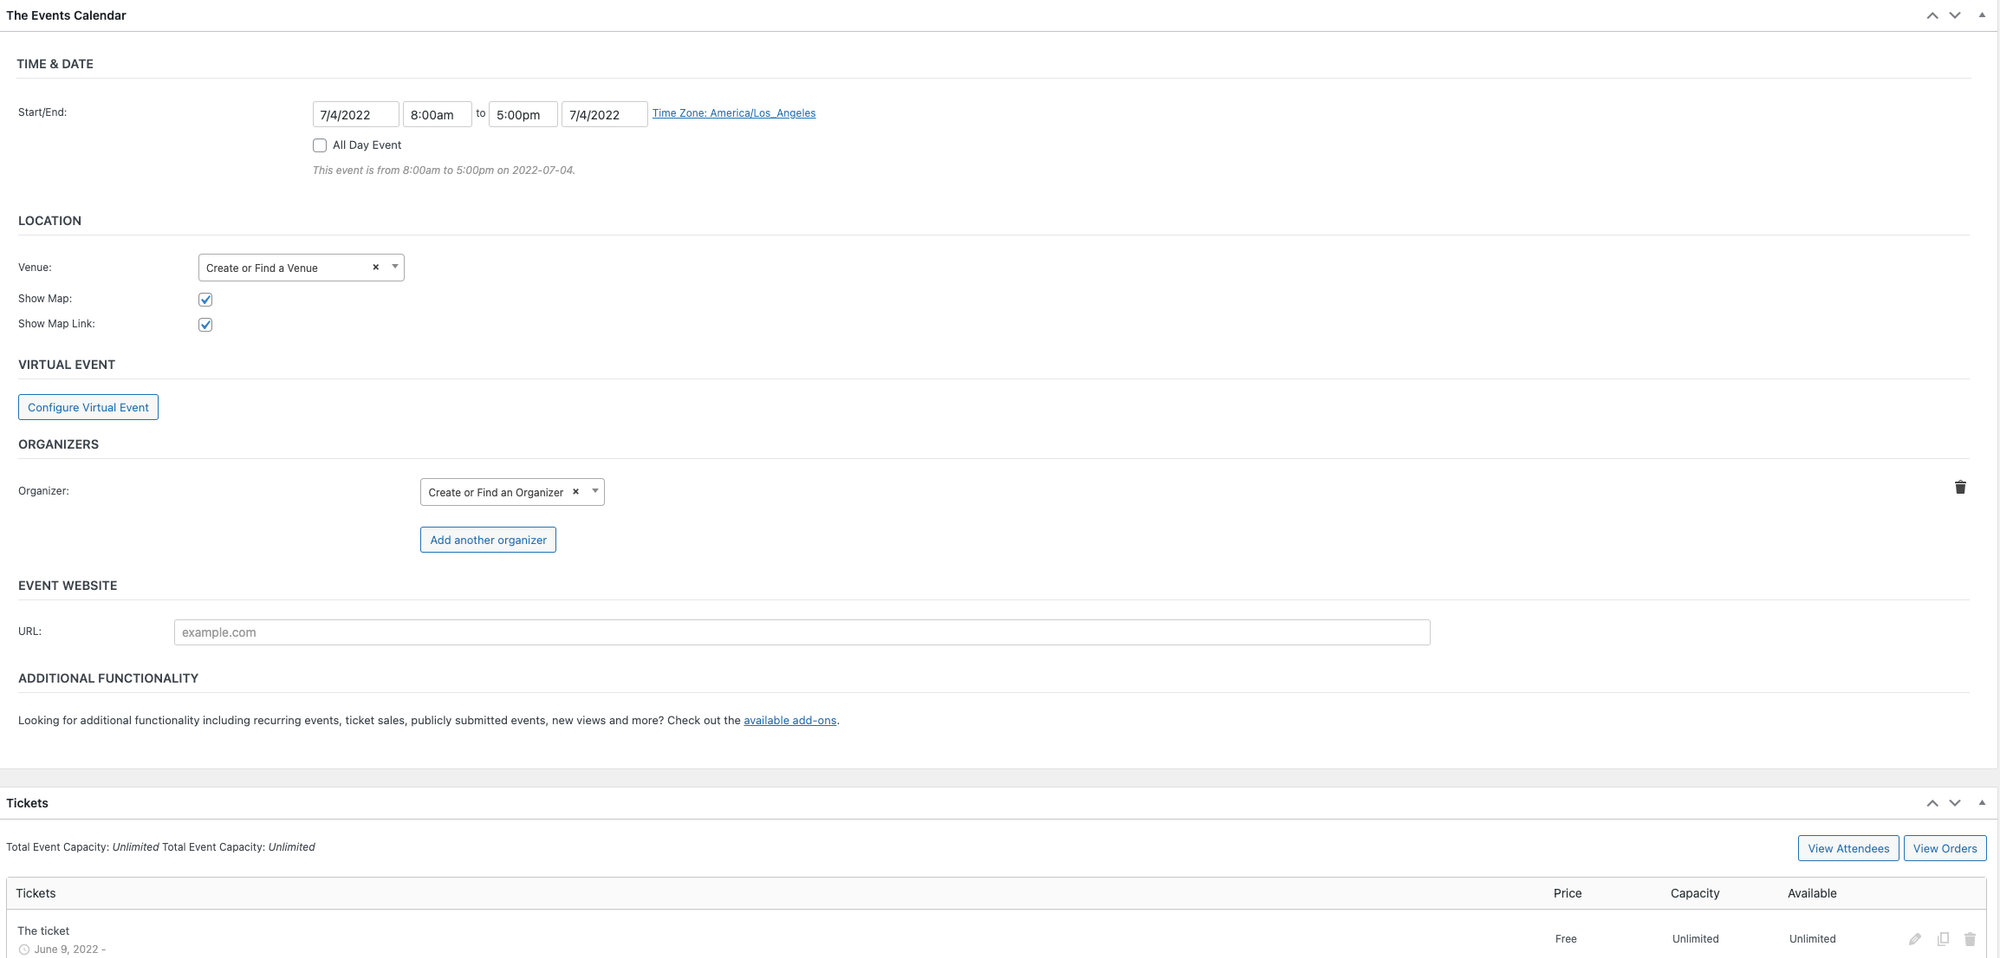
The next step is to create the event where you’d like your course ticket to appear. So go ahead and create an event as you normally do. Then create your ticket located at the bottom of the Add Event page.
Add the ticket URL to the course page
Note: If you are using Event Tickets with Tickets Commerce (instead of WooCommerce), you can skip this step.
Important: If you’d like your event to be the only place where users can purchase your course, you’ll want to use the Event URL as the Button URL in the way that we describe below. Otherwise, feel free to keep your Access Mode and Button URL to whatever setting you currently have in place (so that it doesn’t upset your current sales flow).
When you create a ticket with Event Tickets and Event Tickets Plus, the ticket created is actually a WooCommerce product. You can use that ticket URL to add a button to your course page.
Head over to Products in the WordPress Dashboard and find your ticket by name. Hover over your ticket and select the View option. Copy the URL of your ticket there. You can also find the URL by hovering over the View option (this only works in certain browsers, like Chrome).

Now go back to your LearnDash course page Settings and add the link to the Button URL under Access Mode > Closed.
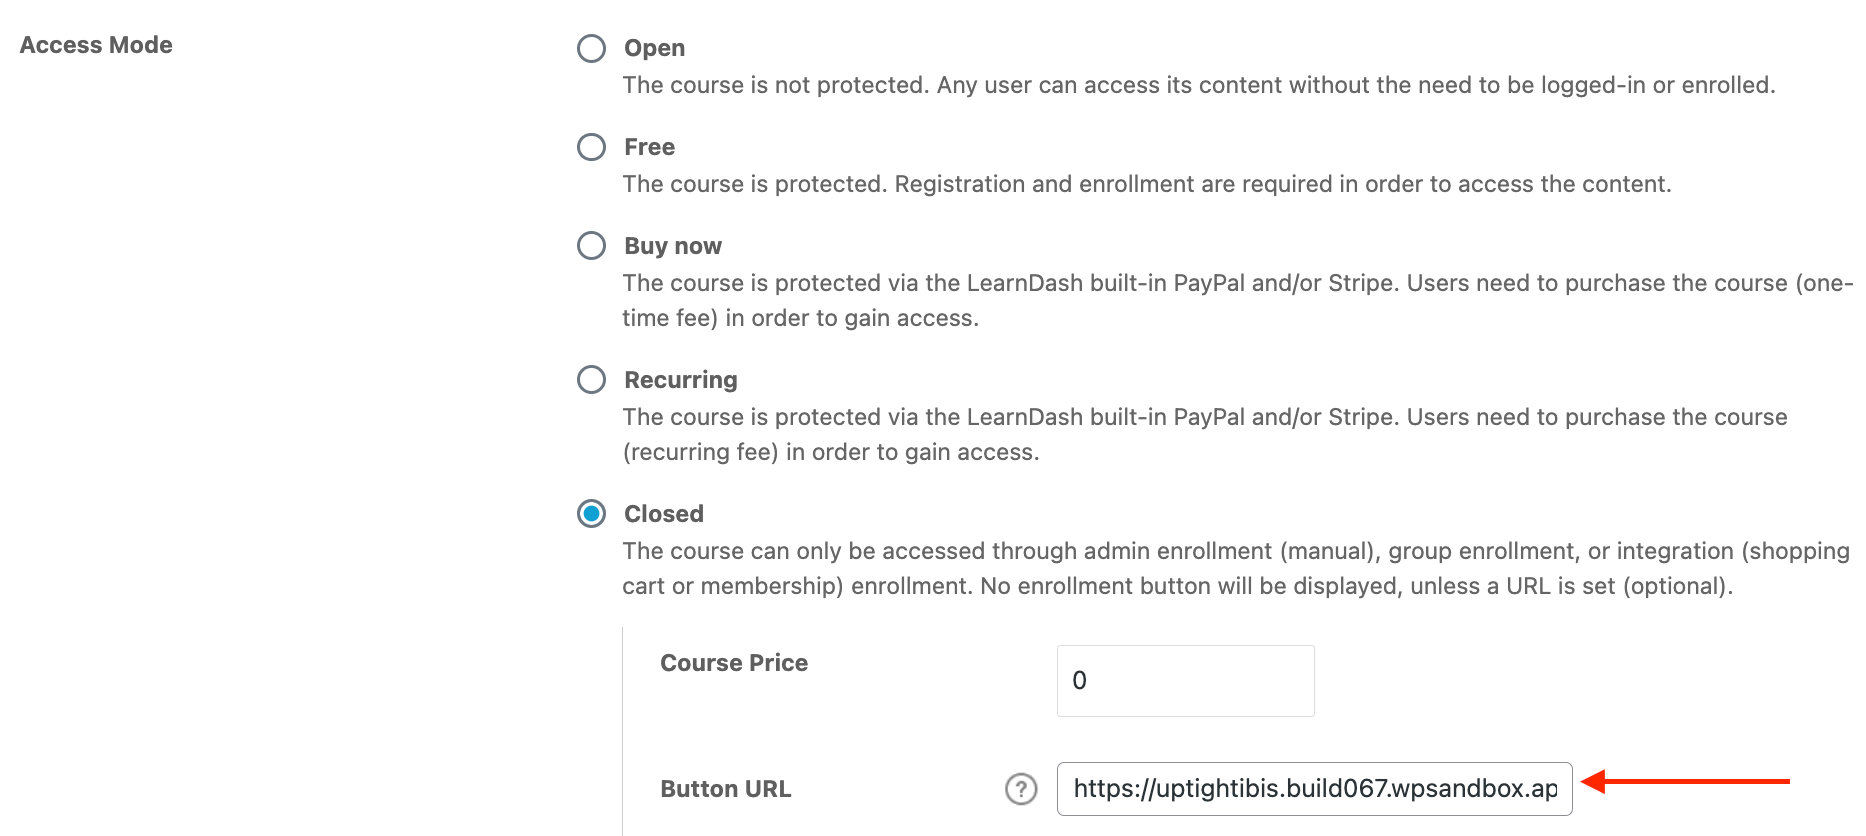
Then, add the course price that corresponds with the price indicated on your ticket. This is an important step, especially if users visit your course page URL directly.
If instead, you’d prefer to create an RSVP, although this integration does not currently support RSVPs, you can use this third-party plugin instead.
Edit the ticket product
Note: If you are using Event Tickets with Tickets Commerce (instead of WooCommerce), you can skip this step.
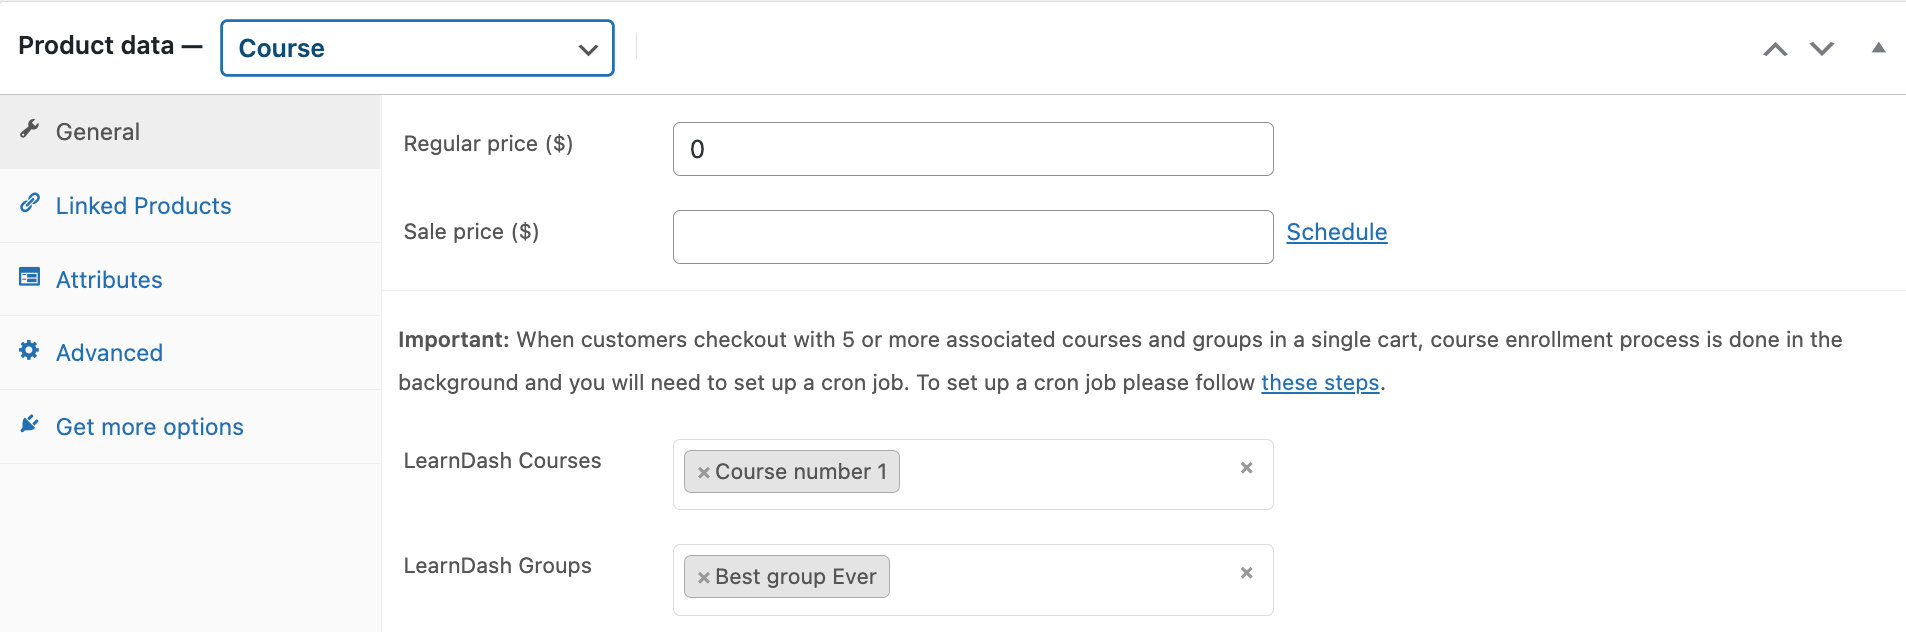
Next, you’ll want to edit the ticket product by going back to Products. Click on the Edit option this time to edit the ticket as a product. Scroll down to Product Data and select Course from the dropdown menu. Under General, select the LearnDash course(s) that you’d like to associate your ticket with. You can optionally associate the ticket with LearnDash Groups as well. Once you’re finished making changes, you can Update the product.
Add the integration to the event
Head back over to your Edit Event page under Events and select the LearnDash course(s) that you’d like to associate with the event. You can also associate the event with a particular LearnDash Group as well.

Create a virtual event
With Events Calendar Pro, you can create virtual events, once you have set up the LearnDash integration, you’ll now see some additional options for your LearnDash for your online courses. This will allow you to limit Virtual Event details (e.g.: meeting links) to specific course enrollees or better yet, to chosen LearnDash Group members.
Head over to your event and Configure Virtual Event. Now, you’ll find new options to show your virtual or hybrid event content to only your LearnDash users.

Note: When purchasing a ticket, it’s important to keep in mind that purchasing multiple tickets for different attendees will not grant them access to the course. Each person wanting access to the course needs to purchase their own ticket.
What else can you do?
With The Events Calendar LearnDash integration, you can basically do anything you normally do with LearnDash, but now it’ll be associated with your events and tickets as well. Some things you can do are:
- Grant tickets to multiple courses at a time
- Associate tickets with LearnDash Groups
- Use LearnDash Prerequisites and Points requirements
- Create custom-linked post types with this The Events Calendar extension.