WP All Import Add-On for The Events Calendar
This extension is needed to successfully migrate The Events Calendar and/or Event Tickets data from one WordPress site to another. It is the glue between The Events Calendar/Event Tickets and opens in a new tabWP All Import Pro (premium).
⚠️ Note: the extension is primarily intended to help import data from The Events Calendar to another The Events Calendar 6.0+ using the new data storage system (after data migration).
Importing from other sources may be possible with additional setup and tweaks, please note however, that is beyond the official scope of this extension and support.
Compatibility
Currently, this add-on supports the following calendar and ticket data to be migrated:
- Venues
- Organizers
- Single events, including all-day and multi-day events
- Recurring Events (from version 1.2.0)
- Event Series (from version 1.2.0)
- RSVPs and Attendees
- Tickets Commerce Tickets, Orders, and Attendees
The add-on currently DOES NOT support the following data types:
- Event Tickets Plus/WooCommerce tickets, orders, and attendees
Adding support for these is on our roadmap.
Requirements
- The Events Calendar – for event-related data
- Events Calendar Pro 7.6.1 or later – for recurring events and event series
- Event Tickets – for ticket and attendee-related data
- WP All Export (free works, Pro is recommended) on the source site where you are migrating events from.
- WP All Import Pro (premium) on the destination site to which you are migrating events.
- WP All Import Add-On (this extension) on the destination site to which you are migrating events.
Preamble
The migration process is fairly simple: the data needs to be exported from one site and imported into the other site. This has to be done for every post type you would like to migrate separately. It is as easy as it sounds. Still, there are a few details to pay attention to to make sure the migration is successful.
It is recommended that you clean up event data on the source site, so that you only migrate data that is needed to avoid bloating your database.
Consider cleaning up event data on the destination site as well to start with a clean slate. Without that, you might get unexpected results, including some data getting deleted.
It is always a good idea to create a database backup of the destination site before starting the migration. To prevent any surprises, it is even better to test the migration on a staging site first, which should be an exact copy of the live destination site. The Events Calendar is not responsible for any data loss.
“Lock” the site
When you start exporting the data from the source site, make sure that you “lock” the data so that there are no more changes when you are midway through the export. Otherwise, the data can be corrupted after migration.
The order of importing data
The different post types of The Events Calendar and Event Tickets plugins (more details in the next paragraph) are linked together in a certain way. This is why it’s really important that the different post types are imported in a specific order. Otherwise, they cannot be re-linked during the import, and the migration will not be successful.
Here is the order in which the post types have to be imported. Of course, if you are not migrating a certain post type, you can skip that.
| Data Type | Post Type |
|---|---|
| Venues | tribe_venue |
| Organizers | tribe_organizer |
| Events | tribe_events |
| Series | tribe_event_series |
| RSVP “Tickets” | tribe_rsvp_tickets |
| RSVP Attendees | tribe_rsvp_attendees |
| Tickets Commerce Tickets | tec_tc_ticket |
| Tickets Commerce Orders | tec_tc_order |
| Tickets Commerce Attendees | tec_tc_attendee |
The Migration Process
Exporting the data
We are going to assume that The Events Calendar, WP All Export (free or Pro) are installed and activated on the source site. For exporting Series, Events Calendar Pro is needed as well.
- On the WordPress dashboard, head over to WP Export > New Export.
- Choose “Specific Post Type” and, from the dropdown, select the post type you want to export.
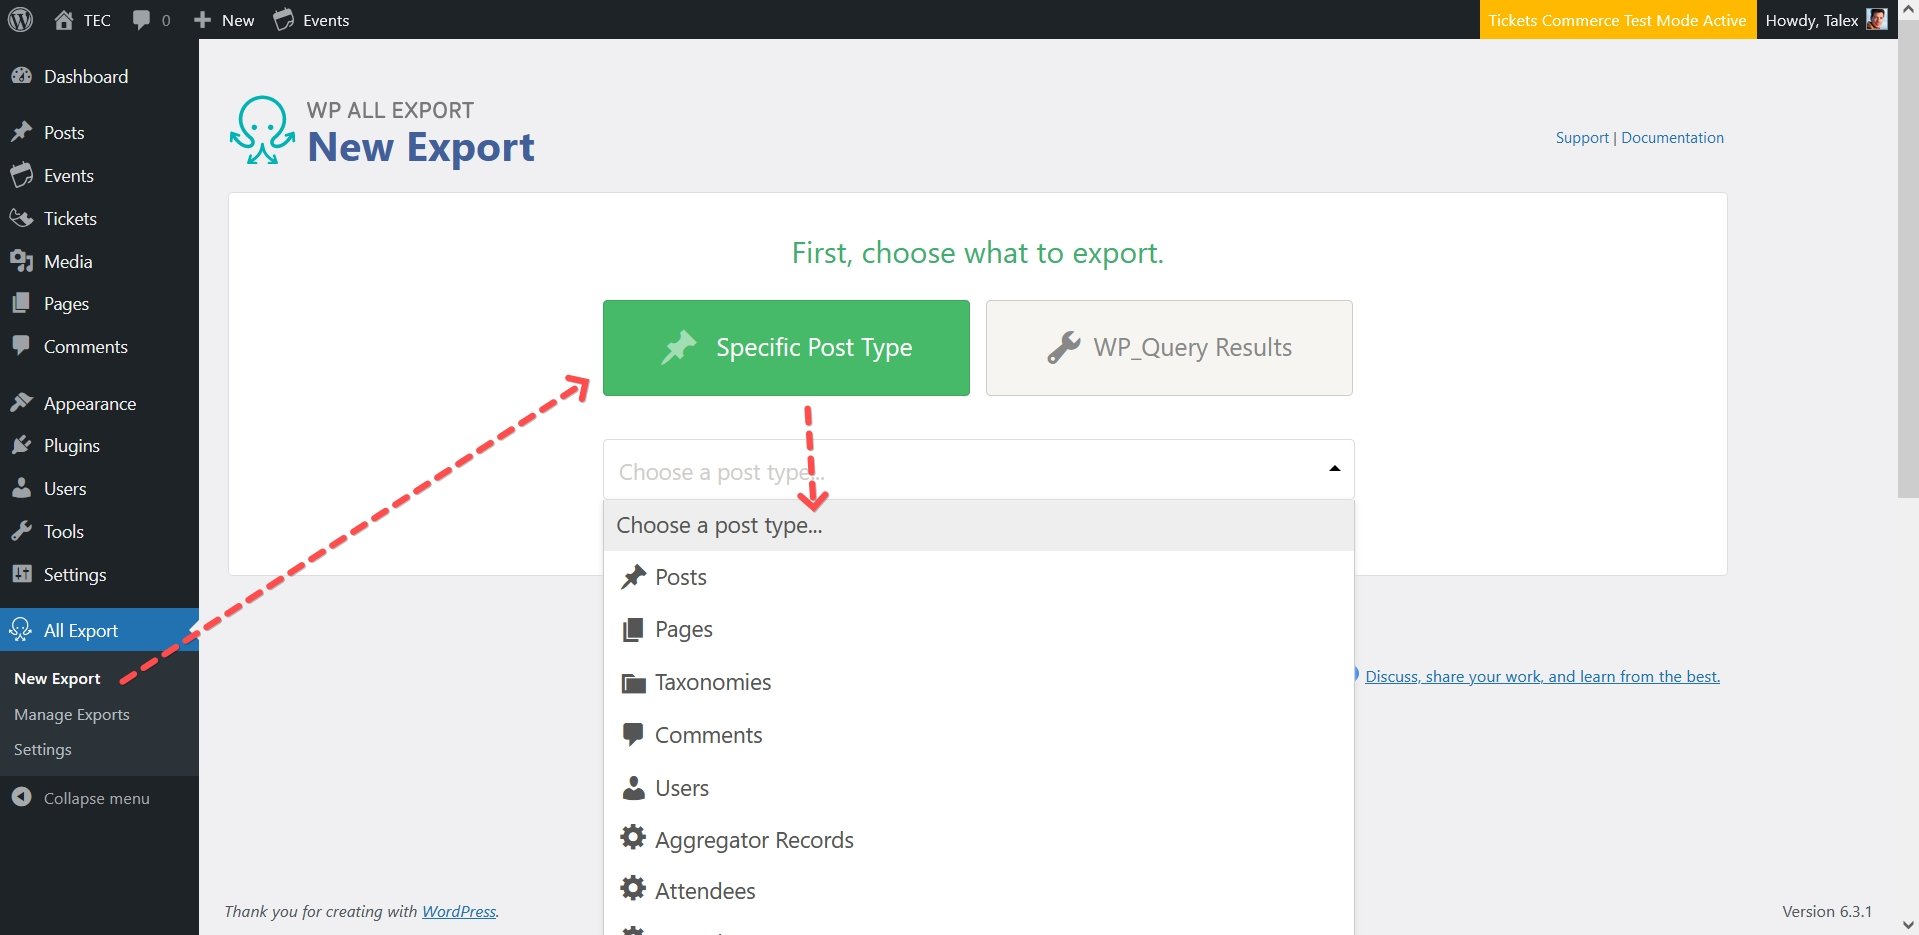
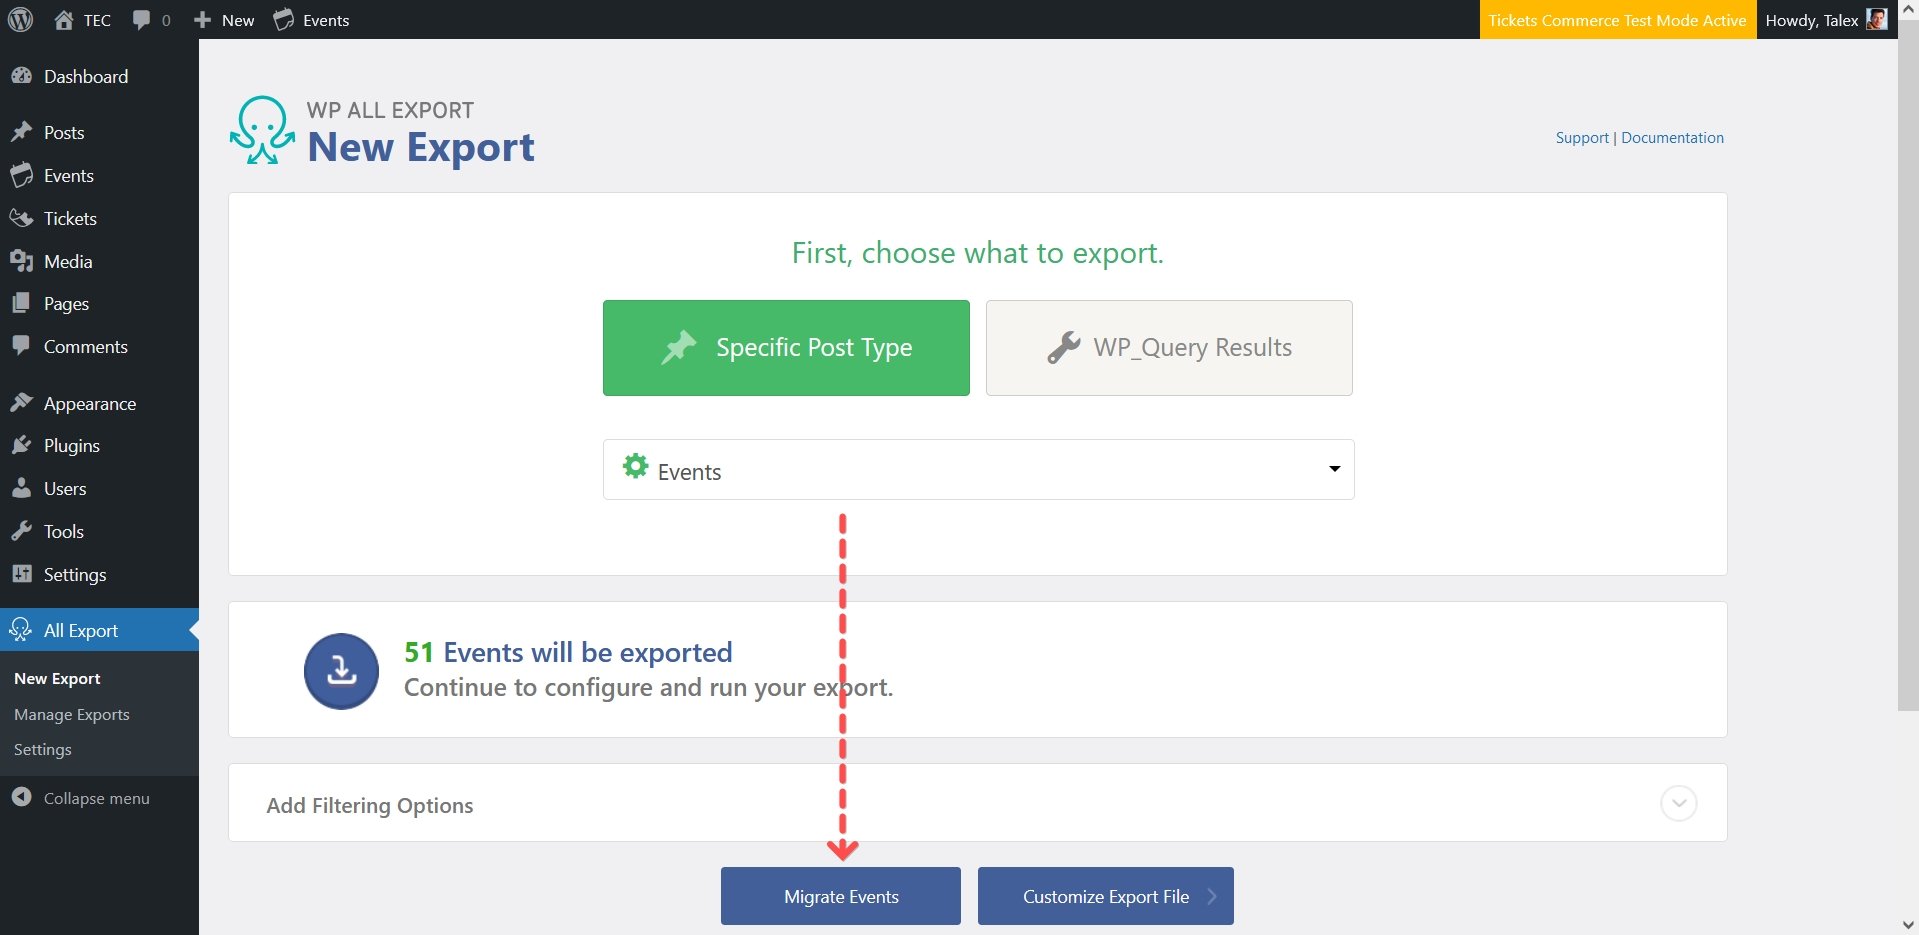
- After choosing the post type, you will see a notification showing how many will be exported.
If you have WP All Export Pro, then continue reading*. If you only have the free version, then continue to the relevant section.
* Important! Migrating the Series (post type) requires some manual steps, so you need to follow the steps of the free version!
Continuing with WP All Export Pro…
WP All Export Pro does most of the heavy lifting for you, automatically adding all necessary data to the export file.
- With WP All Export Pro installed, you can add further filtering options to export only posts with specific properties.
- Click on the blue “Migrate” button to proceed to the last step before the export.
(Click here to skip the free version and skip to the next step.)
Continuing with WP All Export free …
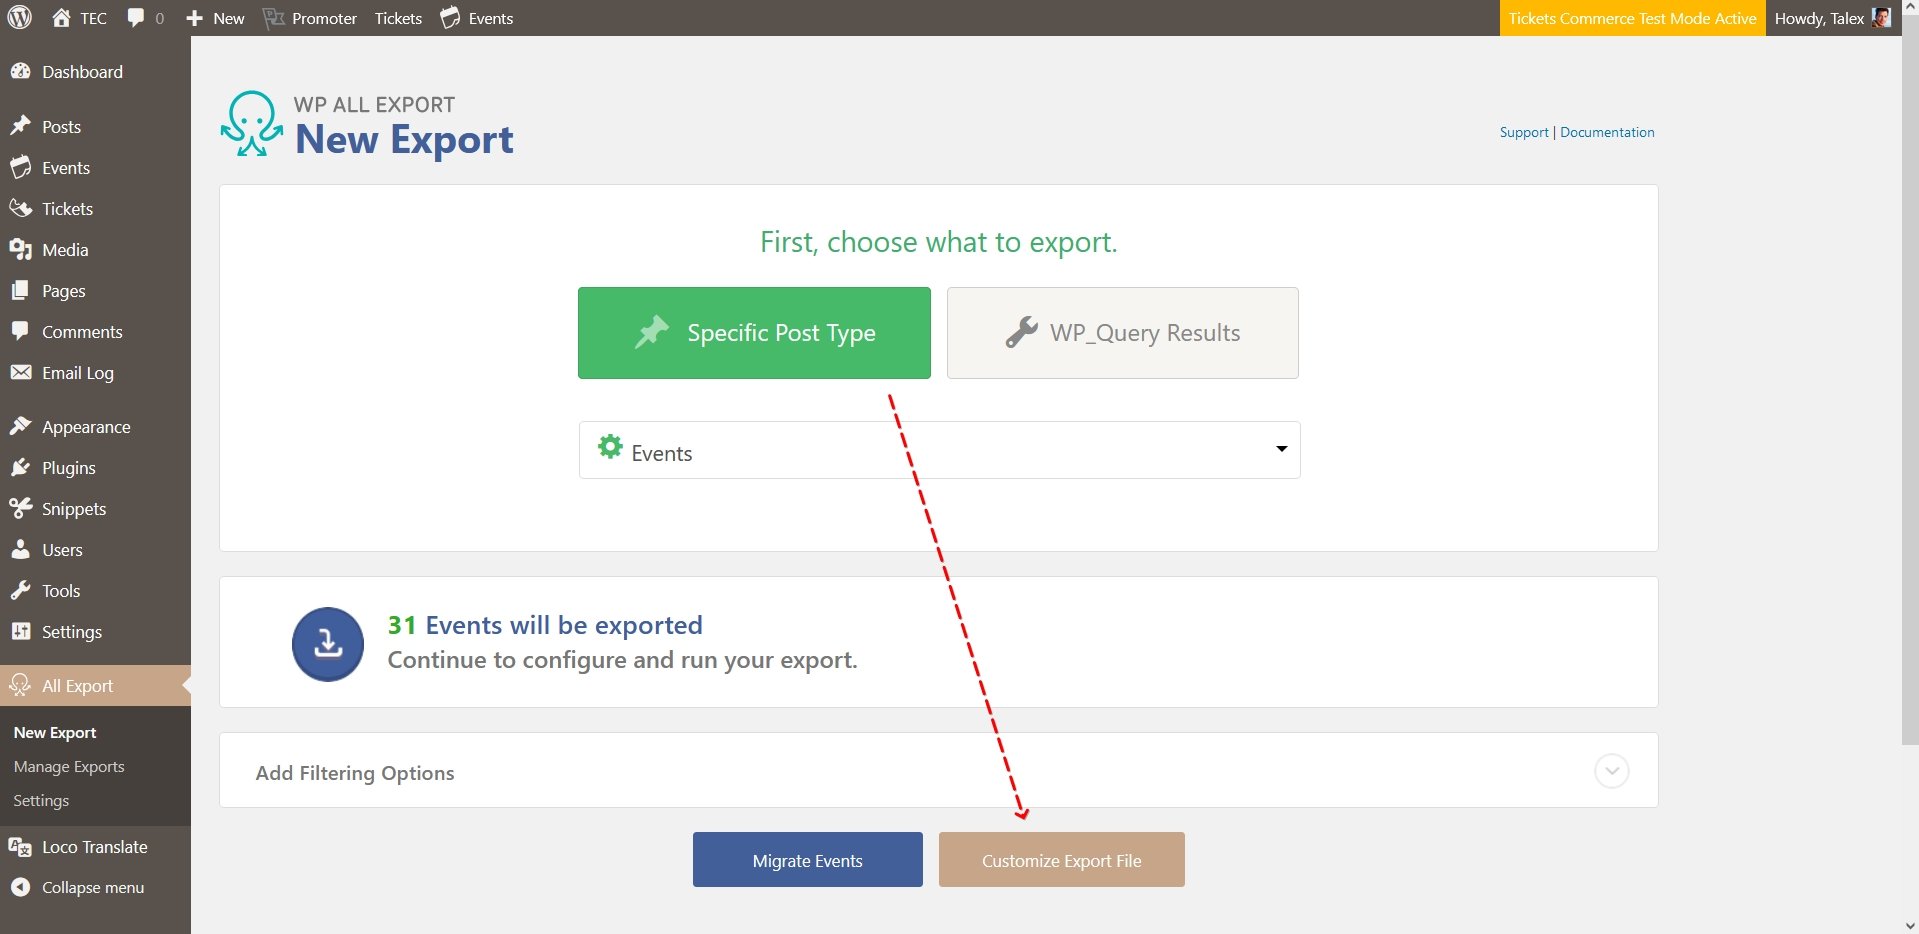
With the free version of WP All Export, you need to manually select all the data you want to be included in the export.
- Click on the “Customize Export File” button to advance to the next step.
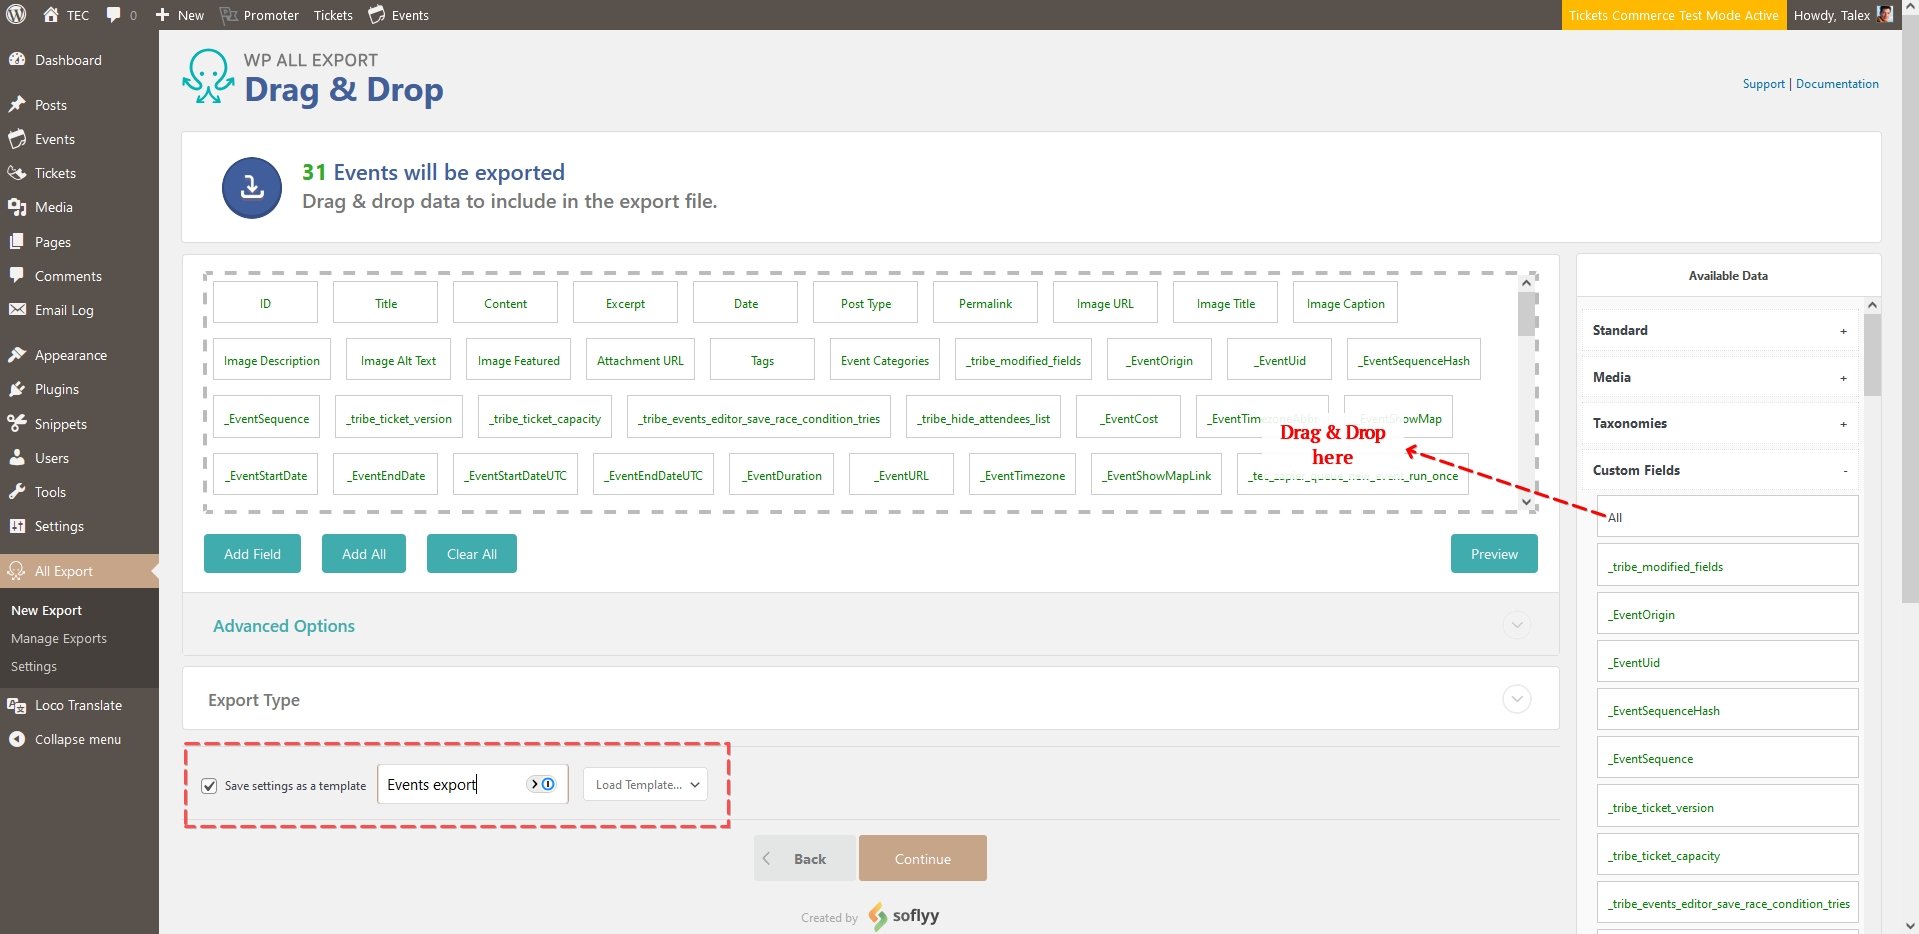
- In this Drag & Drop step, select the data you want exported. On the right side of the screen, there is a column called “Available Data”, which is divided into different sections, such as Standard, Media, Taxonomies, Custom Fields, Other, ACF. You need to open each section and drag the items into the frame on the left. Here is a list that must be included for a successful migration.
- Standard
- All
- Media
- Images
- Image URL
- Image Title
- Image Caption
- Image Description
- Image Alt Text
- Image Featured
- Attachments
- Attachment URL
- Images
- Taxonomies
- All
- Custom Fields
- All – Without this, the events will be missing crucial data, like the start and end date.
- Other
- All
- When exporting Series there’s more to do! You need to add one more field that will contain the events linked to the Series. (Skip Series)
- Click on the “Add Field” button.
- Add
posts_in_seriesas the Column name. - Leave the other fields unchanged and click on “Save”.
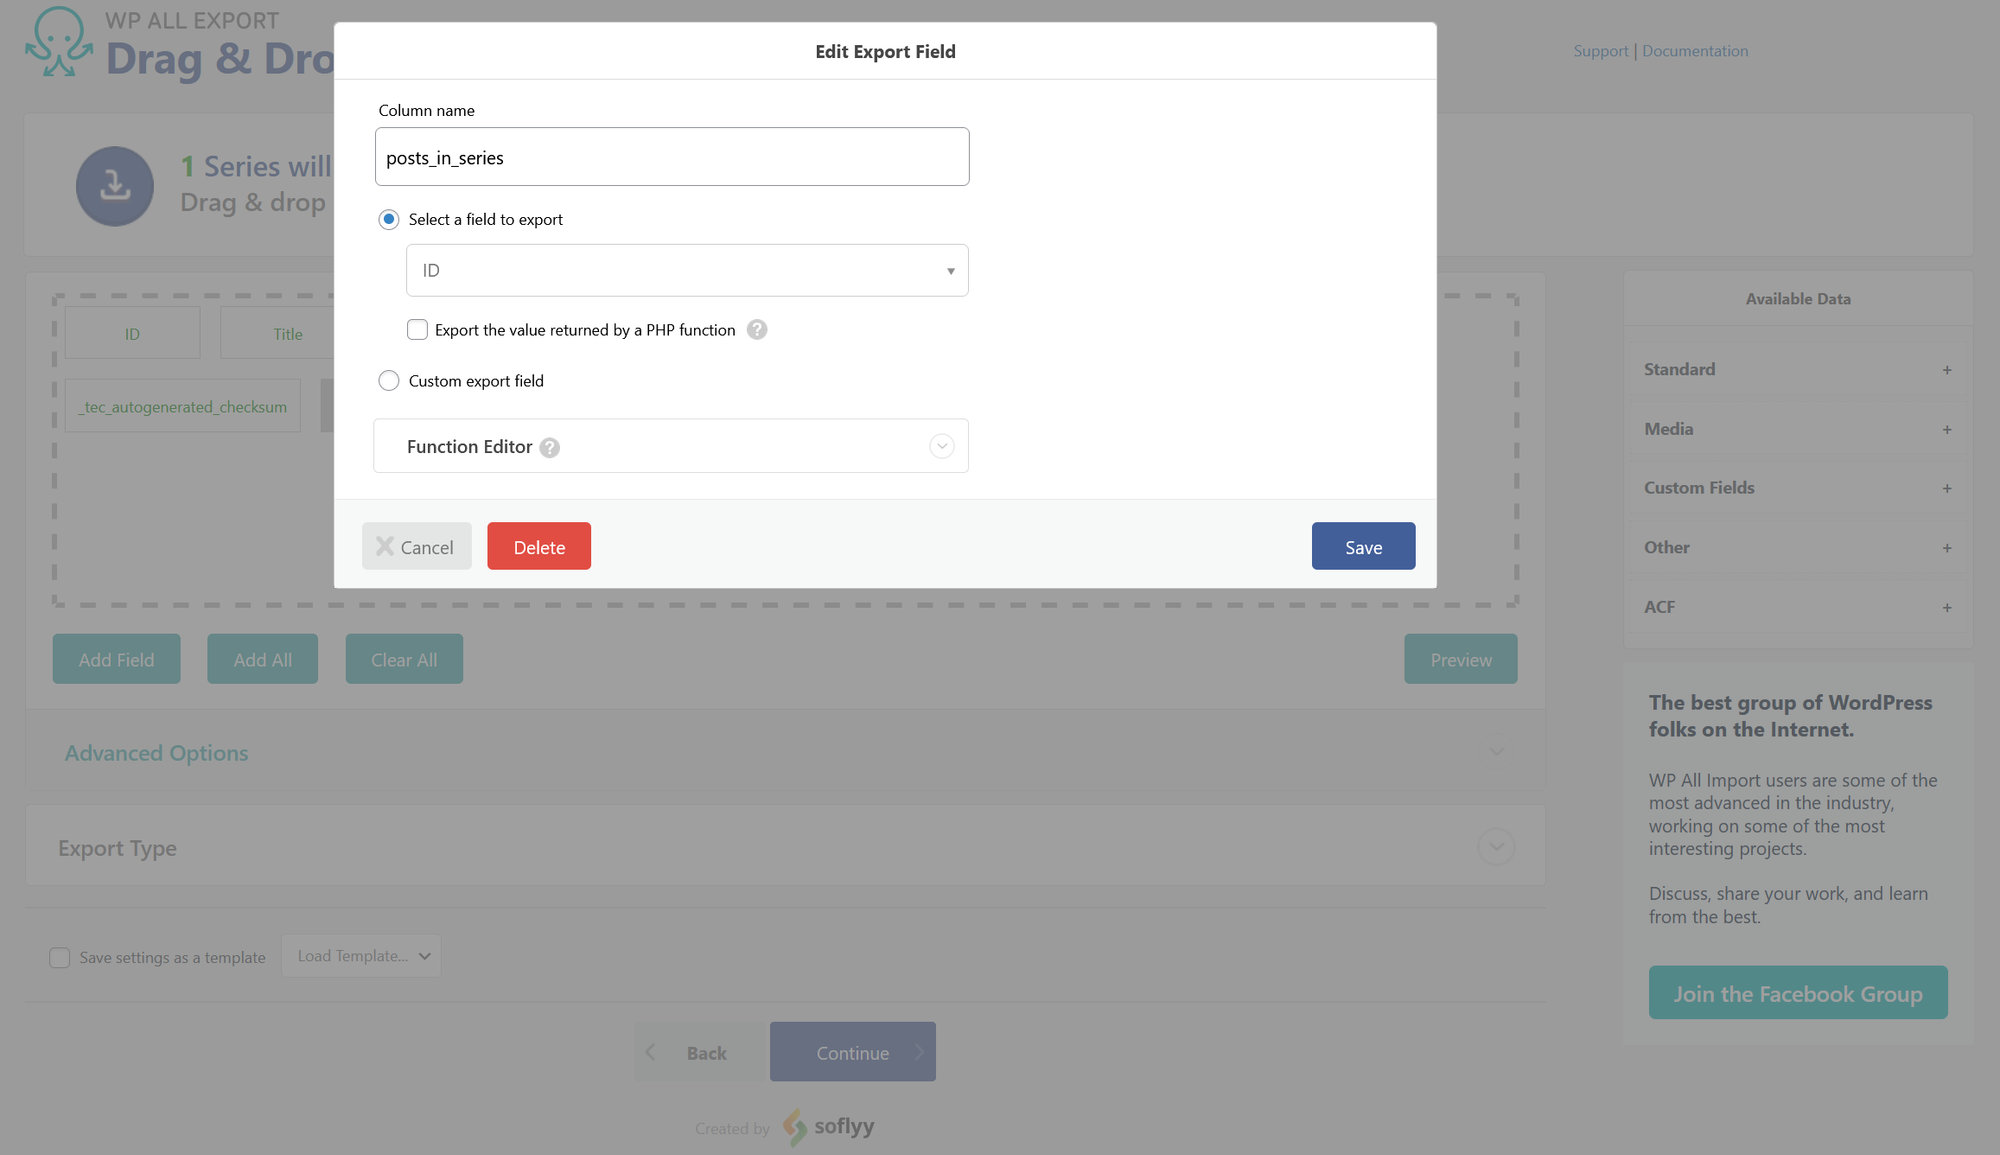
Now, if you click on the “Preview” button, you should see a column named “posts_in_series” in the modal with some post IDs.

- At the bottom of this screen, you also have the possibility to save this setup as a template, or, if you already have a saved template, load it.
When you are done, click on “Continue”.
This is where the Free and Pro paths merge…
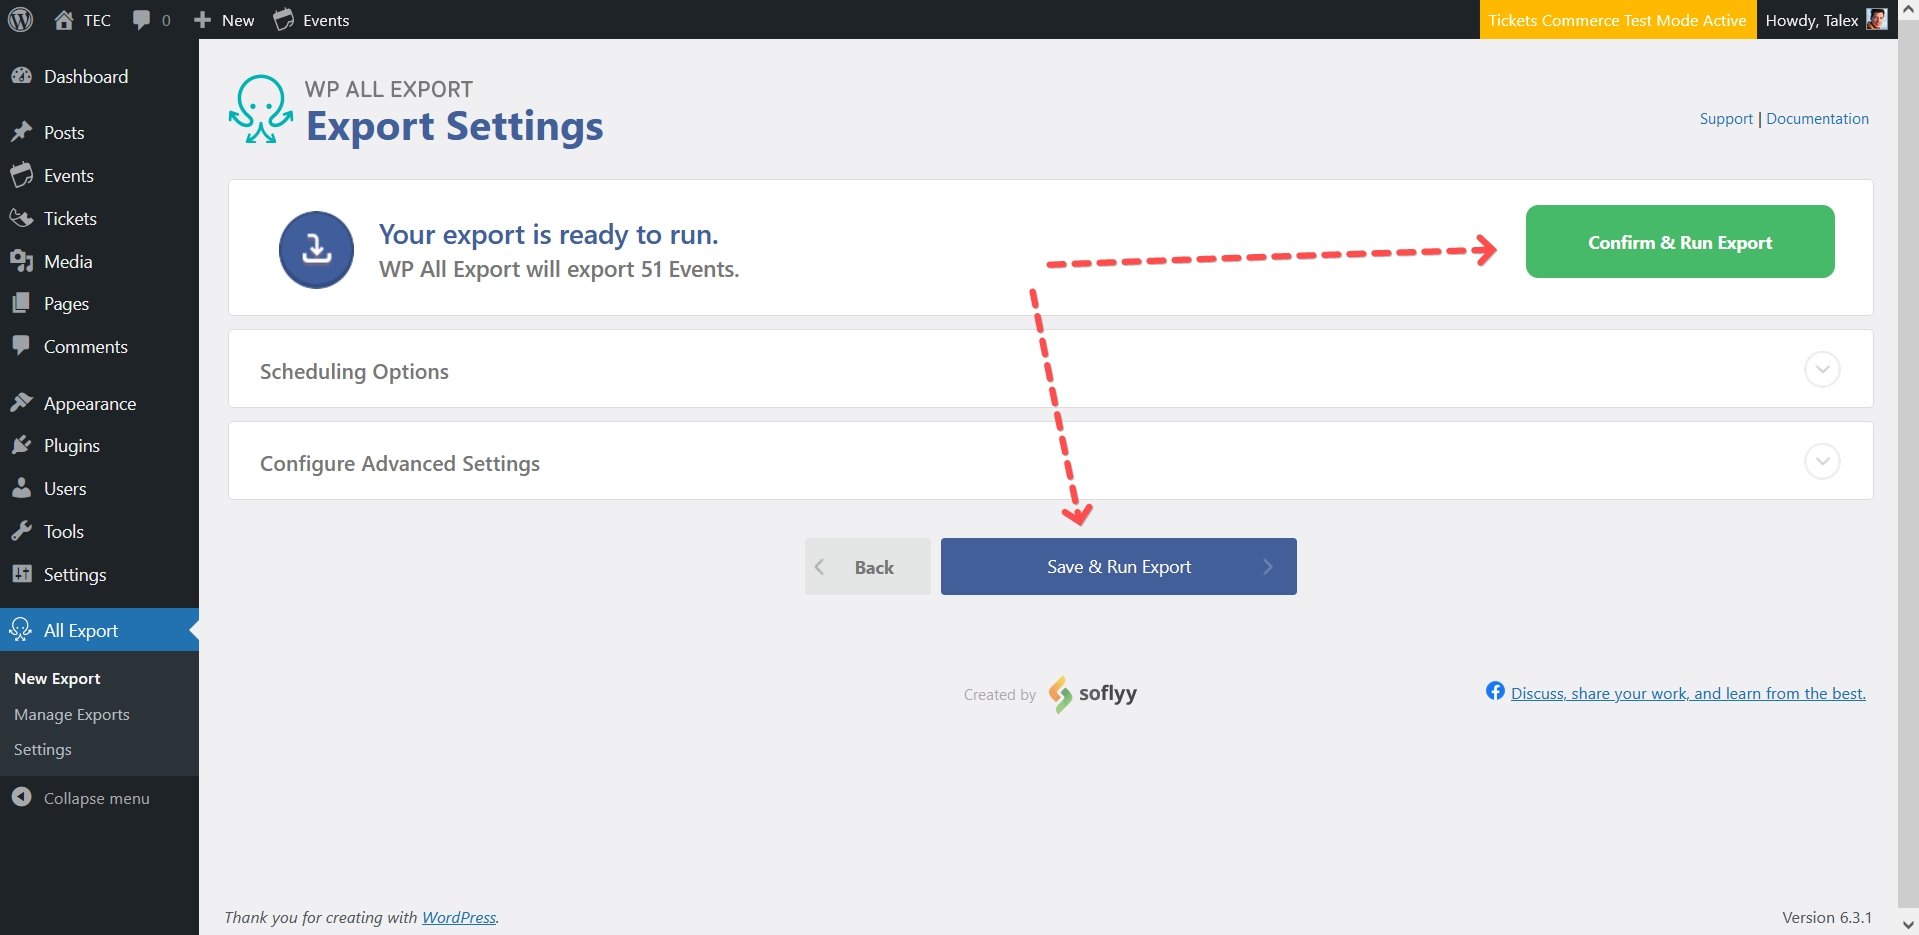
- On the Export Settings page, you can choose some advanced settings to customize your export further. These are mostly useful if you plan to run the export multiple times or regularly. For the migration to be successful, you don’t need to worry about these settings.
- To start the export, click on the green “Confirm & Run Export” button at the top right or the blue “Save & Run Export” button at the bottom of the screen. This will start gathering the data, which will then be packaged in a file for you to download.
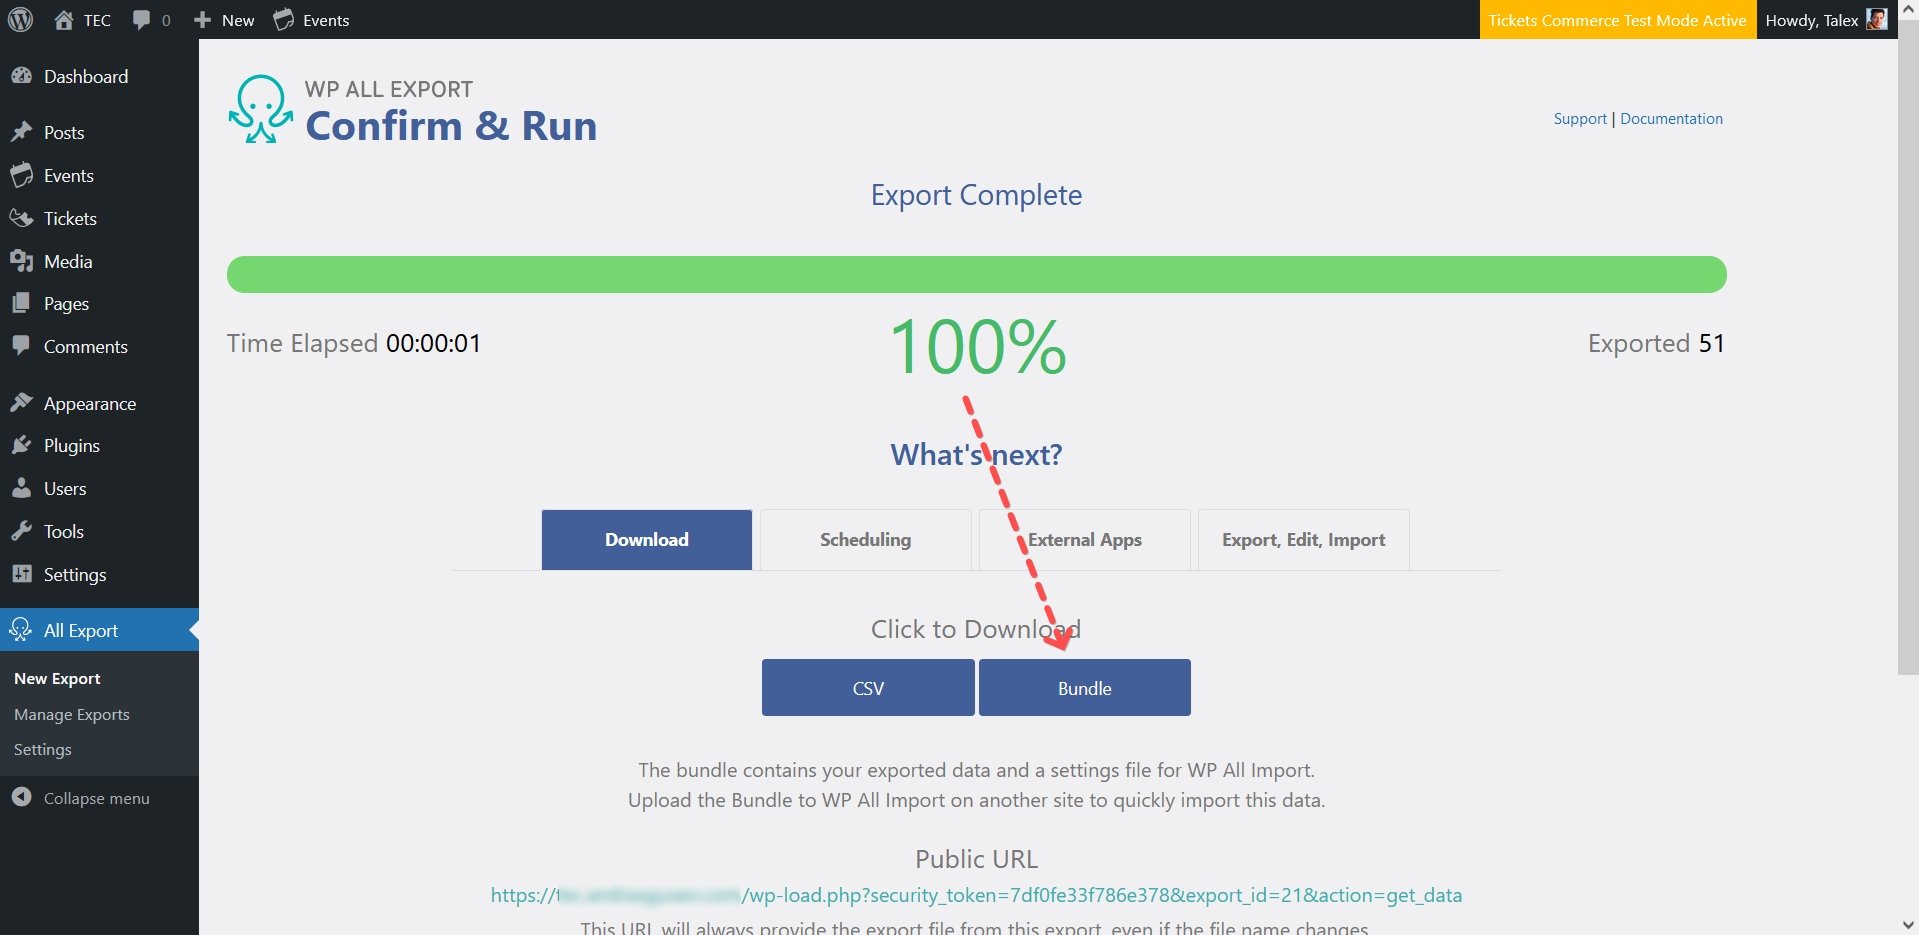
- When the export reaches 100%, you can download the exported data in two formats: a CSV file or a “Bundle” (a .zip file). You will need the bundle, so click on the blue “Bundle” button and save the offered .zip file to your PC.
The export for this post type is done. Repeat the above steps for all post types you would like to migrate.
Importing the data
We will assume that the Events Calendar, WP All Import Pro, and this extension are installed and activated on the destination site. For importing Series, Events Calendar Pro is needed as well.
When importing the different calendar and ticket data, pay attention to the order in which the different data types are imported. Please check the details in the “The order of import” paragraph above.
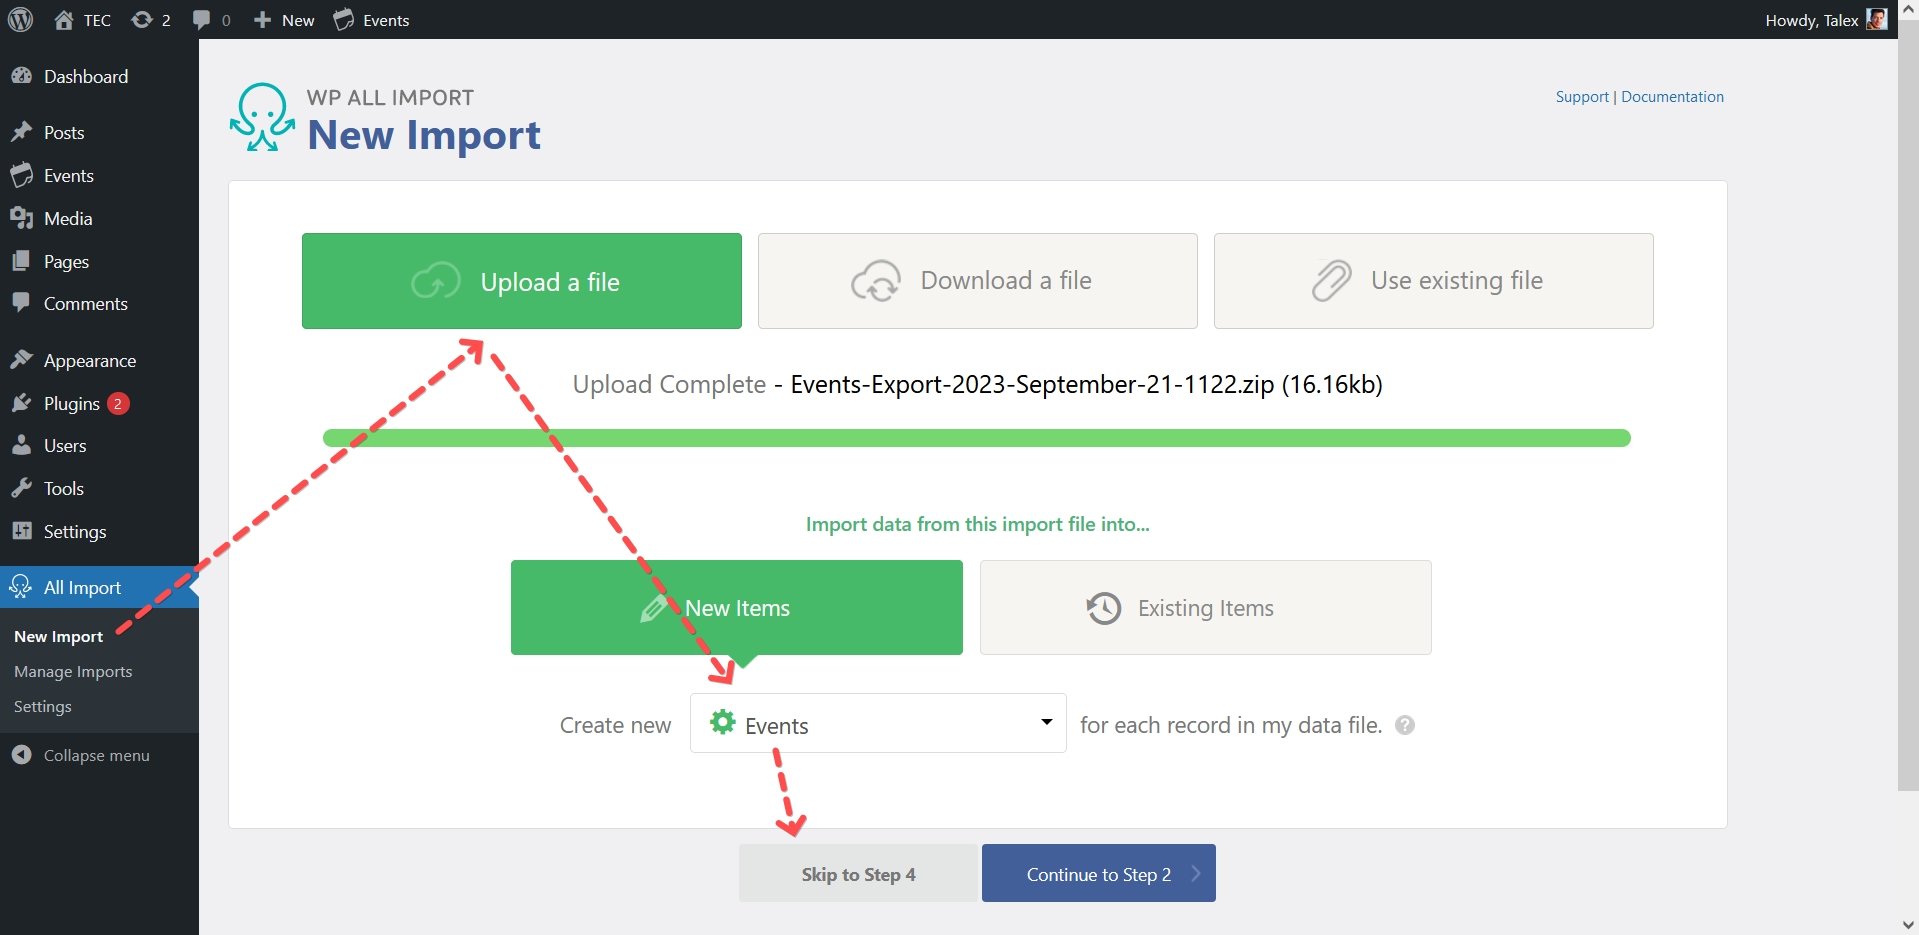
- On the WordPress dashboard, head over to All Import > New Import.
- Choose Upload a file and select the bundle .zip file you have downloaded before.
- If the file has been uploaded before and you are re-running the import, you can select “Use existing file” instead.
- This will upload the file, and WP All Import will try to select the right post type automatically.
If you don’t have the plugin activated, which handles the post type you are trying to import, then WP All Import will not recognize it, and you will not be able to select it from the dropdown. As a result, the import will not work as expected.
If you are importing a Series, then jump to the next section titled “Importing a Series” and continue with that.
- Click on the grey “Skip to step 4” button to go to the import settings page.
- Alternatively*, you can click on “Continue to Step 2” to review your import file. You have the possibility to filter which posts you would like to import.
- In Step 3, you can map the incoming data elements to the correct post fields.
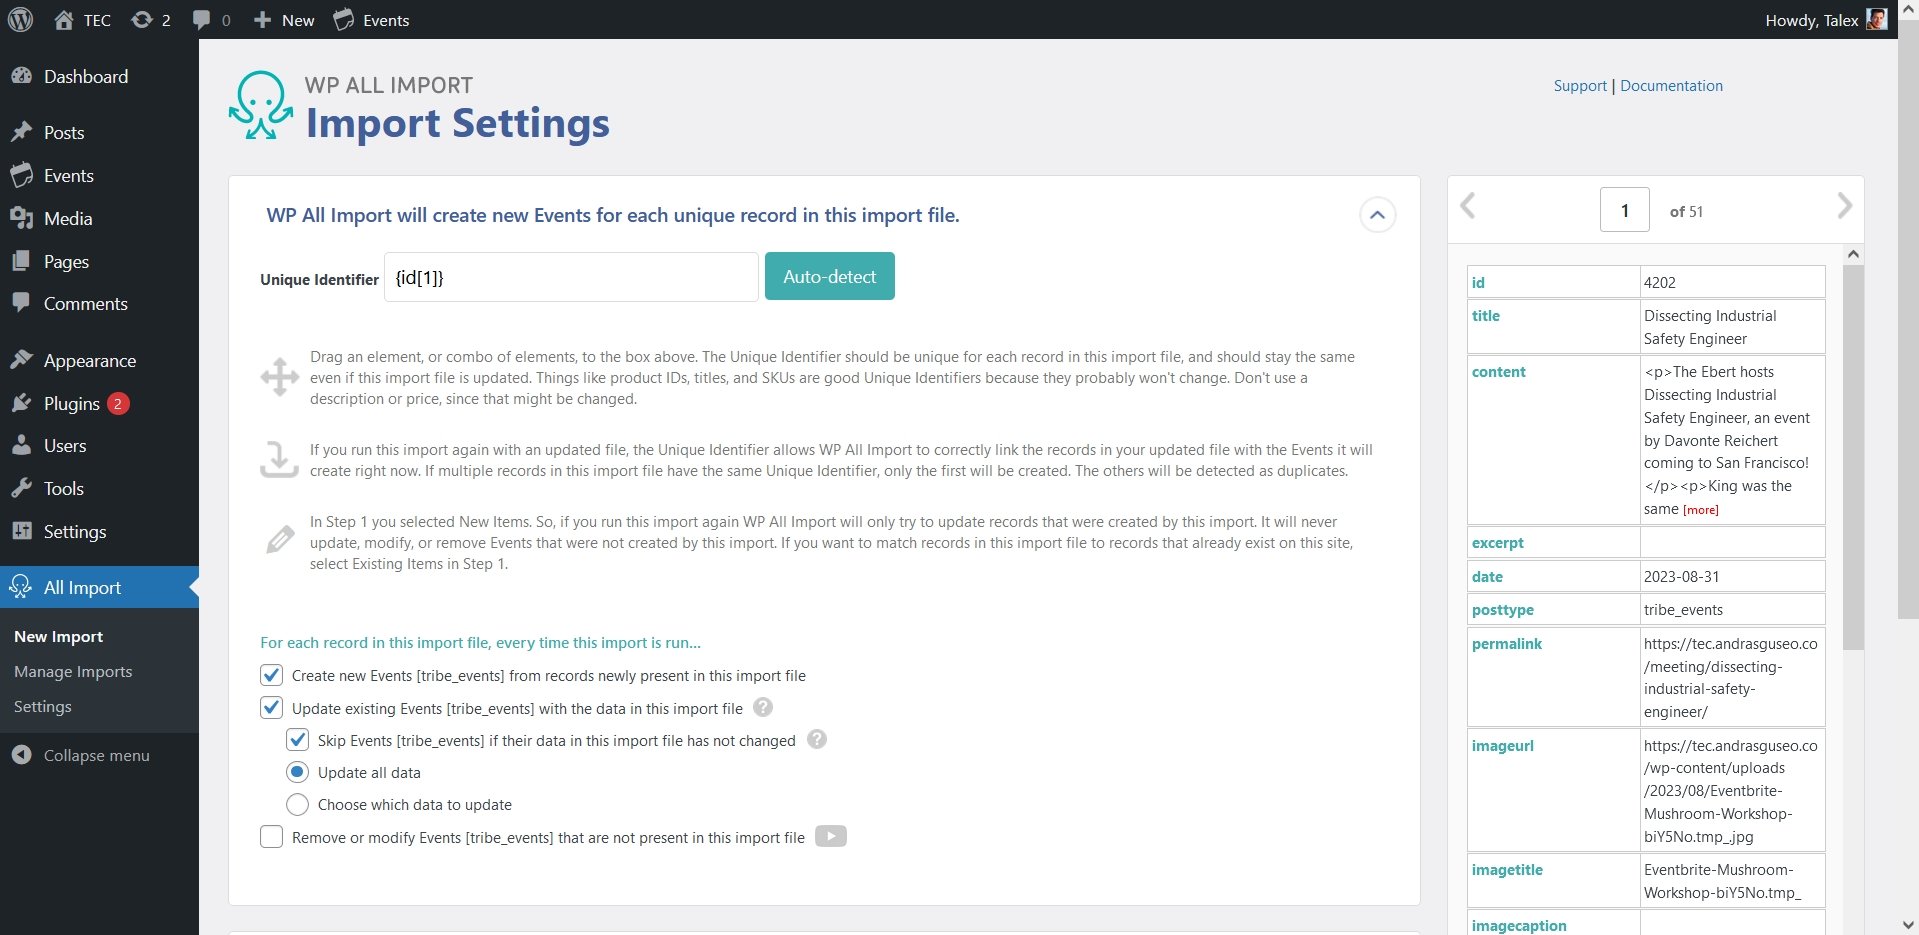
- On the Import Settings page, the most important part is the Unique Identifier field. This should already be automatically filled with “{id[1]}” to signal that the ID column has the unique identifiers for the posts.
There are some other settings on this page that you can use to fine-tune the import. If you want to import everything, there’s nothing more to do.
Click on the blue “Continue” button at the bottom to proceed to the confirmation page.
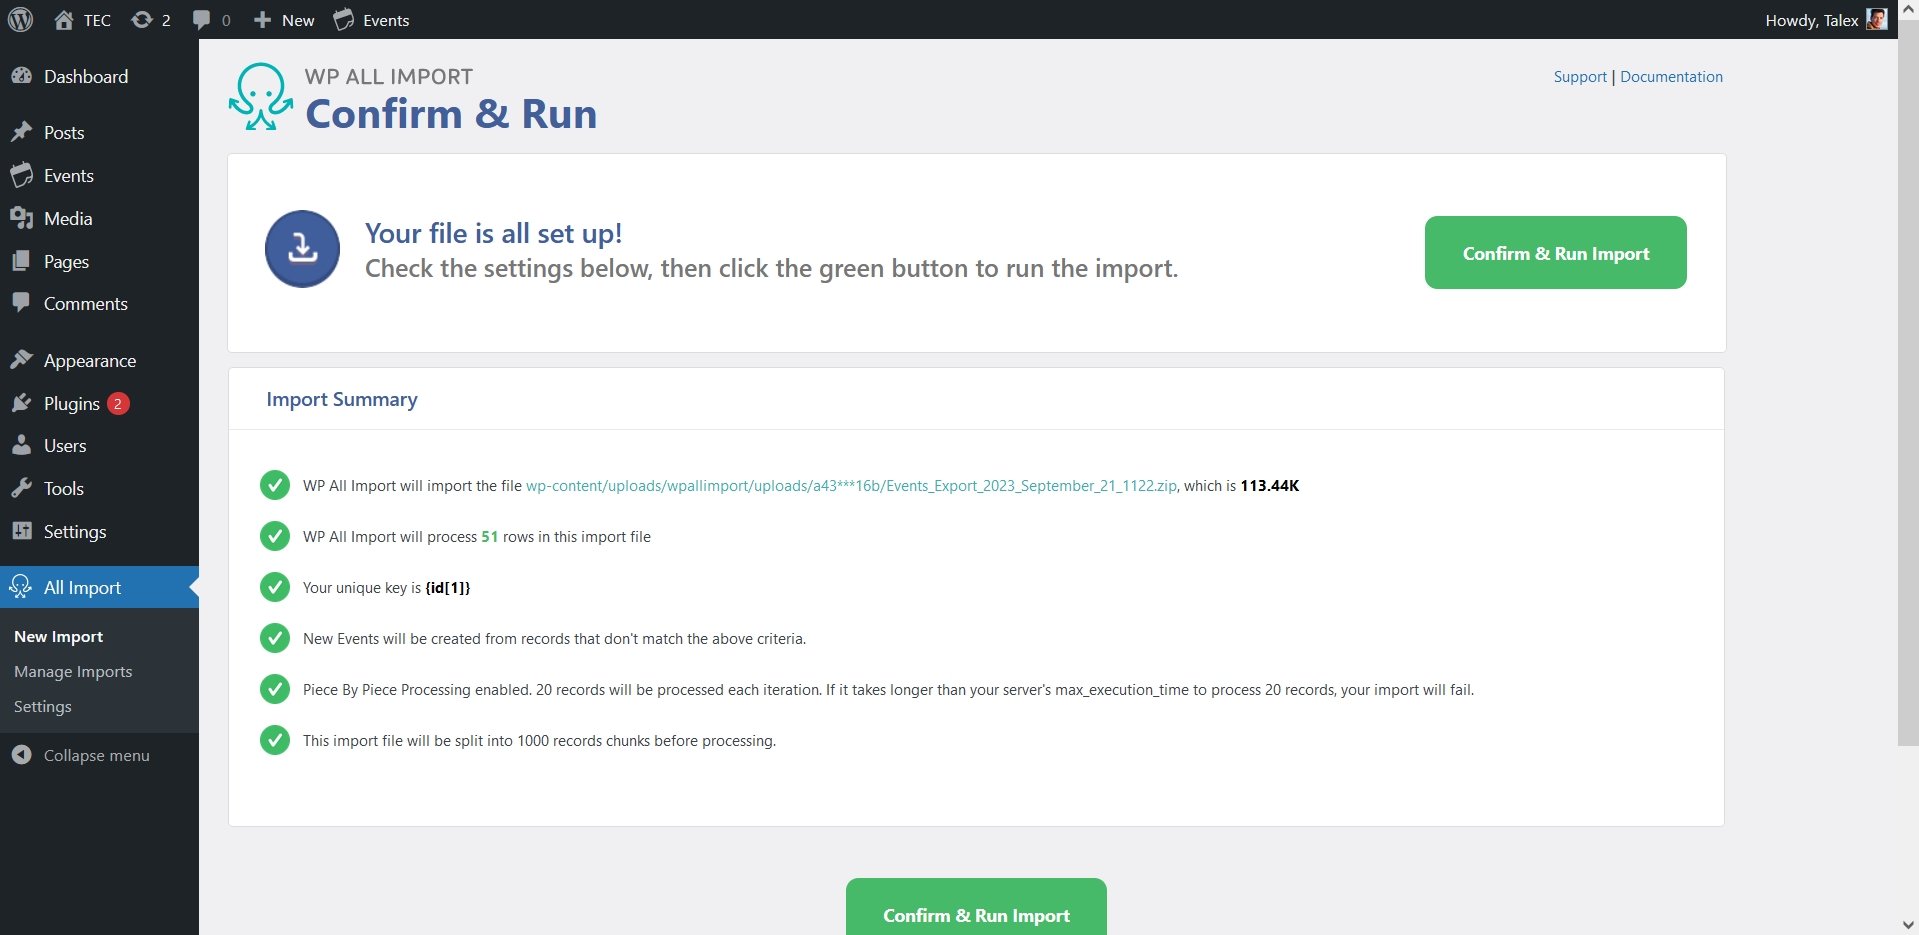
- On the confirmation page, you can double-check the import summary. If you find everything is in order, then click on the green “Confirm & Run Import” button.
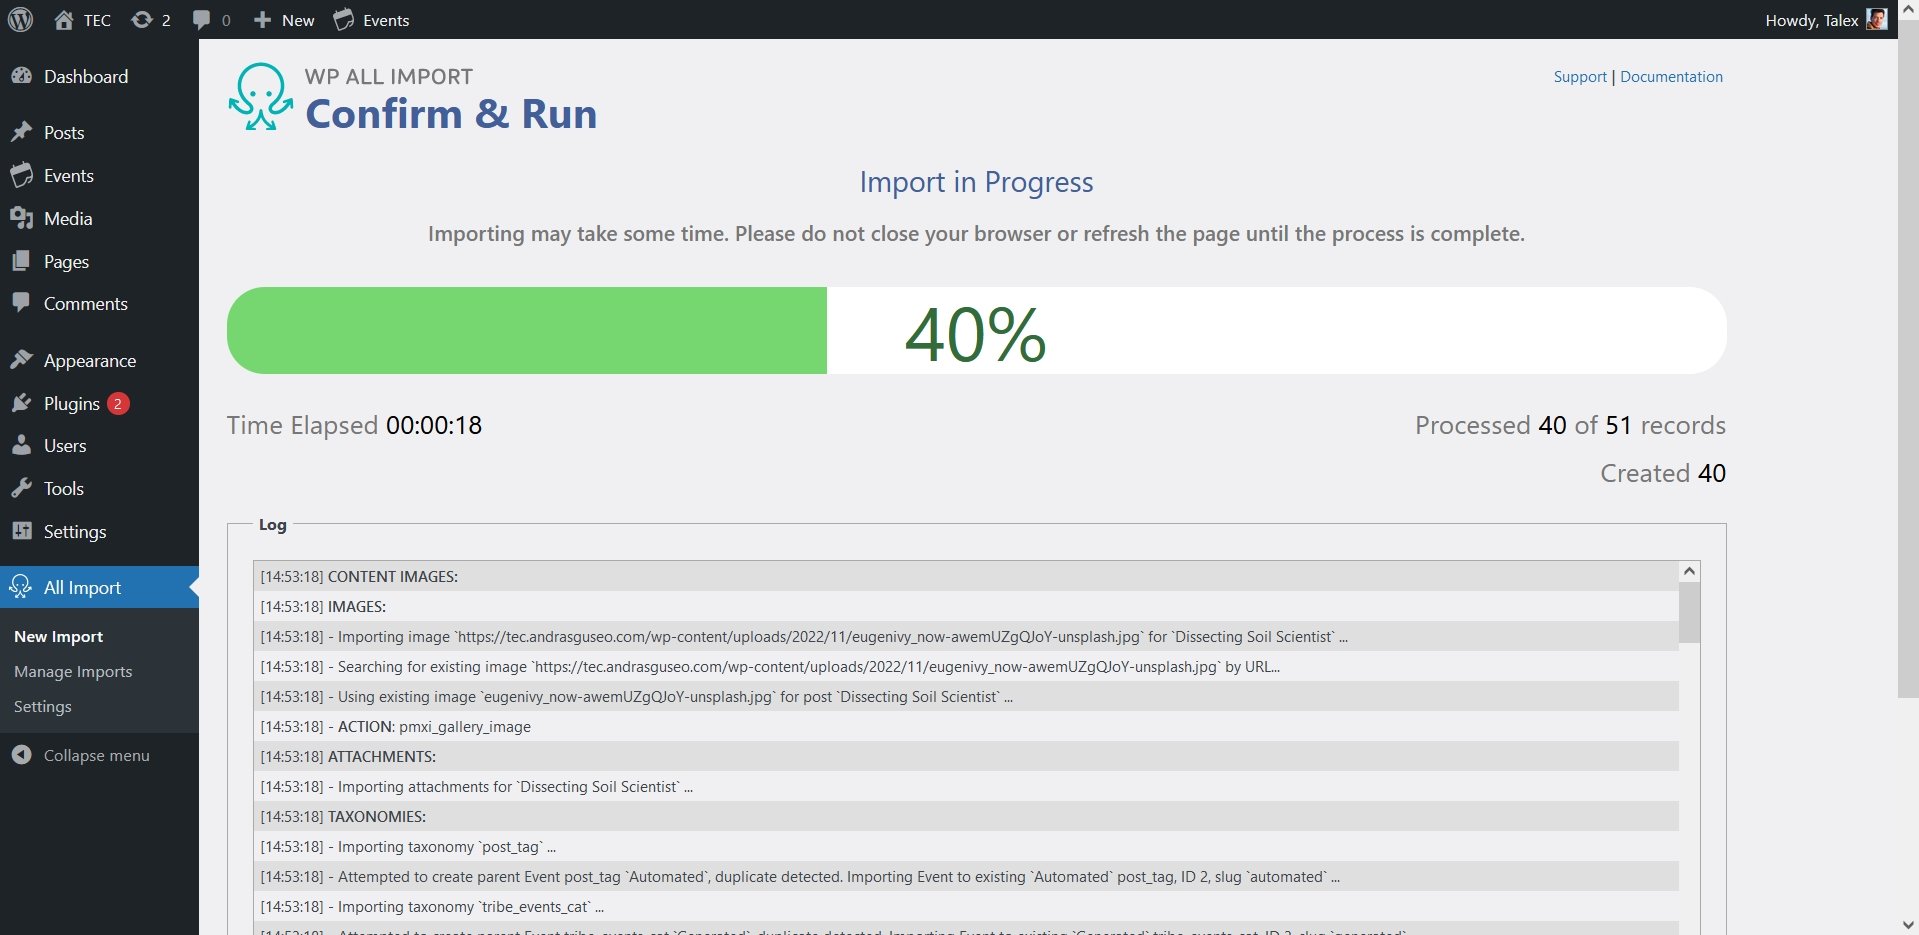
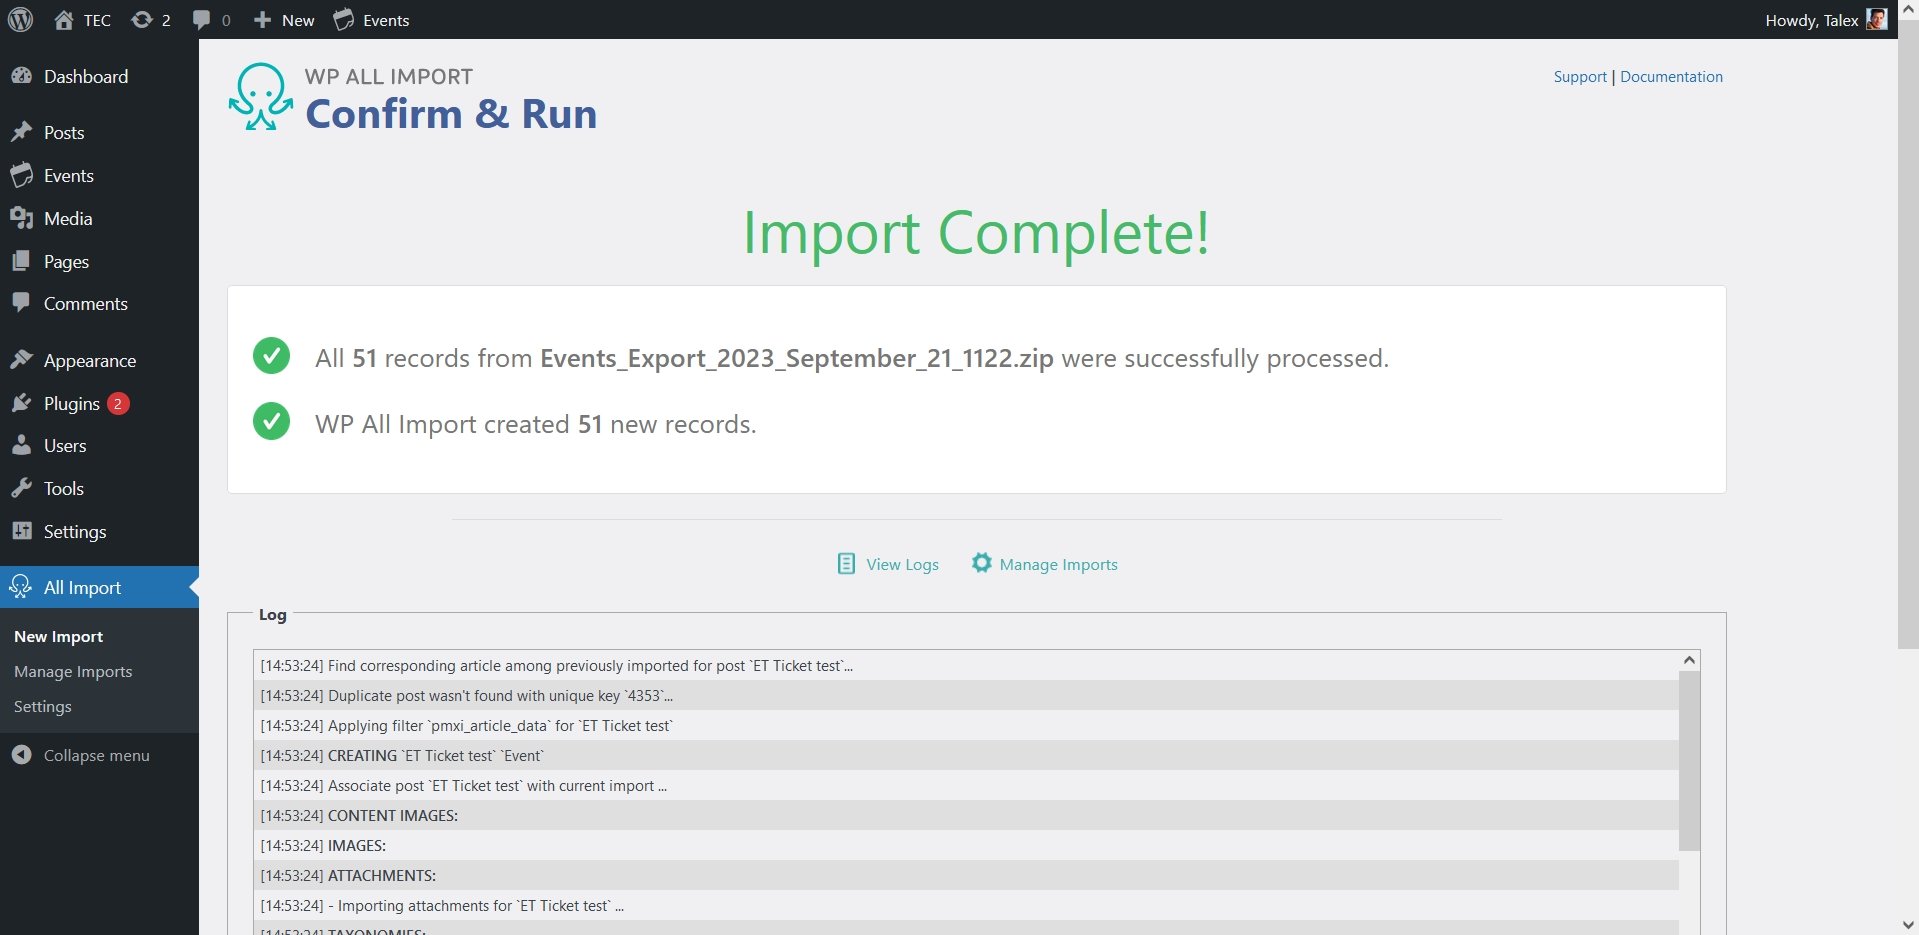
- On the next screen, you can follow the progress of the import. The import finishes successfully when you see “Import Complete!”
- To verify that your import succeeded, review the new events under Events > All Events.
The import for this post type is done. Repeat the above steps for all post types you would like to import, with attention to the order of the import.
* For more detailed information about how the export and import works with WP All Export/Import, visit their documentation.
Importing a Series
Follow the first 3 steps of the above “Importing the Data” section. Then continue here.
- After you uploaded the file click on “Continue to Step 2”.
- If you want to import all the data, you can click on “Continue to Step 3”.
- In this step we need to make sure that the post IDs connected to the Series are also correctly imported.
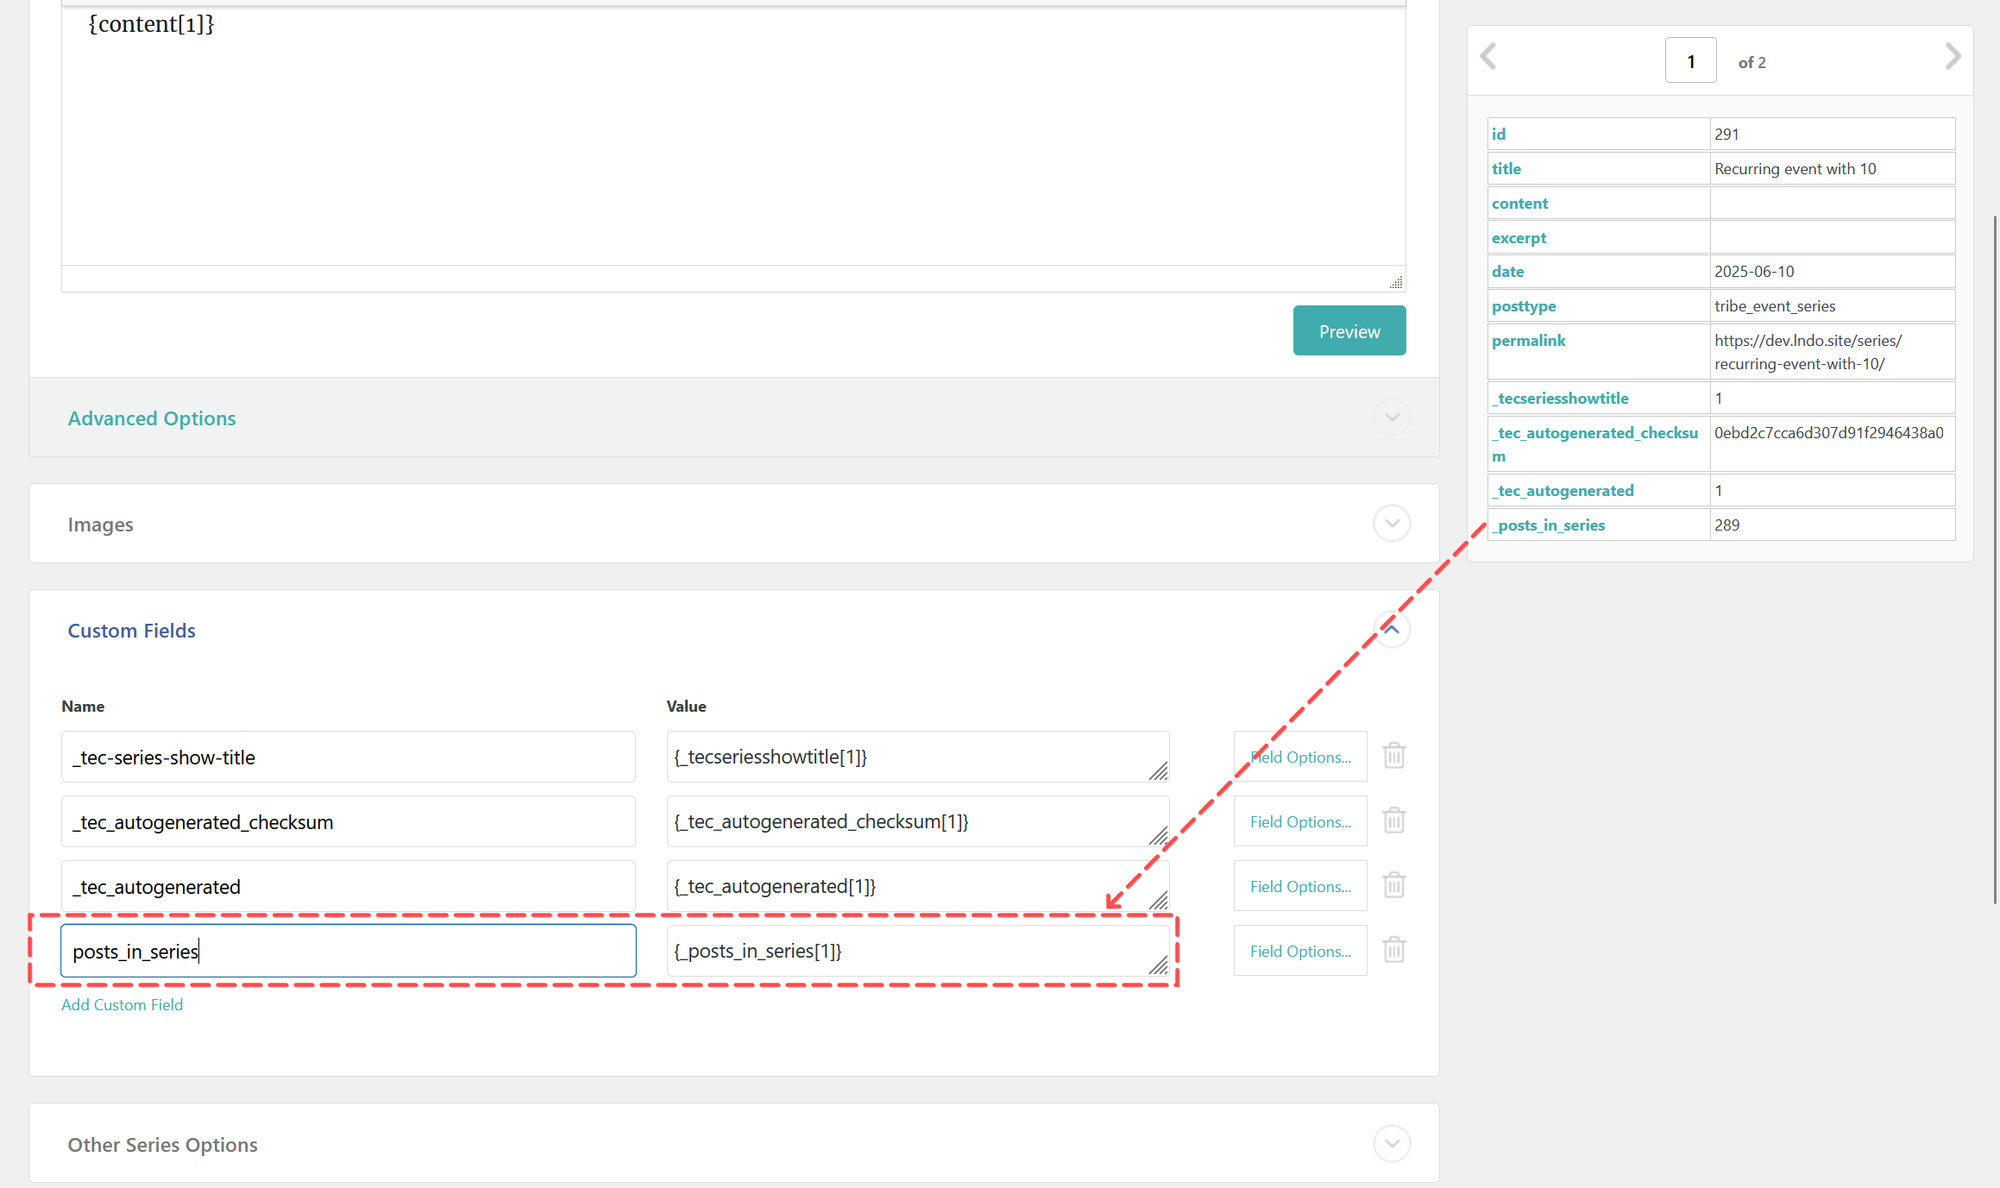
- Open the “Custom Fields” section and click on “Add Custom Field” at the bottom.
- Look for ‘posts_in_series’ In the right column, and drag and drop it into the “value” field. It should add the value
{posts_in_series[1]}.
- Look for ‘posts_in_series’ In the right column, and drag and drop it into the “value” field. It should add the value
- In the Name field enter
posts_in_series. - We’re done on this screen so click on “Continue to Step 4”
- Open the “Custom Fields” section and click on “Add Custom Field” at the bottom.
- In step 4 we need to make sure that the “Unique Identifier” field contains the right information.
- Clear the field.
- Drag and drop
idfrom the right column into the field. It should add the value{id[1]} - Click on “Continue”

From here we follow with Step 6 of the “Importing the data” section above and finish it up. Here are the steps again.
- (Step 6 above) On the confirmation page, you can double-check the import summary. If you find everything is in order, then click on the green “Confirm & Run Import” button.
- (Step 7 above) On the next screen, you can follow the progress of the import. The import finishes successfully when you see “Import Complete!”
- (Step 8 above) If all went well and the import finished you should have all Serieses imported and all recurring events assigned to them, as they were on the source site.
Logging
WP All Export/Import keeps a detailed log of its actions. The logs can be downloaded and reviewed after an import/export is done.
The Events Calendar also adds its own entries to the logs, which can provide information in case something doesn’t work out. These log entries are colored blue to make them stand out.
Advanced Topics, Hooks
Forcing the import when related post type is missing
There are post types that are linked to a different post type and would not work without them. For example, an RSVP attendee depends on the RSVP ticket and the Event (or post type) the RSVP ticket is linked to. If any of those are missing, the RSVP attendee will not be imported.
It is possible to override this behavior with a filter and force the RSVP attendees to be imported, even if the related ticket or event (post) doesn’t exist. To do that, you can use this filter.
apply_filters( 'tec_labs_wpai_force_import_' . $data['posttype'], false, $data, $import_id )where $data['posttype']is the post type we want to force-import.
As an example, for the abovementioned RSVP attendees post type, the snippet would look like this:
add_filter( 'tec_labs_wpai_force_import_tribe_rsvp_attendees', function() { return true; } );This will force all RSVP attendees that are missing a link to a ticket or event to be imported.
Keeping empty metadata
Post types can accumulate a lot of metadata, and some of those might have empty values. During import, the empty metadata will be skipped to minimize unnecessary data.
There are two ways to override this.
Force all
With the following filter, you can force all empty metadata to be imported.
apply_filters( 'tec_labs_wpai_keep_empty_meta', false );A snippet that would go into your functions.php file looks like this:
add_filter( 'tec_labs_wpai_keep_empty_meta', function() { return true; } );Force selected
There’s also a filter that lets you define the meta keys you would like to keep when they have an empty value. It accepts an array of meta keys.
apply_filters( 'tec_labs_wpai_keep_post_meta_meta_keys', $keep_post_meta_meta_keys );The snippet would look like this:
add_filter( 'tec_labs_wpai_keep_post_meta_meta_keys', 'tec_wpai_keep_empty_meta_keys' );

function tec_wpai_keep_empty_meta_keys( $keep_post_meta_meta_keys ) {
    $keep_post_meta_meta_keys = [
        'my_custom_meta_key_1',
        'my_custom_meta_key_2',
    ];

    return $keep_post_meta_meta_keys;
}
Mismatching post type
When importing a post type, WP All Import allows you to import it as a different post type. For example, you can export the “posts” post type from one site and import them as “pages” post type on another site.
This is not allowed by default with The Events Calendar and Event Tickets-related data. However, it can also be overridden with a filter.
If you add the following line to your functions.php file, you will be able to import events and ticket-related post types as something else. Note, this only affects post types of The Events Calendar and Event Tickets. It does not have any effect on other post types.
add_filter( 'tec_labs_wpai_delete_mismatching_post_type', function() { return false; } );Setting a default post type
Since version 1.1.0
There’s also a possibility to change the default post type with the following snippet.
add_filter( 'tec_labs_wpai_default_post_type', static function() { return 'my_custom_post_type'; } );Keep in mind, the post type has an effect on the tec_labs_wpai_force_import_' . $data['posttype'] filter.
Changelog
- 1.2.0
- July 3, 2025
- Version – Events Calendar Pro 7.6.1 or higher is required for the migration of Series.
- Feature – Add support for Event Series and Recurring Events.
- Fix – Ensure other non-TEC post types can be imported when the extension is active.
- Deprecated – Deprecated the
tec_labs_wpai_is_post_type_setfilter without replacement.
- 1.1.0
- September 12, 2024
- Feature – Add the
tec_labs_wpai_is_post_type_setfilter to allow force importing when the post type is not defined in the source. - Feature – Add the
tec_labs_wpai_default_post_typefilter to allow changing the default post type used, in case it is missing from the source. - Tweak – Add more details to some log messages.
- Tweak – Adjust error logging to better handle special characters in log messages. (Props to Rob Gabaree.)
- 1.0.0
- October 17, 2023
- Initial release