The attendee list is the central reporting view for all ticket purchases and RSVP registrations across your events, pages, or posts. This article covers how to access the attendee list, navigate it, manually add or edit attendees, handle check-ins, export and filter the data, and let attendees edit their own information from the frontend.
For the order lifecycle that generates these attendee records — how orders are created and completed, how to issue refunds, and the full order status reference — see Managing Orders.
Accessing the Attendee List
👋 Note: With the Seating add-on, you manage attendees on the Attendee list, but you manage seat assignments on the Seats tab for each event.
Accessing Attendees Across All Events
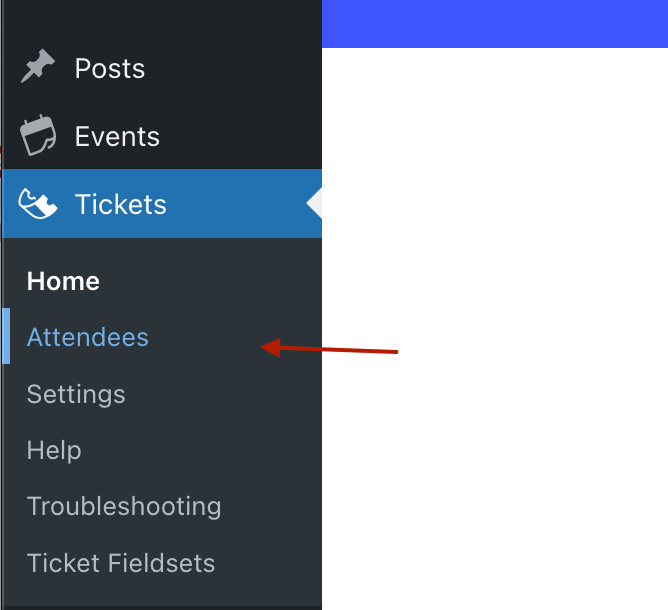
The global attendees list is available from Tickets → Attendees.
Accessing Attendees for a Specific Event, Page, or Post
Hover over an event, page, or post in your WordPress admin and click the Attendees link:

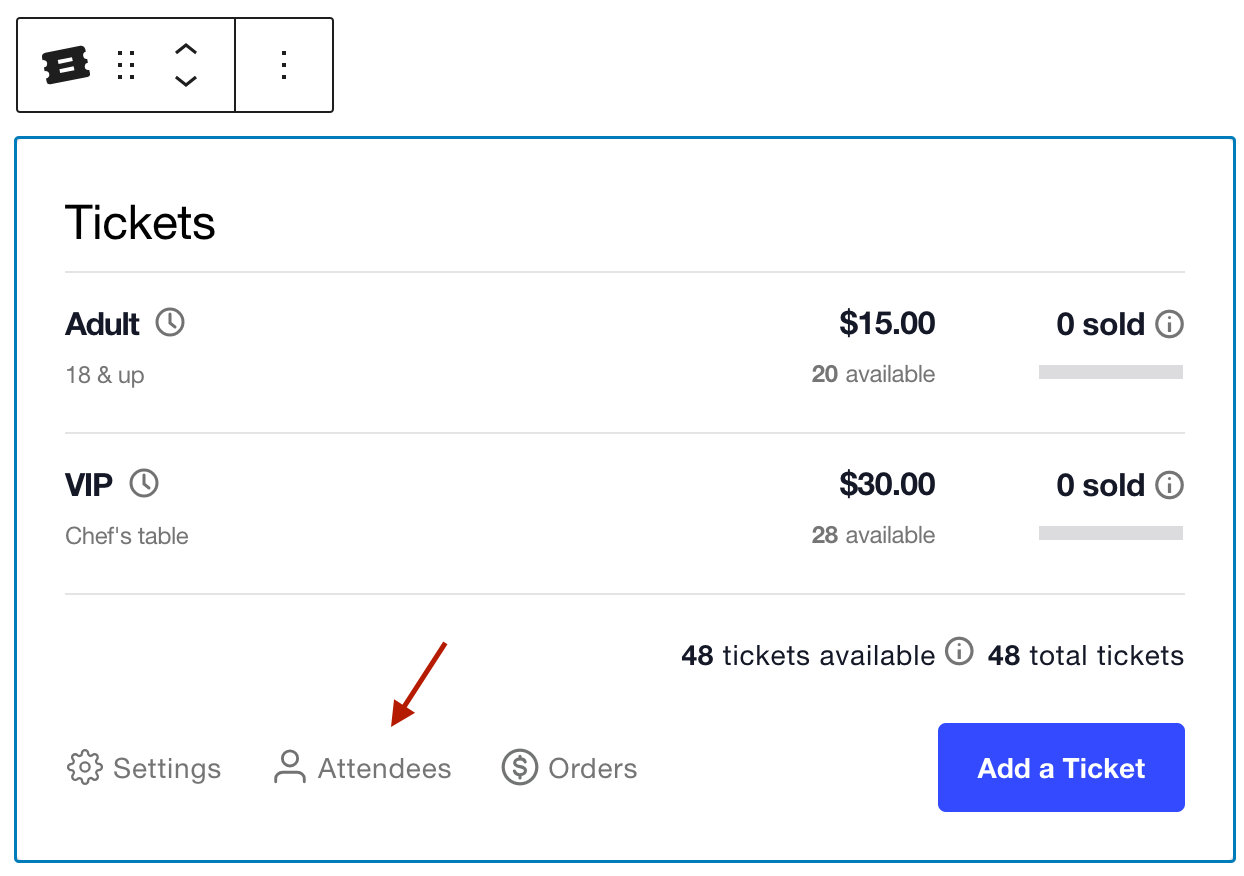
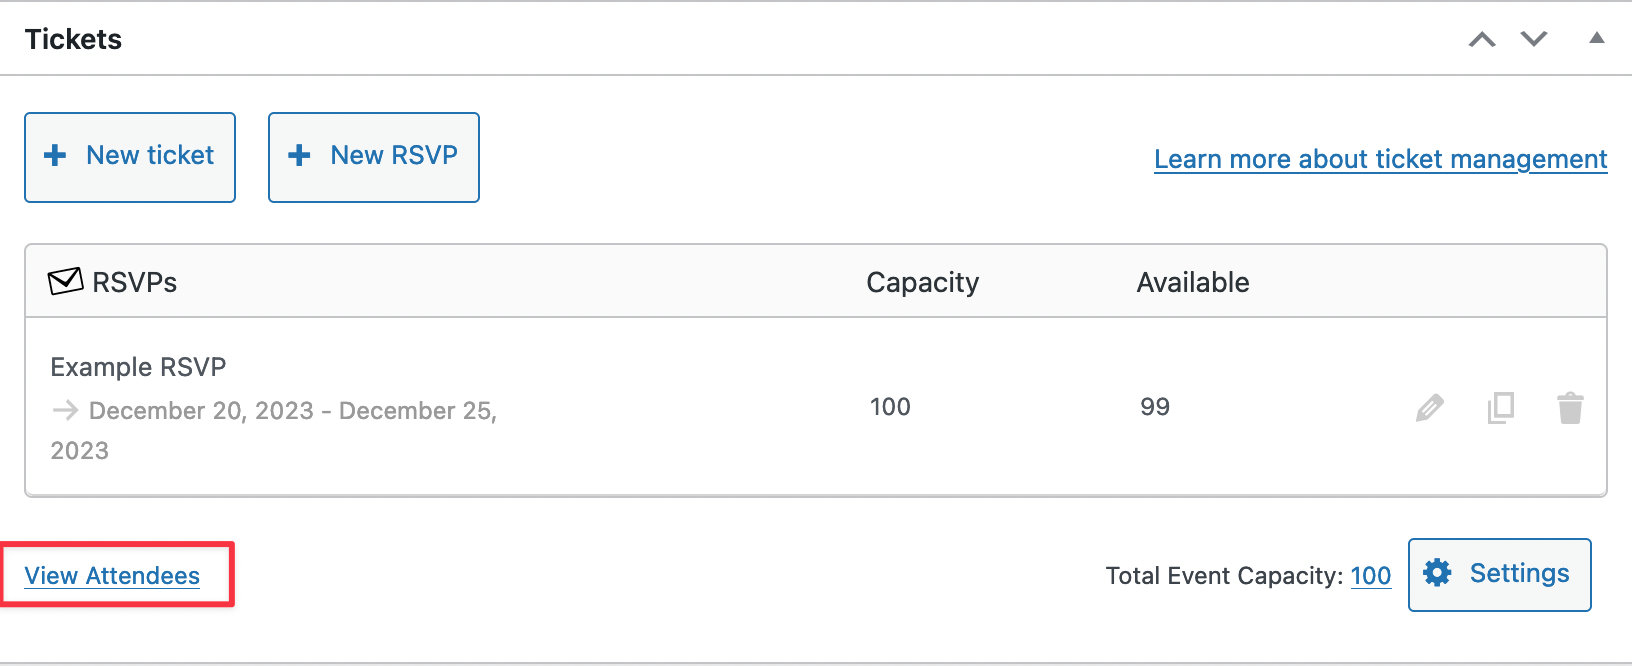
Or click the Attendees link in the ticket form of the Block Editor, or the View Attendees link in the Classic Editor:
Or click the Attendees link in the WordPress admin toolbar when viewing the event on your site:

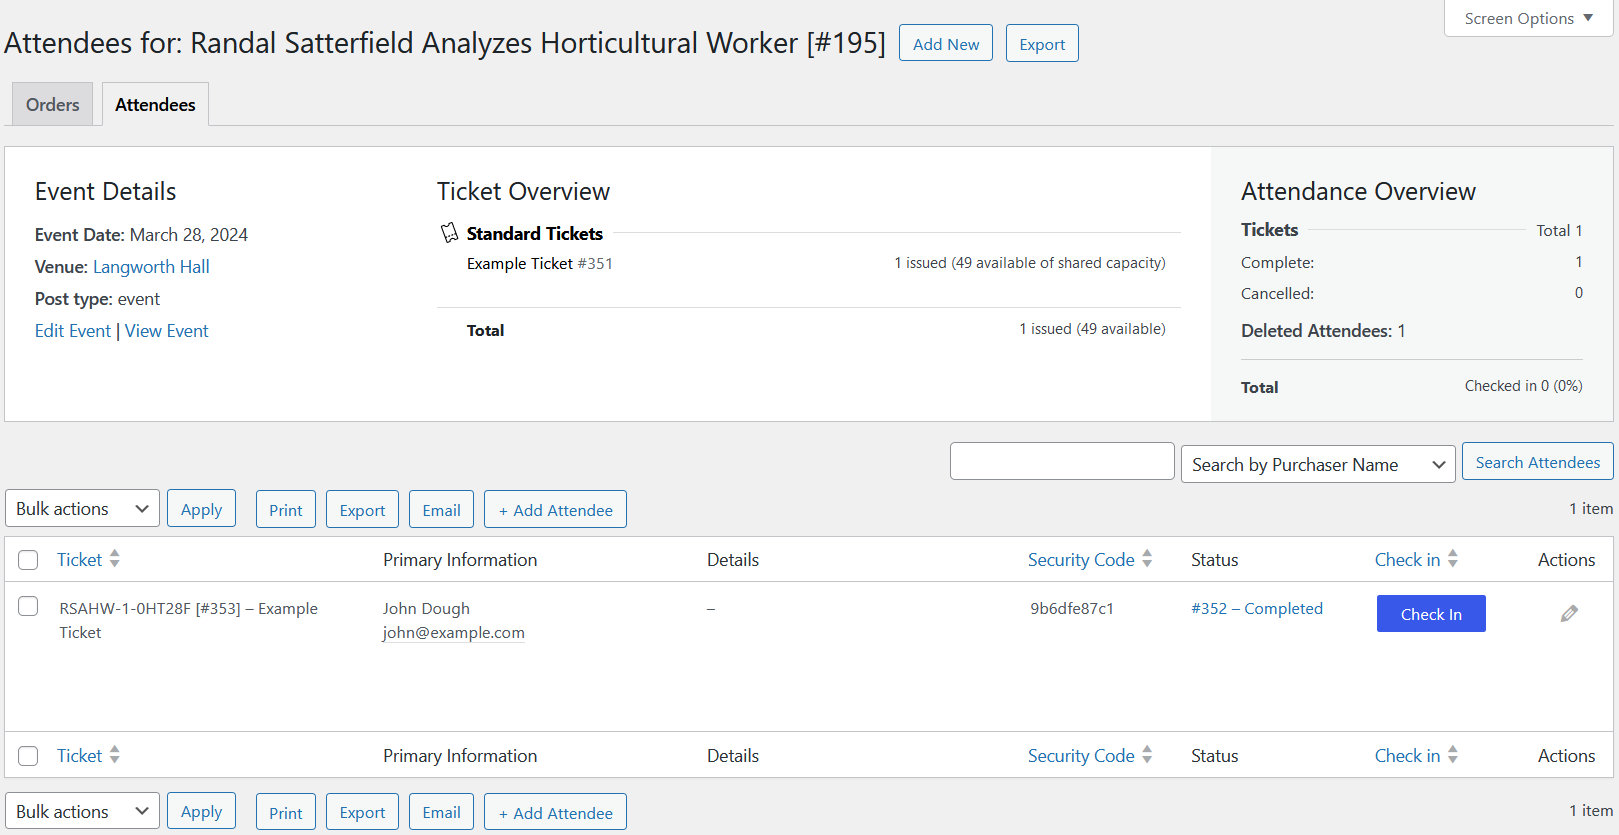
Any of these methods opens the attendee list, showing purchaser name, email, ticket ID, and a unique ticket security code:
Viewing Attendee Registration Information
To view attendee data, click the attendee’s name in the attendee list:
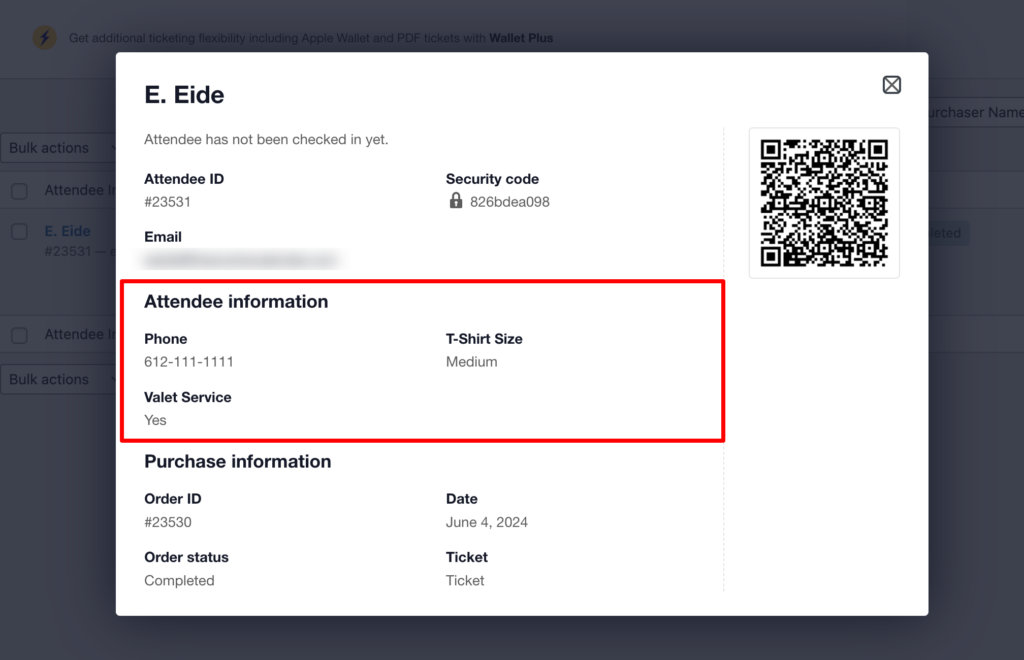
In this example, customers were asked for their phone number, T-shirt size, and whether they require valet service.
Filtering the Attendee List
For large events, the filtering options help narrow down the list:
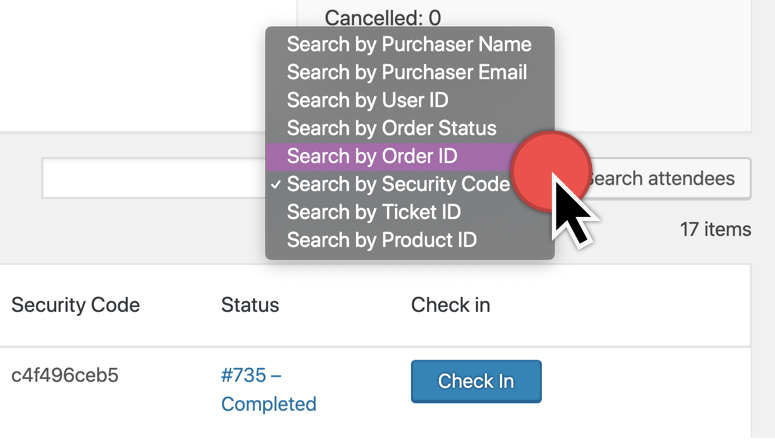
Type a ticket number (or the start of one) and the list filters to matching results. You can also filter by order number, security code, order status, purchaser name, purchaser email, or product ID.
Order Status search requires the exact status slug. See the Order Status Reference in Managing Orders for the full list of slugs by provider.
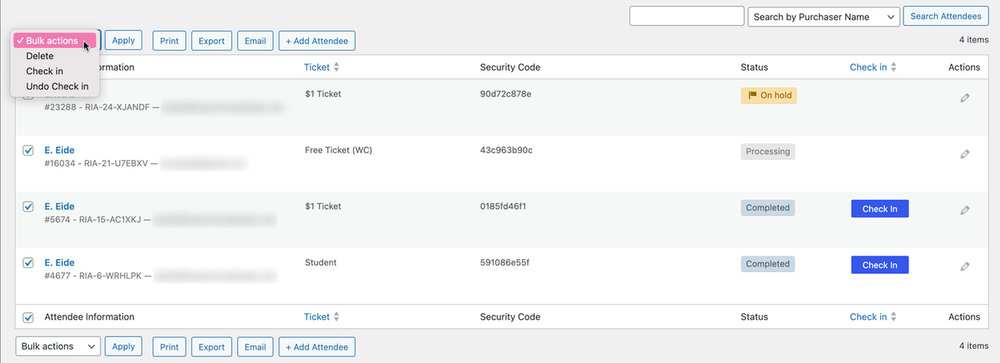
Bulk Actions
Like other WordPress admin pages, the attendee list has bulk actions. You can check in many tickets at once, reverse a check-in, delete entries, or move attendees/RSVPs to another event. Check the relevant rows, choose an action from the Bulk Actions menu, and click Apply.
Exporting Attendee Data
You can extract attendee data via print, CSV export (easy to import into a spreadsheet), or email. The buttons are at the top and bottom of each attendee list.

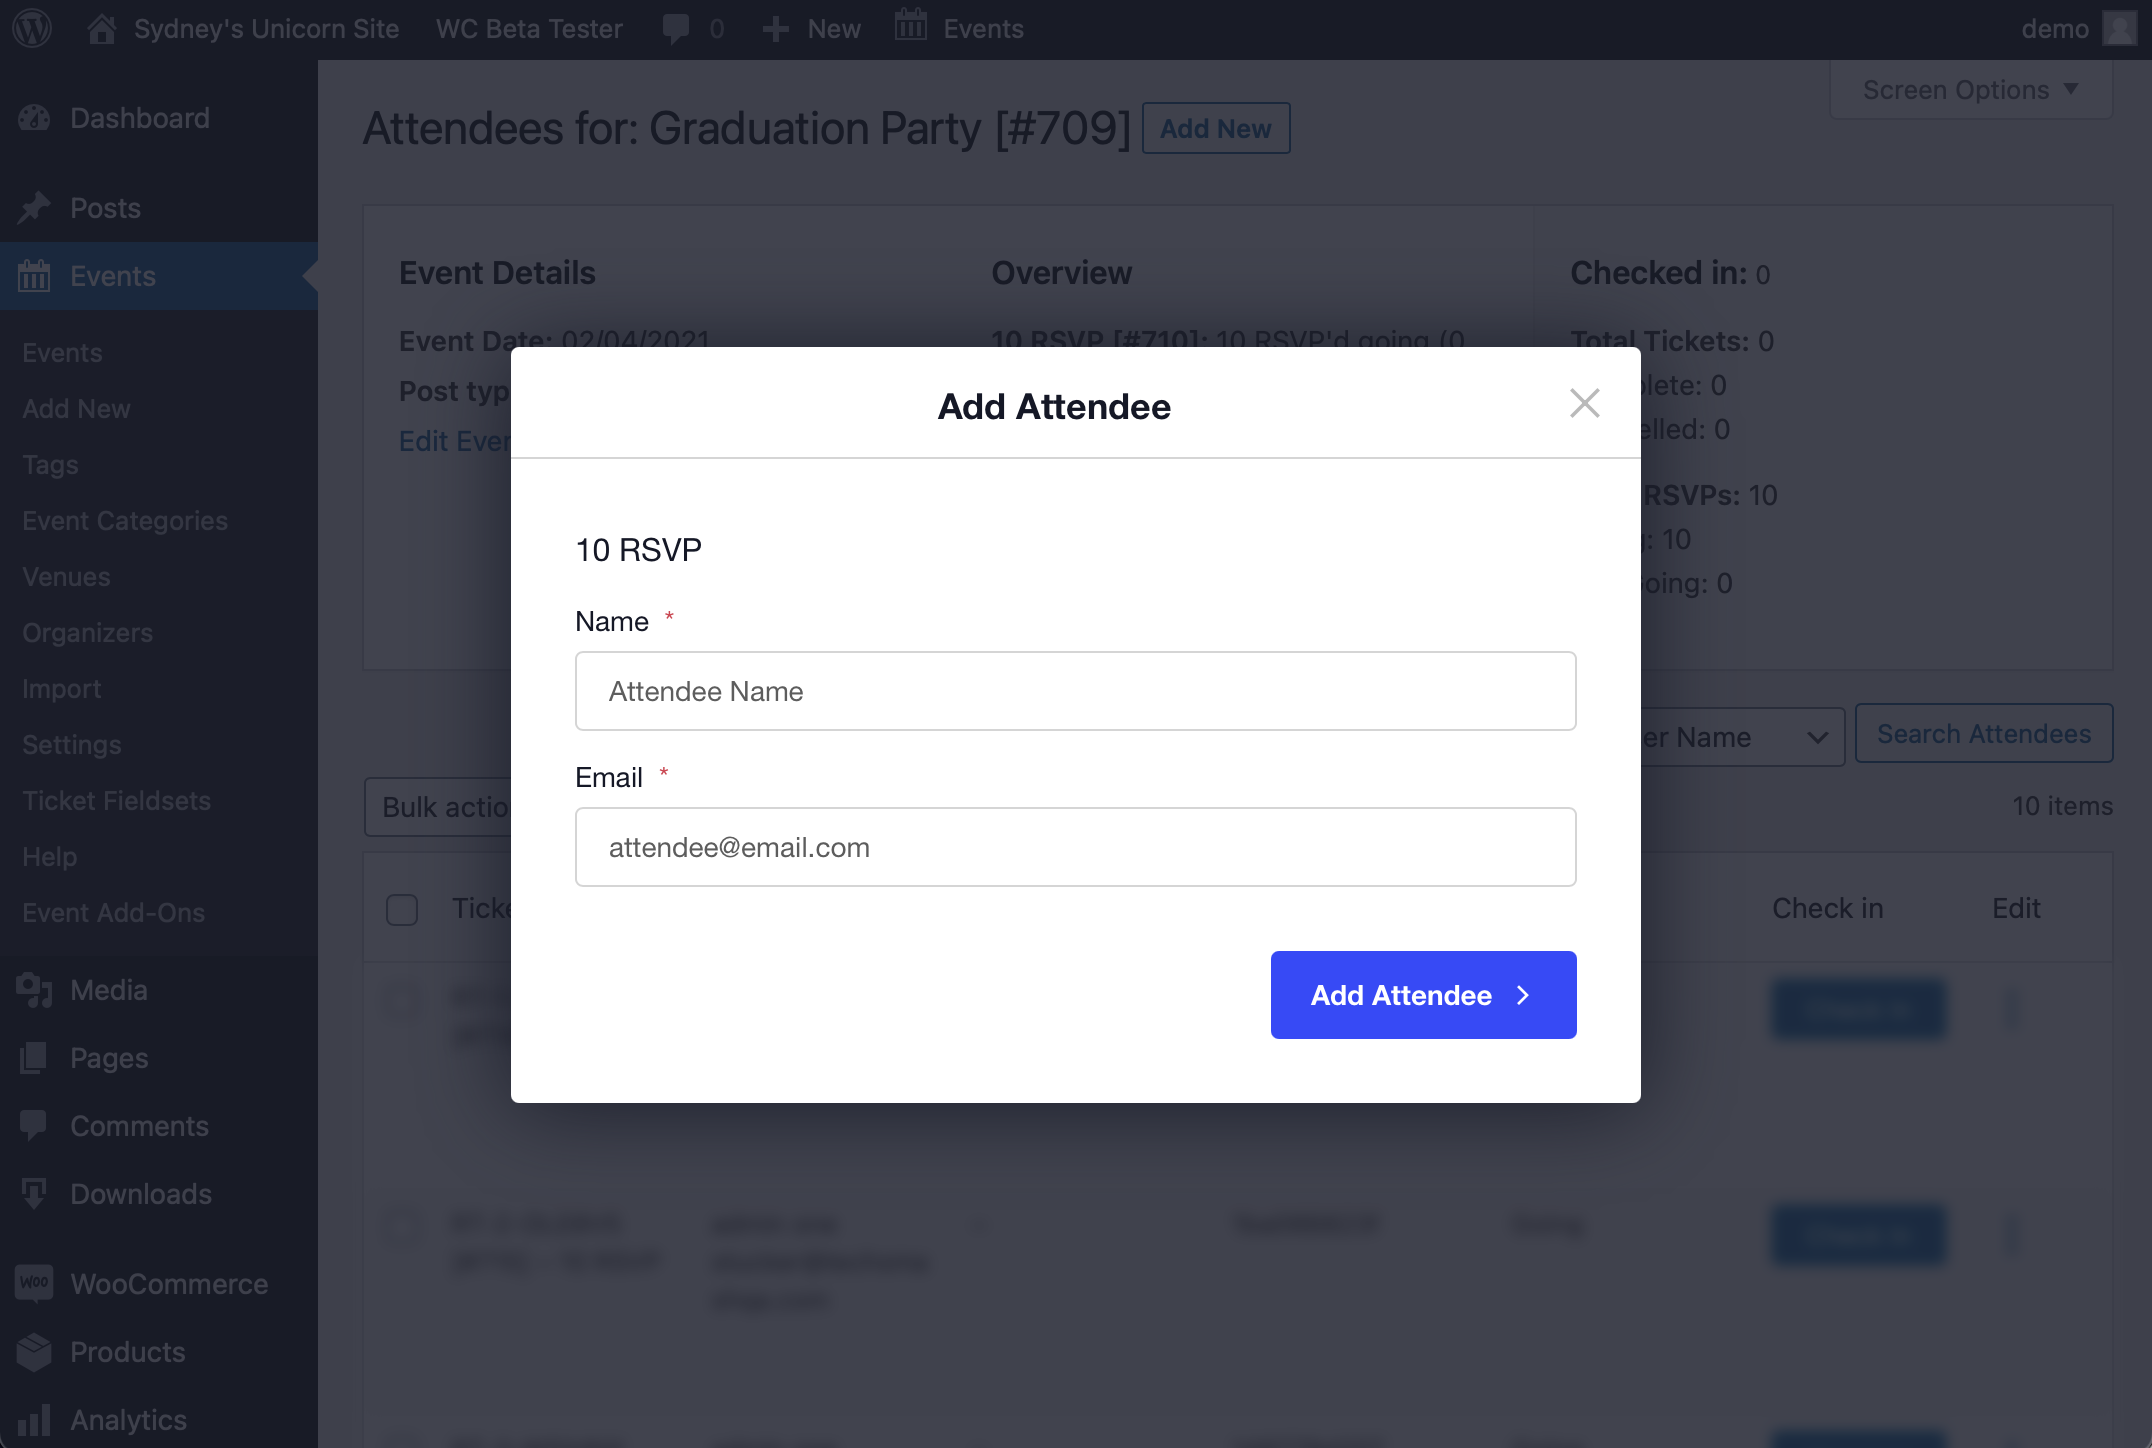
Adding Attendees
Sometimes you need to add an attendee manually — someone who’s having difficulty registering, a comp, or a guest who doesn’t need to go through the registration process at all.
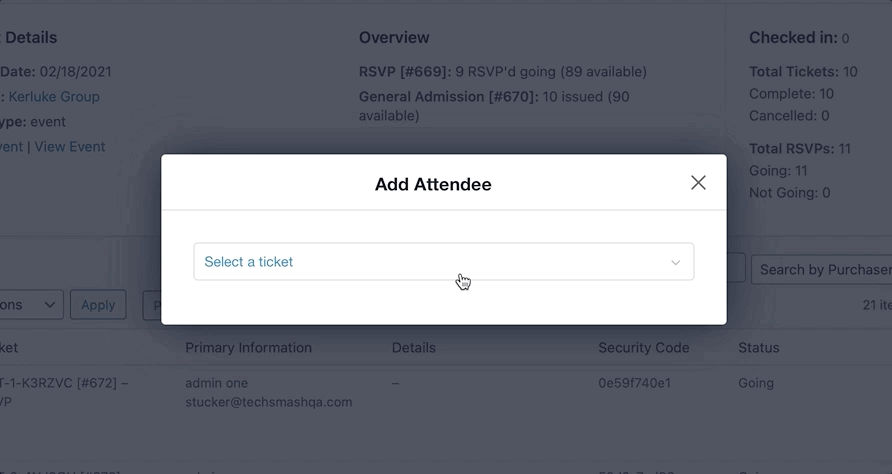
From the attendee list, click the Add Attendee button above the list. A modal appears where you can enter the attendee’s details.
Adding an Attendee to an RSVP
Fill in Name and Email Address.
👋 Note: “Going” is the only RSVP response available when manually adding an attendee. “Can’t go” is not selectable, even if it’s enabled for the RSVP.
Adding an Attendee to a Ticket
Assigning an attendee to a ticket works the same way as an RSVP. The modal also shows how many tickets remain for that specific ticket type.

👋 Note: Manually-added attendees are not charged the ticket price. If you need to collect payment, either complete the registration process for them on your site or handle payment separately.
Adding an Attendee to a Seated Ticket
- Go to the Attendees tab and add the attendee there.
- Navigate to the Seats tab to locate the attendee you just added.
- Click Assign Seat and choose a seat from the available options.
👋 Note: Changing an existing seat assignment is done from the Seats tab. See Using Seating with Event Tickets for details.
Handling Multiple RSVPs and Tickets
If an event has both an RSVP and a ticket form, or multiple ticket types, the Add Attendee modal lets you select which one the attendee should be added to. Every RSVP and ticket associated with the event appears as an option.
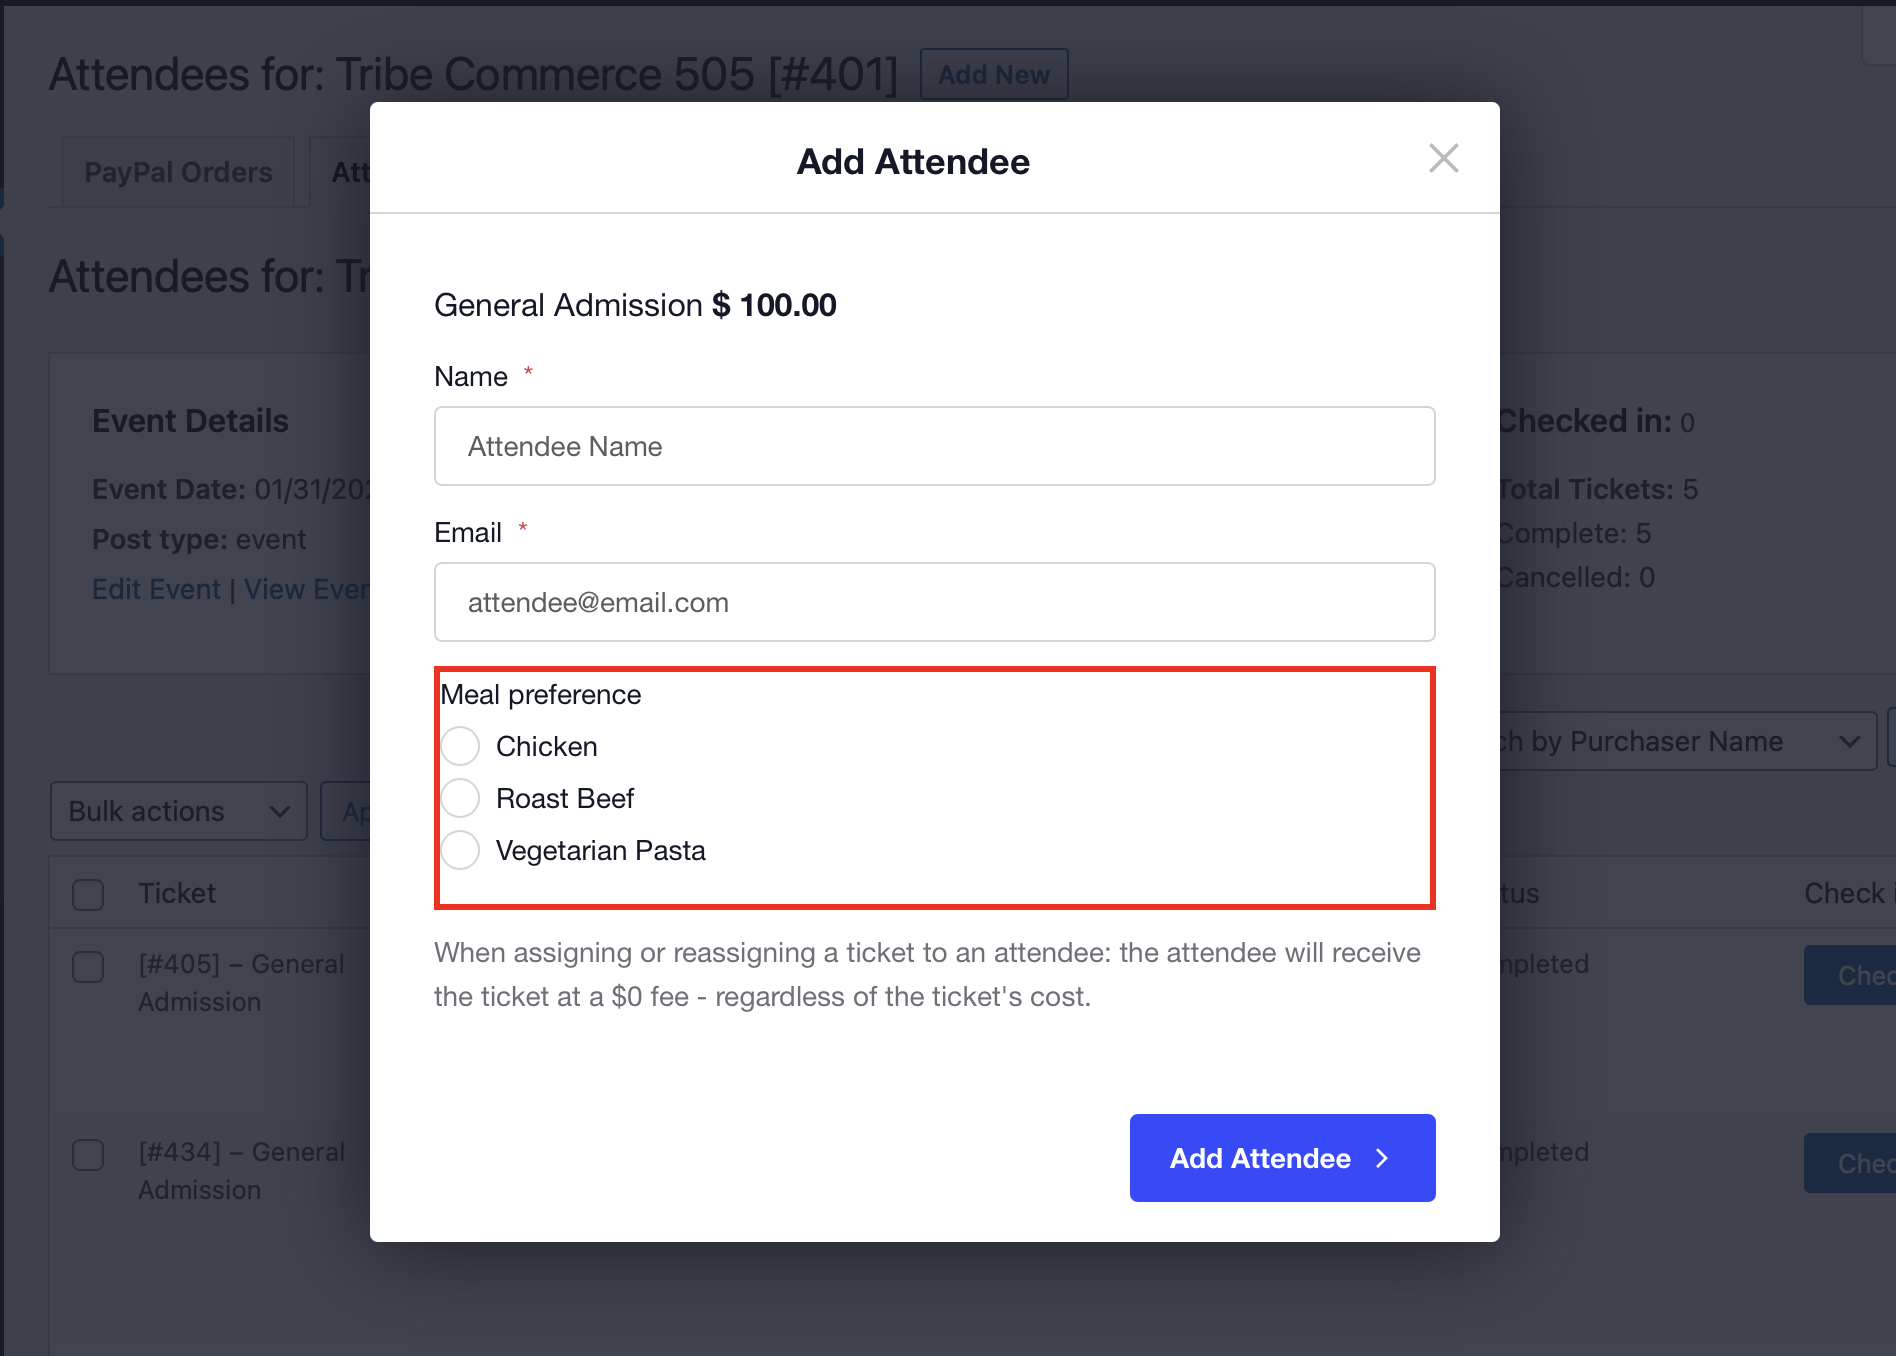
Custom Registration Fields
If you’re using Event Tickets Plus and have created custom registration fields for a ticket or RSVP, those fields appear in the Add Attendee modal.
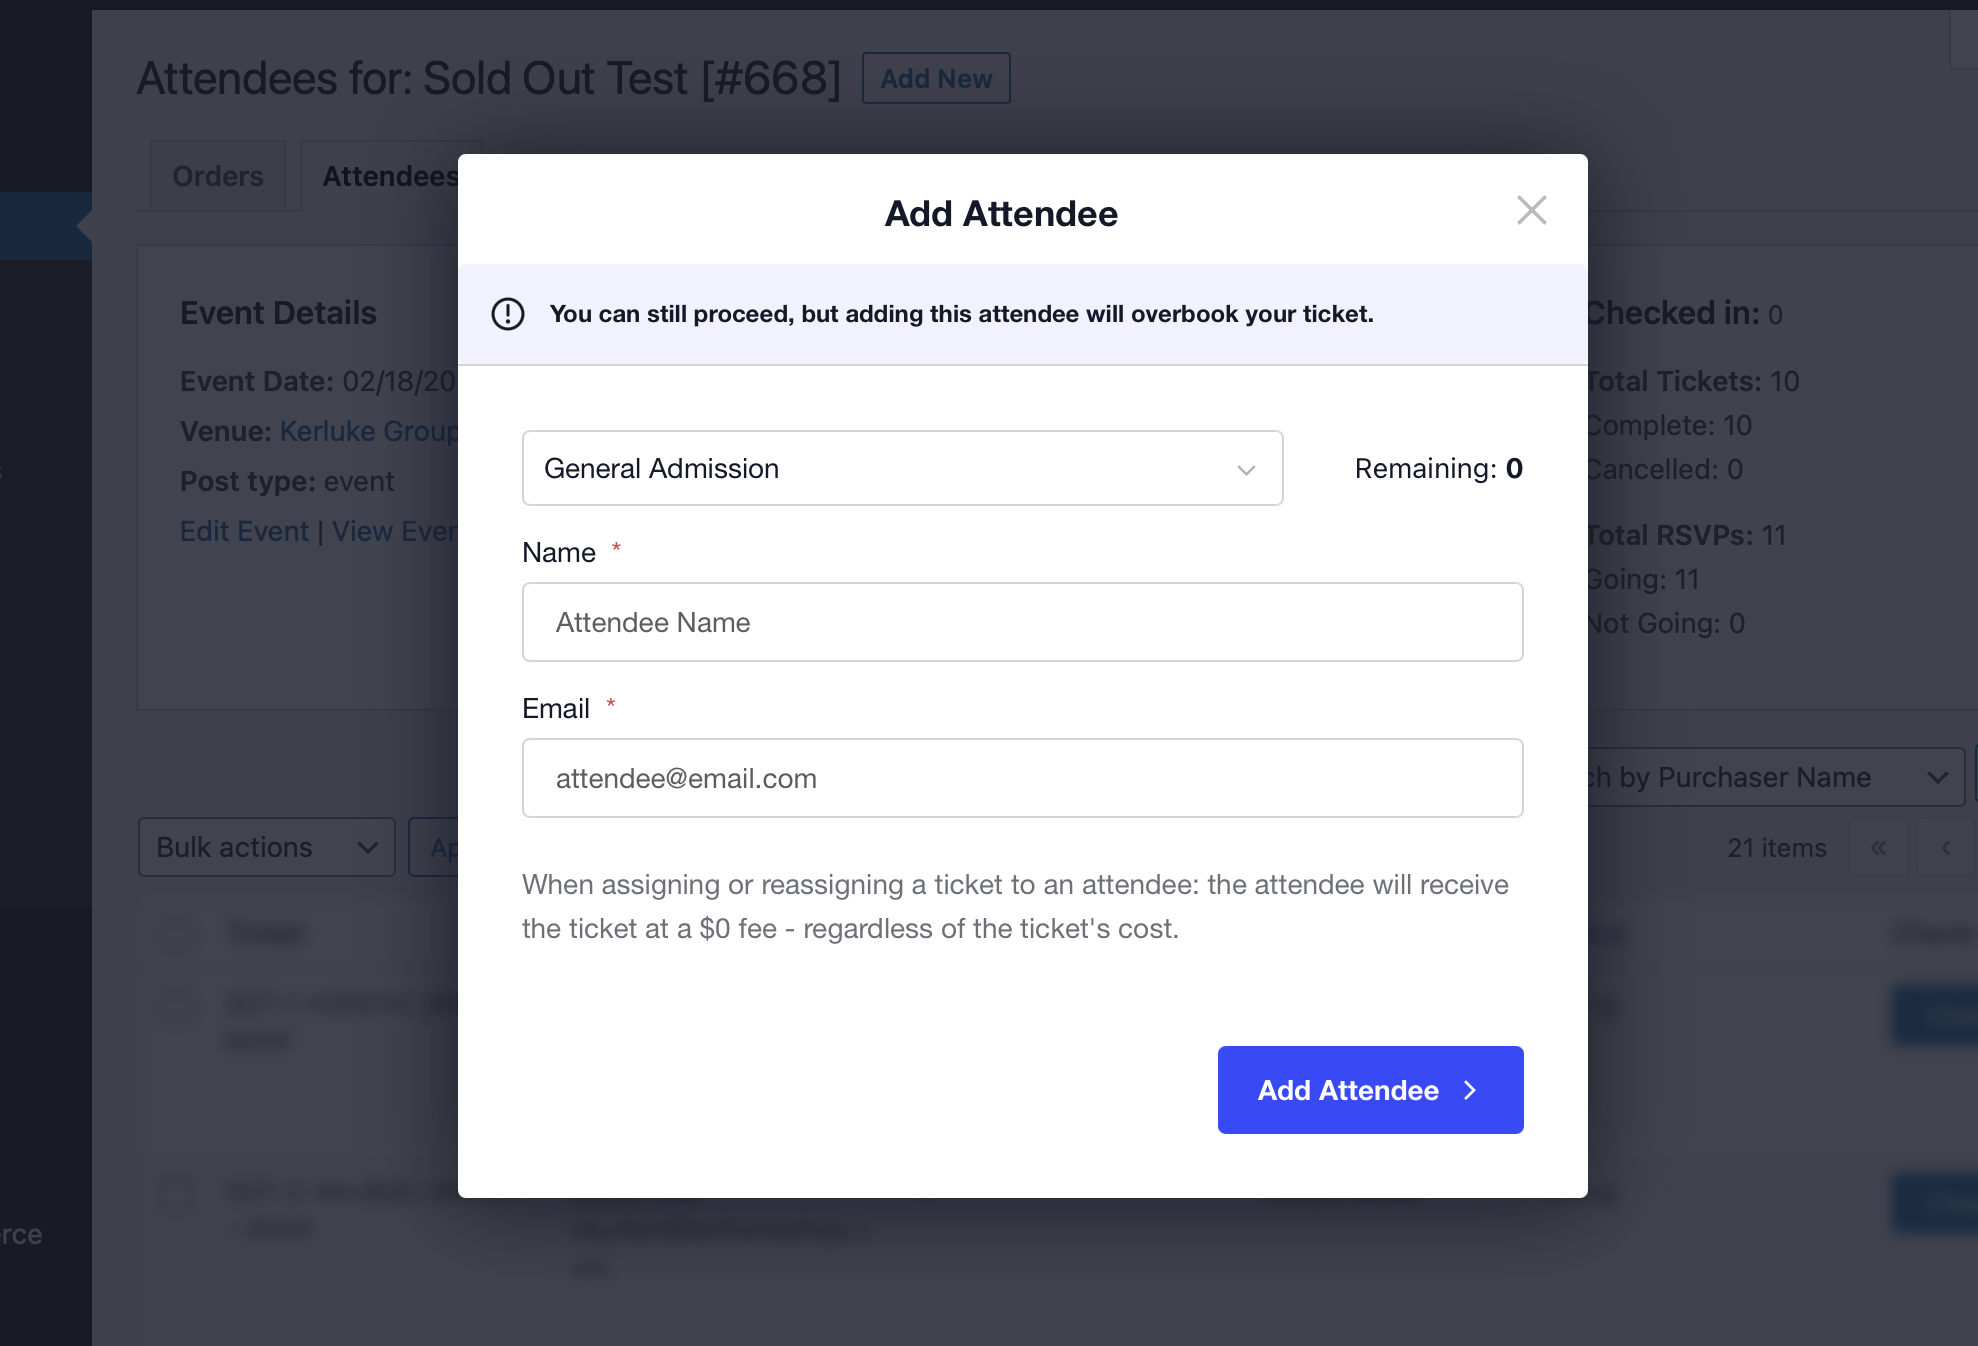
Overbooking an Event
You can exceed the available ticket or reservation count when manually adding attendees. Event Tickets won’t prevent oversell, but it will warn you before you continue.
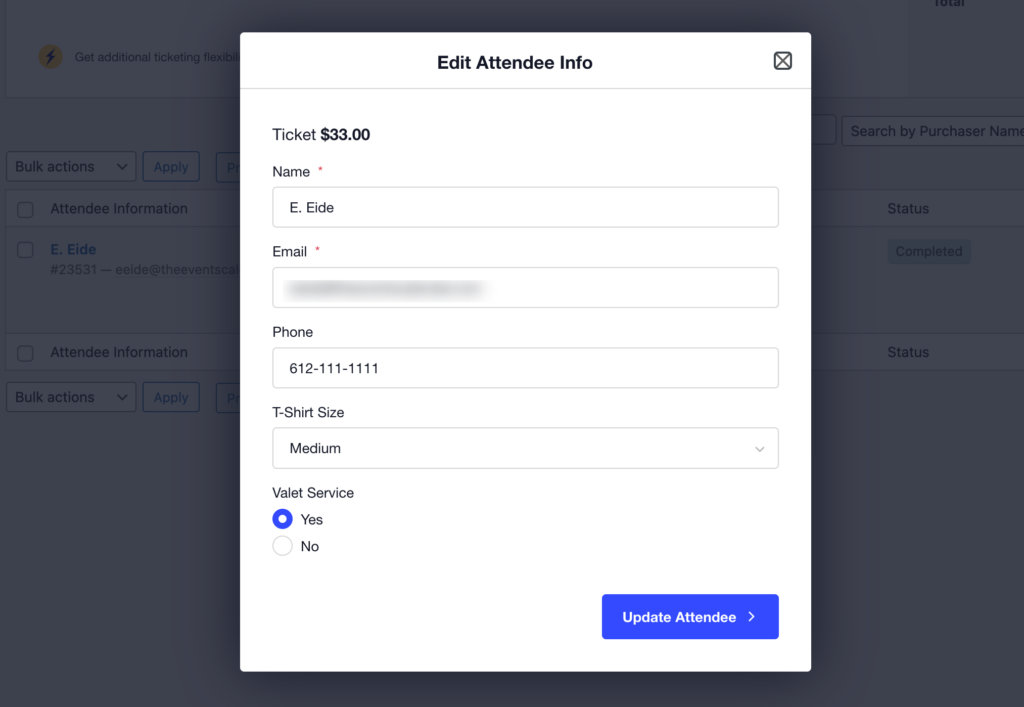
Editing Attendees
To edit an existing attendee, hover over the attendee’s row in the Attendee List and click Edit, or use the Edit option in the right-side column. You can modify Name, Email address, and any custom Attendee Registration fields.
Let Attendees Edit Their Information
With Event Tickets Plus, you can let attendees log in to your site and edit their RSVP or ticket information — meal choice, contact details, custom registration fields, and so on.
👋 Note: This feature requires Event Tickets Plus (even for RSVPs) and works only for tickets where Individual Attendee Collection (IAC) is required.
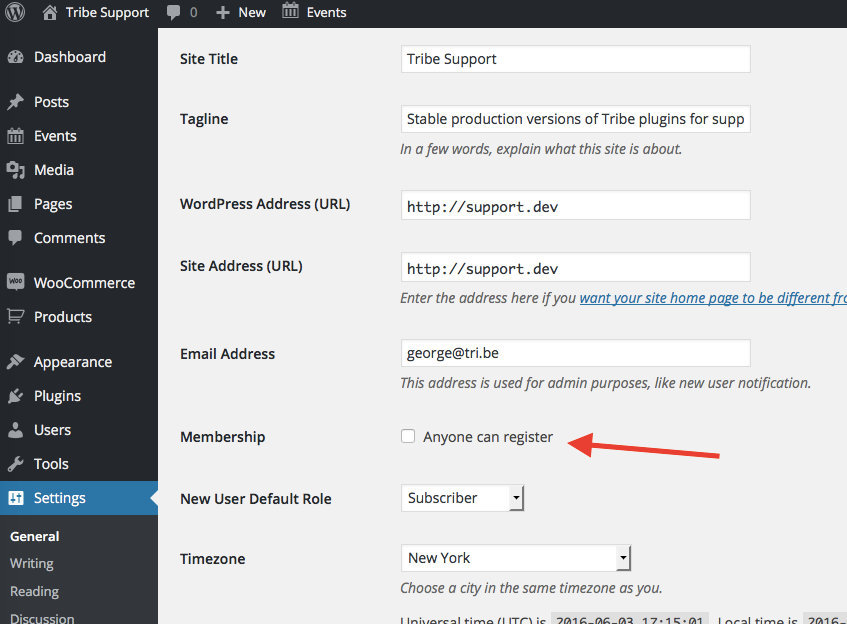
Step 1: Allow User Registration
If your site doesn’t already have a user account creation process, enable registration at Settings → General by checking the “Allow anyone to register” option. This WPBeginner article has more details.
If you use WooCommerce, it can create user accounts with the Customer role automatically. To direct folks to the WooCommerce My Account page for login, add this snippet:
add_filter( 'tribe_tickets_ticket_login_url', function ( $login_url ) {
    return $login_url = get_site_url() . '/my-account';
}, 20 );
Step 2: Limit Purchases to Logged-In Users
Go to Tickets → Settings → General and locate the Login options. See the Settings Overview for details.

Step 3: Let Users RSVP or Buy Tickets Normally
Once configured, customers and visitors can buy tickets and RSVP as usual, as long as they’re logged in. After purchase or RSVP, when they view the event, they’ll see an information box below the venue information and above the ticket purchase form:
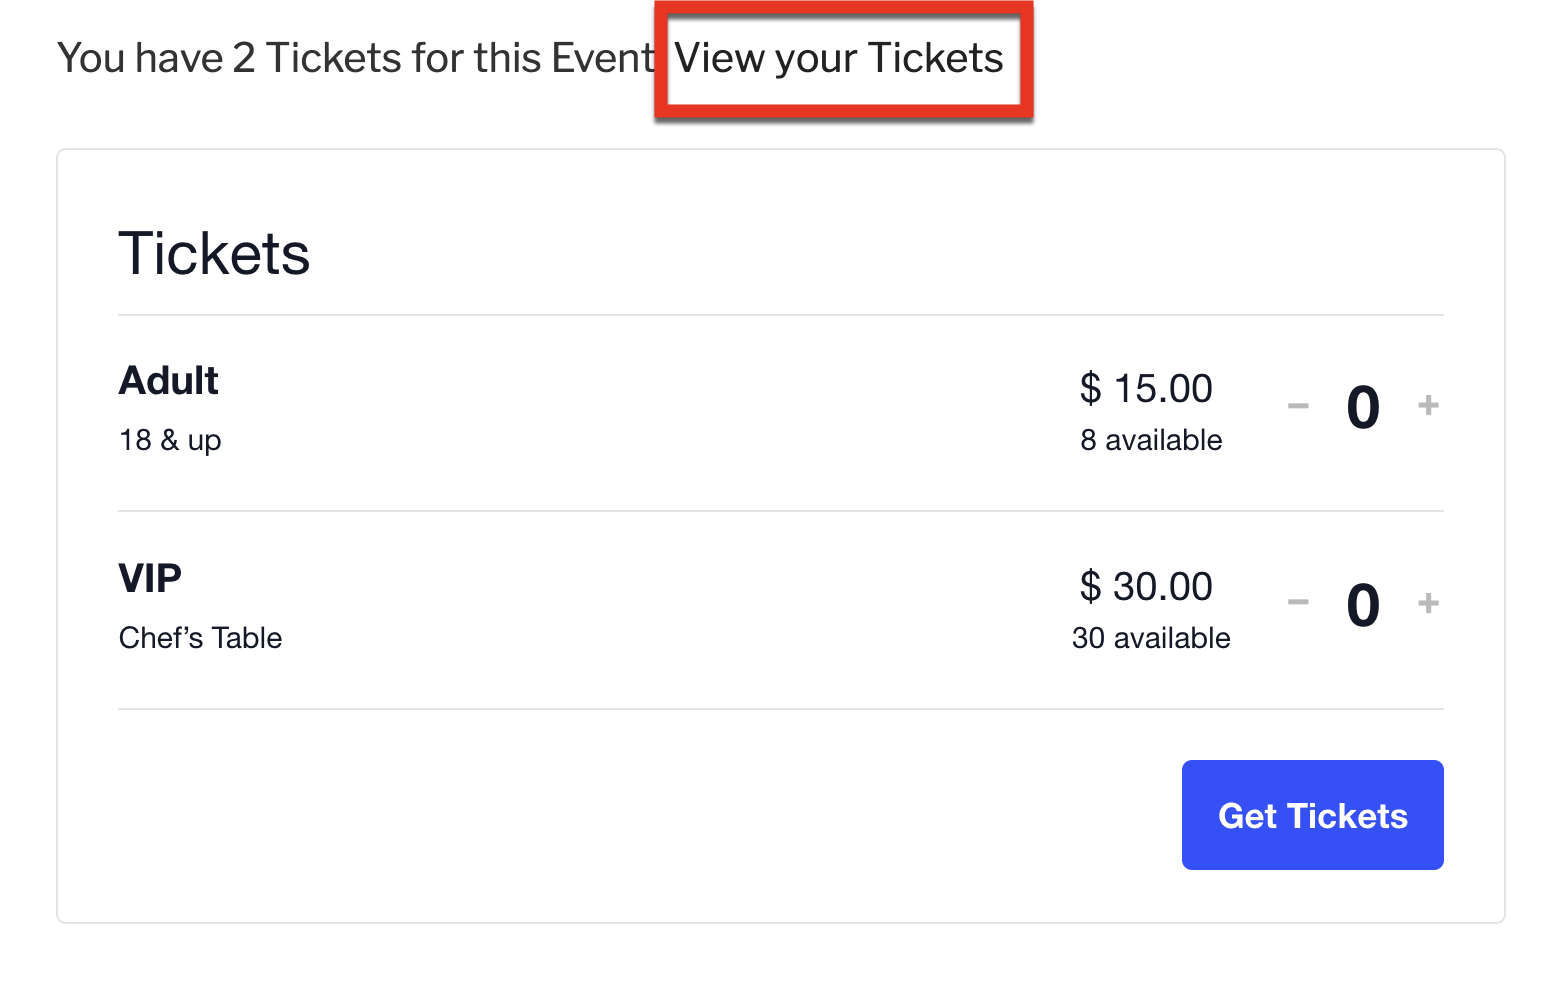
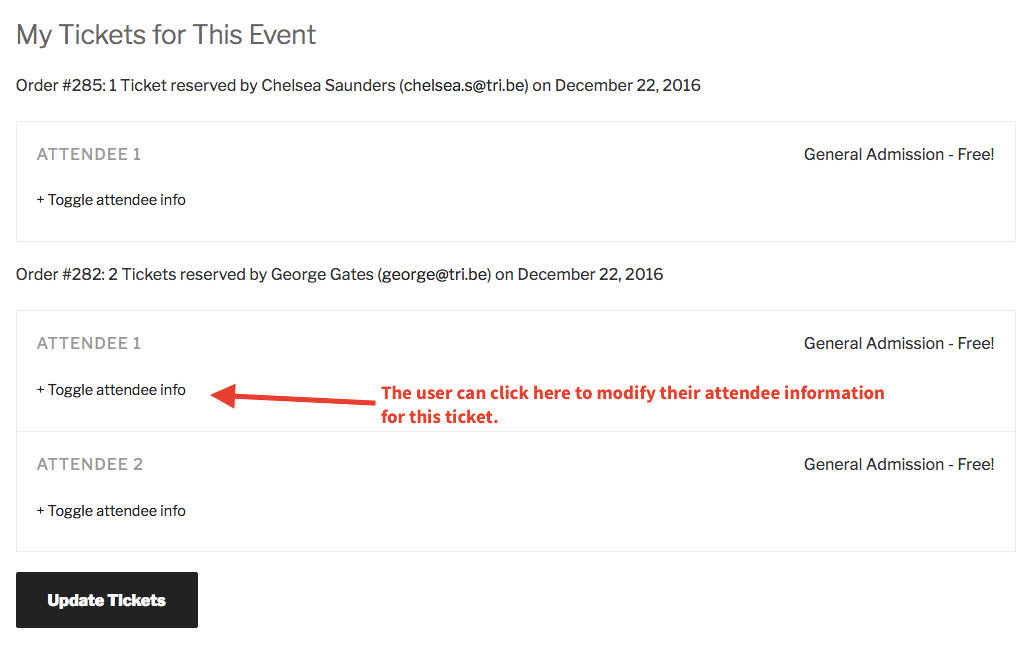
Clicking View Your RSVPs (or View Your Tickets) takes the user to a page where they can edit:
- RSVP response
- Name and email address associated with the ticket
- Attendee Information field responses, if any
- Whether the user wants to appear on the frontend “Who’s Going?” list, if that feature is enabled
Checking In Attendees
The most important column on the attendee screen is Check in. When attendees arrive at your event, use this column to confirm their ticket is valid and that a duplicate with the same ID hasn’t already been checked in.
See also: Ticket QR Codes and the Ticket Check In
QR Code Check-Ins
With Event Tickets Plus, tickets include a QR code. Whether the ticket is on a smartphone screen or printed on paper, scanning the QR code with any supported QR code reader checks in that attendee.

See Using QR Codes with Event Tickets Plus for full details.
💡 If attendees report that the QR code is showing as a broken image icon, it may be an email client setting. Several email clients default to not downloading images; if images are disabled, the QR code won’t appear. See Why QR Codes Aren’t Appearing in Emails.
Check-Ins Without QR Codes
You can check in attendees by clicking the Check-in button next to each ticket in the event’s Attendees page — no QR codes required. You can also disable sending the QR code in emailed tickets if you prefer.
For events in locations without reliable internet, you can export and print an attendee report for offline check-ins (see Exporting Attendee Data below). Note that offline check-ins don’t benefit from the “already checked-in” detection, which matters if you’re checking in attendees at multiple locations.
Re-sending Ticket Emails
If an attendee needs their ticket re-sent, hover over the attendee’s row in the Attendee List to reveal the re-send option.

When you manually add a new attendee, they automatically receive a ticket email. If you edit an existing attendee’s email address, a checkbox lets you re-send the ticket email to the new address.
👋 Note: Updating an attendee’s email address invalidates their previous QR code and Security code — a new QR code and Security code are generated for the new email, regardless of whether the email is re-sent.
To prevent abuse, there’s a default limit of 2 re-sends per attendee. You can adjust this limit via the tribe_tickets_handler_email_max_resend_limit filter. For example, to allow up to 12 re-sends:
/**
 * Customize the maximum number of emails that can be resent to an attendee.
 *
 * Return -1 to remove the limit entirely.
 *
 * @param int          $max_resend_limit The maximum number of emails that can be resent. Default: 2.
 * @param WP_Post|null $ticket           The ticket post object, if available.
 * @param array|null   $attendee         The attendee information, if available.
 */
function my_custom_event_tickets_email_max_resend_limit( $max_resend_limit, $ticket, $attendee ) {
    return 12;
}

add_filter( 'tribe_tickets_handler_email_max_resend_limit', 'my_custom_event_tickets_email_max_resend_limit', 10, 3 );
To remove the limit entirely:
add_filter( 'tribe_tickets_handler_email_max_resend_limit', static function() {
    return -1;
} );
To allow up to 5 re-sends:
add_filter( 'tribe_tickets_handler_email_max_resend_limit', static function() {
    return 5;
} );
Public Attendee Information
The public attendee list feature powers the “Who’s Attending” feature on your event page (with Event Tickets Plus), but it does more than that — it lets you and others see who is attending an event, powered by the public API.
👋 Note: Like all WordPress APIs, the Public Attendee API is public. User data is publicly accessible unless the user opts to hide their data.
See Event Tickets Public Attendee List for full details.