Tickets Commerce is relatively easy to set up, but sometimes there are snafus along the way. Let’s go over some of the most common issues and how you can fix them.
Error Message: Checkout Unavailable!
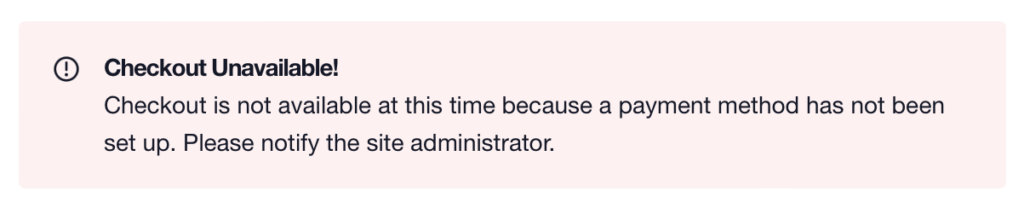
The error message “Checkout Unavailable! Checkout is not available at this time because a payment method has not been set up. Please notify the site administrator.” will be displayed on the frontend and visible to the ticket purchaser when Tickets Commerce is enabled, but no payment gateway is configured. Go to Tickets > Settings > Payments and configure at least one payment option.
Ticket Stock Issues with Cart Abandonment
incomplete orders can still reduce the available ticket stock, leading to discrepancies between actual sales and inventory levels.
To prevent uncompleted orders from affecting your ticket stock, adjust the stock handling settings to ensure that only completed orders decrease the inventory:
- In your WordPress dashboard, navigate to Tickets > Settings > Payments > Tickets Commerce > General Settings.
- Locate the Stock Handling option.
- Set the stock to decrease only when an order is marked as Completed.
This configuration ensures that the ticket stock is reduced solely for completed purchases, preventing uncompleted orders from affecting your available ticket inventory.
For more details on how Event Tickets calculates availability, refer to the How Event Tickets Calculates Availability article.
Resolving “Oops, no tickets!” Error on the Checkout Page
When setting up Tickets Commerce in Event Tickets, some users may encounter an error where instead of seeing the checkout page form, they are shown the message: “Oops, no tickets!” This problem usually points to a configuration or conflict issue. Below, we’ll walk through the most common causes and their solutions.
1. Verify Checkout and Success Pages
Event Tickets requires two key pages to be configured properly:
Checkout Page
This is where customers complete their purchase. Add the following shortcode to your chosen page:
[tec_tickets_checkout]
Success Page
This is where users are redirected after successfully completing their checkout. Add this shortcode to the selected page:
[tec_tickets_success]
To verify that these pages are configured correctly as checkout or success, check the settings under Tickets > Settings > Payments.
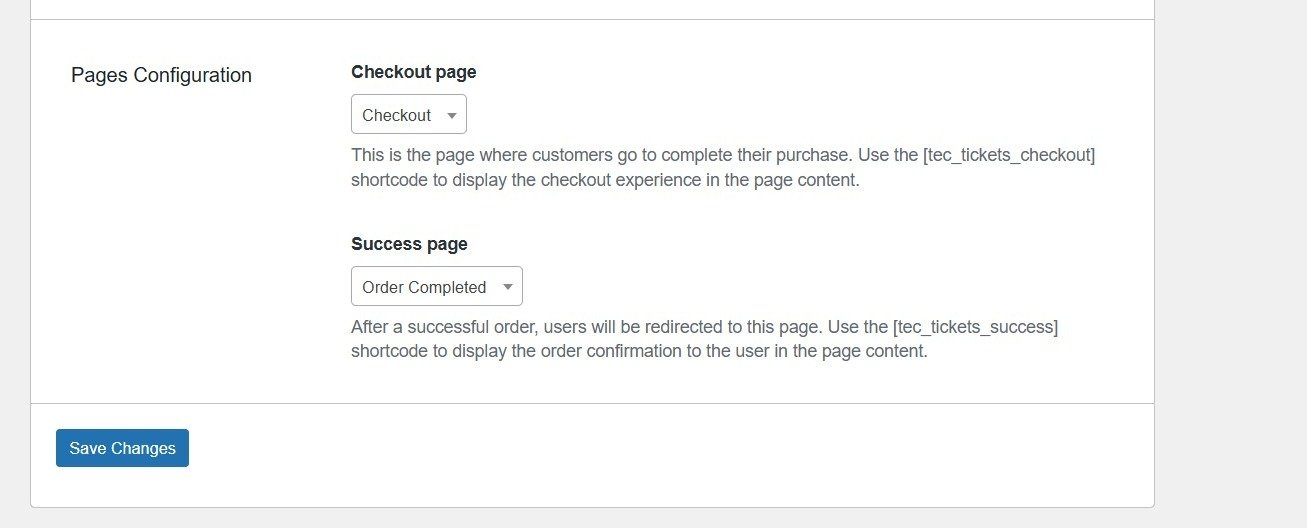
👉 Double-check both pages to ensure the correct shortcodes are present.
2. Resave Permalinks
Sometimes, permalink settings can cause display issues. To fix this:
- Go to Settings > Permalinks in your WordPress dashboard.
- Click Save Changes without modifying anything.
This refreshes your permalink structure and often resolves missing page issues.
3. Check for Plugin Conflicts
If the issue persists, it may be caused by a conflict with the theme or another plugin. To test this:
- Deactivate all plugins except:
- Event Tickets
- The Events Calendar (if applicable)
- Enable one of WordPress default themes.
- Test the checkout process:
- If the issue is gone, reactivate plugins one by one.
- After each reactivation, test again until the error reappears.
- If the problem continues, activate your theme and see if it’s unique to it. If your test results confirm this, contact the theme author.
This process helps identify the conflicting plugin or theme.
⚠️ Important: Testing on a live site can cause disruptions.
To avoid this:
- Use a staging site if your hosting plan provides one.
- Alternatively, install the free version of WP Staging to create a test environment.
Issues with PayPal Purchases
If you are just getting started or having issues with PayPal, here are a few common areas to test.
- Are attendees not generating or are you missing orders from PayPal? Check your PayPal IPN history.
- Recheck your checkout and confirmation page settings in your e-commerce settings and on PayPal’s Auto return and Payment data transfer.
- Using PDT and IPN at the same time has resulted in conflicts. IPN is generally the preferred setting.
- Use an email logging plugin like WP Mail Logging to see all emails your website is sending. Look for payments in PayPal and compare it to the emails sent to attendees.
- If attendees are not being generated at the expected order status changes, it’s possible the cron jobs are not running. You can manually trigger the cron jobs to run by visiting the following url on the site:
[SITE_URL]/wp-cron.php - In some cases, if the Paypal confirmation is not received, the attendees don’t get generated. In this case, go to the WooCommerce Order edit page and click Regenerate Attendees in the Order actions dropdown.
- Check for other Common Ticket Stock Issues.
- If you’re still seeing the Checkout Unavailable! message on your checkout page after connecting your PayPal account, we recommend disconnecting it and then reconnecting using a private window or a different browser. Since PayPal stores account information in your browser, this process helps ensure you’re starting fresh and confirming the connection properly.
Issues with Apple Pay Purchases
Stripe will determine whether to show Apple Pay based on the requirements in their Apple Pay documentation. If your site has met the requirements, but Apple Pay is not showing at Checkout, try the following steps:
Check iOS and macOS versions
Be sure that the device is running the latest version of Safari and check the iOS and macOS versions.
- iOS 9 and above
- macOS Sierra or newer
Tickets Commerce Settings
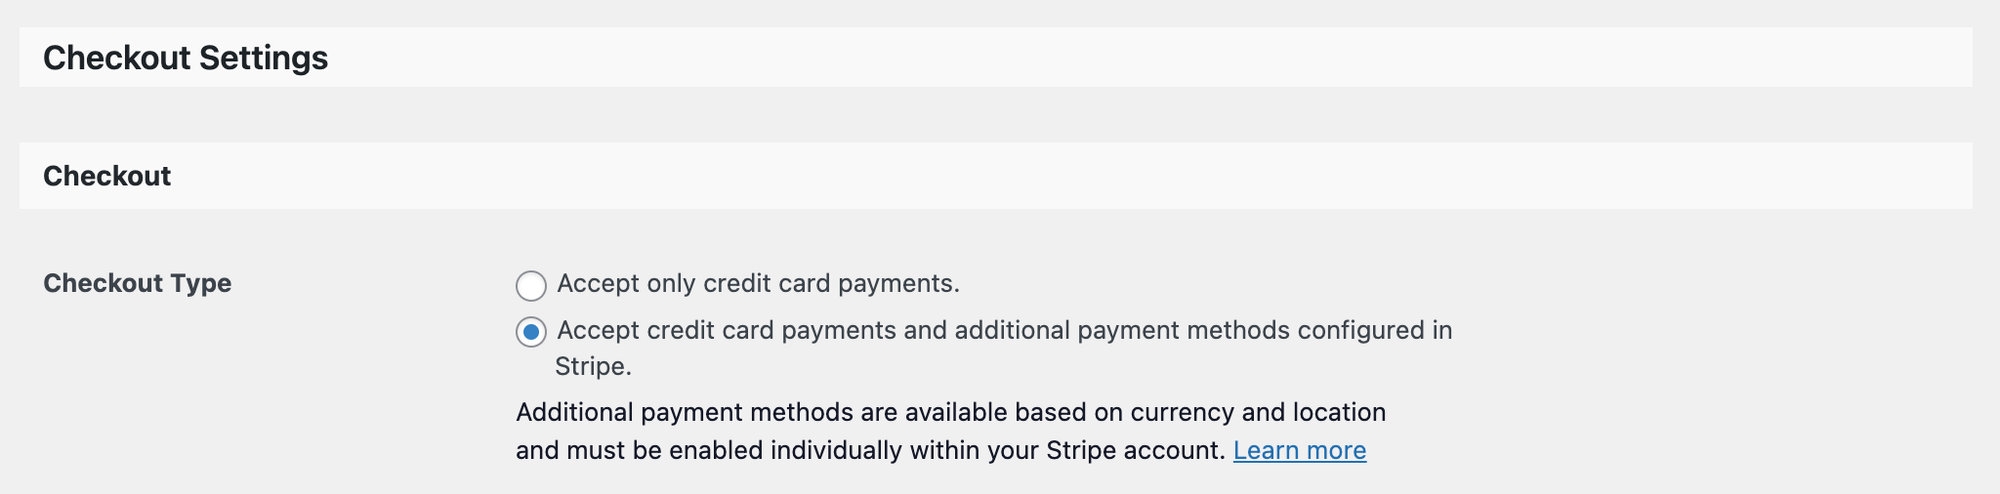
Confirm that Stripe is connected and enabled under Tickets > Settings > Payments > Stripe.
Confirm Checkout Type is Accept credit card payments and additional payment methods configured in Stripe
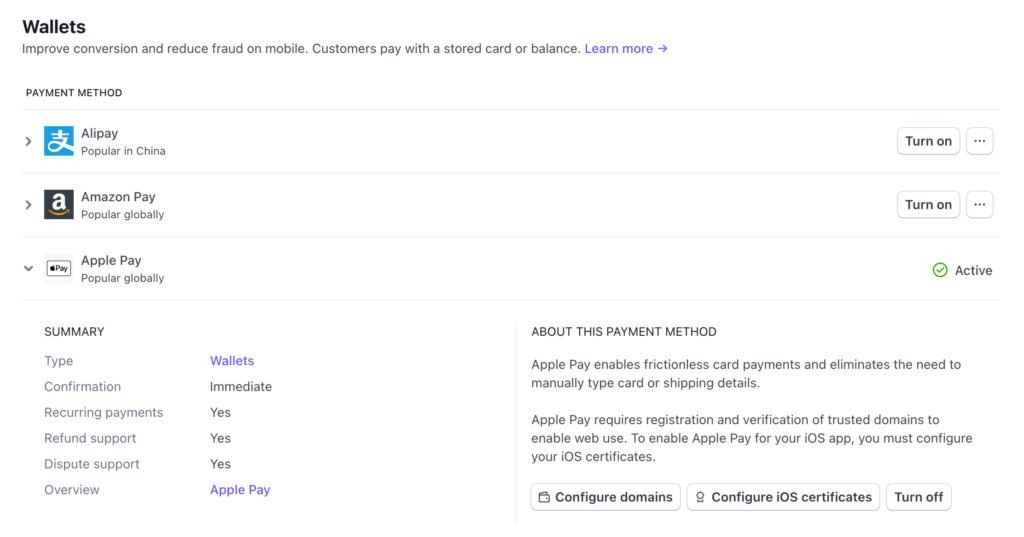
Confirm Apple Pay is enabled under Tickets > Settings > Payment > Stripe > Wallet Payments

Stripe Wallets
Confirm Apple Pay is Active in Stripe under Payment methods.
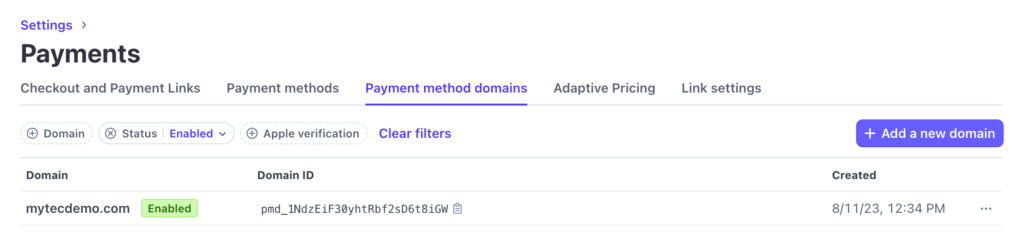
Domain Validation
Confirm your Domain is validated in Stripe under Payment method domains.
If your domain is not listed, click + Add a new domain and proceed through the steps.
Once you added your domain, confirm the .well-known URL is accessible at DOMAIN.COM/.well-known/apple-developer-merchantid-domain-association
Caching Exclusion
Exclude the Checkout page selected under Tickets > Settings > Payments from any caching plugins or server-side caching.
Those are the most common issues faced between Apple Pay and Stripe while using Tickets Commerce as a payment method.
It’s important to remember that Stripe will determine whether to show Apple Pay based on the requirements in their Apple Pay documentation, but if you’re still facing issues, please reach out to our Support Team.
Tickets Commerce Redirects to WooCommerce Checkout
If you’re using Tickets Commerce to handle ticket sales, but your checkout is still redirecting to the WooCommerce cart page, here are a few steps you can take to identify and resolve the issue.
Caching Issues
If your site previously used WooCommerce, some caching plugins might still be storing old checkout paths.
- Try clearing all server-side and plugin-based caches
- Revisit the event and confirm the ticket is still set to use Ticket Commerce
- Test the checkout again.
Tickets Commerce’s Checkout Pages Not Set Up
In some cases, the Page Configuration in WordPress Dashboard → Tickets → Settings → Payments is not properly set up.
You’ll want to make sure:
- The Checkout page contains the shortcode:
[tec_tickets_checkout] - The Success page contains the shortcode:
[tec_tickets_success]
You will find more information about this setup on this article.
Having these pages configured correctly will resolve issues where the checkout unexpectedly redirects to the WooCommerce cart page.
Refreshing Permalinks
If you’re still experiencing unexpected redirects after checking the page settings and clearing cache, it might help to flush your site’s permalinks. Sometimes WordPress needs to refresh its internal rewrite rules to properly recognize new pages like the Ticket Commerce checkout and success pages.
To do this:
- Go to Dashboard → Settings → Permalinks
- Without making any changes, simply click the “Save Changes” button at the bottom of the page
This forces WordPress to regenerate its permalink structure, which can help resolve issues like pages not loading properly or unexpected redirects — including cases where the checkout still routes to WooCommerce instead of the correct Ticket Commerce page.
Currency Mismatch Between Stripe and Tickets Commerce
You may run into issues when different currencies are selected. In order to avoid problems and fees for currency conversions, you will need to select the same currency both for Tickets Commerce (under Tickets > Settings > Payments) and in your Stripe account configuration.
Issues Connecting to Stripe
500 Internal Server Error
In some edge cases, when attempting to “Connect to Stripe” via the Tickets > Settings > Payments page, you may encounter a 500 Internal Server Error.
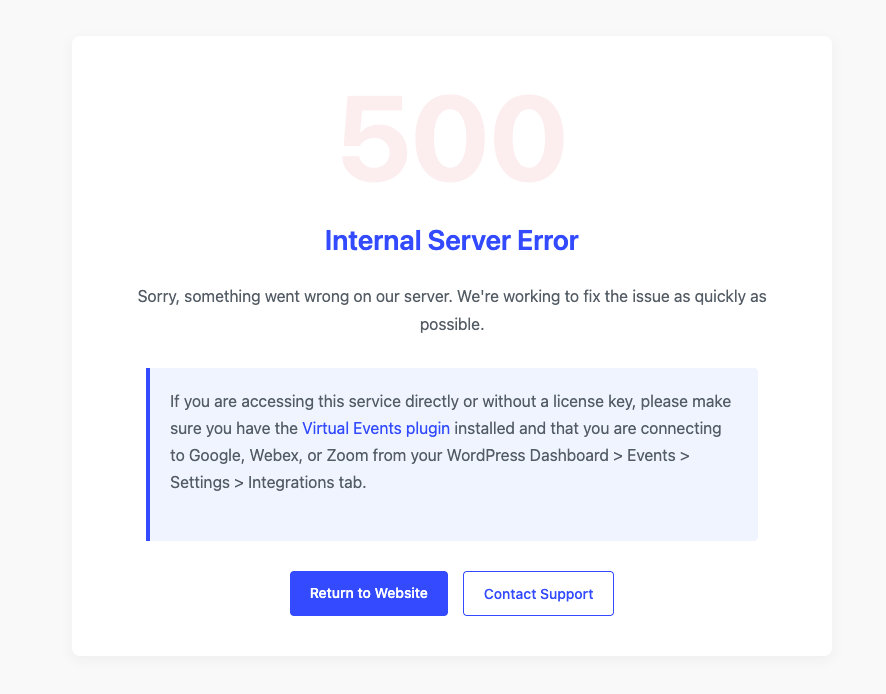
Stripe accounts have a limit of 16 webhook endpoints per account. If that limit is exceeded, any new connection attempts—such as the one initiated by Event Tickets—can fail, resulting in a server error.
How to Fix It
- Log in to your Stripe Dashboard.
- Navigate to Developers > Webhooks.
- Review the list of webhook endpoints.
- Delete one or more webhook endpoints that are no longer in use.
- Go back to Event Tickets > Settings > Payments and try connecting to Stripe again.
This should allow Event Tickets to register its own webhook without exceeding Stripe’s limit.
Payment Methods Not Enabled
When your Stripe for Tickets Commerce checkout type is set to Accept credit card payments and additional payment methods configured in Stripe you will be able to enable the different payment methods that you want to have in your checkout, depending on your currency.
To be sure that these are working correctly, you will have to enable them on your Stripe account as well. For some of them, you’ll have to agree to terms and conditions in order to enable them. You can check your payment methods configuration for Stripe at the following link: https://dashboard.stripe.com/settings/payment_methods.
Once the above steps are done, head over to your WordPress dashboard > Tickets > Settings > Payments (tab) and click on Edit Stripe Connection. Then, scroll down to the Checkout (section) and ensure that the payment method you enabled in Stripe is also enabled in the Payment methods accepted selection.
💡 Additional payment methods are made available with Event Tickets Plus (see Implementing Stripe on Event Tickets and Event Tickets Plus).
Stripe Payment Wallets Not Showing Up
When your Stripe for Tickets Commerce checkout type is set to Accept credit card payments and additional payment methods configured in Stripe you can enable payments via wallets (like Apple Pay and Google Pay) when checking out.
Apple Pay: You will need to configure the domain where you will want to use Apple Pay. This method will work only when the conditions are met.
- To learn more about adding Apple Pay to your Stripe account, please visit this page.
- To learn more about adding Google Pay to your Stripe account, please visit this page.
You can check your payment methods configuration for Stripe at the following link: https://dashboard.stripe.com/settings/payment_methods
“Failed to refresh PayPal webhooks.” Error
If you are trying to connect or want to resync your PayPal account, and you experienced this problem.

Here are the steps to resolve or diagnose this:
- Make sure to use a valid merchant account: PayPal requires an active and valid business account to process ticket payments. If you need help on making one, this guide will help you on how to configure it.
- Up-to-date Event Tickets plugin: Make sure that you have the latest version of Event Tickets plugin. We are actively releasing new updates for it which improve its functionality and bug fixes.
- Check for security plugin: Your website and PayPal mainly communicate via REST API. It passes the information about your account when connecting Ticket Commerce to your account. This process might have unintentionally interrupted or blocked by your security plugin (e.g. All-In-One Security, WordFence, Sucuri, JetPack etc) disabling it will help resolve the problem.
- Monitor the PayPal API response: You might want to try installing the HTTP Requests Manager plugin, which allows you to view incoming and outgoing requests between your server and external APIs, like PayPal in this case. If you’ve already disabled any security-related plugins and the resync still isn’t working, it’s possible that PayPal’s response is being blocked with a 403 Forbidden error. You can review these logs by going to WordPress Dashboard → Tools → HTTP Requests Manager.

- Disable the WordPress debug feature: Connecting or resyncing your account will redirect you to this path after your login to PayPal →
https://yourwebsite.com/wp-json/tribe/tickets/v1/commerce/paypal/, which expects a valid JSON format. PHP notices, warnings and even deprecated errors will sometimes invalidate this format which fails the process. We suggest turning this feature off. Aside from this, these messages usually contain your file paths and will be a potential security risks if enabled on a live/main server. - Conflict testing: If the issue still persists, there might a conflict between your plugins or theme with our Event Tickets/Plus, running this test will help us narrow down the possible reason of what triggers this problem.
Issues Connecting to PayPal
Popup Blocker Prevents PayPal Configuration
When setting up Tickets Commerce, the PayPal interface appears as a mini window or popup. If you do not see the popup, you may have a popup blocker enabled. Disabling your popup blocker should allow the connection prompt to appear as expected.
“Looks like you’re trying to connect to an existing PayPal account…” Error
Error Message: “Looks like you’re trying to connect to an existing PayPal account. For security reasons, only the person who created the PayPal account can do that.”
This error occurs when attempting to set up a PayPal account through the wizard using credentials other than those of the account owner, despite having full access and capabilities, as indicated in the message.
Workaround: Currently, the only way around this issue is using the account owner’s credentials to validate the Paypal account.
Plugin Conflicts
If the issue persists, try the usual conflict test:
- Switch to a default WordPress theme (like Twenty Twenty-Four)
- Deactivate all plugins except Event Tickets and Event Tickets Plus
- Test the checkout again
If the redirect disappears, re-enable plugins one at a time to find the conflict.
Need More Help?
If none of these steps help, feel free to reach out to our support team with:
- A link to a staging site where the issue can be tested
- Confirmation of your current ticket checkout settings
- Any caching systems or plugins active on your site
We’re happy to help you sort it out!