The Events Calendar includes a CSV importer that lets you import events, venues, organizers, RSVPs, and tickets into your site’s calendar in bulk. The importer is part of the Event Aggregator plugin, but the CSV import tool itself is free and included when you install The Events Calendar — you don’t need an Event Aggregator license to use it.
This article covers both the step-by-step import flow and the full field reference for each content type you can import. Use the table of contents to jump straight to the field reference if you already know the import flow.
You Lost Me at CSV…
CSV is a file format that stands for comma-separated values. CSV files are often produced by spreadsheet applications like Excel and Numbers, but they can come from other sources as well. The format converts a spreadsheet from a grid of cells into a plain-text file where each row is a line and each cell is separated by a comma.
For example, a spreadsheet row with the following cells:
| Cell 1 | Cell 2 | Cell 3 |
…would be converted to this in CSV:
Cell 1,Cell 2,Cell 3This plain-text structure is what makes the data readable by importing tools.
Generating a CSV File
Saving a spreadsheet as CSV is usually an option in your spreadsheet application’s Save dialog. In most cases, go to File → Save As and select CSV as the file format.
For the specific columns available for each content type — events, venues, organizers, RSVPs, tickets — see the CSV Field Reference section below. Example files for each content type are available there as well.
💡 Some versions of Microsoft Excel export CSV files with non-standard separator characters (such as semicolons) by default. To ensure your CSV exports can be imported successfully, make sure Excel is configured to use the comma (,) as the separator. Refer to your software’s documentation if you need help adjusting this setting.
Importing a CSV File
Go to the Import Screen
From the WordPress dashboard, navigate to Events → Import in the left-hand menu.
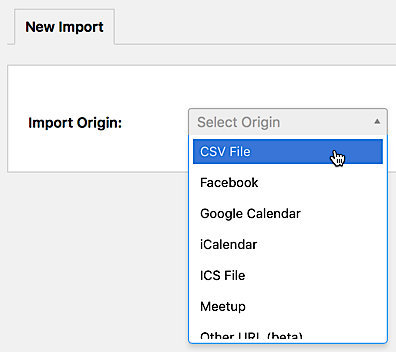
Select CSV as the Import Origin
The first field on the screen asks you to identify the source of your import. Select CSV File from the list of options.
Select the Type of Content to Import
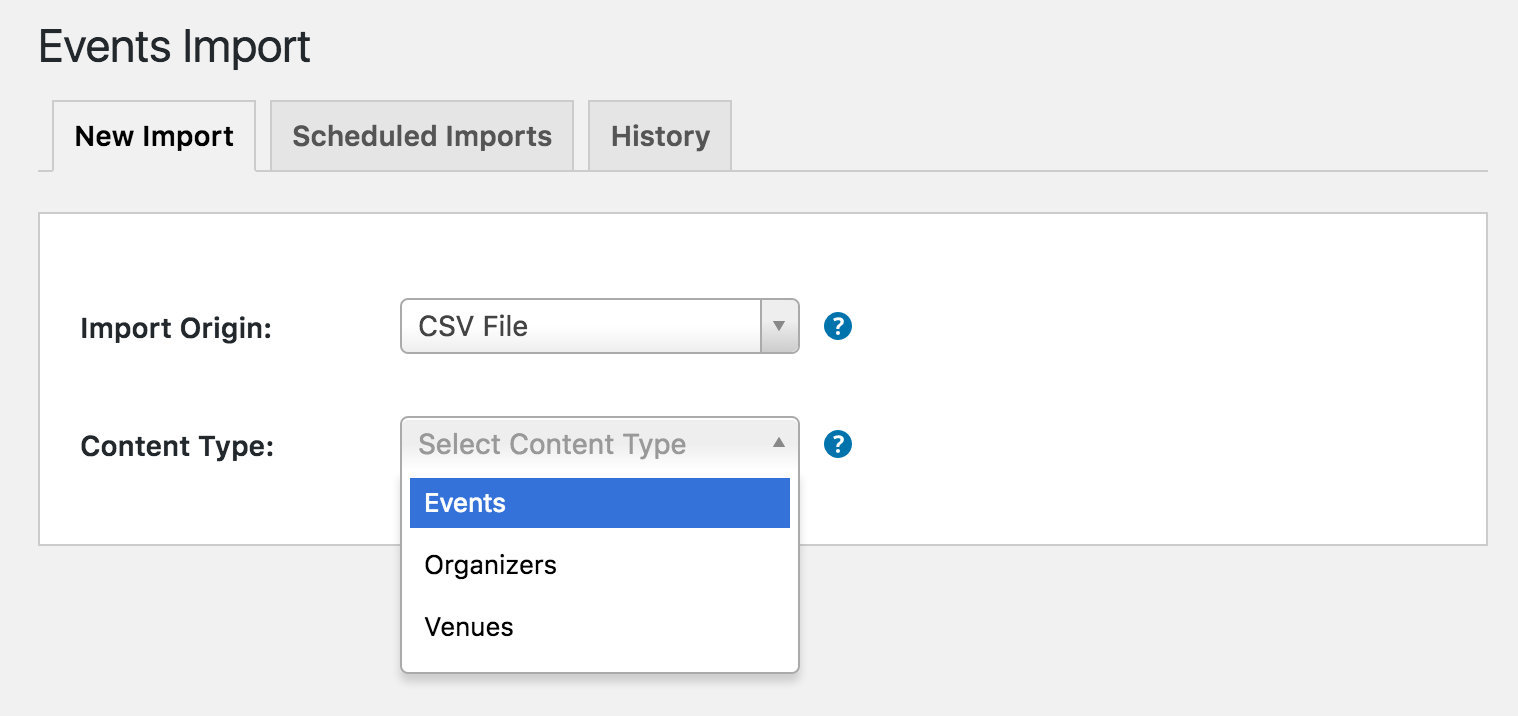
By default, there are three options for data types that can be imported:
- Events — Posts that will be identified as events and published on The Events Calendar.
- Organizers — Saved event organizers that can be associated with events.
- Venues — Saved event locations that can be associated with events.
If you’re planning to import venue and organizer information alongside events, import venues and organizers first. The event importer matches venues and organizers by exact name, so those records must already exist for the association to be made.
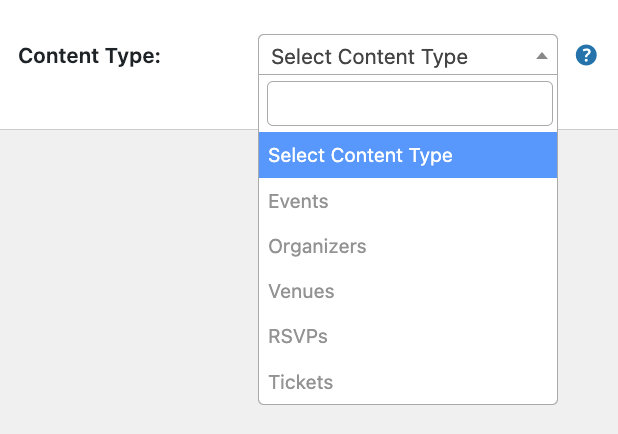
💡 If you’re using Event Tickets and/or Event Tickets Plus, you’ll also see options to import RSVPs or Tickets via CSV:
- RSVPs appears when the Event Tickets plugin is active.
- Tickets appears when Event Tickets, Event Tickets Plus, and WooCommerce are all active.
Import RSVPs and tickets after you’ve imported events, since they must be associated with existing events.
Select the File to Upload
Click the Upload button and select the CSV file from your computer. The file will be saved to the WordPress Media Library and remain available for future use.
Preview the Content and Map Your Fields
Once you’ve selected the file, click Preview. This generates a preview of a portion of your CSV data in table format with column headings and dropdown fields.
Before importing, you need to map each column in your CSV to the corresponding content field in The Events Calendar. The preview only shows some rows from your file — you only need to see enough to map the fields. The actual import will include all the data.
The column headings in your preview match the headings in your original spreadsheet. Each dropdown menu contains the available content fields (event, venue, organizer, ticket, etc., depending on what you’re importing). For each column, use the dropdown to select the correct content field. Scroll right until all columns you want to import are mapped.

💡 If your CSV column headings match the recommended field names from the CSV Field Reference below, the dropdown selections will usually auto-populate. If your columns come from an external source with different names, choose the option from each dropdown that best matches the column’s content, or leave it as Do Not Import to skip it.
Run the Import
Before running the import, set the Publish status for the imported content:
- Published — Content is published to your site right away.
- Draft — Content is saved but not published; available for editing after import.
- Pending Review — Content is flagged for review by an editor or administrator before publishing.
- Private — Content is published immediately but only accessible to logged-in users with permission to view it.
You can also bulk-assign event categories from a list of existing categories on your site. This option only matters when importing events — it’s irrelevant for organizers, venues, RSVPs, or tickets.
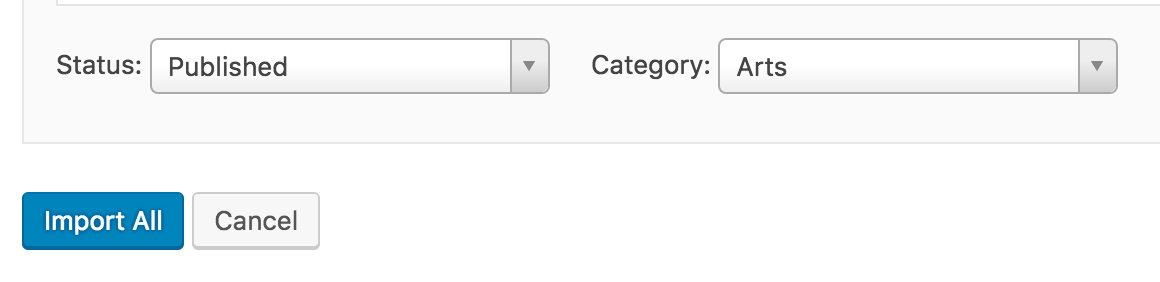
Once you’ve reviewed your settings, click Import All.
⚠️ Important: All imported tickets will be treated as WooCommerce Tickets.
How CSV Import Handles Duplicates
Before we get started, it’s worth knowing that CSV imports will update existing events rather than duplicate them when certain conditions are met:
For All-Day Events
- The event title is identical.
- The event is marked as an all-day event.
- The start date (date only, from
_EventStartDate) matches exactly.
For Timed (Non-All-Day) Events
- The event title is identical.
- The start date and time are exactly the same.
- The end date and time are exactly the same.
These conditions ensure that only genuinely identical events are updated during import.
CSV Field Reference
Each column in a CSV file corresponds to a field that would be filled in manually when creating an event, organizer, venue, ticket, or RSVP in the WordPress editor. If a column name doesn’t match a recognized field, it won’t be included in the import. The field names and example data below are the recommended column headings to use in your files.
💡 Use YYYY-MM-DD for all dates. Some date formats are ambiguous — for example, 05/06/2016 could be read as May 6th or June 5th depending on locale. The ISO format YYYY-MM-DD is always unambiguous. If you need to use the day-first international format, use hyphens rather than slashes (e.g. 05-06-2016).
Venues
| Field Name | Example Data | Field Type | Notes |
|---|---|---|---|
| Venue Name | Precious Lamb | String | |
| Venue Description | A non-profit preschool. | HTML | |
| Venue Country | United States | String | Preferably the full country name. |
| Venue Address | 2005 Palo Verde Ave | String | |
| Venue Address 2 | String | Appended to Venue Address on import. | |
| Venue City | Long Beach | String | |
| Venue State/Province | CA | String | |
| Venue Zip | 90815 | String | |
| Venue Overwrite | 1 | String | Whether geo-coordinates should determine venue location (Pro only). 0 = No (default), 1 = Yes. |
| Venue Latitude | 33.7924082 | String | |
| Venue Longitude | -118.1105883 | String | |
| Venue Phone | +1-800-123-4567 | Phone Number | |
| Venue Website | http://www.example.com/ | URL | |
| Venue Featured Image | http://www.example.com/image.png | URL | Must be a direct URL to the image file. |
Download Example File for Venues
Organizers
| Field Name | Example Data | Field Type | Notes |
|---|---|---|---|
| Organizer Name | George-Michael Bluth | String | |
| Organizer Description | Recently started growing a moustache. | HTML | |
| Organizer Email | [email protected] | Email Address | |
| Organizer Website | http://fakeblock.com | URL | |
| Organizer Phone | +1-987-555-1238 | Phone Number | |
| Organizer Featured Image | http://example.com/photo.jpg | URL | Must be a direct URL to the image file. |
Download Example File for Organizers
Events
Import or create your Venues and Organizers before importing Events. The event importer matches venues and organizers by exact name, so those records must already exist for the association to be made.
| Field Name | Example Data | Field Type | Notes |
|---|---|---|---|
| Event Name | Turtleneck Fitting | String | |
| Event Description | I didn’t invent the turtleneck, but… | HTML | |
| Event Excerpt | I’m afraid of any apex predator… | HTML | Used as the excerpt; the Description field is the full content. |
| Event Start Date | 1965-12-31 | Date | YYYY-MM-DD recommended. Example: December 31st, 1965. |
| Event Start Time | 21:30:00 | Time | Time the event starts. Example: 9:30 pm. |
| Event End Date | 1966-01-01 | Date | YYYY-MM-DD recommended. Example: January 1st, 1966. |
| Event End Time | 00:50:00 | Time | Time the event ends. Example: 12:50 am. |
| All Day Event | FALSE | Boolean | When true, the event lasts all day and Start/End Time fields are ignored. |
| Timezone | America/New_York | String | Must be a valid timezone string. See PHP timezone list. |
| Hide from Event Listings | FALSE | Boolean | When true, the event appears in Month View but not in list-style views. |
| Sticky in Month View | TRUE | Boolean | When true, the event appears at the top of its day cell in Month View regardless of start time. |
| Event Venue Name | Archer’s Penthouse | Comma Separated | Must exactly match the Venue Name of an existing venue. By default only one venue per event is supported — see note below. |
| Event Organizers | Woodhouse, Chelsea S., 42 | Comma Separated | Must exactly match the Organizer Name, or use the organizer’s post ID. Separate multiple values with commas. |
| Event Show Map Link | TRUE | Boolean | |
| Event Show Map | TRUE | Boolean | |
| Event Cost | 500 | String | Use 0 for free events. Leave blank to hide the cost field. Unused when a ticketing plugin is active. |
| Event Currency Symbol | $ | String | Unused when a ticketing plugin is active. |
| Event Currency Position | prefix | Unique | Accepts prefix or suffix. Defaults to prefix. Unused when a ticketing plugin is active. |
| Event ISO Currency Code | USD, EUR | String | Adds the ISO currency code alongside the event cost. |
| Event Category | Tacktleneck, Tailor | Comma Separated | Separate multiple categories with commas. |
| Event Tags | Valet, Mission ready, PPK | Comma Separated | Separate multiple tags with commas. |
| Event Website | http://example.com | URL | |
| Event Featured Image | http://example.com/image.png | URL | Must be a direct URL to the image file. |
| Allow Comments | TRUE | Boolean | |
| Allow Trackbacks and Pingbacks | FALSE | Boolean |
💡 While comma-separated values are technically supported in the Venue Name field, by default each event can only be assigned one venue. Specifying multiple venues only has an effect if multiple venue support has been enabled. In general, specify a single venue name here.
Download Example File for Events
Virtual Events
With Events Calendar Pro installed, the following additional fields are available for virtual and hybrid events.
| Field Name | Example Data | Field Type |
|---|---|---|
| Configure Virtual Event? | TRUE | Boolean |
| Type of Event (Virtual, Hybrid) | Virtual | String |
| Video Source URL | https://www.youtube.com/watch?v=2HMV0JhnB8k | URL |
| Embed Video? | TRUE | Boolean |
| Linked Button Text | Button | String |
| Linked Button | TRUE | Boolean |
| Show Embed at | at-start | String |
| Show Virtual Event Icon on Single? | TRUE | Boolean |
| Show Virtual Event on all Views | True | Boolean |
| Show Embed To | All | String |
| Include Link in RSVP Email? | TRUE | Boolean |
| Include Link in Ticket Email? | TRUE | Boolean |
Download Example File for Virtual Events
RSVPs
Import RSVPs after importing the events they belong to, since RSVPs must be associated with existing events.
| Field Name | Example Data | Field Type | Notes |
|---|---|---|---|
| Event Name, ID, or Slug | NYPL Author Series: Shane Pearlman | String | |
| Ticket Name | General Seating | String | |
| Ticket Description | Reservation for a seat in the Peifer Auditorium. | HTML | |
| Ticket Start Sale Date | 2016-12-01 | Date | YYYY-MM-DD recommended. |
| Ticket Start Sale Time | 14:30:00 | Time | |
| Ticket End Sale Date | 2016-12-15 | Date | YYYY-MM-DD recommended. |
| Ticket End Sale Time | 21:30:00 | Time | |
| Ticket Stock | 450 | Integer | CSV only accepts integers for ticket stock. |
| Ticket Show Description | Yes|No | String |
Download Example File for RSVPs
WooCommerce Tickets
Import tickets after importing the events they belong to. Note that only WooCommerce Tickets can be imported via CSV.

| Field Name | Example Data | Field Type | Notes |
|---|---|---|---|
| Event Name, ID, or Slug | NYPL Author Series: Shane Pearlman | String | |
| Ticket Name | General Seating | String | |
| Ticket Description | Ticket for a seat in the Peifer Auditorium. | HTML | |
| Ticket Start Sale Date | 2016-12-01 | Date | YYYY-MM-DD recommended. |
| Ticket Start Sale Time | 14:30:00 | Time | |
| Ticket End Sale Date | 2016-12-15 | Date | YYYY-MM-DD recommended. |
| Ticket End Sale Time | 21:30:00 | Time | |
| Ticket Price | $25.00 | String | An integer without the currency symbol is also acceptable. |
| Ticket Stock | 450 | Integer | CSV only accepts integers for ticket stock. |
| Ticket SKU | GEN-AD | String |
A separate example CSV file for WooCommerce Tickets is not available. Use the RSVP example file as a base and add the Ticket Price and/or Ticket SKU columns as needed. When running the import, select Tickets (not RSVPs) from the content type dropdown. Make sure the Event Name field in your ticket CSV matches the Event Name in your events CSV exactly, or no tickets will be imported.
Additional Fields (ECP)
If you have Events Calendar Pro and have created custom additional fields, those fields will appear in the CSV importer as available columns to map. The column name to use in your CSV is the label you gave the field when you created it. The following field types are supported:
| Field Type | Example Data | Notes |
|---|---|---|
| Text Field | I swear I had something for this. | String |
| Text Area Field | Do you want ants? …because that’s how you get ants. | String |
| URL Field | http://www.example.com/ | URL |
| Radio Field | Read a book | Must be an exact case-sensitive match to an existing option name. |
| Checkboxes Field | Boop|Yup | Separate multiple selected options with a pipe | character. |
| Dropdown Field | Danger Zone! | Must be an exact case-sensitive match to an existing option name. |
Field Type Glossary
The field type column in each table above uses the following definitions:
- HTML — Accepts HTML markup. Also runs through
wpautop(), so two consecutive newlines are interpreted as a paragraph break, just as in the WordPress editor. - String — Accepts most text including numbers and special characters. Newlines are typically ignored.
- Boolean — Accepts
true/false,1/0, oryes/no. Not case-sensitive. When left blank the default is applied, which is typically false. - Integer — Accepts whole numbers only.
- Date — Accepts formatted dates. Use ISO 8601
YYYY-MM-DD(e.g.2025-12-31) for unambiguous results. For the North AmericanMM/DD/YYYYformat use slashes. For the internationalDD-MM-YYYYformat use hyphens. - Time — Accepts formatted times in ISO 8601
HH:MM:SSformat (e.g.23:59:59). - URL — Accepts full URLs including the protocol (e.g.
https://). - Comma Separated — Accepts a comma-separated list of values. “Concert, Barbecue” is interpreted as two separate values: “Concert” and “Barbecue”. If you’re not exporting from Excel or a similar tool, make sure to properly escape fields containing commas so they aren’t treated as column separators.
- Email Address — Accepts any string, but prefers a valid email address format.
- Phone Number — For proper internationalization, include the full number with country code and leading
+(e.g.+1-800-867-5309).
Advanced: Importing Tickets Commerce Tickets via CSV
Importing Tickets Commerce tickets using the built-in CSV import feature is not directly supported. With a few tweaks you can achieve this.
📌 Requirements
- WooCommerce must be installed and activated temporarily for the import process to work.
- A custom snippet is required to map imported data correctly to Tickets Commerce.
🛠️ Step-by-Step Instructions
1. Install and Activate WooCommerce
Even if you don’t plan to use WooCommerce long-term, it must be active during the import process.
2. Add the Custom Code Snippet
Add this snippet to your site using the Code Snippets plugin (recommended) or by inserting it into your functions.php file.
⚠️ Important: Always test changes on a staging site before applying them to a live environment.
3. Import Your CSV File
Follow the same steps shown above.
4. Verify the Tickets
After importing, confirm that your tickets were successfully imported and are appearing as expected in your events.
5. Deactivate WooCommerce (If Not Needed)
Once you’ve confirmed the tickets are working correctly, you can deactivate and delete WooCommerce if you don’t need it for anything else.
Advanced: Import Attendees
To import tickets or RSVPs attendee from a CSV file, you need to have this free Event Tickets Attendee CSV Importer Extension installed first.
Creating the CSV
The first step is to create a CSV with the correct columns. The following data can be included when importing attendees:
- event_name
- ticket_name
- attendee_name
- attendee_email
- display_opt_in
- user_id
If you are importing RSVP attendees, there can also be a column for going. Download a sample file here.
Defining the Target Ticket
The ticket_name column can accept either the ticket name or the ticket ID to match attendees with the correct ticket. If you prefer to use the ticket ID to specify which ticket each attendee should be assigned to, you can find the ticket ID on the Event’s Attendees Page. This ID is associated with the specific ticket within the event.
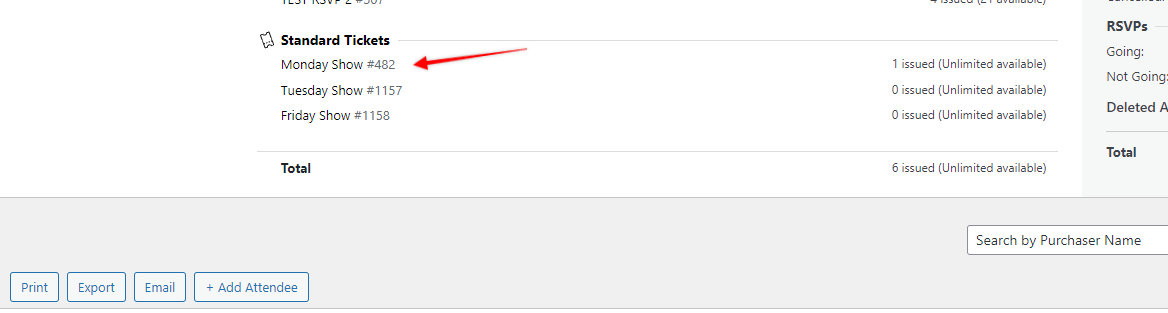
For example, if the ticket ID is 482 and the ticket name is “Monday Show” your CSV file should include this information as shown below:

Import Steps
Once you have your CSV, follow these steps to start importing attendees.
- On your WordPress Admin, go to Events → Import, then select CSV as origin.
- Select the correct Ticket Type for your import here:
RSVP Attendees
Ticket Attendees (Tickets Commerce)
Ticket Attendees (WooCommerce) - Upload the Attendee’s CSV file for the selected ticket type.
- Click the Preview button and if everything is correct in this window, click Import All or the desired row(s).
Note: Each of these Ticket Types processes differently. For example, if you want to import attendees from an RSVP ticket, you need to select the first option.