Once tickets start selling, you’ll need to manage the orders that come through. This article covers the full order lifecycle for Event Tickets — how orders are created and completed using Tickets Commerce (or, optionally, WooCommerce), how order status affects ticket issuance, how to issue refunds, and the filter reference for order statuses.
For managing the attendees attached to those orders — check-ins, manual adds, exports, and so on — see Managing Attendees.
The Order Process
Tickets Commerce is the default e-commerce solution built into Event Tickets, using Stripe or PayPal as the payment gateway. When a customer buys a ticket with Tickets Commerce:
- The customer adds one or more tickets to their cart and checks out.
- The customer is redirected to Stripe or PayPal, where the order is completed.
- Stripe or PayPal sends the order information back to your site.
- The order information is registered and attendee records are generated.
If you’re using Event Tickets Plus with WooCommerce instead, the flow differs slightly:
- A customer adds one or more tickets to their cart and checks out.
- An order or purchase record is created.
- You review the order and, if you’re happy with it, mark the order Complete. WooCommerce may do this automatically.
- The moment the order is completed, tickets are generated and emailed to the customer.
- The attendee list for the event is updated in WordPress with the ticket and attendee details.
👋 Note: RSVPs are unlike tickets and do not create or send order confirmations, but completed registrations are captured and accessible in the attendee reports for that event.
Creating and Completing Orders
Tickets Commerce
When Tickets Commerce is used, orders are created on your Stripe or PayPal account and the information is sent back to your site. Once the information has been relayed, the order appears in the Orders report in WordPress and ticket emails are sent to the customer — no manual approval step is required.
WooCommerce
The process for completing orders in WooCommerce varies, so check WooCommerce’s documentation for accepting payments and completing orders. Don’t assume tickets will be sent to the customer as soon as checkout completes — you may need to manually confirm or approve the order first. Event Tickets Plus includes WooCommerce-specific settings to adjust how and when tickets are created and sent to customers after purchase.
Incomplete Orders and Unissued Tickets
If tickets have been purchased but the orders haven’t yet been completed, the tickets haven’t been issued yet — they won’t appear on the attendee screen. With WooCommerce, ticket issuance timing depends on your WooCommerce-specific settings.
Issuing Refunds
For Tickets Commerce, refunds are processed through your payment provider’s dashboard (Stripe or PayPal), not from WordPress. After refunding through the provider, you may need to return to WordPress to adjust the attendee record and ticket capacity.
See Refunding and Canceling Ticket Orders
👋 Note: For refunds with WooCommerce, see WooCommerce’s documentation. For the full capacity-cleanup workflow (deleting refunded attendees, adjusting event capacity), see Refunding and Canceling Ticket Orders.
Order Statuses
When using Tickets Commerce, order management is primarily handled through your connected Stripe or PayPal accounts. While you can view all orders within the WordPress dashboard, actions like refunds or payment confirmations are managed externally.
Stripe Payment Statuses
When a user adds a ticket to the cart and heads to checkout, the site will ping Stripe and will create a “payment intent.” Stripe responds to this and opens up the credit card form on the checkout page, so the user can check out with the ticket. Once the credit card details are submitted, the payment status will be defined:
- A new order will be created and will be marked as “Pending.”
- If the payment fails, then the original order will be marked as “Not Completed” or usually “Declined.”
- If the payment succeeds, then the Pending order will be marked as “Completed.” There is no way to force orders to “Completed” status from Event Tickets.
You can check out Stripe’s documentation on this here: Payment status updates.
PayPal Order Statuses
When a user adds a ticket to their cart, goes to checkout, and selects PayPal for payment, a new window opens for PayPal authentication. Once the user logs in and confirms their payment details, the payment is processed, and the amount is deducted from their chosen funding source. A unique transaction ID is generated at this stage. The order status may initially appear as pending for up to 30 days.
- A new order will be created and will be marked as “Pending.”
- If the payment fails, then the original order will be marked as “Not Completed” or usually “Denied.”
- If the payment succeeds, then the Pending order will be marked as “Complete.” There is no way to force orders to “Completed” status from Event Tickets.
You can check out PayPal’s documentation on this here: Payment status updates.
Resending Order Confirmations
Sometimes, the situation may arise where you send an order confirmation to your attendees, but they would like to resend the order to their email address. This is possible with Tickets Commerce, although the process varies depending on which payment gateway you use.
We’ll walk you through the processes with both Stripe and PayPal below.
Resend Order Confirmation with Stripe
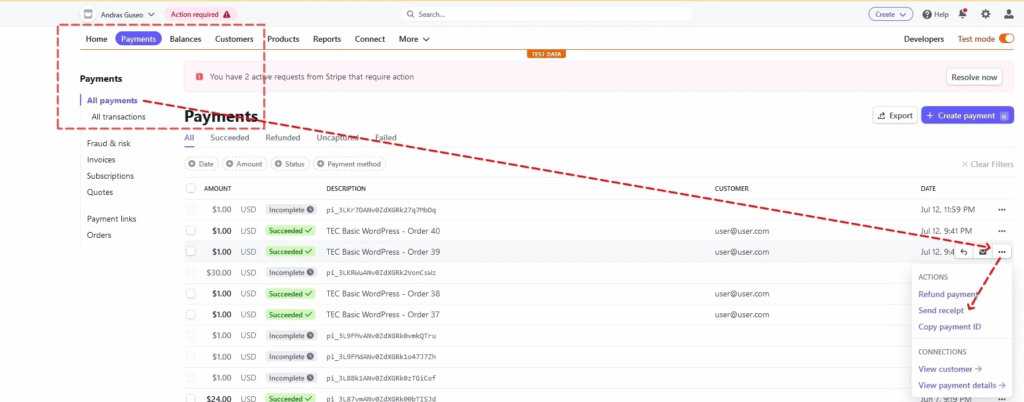
To resend the order confirmation for orders placed with Tickets Commerce and Stripe, you’ll first want to log in to the Stripe Dashboard.
From there, head over to Payments, and then click on the three dots next to the order you’d like to resend the order confirmation—select Send Receipt from the dropdown menu.
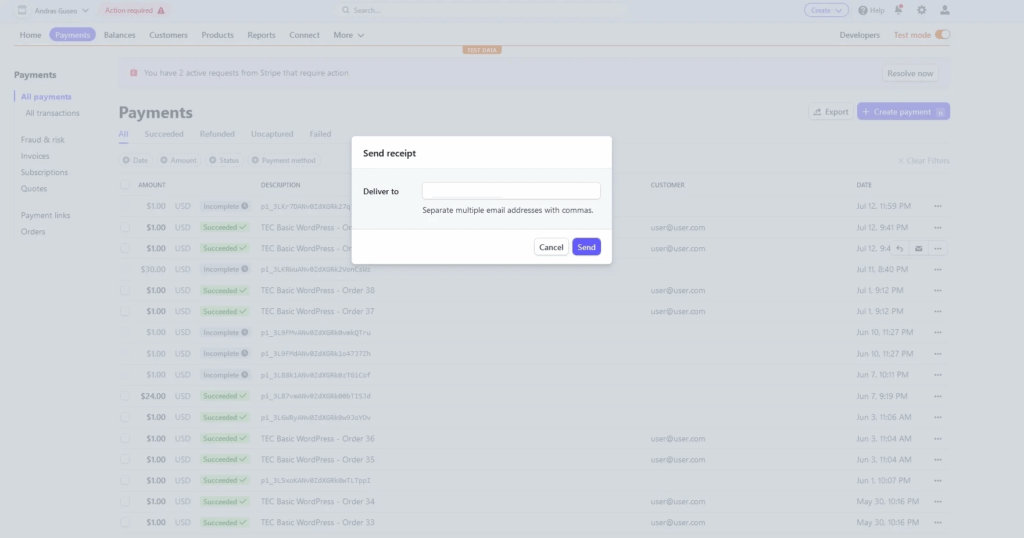
Then, you’ll see a pop-up menu where you can change the email address to which you’d like the order confirmation sent.
Resend Order Confirmation with PayPal
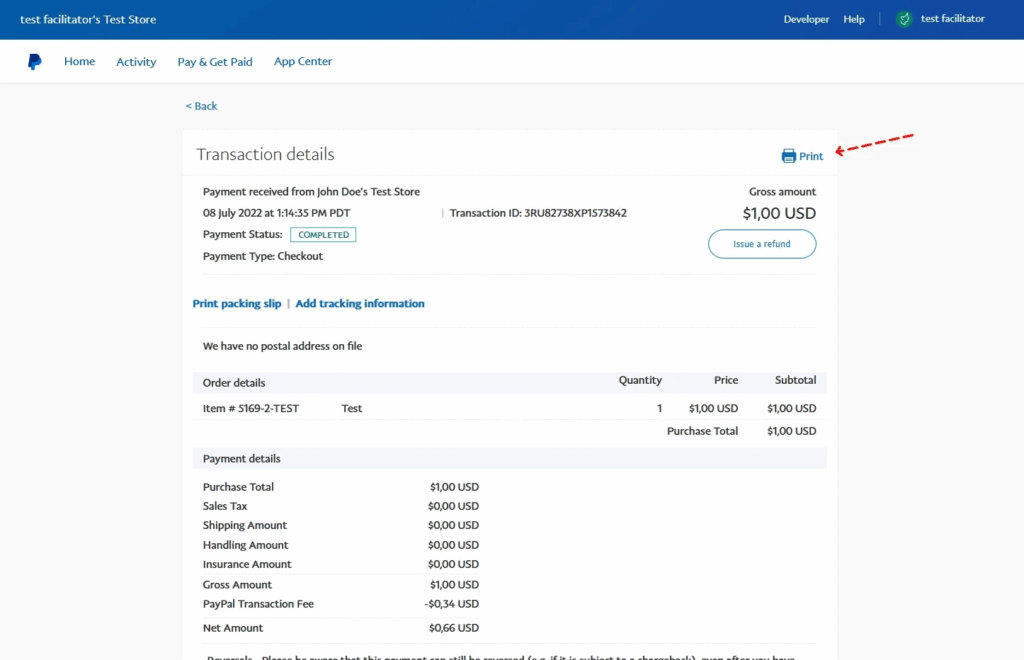
To resend the order confirmation with PayPal, the process varies slightly, as you’ll need to send the order confirmation manually. Log in to the PayPal Dashboard and locate the transaction for which you’d like to resend the order confirmation.
Select the Print option to create a PDF of the order and send it manually by attaching the PDF to an email that you create externally.
Known Issue: Tickets Commerce Stock Handling
In some cases, Tickets Commerce users initiate ticket purchases but don’t complete the process. These incomplete orders can still reduce available ticket stock, leading to discrepancies between actual sales and inventory.
To prevent uncompleted orders from affecting your ticket stock, adjust the stock handling settings so that only completed orders decrease inventory:
- Navigate to Tickets → Settings → Payments → Tickets Commerce → General Settings.
- Locate the Stock Handling option.
- Set stock to decrease only when an order is marked Completed.
This configuration ensures ticket stock is reduced only for completed purchases. For more on availability, see How Event Tickets Calculates Availability.