Seating is an add-on for Event Tickets that allows you to sell tickets with assigned seating. The first step is to define your space with Seating Maps and Seat Layouts. Then when you’re creating a ticket, you can connect it to a specific seat type. During the purchase process, a customer can choose from the available seats and the associated tickets.
Getting started
To create assigned seating tickets, you need to be using the block editor and have Tickets Commerce or WooCommerce configured.
Seating is a tool that relies on SaaS (software as a service), so you don’t need to install a separate plugin. When you purchase Seating, you’ll get a license key. When you enter the key under Tickets > Settings > License Keys, you’ll also be prompted to connect to the Seat Builder service which powers the seating functionality. Read more about connecting your site in this article.
Before you start making tickets, you first need to define your space and seat types with Seating Maps and Seat Layouts. Then when you create tickets, you’ll be able to relate them to specific seat types in your configuration.
Creating Assigned Seating tickets
When you create a new ticket in the Tickets block, you’ll see two options for Ticket Capacity: General Admission and Assigned Seating. General Admission capacity is the standard option available with Event Tickets, and does not include assigned seating. To allow your attendees to choose their seats, select Assigned Seating.
Next, choose the Seat Layout to use for this event. Once you’ve defined the Seat Layout, you can choose the Seat Type for this ticket. The seat type that you choose defines the capacity for the ticket.
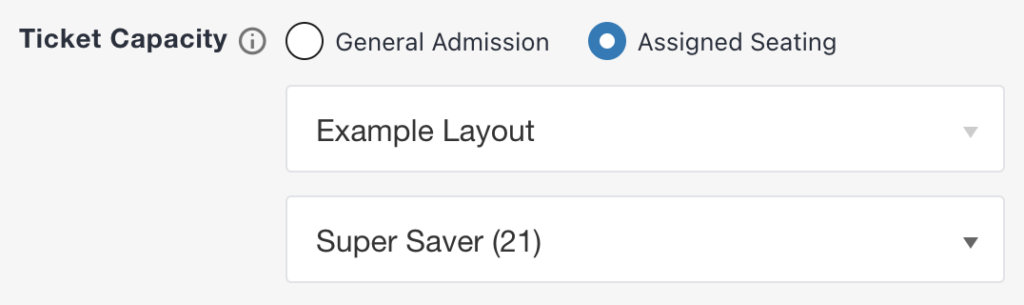
In order to sell the same group of seats at different price points (e.g. Adult, Child, Senior), make multiple tickets and associate them with the same seat type. To price tickets based on seat type (e.g. Premium, Standard, Super Saver), you can associate each seat type with a different ticket. You can also do a combination by using some seat types with multiple tickets and others with only one ticket.
You can also use sale prices, sales windows, individual attendee collection, and/or attendee registration fields just like with any other ticket.
Notes
- The seat layout for your event is set when you create the first ticket. When creating additional tickets, you will be able to select from any seat type on that layout. You cannot use more than one seat layout on an event.
- For now, you cannot use General Admission (unseated) capacity tickets on the same event with Assigned Seating tickets. Once you create a ticket, all other tickets will use the same capacity type.
- Assigned seating is not available for Series Passes or Community tickets
Capacity and availability for seated tickets
Seat reservations and seat status (i.e. reserved or unoccupied) are controlled by the Seating Builder SaaS, while capacity and availability are managed on the WordPress side by Event Tickets. When you create a seated ticket, the capacity is set based on the selected Seat Type. When you have multiple tickets using the same Seat Type, those tickets are pulled from the same pool of capacity (i.e., the number of seats defined as that Seat Type on the Seat Layout).
As people purchase tickets, the event’s availability will decrease and seats will be reserved. In most situations, the number of unoccupied seats will be equal to the availability of the event. However, there are some situations where the numbers will not match, and you may want to take manual action by removing an attendee’s seat assignment, reviewing attendees without seat assignments, or deleting an attendee.
Note: editing a Seat Layout that is associated with events can impact those events and attendees, so be careful when making changes. We recommend reviewing attendees on associated events before making changes to a Layout. Read more about editing layouts
Editing Assigned Seating tickets
You can edit a ticket with assigned seating to adjust name, price, etc. You can change the seat type, but keep in mind that doing so will not change the seat assignment of any existing attendees. For more information, go to Editing a layout with associated events.
Managing attendees & seat assignments
The Seats tab
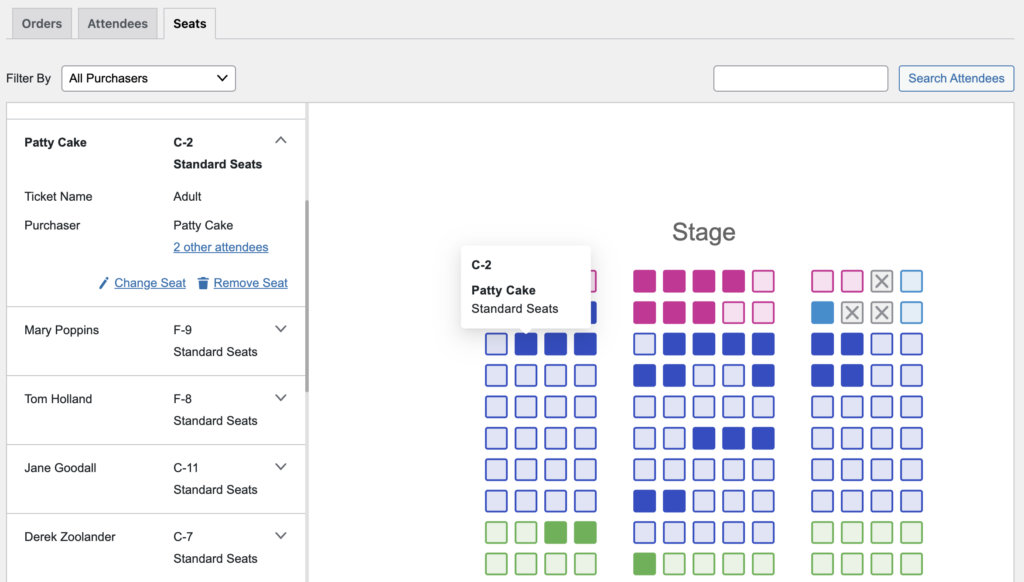
Every event with seated tickets has a Seats tab alongside the usual Orders and Attendees tabs. You can get directly to the seats tab by clicking the link at the bottom of the Ticket block.
The Seats tab lists all of the attendees with their seat assignments and shows the event’s seat layout with all reserved and available seats. Click any reserved seat to see the attendee’s information or select an attendee from the list.
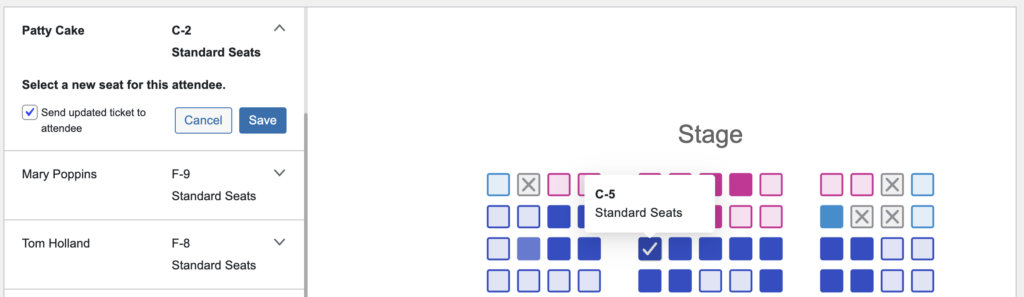
Changing seat assignments
From the Seats tab, you can change any attendee’s seat assignment. Select an attendee from the list or click an occupied seat on the layout. From the attendee list, select the Change Seat option and select a new seat from the available seats on the layout. By default, the attendee will get a new email with an updated ticket showing the new seat assignment. Or you can uncheck that option and they will not receive an email.
If an attendee was seated with other people, you may want to re-seat the entire party so that they can stay together. If you want to see a group of people who are attending together, you can use the Filter By dropdown to see a list of all seats bought by the same person. Or click the “other attendees” link in the attendee details.
Removing a seat assignment
You can remove an attendee’s seat assignment by selecting them and clicking the Remove Seat option. The seat will show as unoccupied. When someone else is purchasing, they will be able to choose that seat to purchase. Keep in mind that removing a seat assignment does not delete the attendee or impact the availability for the event. If you want to increase ticket availability, you need to delete the attendee on the Attendees page.
Adding a new Attendee with a seat assignment
If you need to manually add an attendee to your seated event, first go to the Attendees tab and use the Add Attendee option to create the new attendee. Then go to the Seats tab and you’ll see them listed there. Select the attendee from the list at the left, click Assign Seat, and choose from any available seat on the layout. You can also choose to send them an email with their new seat assignment.
Attendees without seat assignments
If you go to the Seats tab for an event and see attendees without seat assignments, it is most likely for one of the following reasons:
- The attendee was created manually but did not get a seat assigned (see above)
- The seat layout for the event was changed, which removes all seat assignments
- The event layout was edited and the attendee’s original seat was changed to blocked
You can assign these attendees to any open seat by clicking the Assign Seat option.
Order management with seated attendees
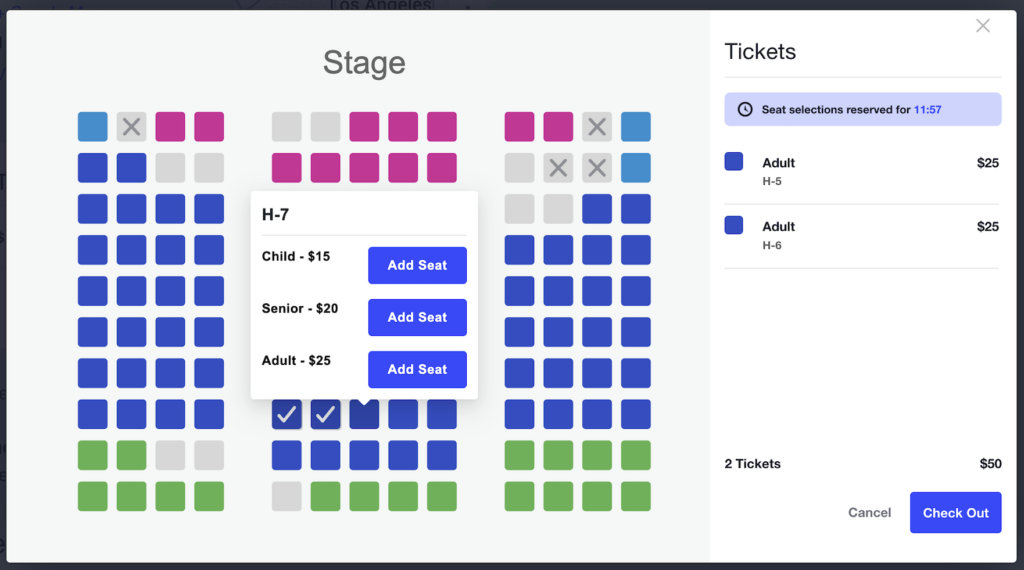
Seat are reserved as soon as someone selects them during the purchase process. If they don’t complete the purchase, the seats will be returned to available. If they complete the purchase, an order and attendee record will be created immediately, even if the payment is still pending. This helps prevent people from trying to book the same seats simultaneously.
If the order status changes, there will not be any automatic change to the attendee’s seat assignment. If something goes wrong with the payment or someone wants a refund and will not be attending, you’ll need to take manual action in order to free up their seat(s) to be purchased by someone else. You can either delete the attendee completely (from the Attendees tab) or remove the attendee’s seat assignment (from the Seats tab) in order to change the seat from reserved to available. Then someone else will be able to purchase and reserve that seat.
Attendee Check-In
Like with any other ticket, seated attendees are checked in from the Attendees tab. The Attendees tab always includes the seat assignment for reference. If you have Event Tickets Plus, you can also check attendees in using the check-in app.
Other Settings
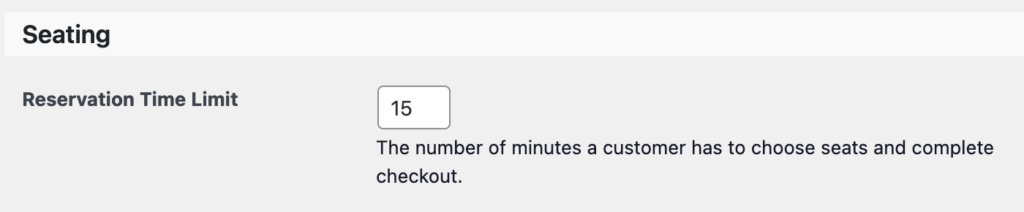
Under Tickets > Settings > General > Seating you’ll find a setting for defining the reservation time limit. By default, your customers have 15 minutes from opening the seat reservation modal to completing check out. You can use this setting to change that time limit as needed.