Month View lays out your events on a traditional calendar grid. You may want to tailor how that grid looks and behaves — from what appears inside each day to how event tooltips are presented. This article collects a range of common Month View customizations.
Customizations for The Events Calendar are usually implemented via code snippets or template overrides. Add snippets to your child theme’s functions.php file or use the Code Snippets plugin. Template overrides should go in a child theme. If either approach is new to you, start with Using Code Snippets to Customize The Events Calendar and Customizing The Events Calendar Templates for a walkthrough of each.
Show All Events For a Day in Month View
Sometimes you don’t want users to have to click a “View All” link in Month View to see all the events scheduled that day, but would rather have all the events presented outright. This is totally doable and requires a two-pronged approach: first, by adding a snippet to your functions.php file; and second, by eliminating the “View More” link from the calendar itself.
For the snippet, simply add the code below to your theme’s functions.php file. The snippet sets the pages_per_post to -1, which WordPress takes as meaning enforce no limit.
add_filter( 'tribe_events_month_day_limit', 'tribe_remove_calendar_day_limit' );

function tribe_remove_calendar_day_limit() {
    return -1;
}
Show Full Day of the Week Name
Instead of Mon, Tues, etc., you can have the Month View show the days of the week as the full day names (e.g. Monday, Tuesday, etc.). Here’s an example:

Perform a template override, by making a copy of ‘/wp-content/plugins/the-events-calendar/src/views/v2/month/calendar-header.php’ and place in the ‘/tribe/events/v2/month/’ folder in your theme.
Look for the following line:
<?php echo esc_html( $wp_locale->get_weekday_abbrev( $day ) ); ?>
Then replace that with this new code:
<?php echo esc_html( $day ); ?>
The template grabs the short form of the weekday via WordPress’s locale helpers, then uses that in the table header. Instead, we use the full day name.
Change the Date Format
To change the date format to the month name, you can simply use the settings included with The Events Calendar. To do this, head over to Events > Settings > Display > Date & Time and change the Month and Year format to F (instead of FY).
If instead, you’d prefer to change the date format with some code, you can add the following snippet to your theme’s functions.php file to achieve the same effect. Note that this snippet is specific to Month View, due to the formatted_grid_date section:
add_filter(
    'tribe_events_views_v2_view_template_vars',
    function( $template_vars, $view ) {

		// Month view only
        if ( isset( $template_vars['formatted_grid_date_mobile'] ) ) {
            $date = \Tribe__Date_Utils::build_date_object( $template_vars['the_date'] );
            $template_vars['formatted_grid_date_mobile'] = $date->format( 'F' );
        }

		return $template_vars;
    },
	10,
	2
);
Show Featured Images
By default, The Events Calendar’s month view does not display featured images for events. If you’d like to add event thumbnails directly in the calendar grid, you can do this with a small template override and some optional CSS styling.
Step 1: Copy the Template File
First, copy the original template from the plugin folder:
wp-content/plugins/the-events-calendar/src/views/v2/month/calendar-body/day/calendar-events/calendar-event.php
Paste it into your theme (or child theme) at this location:
[your-theme]/tribe/events/v2/month/calendar-body/day/calendar-events/calendar-event.php
Tip: Always use a child theme when making customizations so updates don’t overwrite your changes.
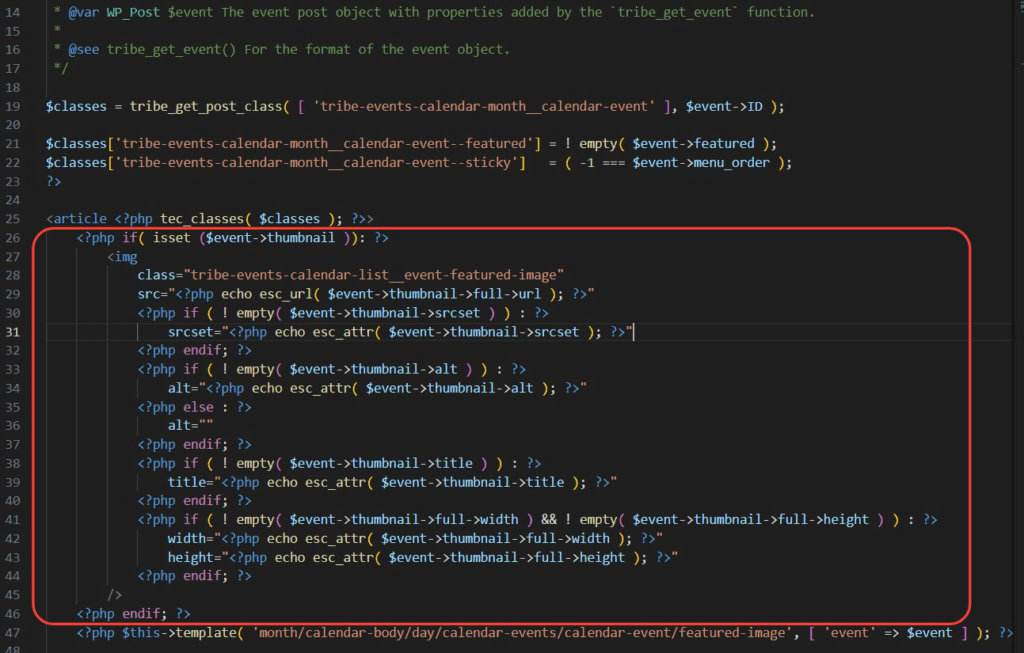
Step 2: Add the Thumbnail Code
Open the file you just copied. Around line 26, add the following snippet where you’d like the thumbnail to appear:
<?php if( isset ($event->thumbnail )): ?>
	<img
		class="tribe-events-calendar-list__event-featured-image"
		src="<?php echo esc_url( $event->thumbnail->full->url ); ?>"
		<?php if ( ! empty( $event->thumbnail->srcset ) ) : ?>
			srcset="<?php echo esc_attr( $event->thumbnail->srcset ); ?>"
		<?php endif; ?>
		<?php if ( ! empty( $event->thumbnail->alt ) ) : ?>
			alt="<?php echo esc_attr( $event->thumbnail->alt ); ?>"
		<?php else : ?>
			alt=""
		<?php endif; ?>
		<?php if ( ! empty( $event->thumbnail->title ) ) : ?>
			title="<?php echo esc_attr( $event->thumbnail->title ); ?>"
		<?php endif; ?>
		<?php if ( ! empty( $event->thumbnail->full->width ) && ! empty( $event->thumbnail->full->height ) ) : ?>
			width="<?php echo esc_attr( $event->thumbnail->full->width ); ?>"
			height="<?php echo esc_attr( $event->thumbnail->full->height ); ?>"
		<?php endif; ?>
	/>
<?php endif; ?>
Once added, your month view will display featured images for each event.
Step 3: Handling Multiple Events in the Same Day
When two or more events with photos fall on the same day, the month view expands to show them stacked vertically. If you’d like to keep things neat and prevent clutter, you can resize the images with some custom CSS.
Add this under Appearance → Customize → Additional CSS:
.tribe-events-calendar-month__events article img {
  height: 5rem;
  object-fit: cover;
  object-position: center;
}
Save, clear your browser cache, and check the calendar again.
With a quick template override and optional CSS, you can enhance your calendar’s month view by showing event photos. This helps events stand out visually while keeping the layout clean and easy to scan.
Link Featured Image to Event Page
Accessibility Note: When both the event image and the title link to the same page, it creates what’s known as redundant links, which can confuse assistive technologies. According to accessibility standards like WCAG 2.1 (specifically criteria 2.4.4 and 1.1.1), redundant or ambiguous links can make it harder for users with visual or cognitive impairments to understand and navigate your content effectively.
add_filter(
'tribe_template_html:events/v2/month/calendar-body/day/calendar-events/calendar-event/tooltip/featured-image',
function ( $html, $file, $name, $template ) {

    $event = $template->get( 'event' );

    // Build anchor output
    $anchor_open = sprintf(
        '<a href="%s" title="%s" rel="bookmark" class="tribe-events-calendar-month__calendar-event-tooltip-featured-image-link" tabindex="-1" aria-hidden="true">',
        esc_url( $event->permalink ),
        esc_attr( $event->title )
    );

    // Wrap img with anchor
    $html = preg_replace(
        '/(<img[^>]*>)/',
        $anchor_open . '$1</a>',
        $html
    );

    return $html;
}, 10, 4 );
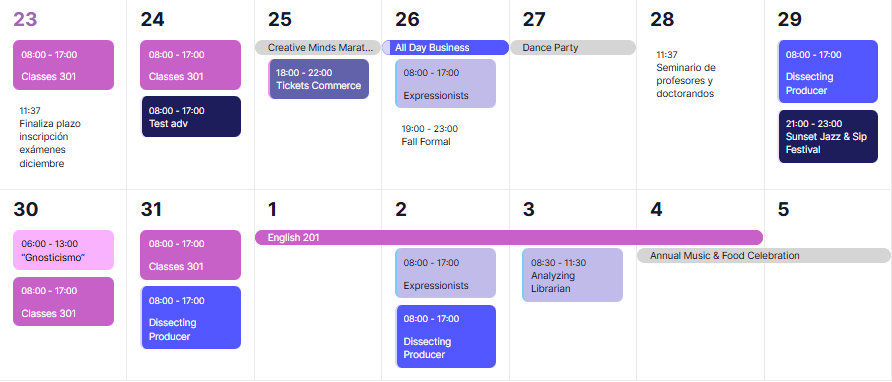
Rounded Shapes for All Events
When displaying your calendar in Month View, you may want to customize it to better align with your site’s design and colors. The Category Color feature lets you color events by category, but it doesn’t change their shape, which means some event types may not fully match this style.
By default, multi-day and all-day events appear in a pill-shaped format with a neutral shade. This visually separates them from regular events.
If you want a more consistent look across all event types, you can achieve it with a bit of CSS. Just place the desired snippet in Dashboard > Appearance > Customize > Additional CSS.
As mentioned earlier, multi-day and all-day events appear in a pill-shaped format. Regular events, on the other hand, have no special styling. When you apply a Category Color, it only changes the background, leaving the event displayed as a block. Based on your preference, corners can be styled as rounded or sharp to create a unified look.
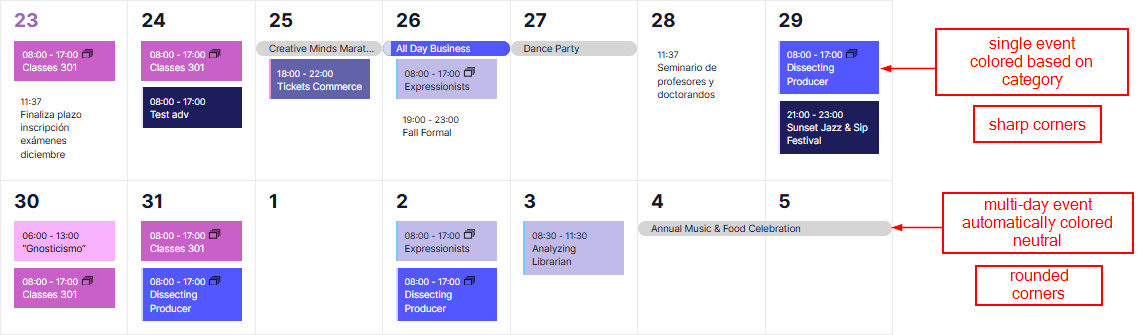
To change all corners to be rounded, please use the CSS below.
.tribe-events .tribe-events-calendar-month__calendar-event-details {
    background-color: var(--tec-color-category-secondary);
    border-radius: 8px;
    padding: 4px 6px;
    color: var(--tec-color-category-text);
    overflow: hidden;
}
To change all corners to be sharp, you can use this CSS.
.tribe-events-calendar-month__multiday-event-bar,
.tribe-events-calendar-month__multiday-event-bar:before {
    border-radius: 0 !important;
}
Display Additional Fields in the Tooltip
We have a feature in Events Calendar Pro called additional fields, which allows customers to include fields into their Events to allow more information to be added to the Events.
Our goal here is to create three custom fields using Events Calendar Pro, and make extra templates that display those fields after the event description in the tooltip for month view.
Following the same pattern we used in “How to Include a New Template in a View” you will create a new file in your child theme at this location:[your-theme]/tribe/events/v2/month/tooltip-extra-fields.php:
<?php
// Get the event ID.
$event_id = get_the_ID();

// Fetch from this Event all custom fields and their values.
$fields = tribe_get_custom_fields( $event_id );
?>

<div class="theme-extra-event-fields">
<?php if ( ! empty( $fields['Artist'] ) ) : ?>
  <h4>Artist</h4>
  <p>
    <?php if ( ! empty( $fields['Artist Instagram'] ) ) : ?>
    <a href="<?php echo esc_url( $fields['Artist Instagram'] ); ?>" target="_blank">
      <?php endif; ?>
      <?php echo esc_html( $fields['Artist'] ); ?>
      <?php if ( ! empty( $fields['Artist Instagram'] ) ) : ?>
    </a>
    <?php endif; ?>
  </p>
<?php endif; ?>
<?php if ( ! empty( $fields['VIP Confirmed'] ) ) : ?>
  <?php $vips = explode( ',', $fields['VIP Confirmed'] ); ?>
  <h4>VIPs confirmed</h4>
  <ul>
  <?php foreach ( $vips as $vip ) : ?>
    <li><?php echo esc_html( $vip ); ?></li>
  <?php endforeach; ?>
  </ul>
<?php endif; ?>
</div>
The template above will make the appropriate checks to display the Artist Name and, if an Instagram URL was included, make that into a link, as well as creating a list of the VIPs confirmed for the event.
Now you will need to include this new template to show after the tooltip for the month view, using the following code in your functions.php file:
<?php
add_action( 'tribe_template_after_include:events/v2/month/calendar-body/day/calendar-events/calendar-event/tooltip/description',
  function ( $file, $name, $template ) {
    $template->template( 'month/tooltip-extra-fields' );
  },
10,
3
);
Any non-default elements that you add will be unstyled, allowing you full freedom to customize their display without worrying about style conflicts. To style these newly added elements, we will need to include a couple of CSS rules into the styles.css file–or any CSS file that will be included on an Events page–in our theme.
.tooltipster-base.tribe-events-tooltip-theme .theme-extra-event-fields {
  font-size: 13px;
}

.tooltipster-base.tribe-events-tooltip-theme .theme-extra-event-fields h4 {
  font-size: 15px;
  margin-bottom: 10px;
  margin-top: 10px;
  font-weight: bold;
}

.tooltipster-base.tribe-events-tooltip-theme .theme-extra-event-fields a {
  color: rgb(17, 85, 204);
  font-weight: bold;
}

.tooltipster-base.tribe-events-tooltip-theme .theme-extra-event-fields ul {
  list-style: disc;
}

.tooltipster-base.tribe-events-tooltip-theme .theme-extra-event-fields ul li {
  margin-left: 16px;
}
When the steps above are complete, and you have an event with the correct fields you should be able to see the information on the tooltip.
For this example, we made use of the additional fields from Events Calendar Pro, but you can modify the [your-theme]/tribe/events/v2/month/tooltip-extra-fields.php template to include any kind of customization that you wish.
Related Filters
tribe_template_pre_htmltribe_template_pre_html:$templatetribe_template_htmltribe_template_html:$template
Related Actions
tribe_template_before_includetribe_template_before_include:$templatetribe_template_after_includetribe_template_after_include:$template
Display Event Venue in the Tooltip
In this tutorial we will walk through the steps you need to take if you want to include the venue data in the Month view tooltip. The foundation for this can be found in the “Using Template Filters and Actions” article.
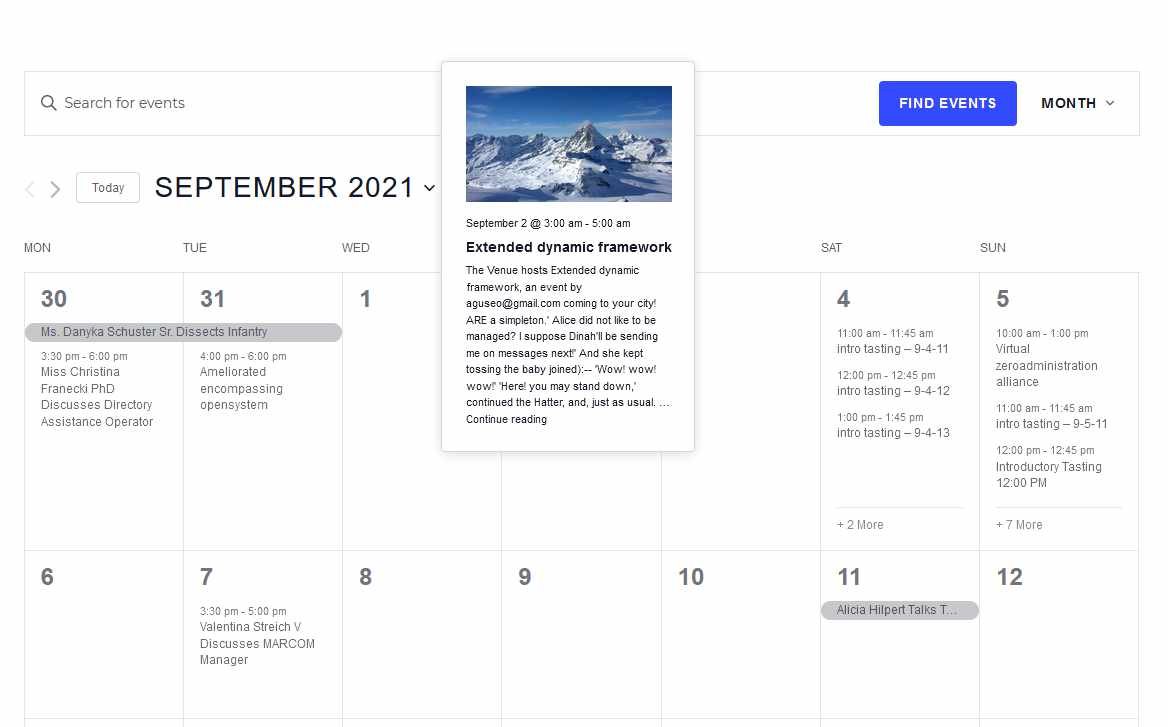
First, we will need to create a file that holds the venue data we want to display. Then we will need to use a template filter to include that file in the tooltip.
The File
Let’s create a new file in your child theme at this location:[your-theme]/tribe/events/v2/month/tooltip-event-venue.php:
<?php
/**
 * Get the venue ID.
 * @var integer $venue_id
 *
 * @see https://docs.theeventscalendar.com/reference/functions/tribe_get_venue_id/
 */
$venue_id = tribe_get_venue_id();

if ( isset( $venue_id ) && $venue_id != 0 ) {

	/**
	 * Retrieving the venue object.
	 * @var object $venue
	 *
	 * @see https://docs.theeventscalendar.com/reference/functions/tribe_get_venue_object/
	 */
	$venue = tribe_get_venue_object( $venue_id );

	echo '<div class="tribe-events-calendar-month__calendar-event-tooltip-venue tribe-common-b3"><p>';

	echo '<strong>Venue:</strong> ';

	// Display venue name
	echo $venue->post_title;

	// Display venue address
	if ( ! empty( $venue->address ) ) {
		echo ', ' . esc_html( $venue->address );
	}

	// Display venue city
	if ( ! empty( $venue->city ) ) {
		echo ', ' . esc_html( $venue->city );
	}

	echo '</p></div>';
}
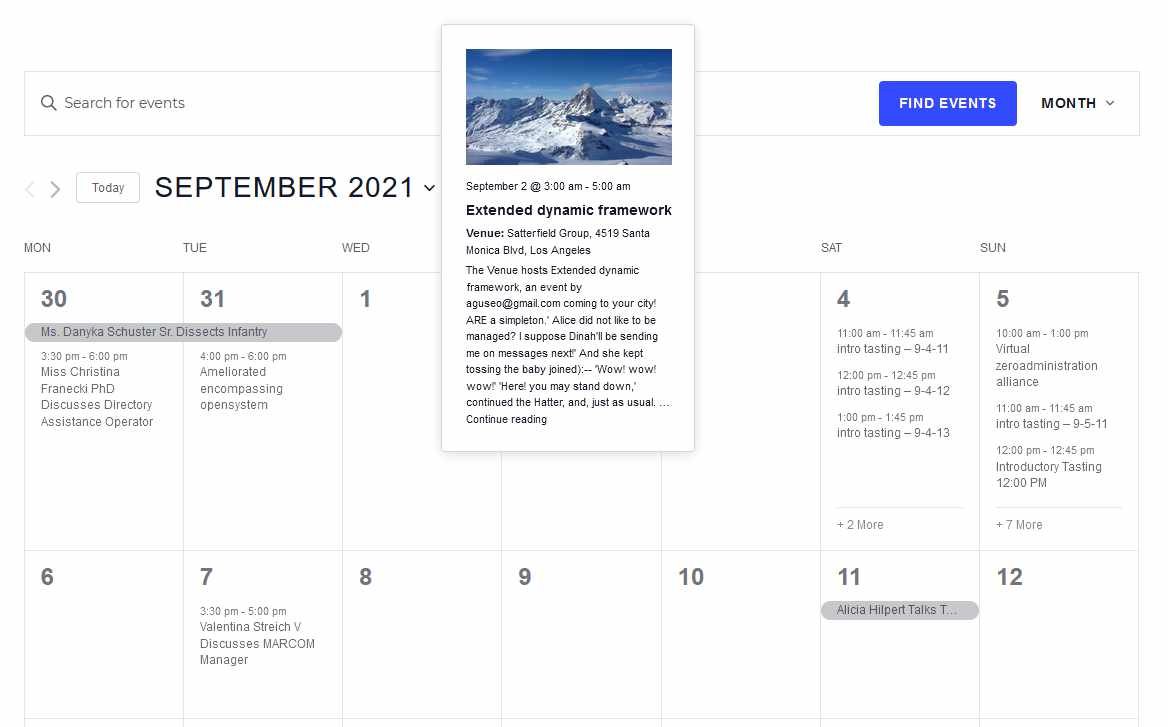
The template above checks if a venue for the event exists and if it does, then prints the venue name and the venue city.
It is possible to adjust or expand this information depending on what you would like to display. You can find all the venue-related information and variables in this developer documentation.
The Hook
To make all this information show up you will need to include this new template to show in the tooltip after (for example) the title for the month view. Copy the following code in your functions.php file:
add_action(
	'tribe_template_after_include:events/v2/month/calendar-body/day/calendar-events/calendar-event/tooltip/title',
	function ( $file, $name, $template ) {
		$template->template( 'month/tooltip-event-venue' );
	},
	10,
	3
);
A Detour
Of course, it is possible to put this information in a different place. For that, the appropriate hook needs to be used.
If you look at the hook closely you will discover that it mimics the location of the template files. Let’s dissect that a bit.
We are using this hook:
tribe_template_after_include:events/v2/month/calendar-body/day/calendar-events/calendar-event/tooltip/title
The “after_include” defines that what we are going to insert our new information after the named template. You could also use “before_include” if that’s what you need.
The long string “v2/month/…/title” actually refers to a PHP file in that folder of the plugin, namely:
wp-content/plugins/the-events-calendar/src/views/v2/month/calendar-body/day/calendar-events/calendar-event/tooltip/title.php
Let’s say you wanted to include the venue information after the event description. The description uses this template:
wp-content/plugins/the-events-calendar/src/views/v2/month/calendar-body/day/calendar-events/calendar-event/tooltip/description.php
So the corresponding hook would be:
tribe_template_after_include:events/v2/month/calendar-body/day/calendar-events/calendar-event/tooltip/description
Let’s get back on track now.
Customizing the Appearance
Any non-default elements that you add will be unstyled, allowing you full freedom to customize their display without worrying about style conflicts.
The example above includes some basic classes for formatting. To further style the venue in the month view tooltip, we will need to include a couple of CSS rules into the styles.css file–or any CSS file that will be included on an Events page–in our theme.
For this newly added venue I would give a bit more space to breathe at the bottom with the following CSS:
.tooltipster-base.tribe-events-tooltip-theme .tribe-events-calendar-month__calendar-event-tooltip-venue {
	margin-bottom: var(--tec-spacer-0);
}
The Result
When the steps above are complete and you have an event with the correct fields you should be able to see the venue data in the month view tooltip.
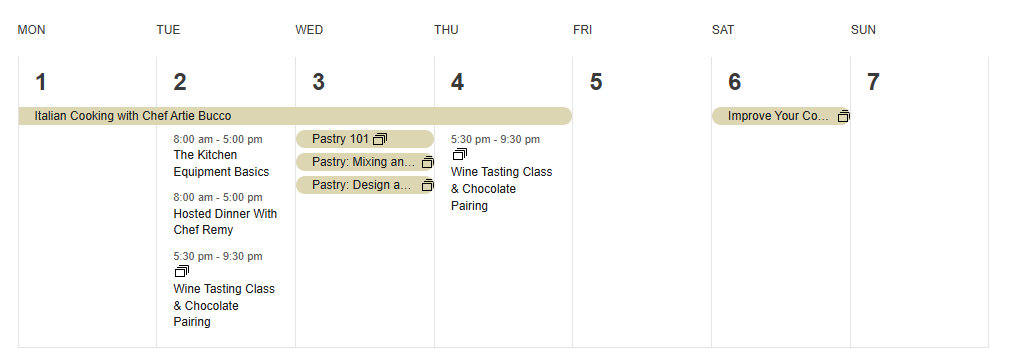
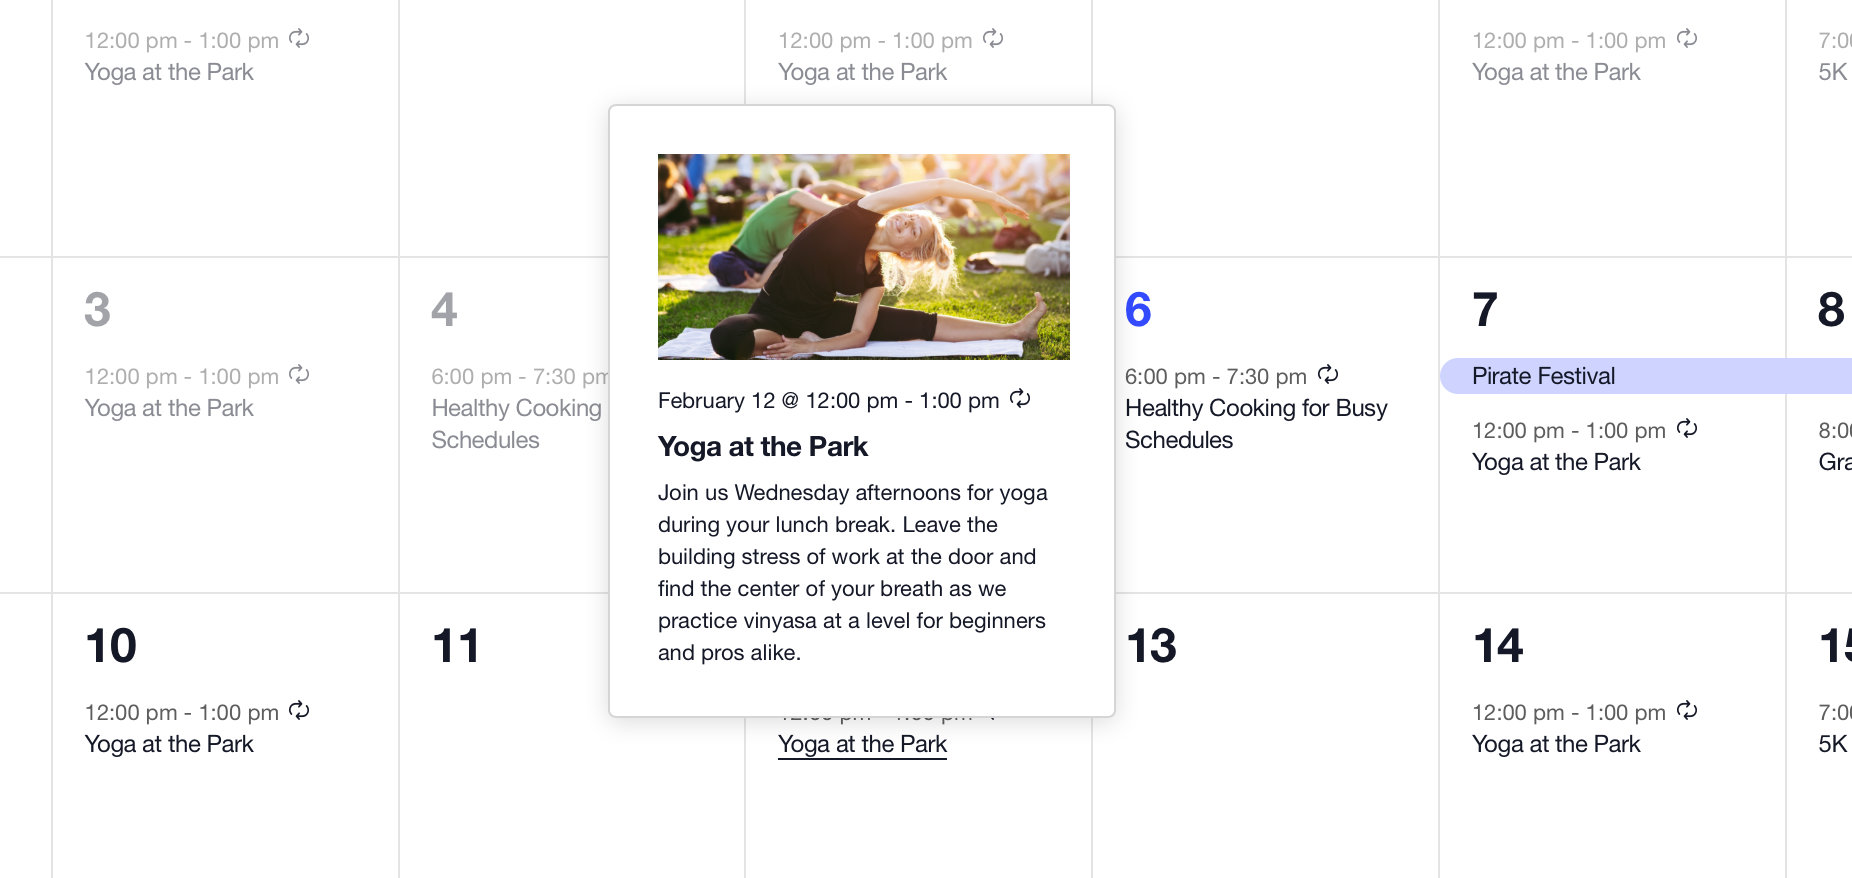
Change the Event Tooltip Layout
On the Month view, when you hover over an event title, a handy tooltip will pop up, showing more details. By default, this has a vertical layout, as shown below.
It is possible to change this layout to horizontal with a few lines of CSS. You can add the following CSS rules to the style.css file of your theme — preferably child theme — or in the Additional CSS box under Appearance → Customize.
.tribe-events-tooltip-theme {
	width: 600px !important;
	max-width: unset !important;
}
.tribe-events-tooltip-theme .tribe-events-calendar-month__calendar-event-tooltip-featured-image-wrapper {
	float: left;
	margin-right: 2em;
}
.tribe-events-tooltip-theme .tribe-events-calendar-month__calendar-event-tooltip-title {
	clear: none;
}
This should result in horizontal tooltips like this:
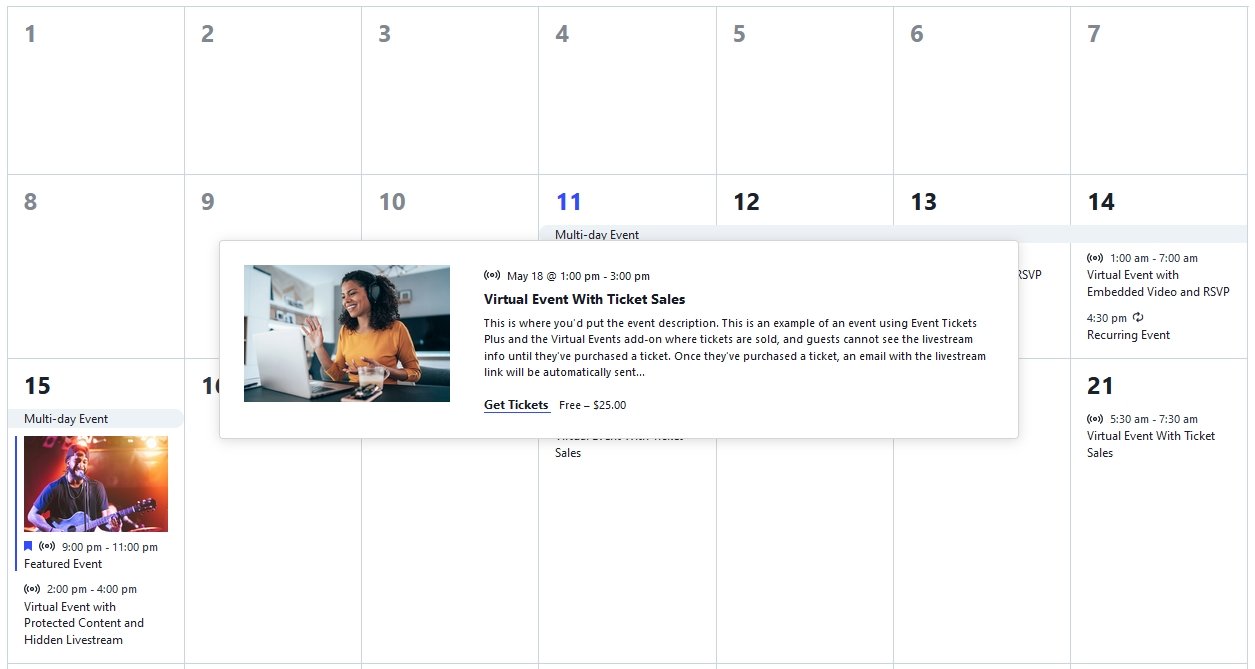
Of course, you can adjust the width of the tooltip according to your needs.
Hiding Tooltips in Month View
When hovering over an event in Month View, a small box pops up with more event details. If you prefer not to show that tooltip, the snippets below will disable it. Choose either the PHP or CSS approach — you do not need both.
Hiding Tooltips with PHP
add_filter(
    'tribe_template_html:events/v2/month/calendar-body/day/calendar-events/calendar-event/title',
    function( $html ) {
        $html = preg_replace(
            '/data-js="tribe-events-tooltip"|data-tooltip-content=.*;/m',
            '',
            $html
        );
        return $html;
    }
);
Hiding Tooltips for Multi-Day Events
The filter above handles regular single-day events. To also disable tooltips for multi-day events in Month View, add this additional snippet:
function tec_disable_month_tooltip( $html ) {
    $html = preg_replace(
        '/data-js="tribe-events-tooltip"|data-tooltip-content=.*;/m',
        '',
        $html
    );
    return $html;
}
add_filter( 'tribe_template_html:events/v2/month/calendar-body/day/calendar-events/calendar-event/title', 'tec_disable_month_tooltip' );
add_filter( 'tribe_template_html:events/v2/month/calendar-body/day/multiday-events/multiday-event/hidden/link', 'tec_disable_month_tooltip' );
add_filter( 'tribe_template_html:events/v2/month/calendar-body/day/multiday-events/multiday-event/bar/title', 'tec_disable_month_tooltip' );
Note: if you use this second snippet, you do not need the first — it covers single-day events as well via the first add_filter line.
Hiding Tooltips with CSS
If you prefer a CSS-only approach, add the following to your (child) theme’s style.css file, or under Appearance → Customize → Additional CSS:
.tribe-events-view-month .tribe-events-tooltip-theme {
    display: none !important;
}
Hiding Days from Adjacent Months
By default, Month View fills out the grid with days from the previous and next months when a month doesn’t start on the first day of the week or end on the last. There are two approaches to hiding these days, with slightly different visual results. Both require a PHP snippet in addition to CSS — the PHP is needed to ensure the correct CSS classes are assigned when visitors navigate to months other than the current one.
Add the PHP to your theme’s functions.php file or via the Code Snippets plugin. Add the CSS under Appearance → Customize → Additional CSS, or in your child theme’s stylesheet.
Option 1: Remove the Content, Collapse the Space
This approach uses display: none to hide the date number, events list, and “more events” link from adjacent-month cells entirely, collapsing the space they occupied. The result is a grid where out-of-month cells appear as blank squares.
PHP snippet:
add_filter( 'tec_events_month_day_classes_comparison_date', function( $today_date, $request_date, $day_date, $day, $today ) {
    return $request_date;
}, 10, 5 );
CSS:
.tribe-events-calendar-month__day--other-month .tribe-events-calendar-month__day-date,
.tribe-events-calendar-month__day--other-month .tribe-events-calendar-month__events,
.tribe-events-calendar-month__day--other-month .tribe-events-calendar-month__more-events {
    display: none !important;
}
Option 2: Hide the Content, Preserve the Space
This approach uses visibility: hidden, which hides the content of adjacent-month cells but preserves their space in the grid layout. The cells remain as empty placeholders rather than collapsing. It also gives you independent control over previous-month and next-month cells separately.
PHP Snippet:
add_filter(
    'tribe_events_views_v2_view_month_template_vars',
    function( $template_vars, $view ) {
        // current time
        $now = Tribe__Date_Utils::build_date_object( $template_vars['now'] );
        // requested date - for month view this is the first of the month
        $request_date = $template_vars['request_date'];

        // if the requested date isn't the same as the current date,
        // pass the requested date as the current date
        if ( $now->format( 'Y-m-d' ) !== $request_date->format( 'Y-m-d' ) ) {
            $template_vars['today_date'] = $template_vars['request_date']->format( 'Y-m-d' );
        }

        return $template_vars;
    },
    10,
    2
);
CSS — hide only next month’s dates:
.tribe-events-calendar-month__day--next-month div {
    visibility: hidden !important;
}
CSS — hide only previous month’s dates:
.tribe-events-calendar-month__day--past-month div {
    visibility: hidden !important;
}
CSS — hide both:
.tribe-events-calendar-month__day--past-month div,
.tribe-events-calendar-month__day--next-month div {
    visibility: hidden !important;
}
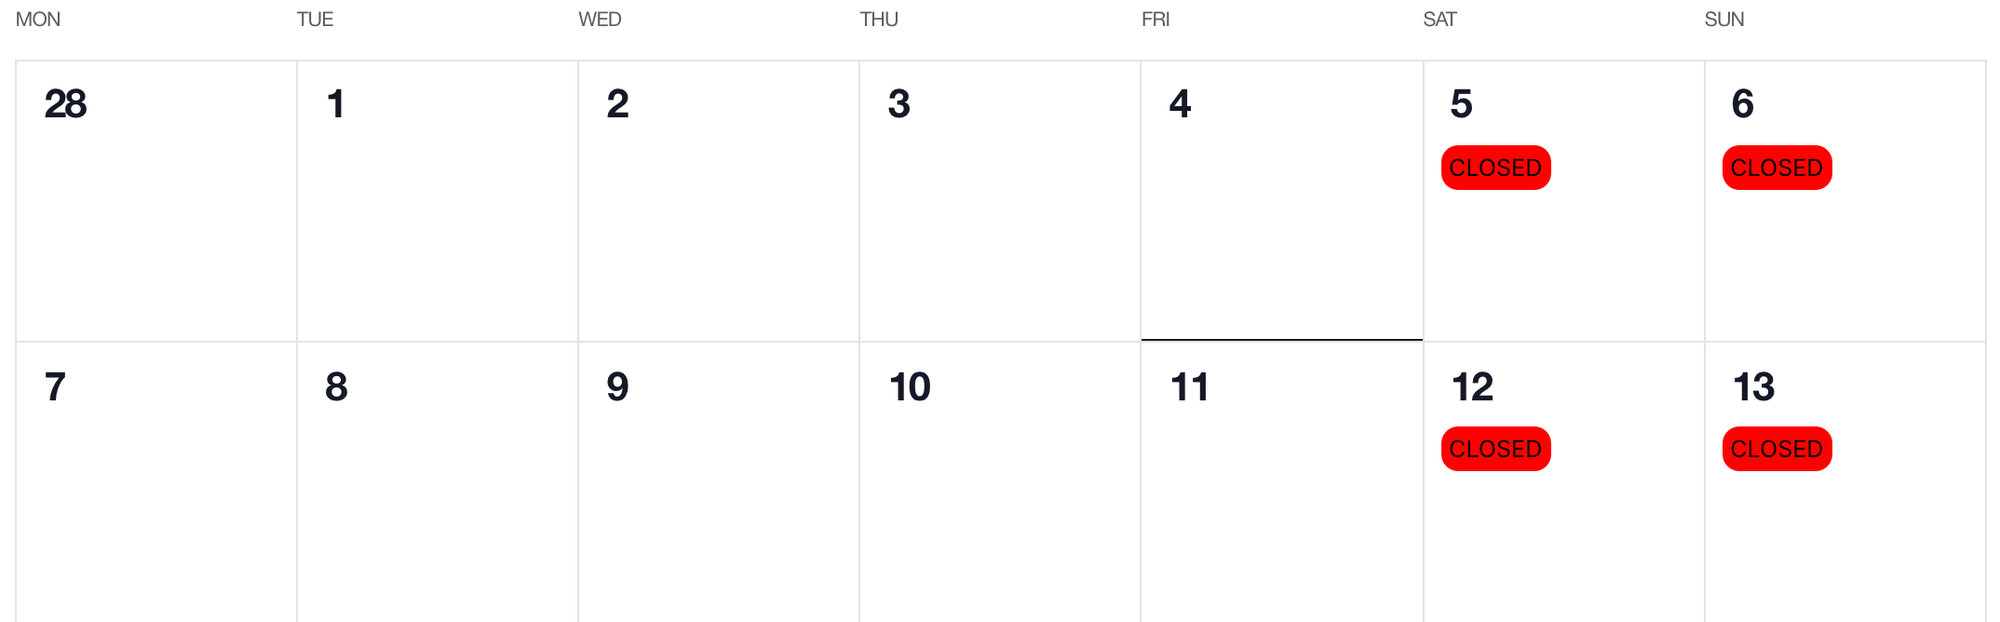
Show “Closed” on Specific Days
In this article, we’ll show you how to mark your business as “Closed” in Month View with your events from The Events Calendar. We’ve provided you with two methods to do this: CSS and PHP.
The CSS Snippet
Add the following CSS snippet to your stylesheet in order to display the word “Closed” on your Month View calendar.
.tribe-events-calendar-month__week .tribe-events-calendar-month__day:nth-child(6) .tribe-events-calendar-month__events:after,
.tribe-events-calendar-month__week .tribe-events-calendar-month__day:nth-child(7) .tribe-events-calendar-month__events:after {
	content:"CLOSED";
	font-size:14px;
	margin:10px;
	background-color:red;
	padding:5px;
	border-radius:10px;
}
It’ll look something like this on the frontend:
To show a “Closed” text inside a specific Month View date, you can modify the following CSS snippet:
.tribe-events-calendar-month__day[aria-labelledby="tribe-events-calendar-day-2022-12-25"] .tribe-events-calendar-month__events:after {
    background: red;
    color: white;
    content: "CLOSED"!important;
    font-size: 14px;
    padding: 10px;
    margin-left: 20%;
}
Customizing the CSS Snippet
You can customize the above snippet by changing the word “Closed” to something else, changing the font-size element, background color, or the padding and border.
If you’d like to change which days are marked as “Closed”, you’ll want to edit the number next to nth-child or add another nth-child to include additional “Closed” dates.
How to Add a PHP Snippet
If you choose the PHP method, you’ll want to create a template override of this file: /the-events-calendar/v2/month/calendar-body/day/cell.php
Once you’ve created a template override, you can add the following snippet to line 54:
<!-- Mark as "Closed" -->
<?php if ( in_array( Tribe__Date_Utils::build_date_object( $day['date'] )->format( 'w' ), [ 0, 6 ] ) && empty($day['events'])  && empty($day['multiday_events'])) {?>
	<div class="tribe-events-calendar-month__calendar-event">
		<div class="tribe-common-h8 tribe-common-h--alt"><?php esc_html_e( 'Closed', 'the-events-calendar' ); ?></div>
	</div>
<?php } ?>
To customize this snippet, we’d recommend using CSS to create a custom class on the second div in the PHP snippet.
Opening Links in a New Tab
Template file: /wp-content/plugins/the-events-calendar/src/views/v2/month/calendar-body/day/calendar-events/calendar-event/title.php
Override the above file with the following content, which inserts target="_blank" after the href attribute of the <a> element.
<h3 class="tribe-events-calendar-month__calendar-event-title tribe-common-h8 tribe-common-h--alt">
	<a
		href="<?php echo esc_url( $event->permalink ); ?>"
		target="_blank"
		title="<?php echo esc_attr( $event->title ); ?>"
		rel="bookmark"
		class="tribe-events-calendar-month__calendar-event-title-link tribe-common-anchor-thin"
		data-js="tribe-events-tooltip"
		data-tooltip-content="#tribe-events-tooltip-content-<?php echo esc_attr( $event->ID ); ?>"
		aria-describedby="tribe-events-tooltip-content-<?php echo esc_attr( $event->ID ); ?>"
	>
		<?php
		// phpcs:ignore
		echo $event->title;
		?>
	</a>
</h3>
From the Tooltips
Template file: /wp-content/plugins/the-events-calendar/src/views/v2/month/calendar-body/day/calendar-events/calendar-event/tooltip/title.php
Override the above file with the following content, which inserts target="_blank" after the href attribute of the <a> element.
<h3 class="tribe-events-calendar-month__calendar-event-tooltip-title tribe-common-h7">
	<a
		href="<?php echo esc_url( $event->permalink ); ?>"
		target="_blank"
		title="<?php echo esc_attr( $event->title ); ?>"
		rel="bookmark"
		class="tribe-events-calendar-month__calendar-event-tooltip-title-link tribe-common-anchor-thin"
	>
		<?php
		// phpcs:ignore
		echo $event->title;
		?>
	</a>
</h3>