Many of our users often want their Event Categories to be designated via different colors, so their visitors can easily distinguish between categories. Luckily for you, our new Category Colors feature offers an integrated way to do just this.
The feature settings let you choose colors for each category and add an optional legend at the top of the calendar.
⚠️ Note: If you’re using the old standalone version of the Category Colors plugin, please refer to our migration guide here.
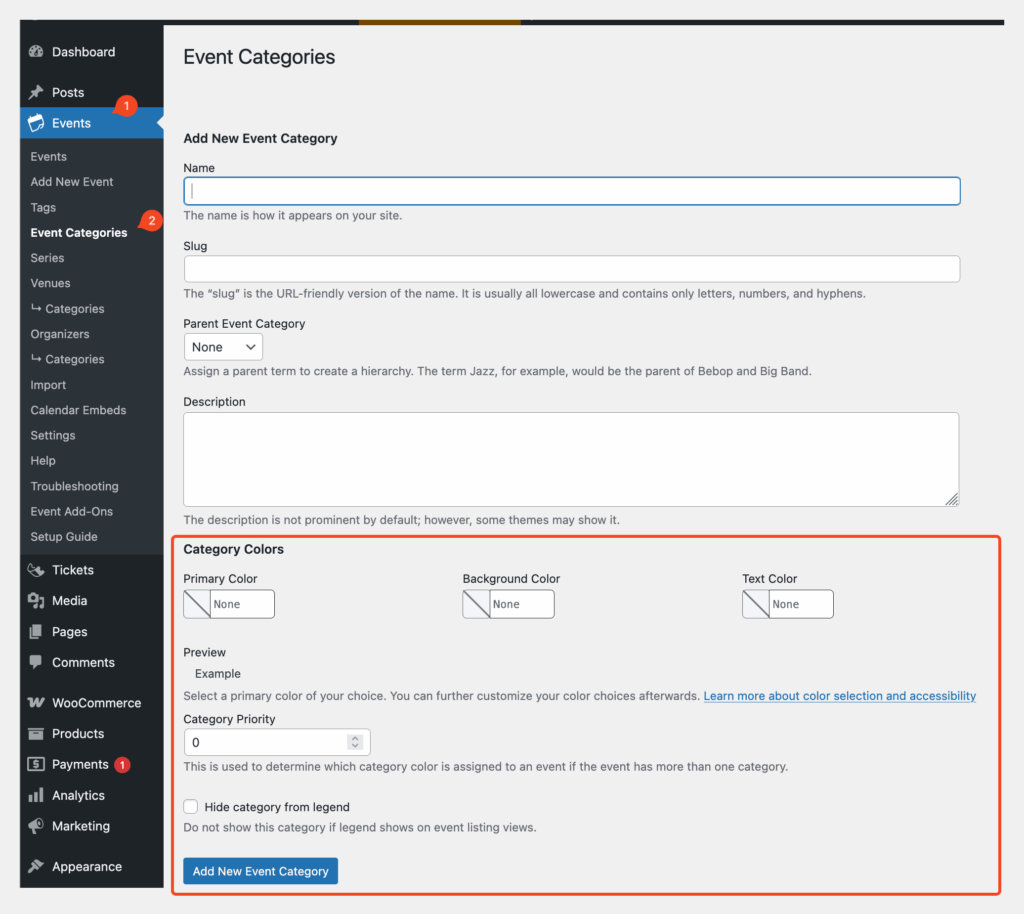
Accessing Event Categories
To access the feature, go to Events > Event Categories. This will open the familiar WordPress Categories page, now enhanced with new color options.
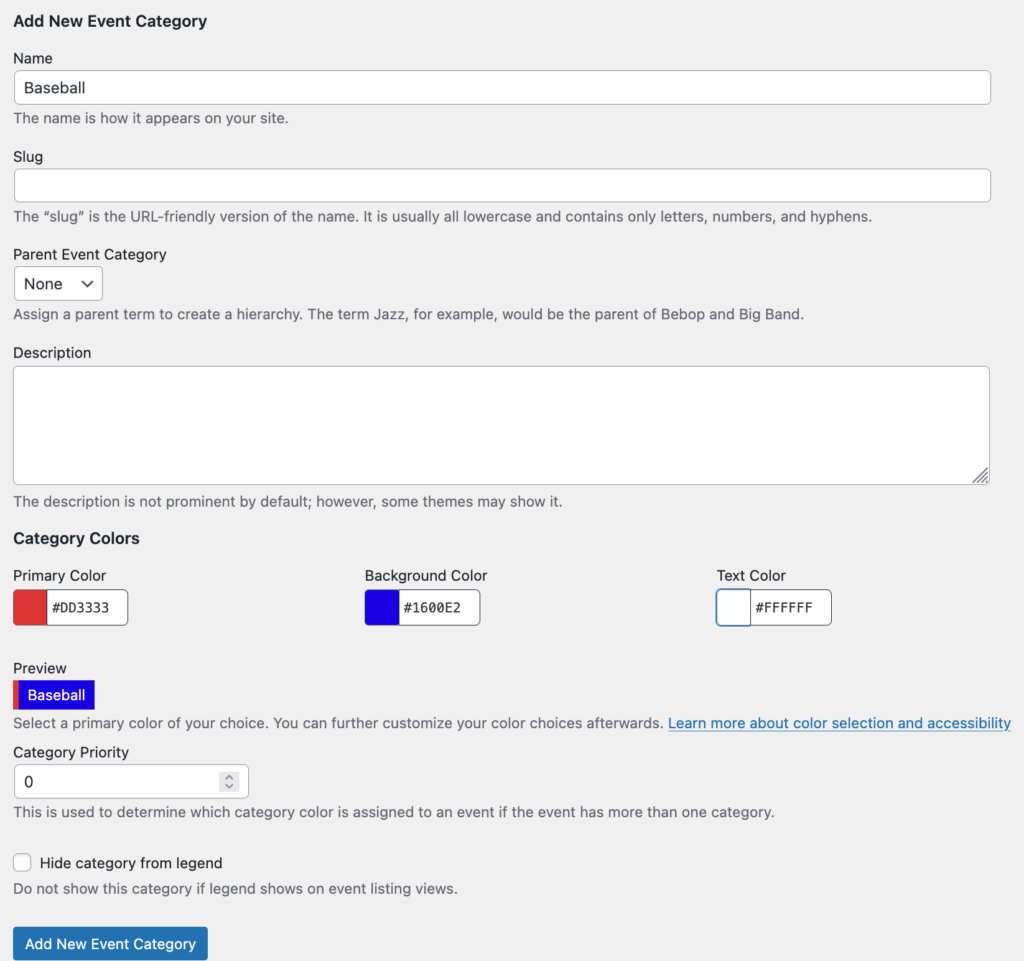
Adding a New Category with Colors
- Name your category as you would normally (e.g. “Baseball”).
- Scroll down to the Category Colors section.
- Choose:
- Primary Color – The standout color (used prominently, often inside).
- Background Color – A subtler secondary color (used as a background).
- Text Color – The font color used when displaying the category name.
- In the live preview you see how the combination will appear.
Note: This is a preview only and may not be exactly how it renders on the front end. It servers more to give you an idea of how it will look. - Set a Priority (optional):
- Higher numbers indicate higher importance.
- If multiple categories are assigned to a single event, the one with the highest priority determines the color shown on the front end.
- Toggle Hide from Legend if you do not want this category to appear in the category color legend on the front end.
Once you’re happy, click Add New Event Category.
You will then see this in the category list, together with a visual representation of the colors:

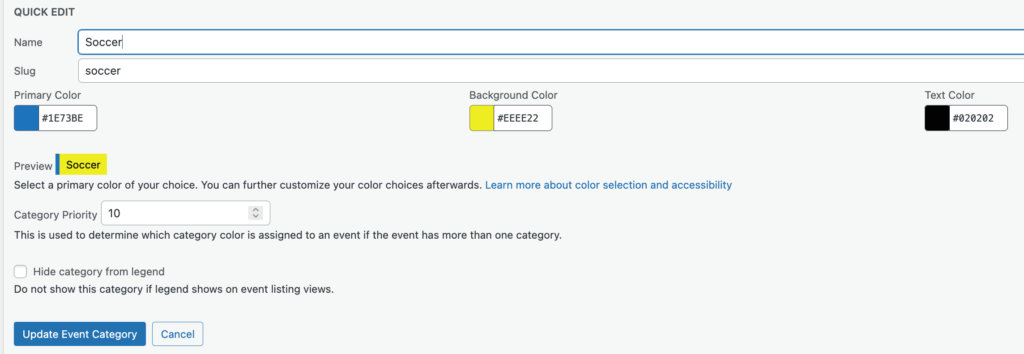
Editing an Existing Category
Editing the existing category works like editing any other category in WordPress. Once you click Edit you’ll be taken to a page that’s the same as creating a new category where you can edit the options.
Category Colors also supports Quick Edit where you can quickly edit the colors and priority.
Assigning Categories to Events
The Category Colors feature does not affect this part of the UI – it functions just like regular WordPress categories. While creating or editing an event, under the Categories panel, select one or more event categories. Once published, the category with the highest priority (as set above) will determine the colours used on the front end calendar display.
Category Color Settings
To access the settings for Category colors, go to Events > Settings > Display > Category Colors
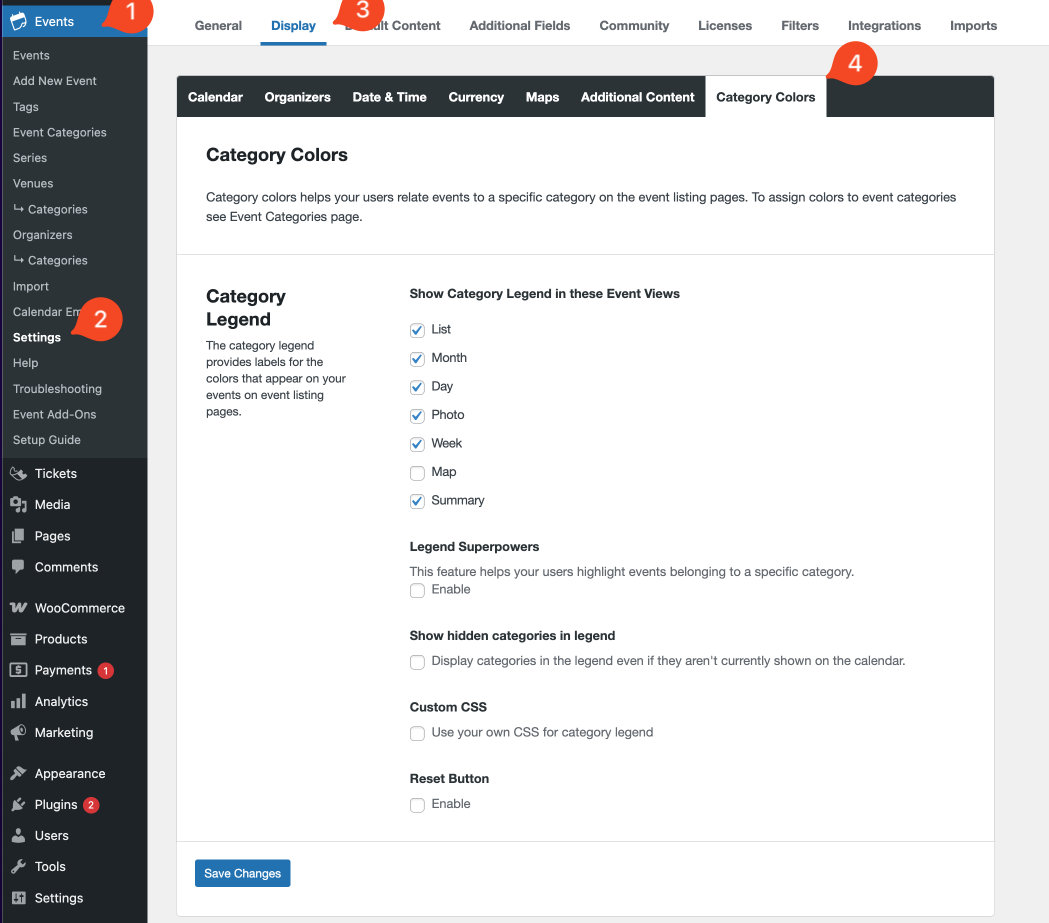
Let’s walk through the settings one by one:
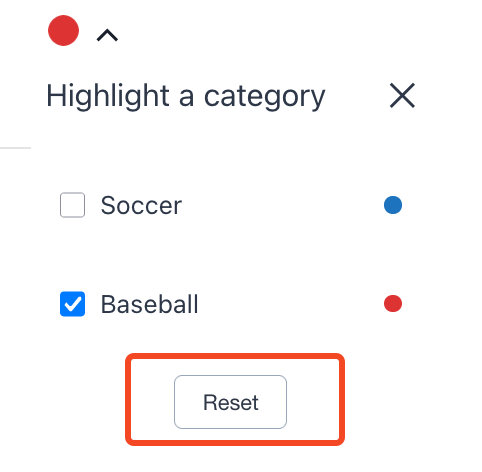
- Show Category Legend in these Event Views – choose which event view you want applied on the Category Legend.
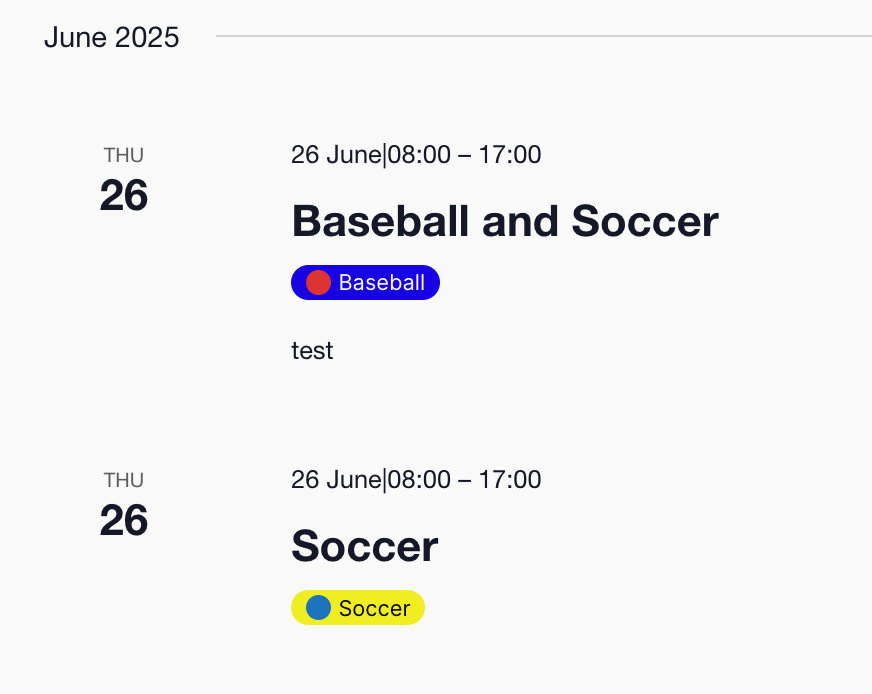
- Legend Superpowers – here you can select to highlight events belonging to a certain category. Note: if you select a category color that is not the highest priority for that category, it will still highlight that event. For example, the “Baseball and Soccer” event has both of these categories, and when I select baseball, it highlights it, even though the main category color is that of “Soccer”
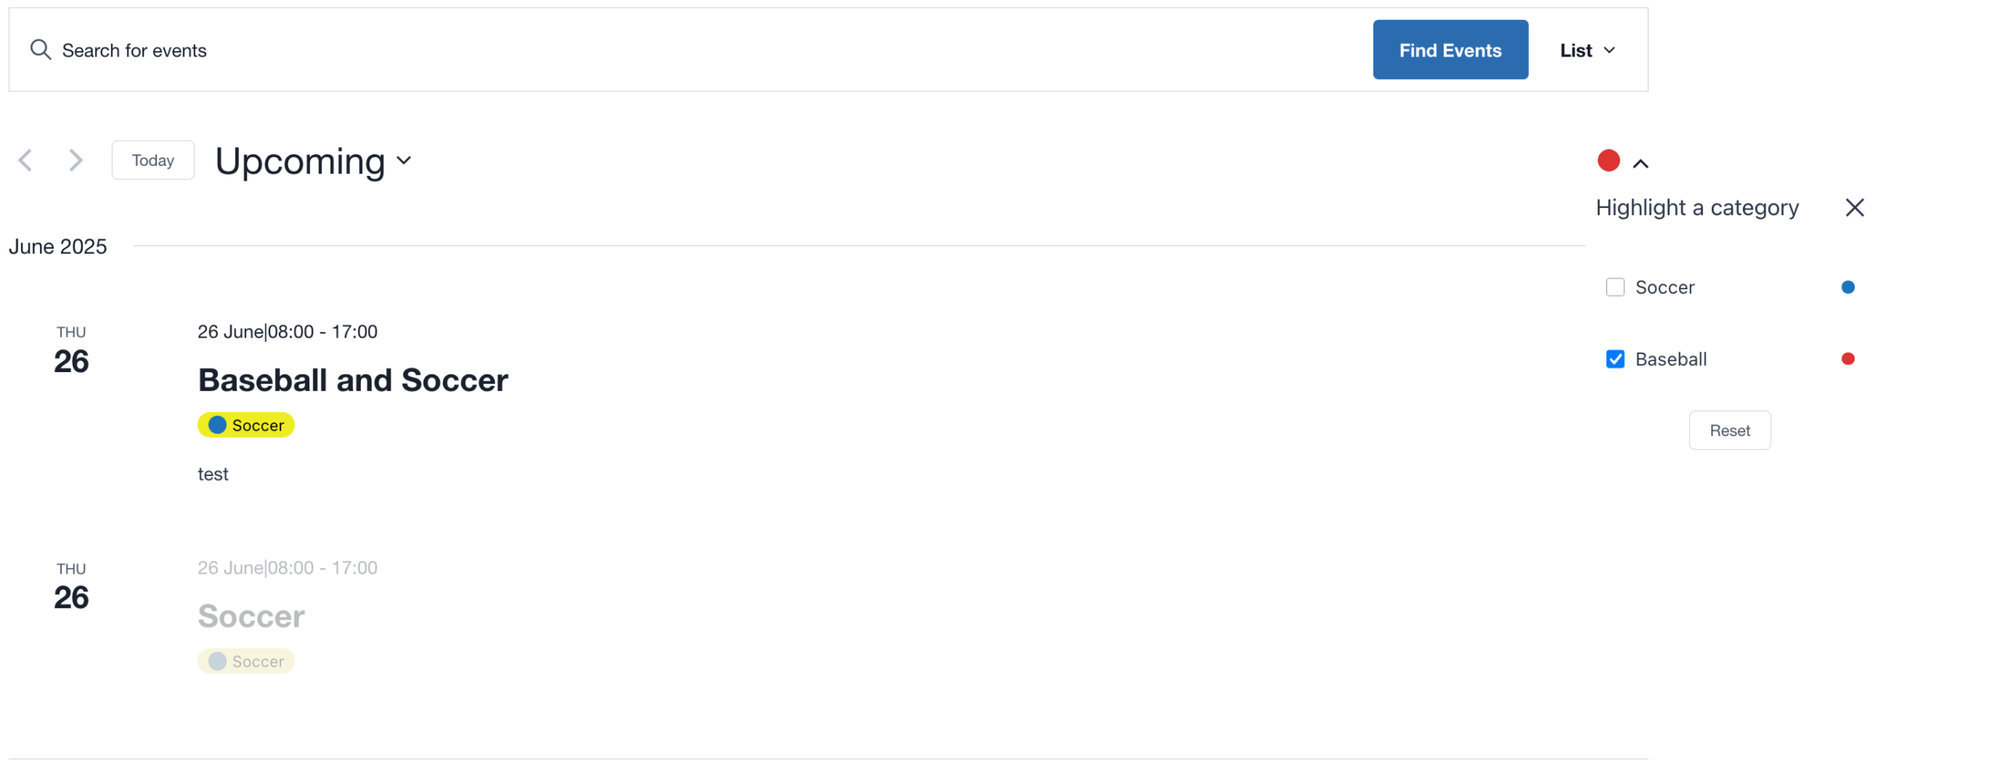
3. Show hidden categories in legend – displays categories that aren’t currently shown on the calendar in the Legend.
4. Custom CSS – Enable this option to remove our CSS and add your own custom CSS to the legend.
5. Reset Button – enables a reset button in the legend. This is useful when selecting many categories, and you want to quickly clear the results.
Category Colors on the Front End
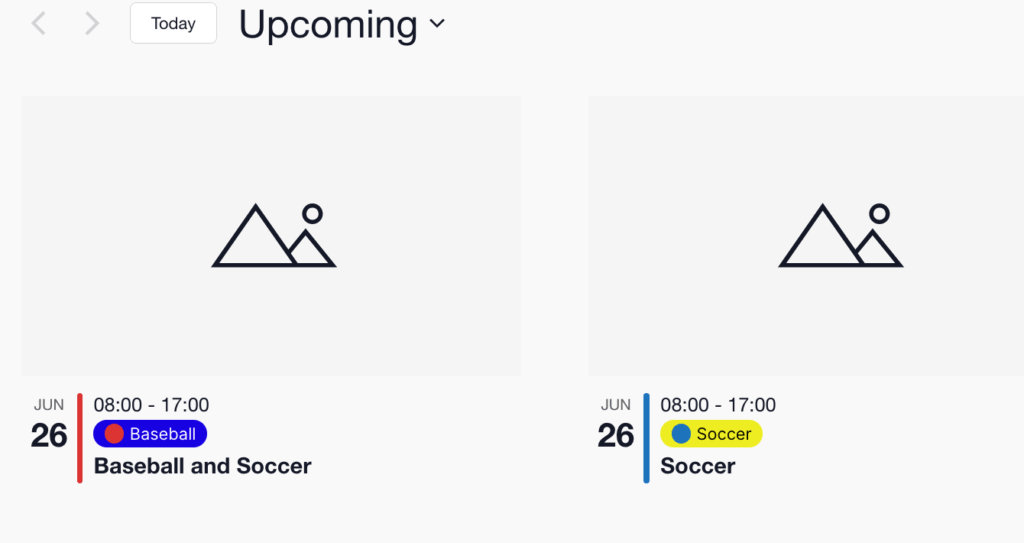
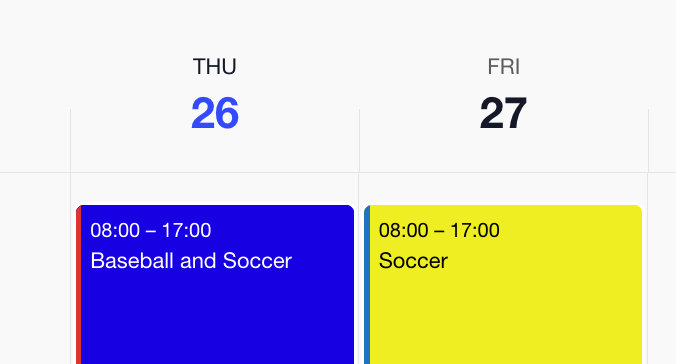
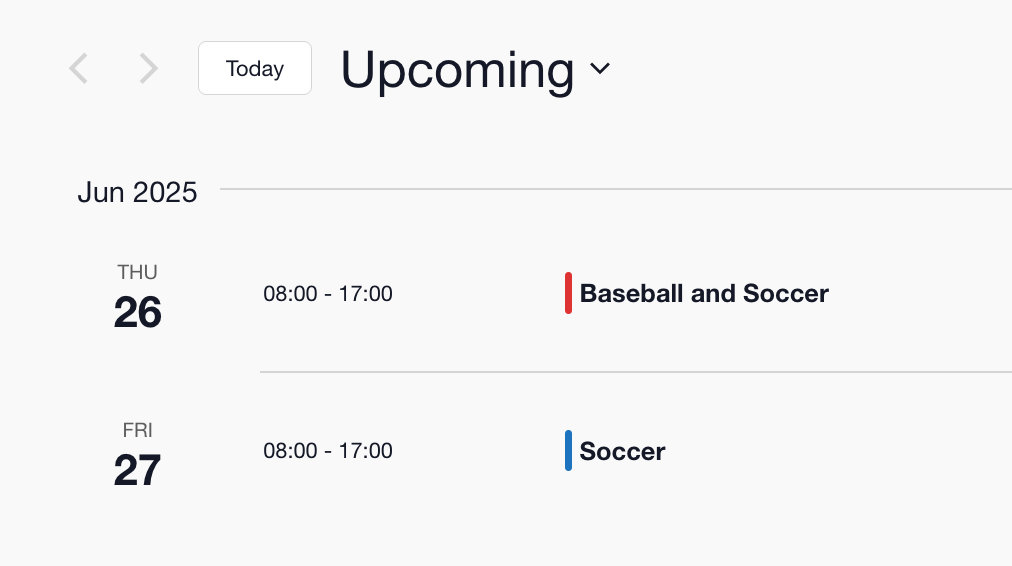
The category colors appear differently in different views. Here’s a quick look at all the views:
List view:
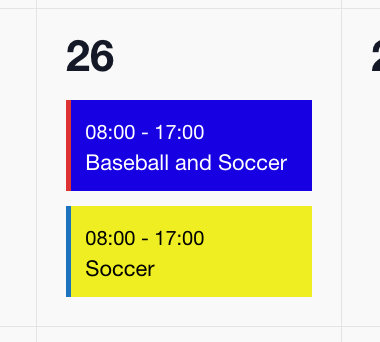
Month View:
Day View:
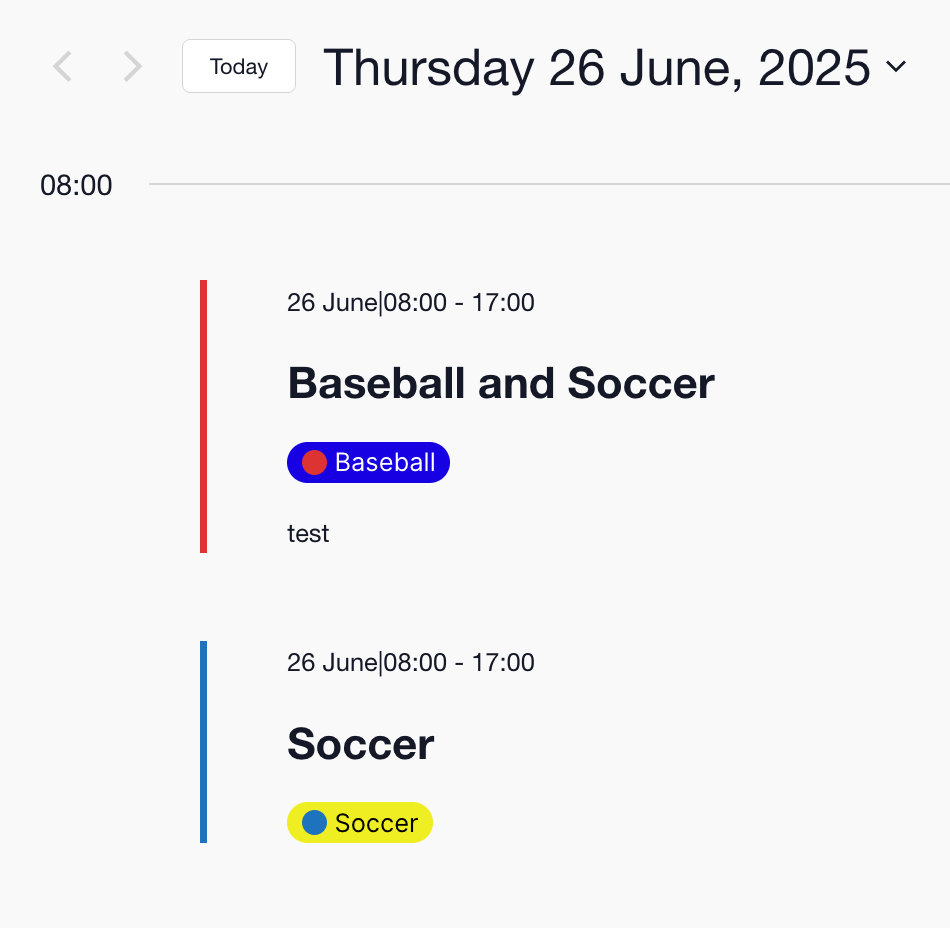
Photo View
Week View:
Summary View:
Best Practices for Accessibility
While choosing colors can significantly enhance your calendar’s readability, it’s essential to follow accessibility guidelines to ensure that your calendar is usable for everyone, including users with visual impairments or color blindness.
In this section, we’ll explore how to select accessible colors using WCAG guidelines, ensuring your events are clear, readable, and inclusive.
Understanding WCAG Guidelines
The Web Content Accessibility Guidelines (WCAG) are maintained by the World Wide Web Consortium (W3C) to provide a global standard for web accessibility. These guidelines help ensure web content is accessible to all users, particularly those with disabilities or visual impairments.
Following WCAG guidelines not only improves usability for people with specific accessibility needs but also enhances the overall user experience for everyone.
- Contrast Ratios: Ensuring sufficient contrast between text and background.
- Avoid Color-Only Indicators: Always supplement color indicators with text or icons.
Recommended Contrast Ratios
WCAG recommends specific contrast ratios to ensure readability:
- Normal Text (<18pt or <14pt bold): Contrast ratio of 4.5:1 or higher
- Large Text (≥18pt or ≥14pt bold): Contrast ratio of 3:1 or higher
- Non-text UI elements (such as borders or icons): 3:1 or higher
How to Pick Accessible Colors
Here’s a quick process to pick accessible colors for your event categories:
- Choose your primary color: This is the color indicator that appears as a visual cue (such as the left margin color).
- Choose a background color: Select a color that contrasts well with the primary color and the text color.
- Choose a text color: Ensure your text is readable against your chosen background.
Accessibility Testing Tools
These tools help verify your chosen colors meet accessibility standards:
Example of Accessible Color Choices
Here are several accessible color combinations you can use for your events, providing a variety of appealing and inclusive schemes:
Example 1:
- Primary Color:
#1E90FF(Dodger Blue) - Background Color:
#E8F4FF(Very Light Blue) - Text Color:
#003366(Dark Navy Blue)
Category Title here
Example 2:
- Primary Color:
#228B22(Forest Green) - Background Color:
#E7F5E7(Pale Green) - Text Color:
#004400(Deep Dark Green)
Category Title here
Example 3:
- Primary Color:
#FF8C00(Dark Orange) - Background Color:
#FFF3E5(Very Light Orange) - Text Color:
#663300(Dark Brown)
Category Title here
Example 4:
- Primary Color:
#6A5ACD(Slate Blue) - Background Color:
#F2F0FF(Very Pale Purple) - Text Color:
#1E1A5C(Very Dark Indigo)
Category Title here
Example 5:
- Primary Color:
#DC143C(Crimson) - Background Color:
#FFE8ED(Very Pale Pink) - Text Color:
#590017(Deep Maroon)
Category Title here
These examples have high contrast ratios and meet WCAG AA accessibility guidelines while offering more dynamic color palettes.
Common Mistakes to Avoid
- Low contrast colors: Avoid combinations like light gray on white or blue on dark gray.
- Problematic color pairs: Avoid using color combinations that are difficult for users with color vision deficiencies, such as red and green or blue and purple.
- Relying solely on color to convey meaning: Always include text or icon indicators (TEC already includes the category title).
By following these recommendations, you’ll create visually attractive, readable, and accessible calendars that enhance the experience for all users.
Customization: Make Categories in Link to Category Pages
If you’re using the Category Colors feature, you’re already familiar with how it enhances views by applying color-coded categories. Using the category legend, you can select a certain category and see all the events associated with it.
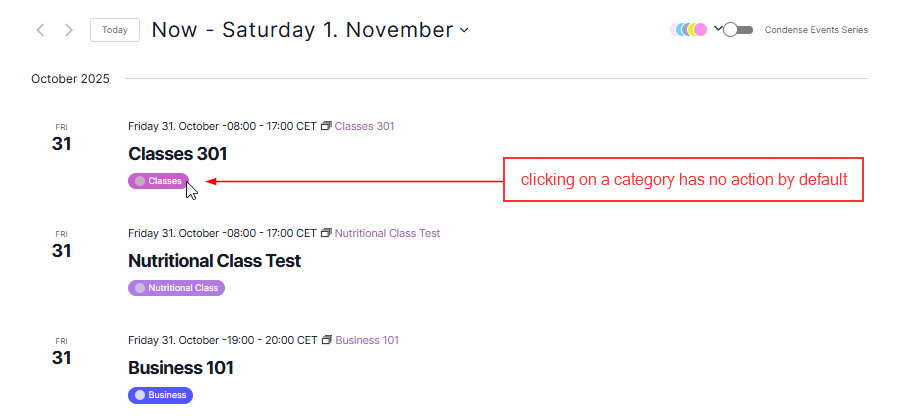
In the List View, by default, the pill-shaped categories help visually differentiate items, but they don’t provide any additional functionality.
However, with a bit of customization, you can make these pill-like categories link to category pages. Paste this snippet within your theme’s function.php file or use this handy Code Snippets plugin. You can learn more about using custom code snippets in our knowledegebase.
/**
 * Make event category display as a link in The Events Calendar List View.
 */

add_filter( 'tribe_template_html:events/v2/list/event/category', 'tec_make_event_category_link', 10, 4 );

/**
 * Converts the TEC List View category div into a clickable link.
 *
 * @param string          $html     The rendered HTML.
 * @param string          $file     Template file path.
 * @param array           $name     Template name parts.
 * @param Tribe__Template $template The template instance.
 *
 * @return string Modified HTML.
 */
function tec_make_event_category_link( $html, $file, $name, $template ) {
	/** @var WP_Term|null $priority_cat */
	$priority_cat = $template->get( 'category_colors_priority_category' );

	if ( empty( $priority_cat ) || ! $priority_cat instanceof WP_Term ) {
		return $html;
	}

	$url = get_term_link( $priority_cat );

	if ( is_wp_error( $url ) ) {
		return $html;
	}

	// Match the inner category div only, not the outer wrapper.
	$pattern = '/<div\b([^>]*\btec-events-calendar-list__category\b[^>]*)>(.*?)<\/div>/s';

	// $1 = attributes on the div, $2 = inner HTML.
	$replacement = sprintf(
		'<a href="%s"$1>$2</a>',
		esc_url( $url )
	);

	// Replace only the first matching category div.
	$html = preg_replace( $pattern, $replacement, $html, 1 );

	return $html;
}
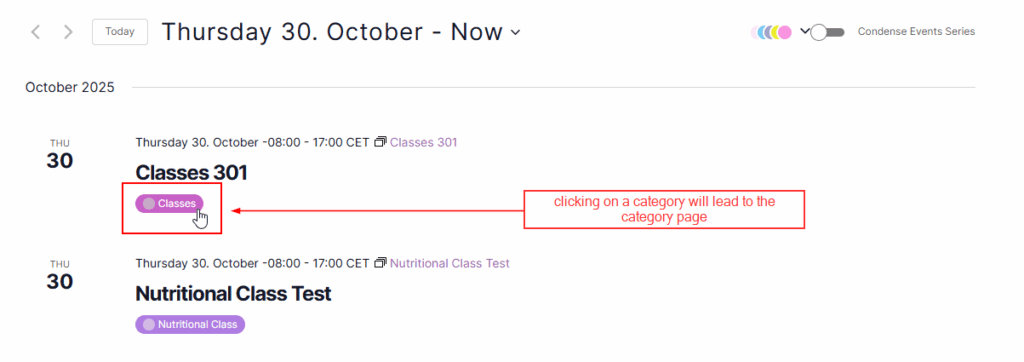
That’s it! Clicking a category button below an event in List View will now take users to that Category’s page.