The Events Calendar’s calendar views — Month, List, Day, and the additional views available with Events Calendar Pro — share a common set of customization options that apply across all views. This article covers those general customizations: how many events appear, what displays in the header, how the page title is output, and more.
For customizations specific to a particular view, see the individual view articles:
- Customizing Month View
- Customizing List View
- Customizing Week View
- Customizing Photo View
- Customizing Map View
For styling and color changes that don’t require code — such as accent colors, font choices, and button styles — see Customizing The Events Calendar with the WordPress Customizer.
Number of Events Displayed
The number of events shown in calendar views is controlled by two settings at Events → Settings → Display → Calendar Display:
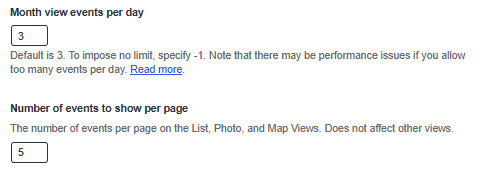
- Month view events per day — controls the maximum number of events listed per day cell in Month View. The default is 3. Use
-1to show all events. Note that all-day and multi-day events are not counted toward this limit, so the actual number of items visible in a cell may be higher. - Number of events to show per page — controls the number of events per page in List, Photo, and Map views. Day View always shows all events on the given day regardless of this setting.
Because events come in different forms — single, recurring, all-day, multi-day — the displayed count doesn’t always match the setting exactly. Here’s how each view handles it:
Month View
Month View honours the events-per-day setting, but all-day and multi-day events are displayed in addition to that count rather than within it.


If you want all-day and multi-day events to count toward the per-day limit, that requires a template customization.
Summary View
In Summary View, multi-day events appear on each day they span. In the page’s total event count, each multi-day event counts as one event regardless of how many days it occupies.
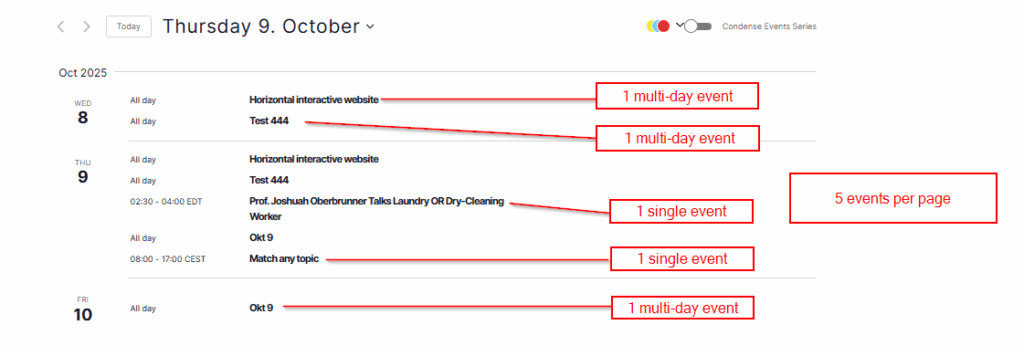
List, Photo, and Map Views
In these views every event counts as one toward the per-page total, regardless of type. Single, recurring, all-day, and multi-day events all count equally.
When the Setting Doesn’t Take Effect
If changing the events-per-page setting has no effect, your theme may be overriding it via its own archive posts-per-page setting. You can work around this with a snippet. Add the following to your child theme’s functions.php or via the Code Snippets plugin, changing the number to your desired value:
add_filter(
    'tribe_events_views_v2_view_latest-past_repository_args',
    function( $args, $context, $view ) {
        $args['posts_per_page'] = 10; // Change to your desired number
        return $args;
    }
);
Controlling Events in the Latest Past Events Section
When there are no upcoming events, The Events Calendar can display a “Latest Past Events” section. By default it shows 3 events. To change that number:
add_filter( 'tribe_context_latest_past_per_page', function( $value ) {
    return 10; // Change to your desired number
} );
To match the Latest Past Events count to your main list view setting:
add_filter( 'tribe_context_latest_past_per_page', function( $value ) {
    return tribe_get_option( 'postsPerPage', 3 );
} );

add_filter(
    'tribe_events_views_v2_view_prev_url',
    function( $url, $canonical, $view ) {
        $parsed_url = wp_parse_url( $url );

        if ( empty( $parsed_url['query'] ) || false === strpos( 'eventDisplay=past', $parsed_url['query'] ) ) {
            return $url;
        }

        if ( ! empty( $parsed_url['path'] ) && false !== strpos( 'page', $parsed_url['path'] ) ) {
            return $url;
        }

        return add_query_arg( 'paged', '2', $url );
    },
    10,
    3
);
Hiding Events That Have Already Started
By default, TEC shows ongoing events even after they’ve started, as long as they haven’t ended yet. This is useful for multi-day events. If you’d rather hide events from all calendar views as soon as their start time passes — so only truly upcoming events appear — use the following snippet.
It hooks into tribe_repository_events_pre_get_posts to modify the main frontend event query. It uses your site’s configured WordPress timezone, and does not affect single event pages — events remain accessible at their direct permalink.
Add this to your child theme’s functions.php or via the Code Snippets plugin.
<?php //Do not copy this line

add_action( 'tribe_repository_events_pre_get_posts', function ( $query ) {
	// Only modify the main frontend query
	if ( is_admin() || ! $query->is_main_query() ) {
		return;
	}

	// Use site's timezone safely
	$timezone = wp_timezone();
	$now      = new DateTime( 'now', $timezone );
	$today    = $now->format( 'Y-m-d H:i:s' );

	// Exclude events that have already started
	$meta_query   = (array) $query->get( 'meta_query', [] );
	$meta_query[] = [
		'key'     => '_EventStartDate',
		'value'   => $today,
		'compare' => '>=',
		'type'    => 'DATETIME',
	];

	$query->set( 'meta_query', $meta_query );
}, 10 );
⚠️ This affects all frontend event queries, including List, Month, and Day views. It does not affect admin event listings.
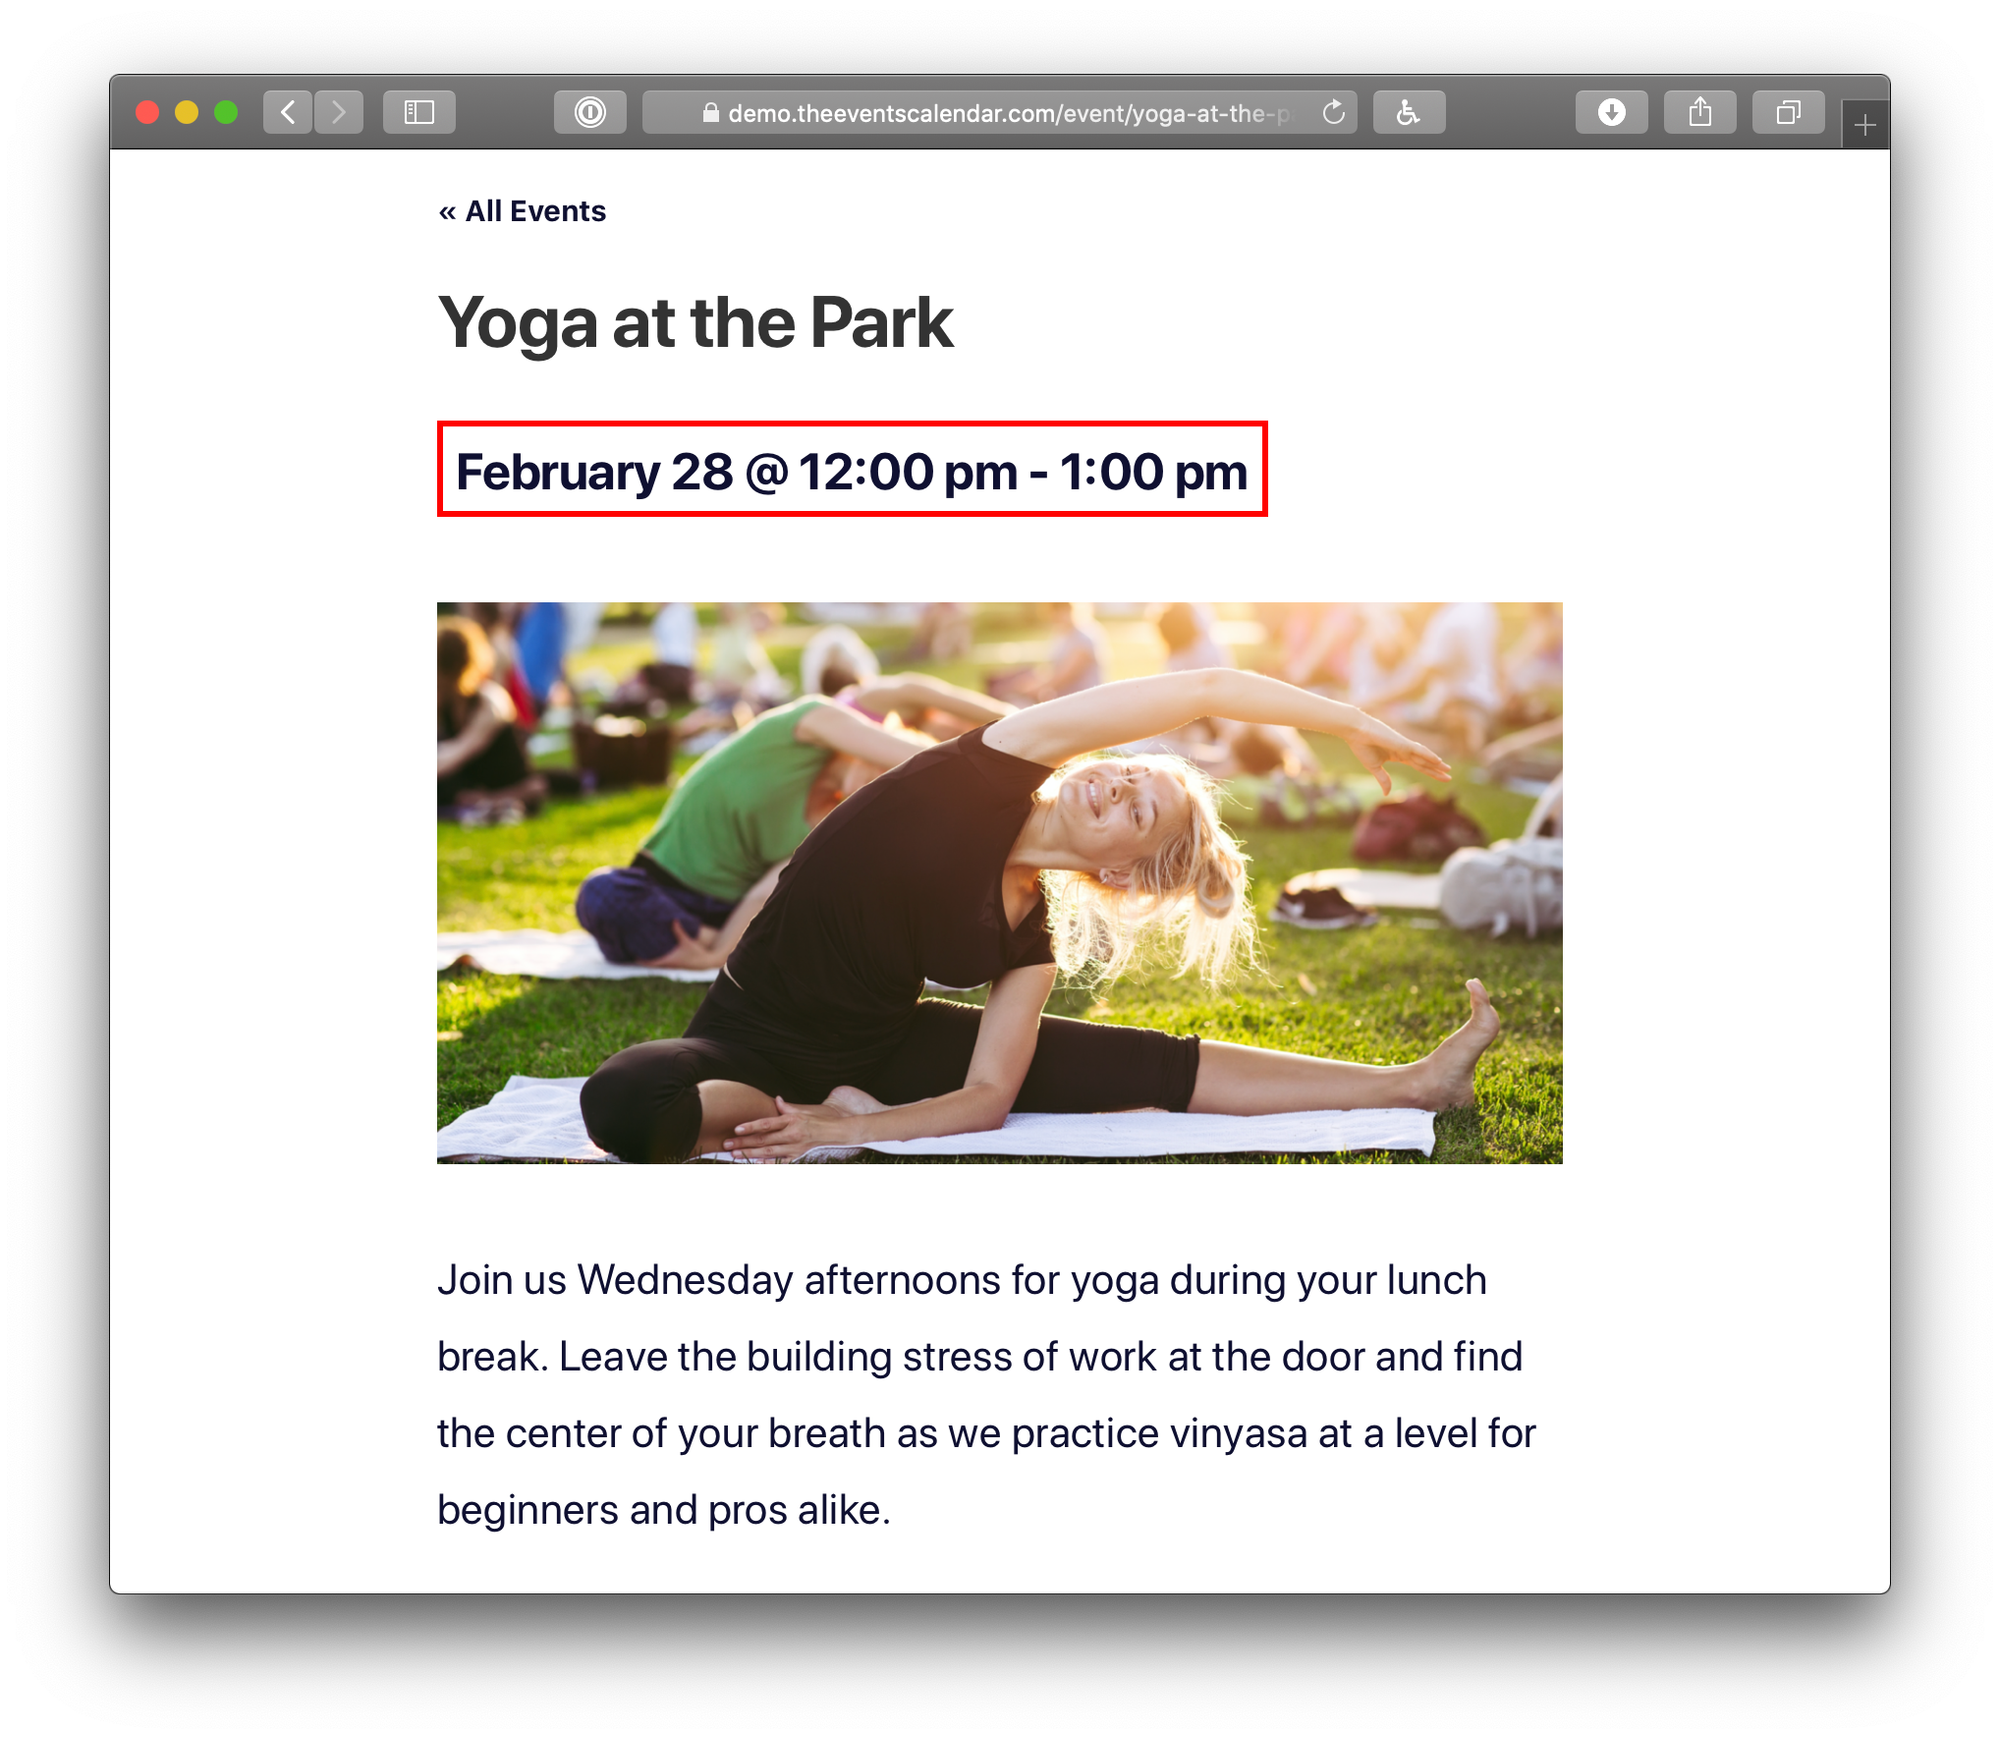
Removing the Event End Time
By default, TEC displays both the start and end time for events across all views.
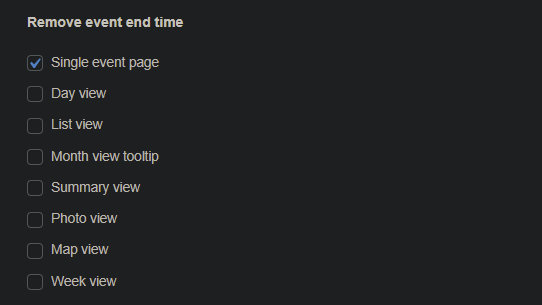
Using Settings (Easiest)
The simplest way is via Events → Settings → Display → Date & Time → Remove event end time.
Using a Snippet
To remove the end time with code, add the following to your child theme’s functions.php or via the Code Snippets plugin. This hides end times across List, Day, Map, and Photo views, and within event details and tooltips in Week and Month views.
add_filter( 'tribe_events_event_schedule_details_formatting', 'tribe_remove_end_date' );
function tribe_remove_end_date( $settings ) {
    $settings['show_end_time'] = false;
    return $settings;
}
To remove all times entirely (start and end):
add_filter( 'tribe_events_event_schedule_details_formatting', 'tribe_remove_end_date' );
function tribe_remove_end_date( $settings ) {
    $settings['time'] = false;
    return $settings;
}
Removing End Times from Month, Map, and Photo Views via Template Override
The snippet above does not cover the date/time display inside the Month, Map, and Photo view grid cells — those use separate template files. To remove end times there, override the relevant template and change one line in each file.
| View | Template to override |
|---|---|
| Month view | the-events-calendar/src/views/v2/month/calendar-body/day/calendar-events/calendar-event/date.php |
| Map view | events-pro/src/views/v2/map/event-cards/event-card/event/date-time.php |
| Photo view | events-pro/src/views/v2/photo/event/date-time.php |
In each overridden file, find:
$display_end_date = $event->dates->start_display->format( 'H:i' ) !== $event->dates->end_display->format( 'H:i' );
Replace it with:
$display_end_date = false;
Map and Photo views require Events Calendar Pro. For template override instructions, see Customizing Template Files.
Customizing the Calendar Page Title
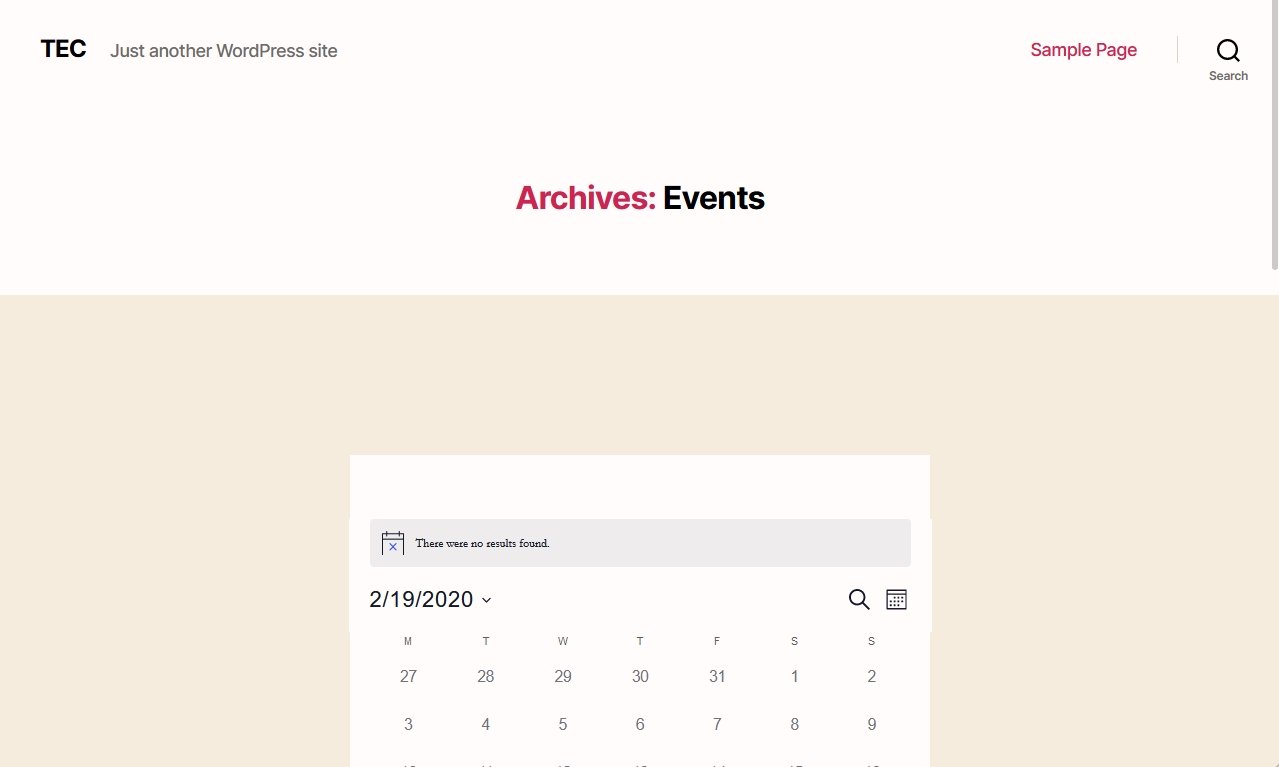
The title shown on your main calendar page can come from one of two places depending on your theme and template settings: either from TEC itself (via tribe_get_events_title()) or from your theme (via WordPress’s get_the_archive_title()). The method you need depends on which function is producing the title on your site.
The most common symptom that sends people here is seeing the word “Archives” prepended to the calendar title — for example, “Archives: Events.” This happens when a theme uses the Default Page Template setting and outputs get_the_archive_title() without filtering it for custom post types.
Option 1: When Your Theme Controls the Title
If your theme (including Blocksy and most page builders) outputs the title, use the get_the_archive_title filter. This also fixes the “Archives” prefix:
function tec_custom_archive_page_title( $title ) {
    if ( is_post_type_archive( 'tribe_events' ) ) {
        $title = 'Upcoming Events'; // Replace with your preferred title
    }
    return $title;
}
add_filter( 'get_the_archive_title', 'tec_custom_archive_page_title' );
Option 2: When The Events Calendar Controls the Title
If your setup uses TEC’s built-in title function, use the tribe_get_events_title filter instead:
function tec_custom_events_page_title( $title ) {
    if ( is_post_type_archive( 'tribe_events' ) ) {
        $title = 'Upcoming Events'; // Replace with your preferred title
    }
    return $title;
}
add_filter( 'tribe_get_events_title', 'tec_custom_events_page_title' );
Add either snippet to your child theme’s functions.php or via the Code Snippets plugin.
Notes for Elementor and Other Page Builders
Some themes — including Blocksy — and site builders like Elementor and Divi manage archive page titles within their own templates or widgets, which can override both filters above. If neither snippet takes effect, try switching the Events template to Default Events Template under Events → Settings → Display → Events Template to give TEC full control over the page layout and title.
To change the browser/meta title for calendar views rather than the on-page heading, see Changing the Browser Title for Calendar Views.
Disabling Event Links by Category
By default, every event in every view links through to its single event page. If you want to display certain events — such as holidays, blackout dates, or days when a business is closed — without linking to a detail page, you can use CSS to disable the links for events in a specific category.
Create a Category
First, create an event category for events that shouldn’t be clickable. In the examples below, the category slug is holiday.
Disable Links in List, Month, Day, and Summary Views
.tribe_events_cat-holiday h3 a {
    pointer-events: none;
}
Disable Links in Photo and Week Views
.tribe-events-view--photo .tribe_events_cat-holiday a {
    pointer-events: none;
}
Replace holiday with your actual category slug throughout. For Map View, the link lives inside a template rather than a simple anchor, so disabling it requires a template override of:
/events-calendar-pro/src/views/v2/map/event-cards/event-card/actions/details.php
Add this CSS to your child theme’s stylesheet or under Appearance → Customize → Additional CSS.
Adding Content Above the Calendar
To add custom text, HTML, or any other content above a calendar view, create a template override for the view’s top-level template file and add your content inside the main layout container.
Template Files to Override
The Events Calendar (Month, List, Day):
wp-content/plugins/the-events-calendar/src/views/v2/month.phpwp-content/plugins/the-events-calendar/src/views/v2/list.phpwp-content/plugins/the-events-calendar/src/views/v2/day.php
Events Calendar Pro (Photo, Map, Summary, Week):
wp-content/plugins/events-calendar-pro/src/views/v2/photo.phpwp-content/plugins/events-calendar-pro/src/views/v2/map.phpwp-content/plugins/events-calendar-pro/src/views/v2/summary.phpwp-content/plugins/events-calendar-pro/src/views/v2/week.php
See Customizing Template Files for instructions on creating a template override in your theme.
Where to Insert Your Content
In each overridden file, locate the line:
<div class="tribe-common-l-container tribe-events-l-container">
Add your content in a <div> immediately after it:
<div class="tribe-common-l-container tribe-events-l-container">
<div>Your custom text or HTML here</div>
Customizing the Calendar Header and Events Bar
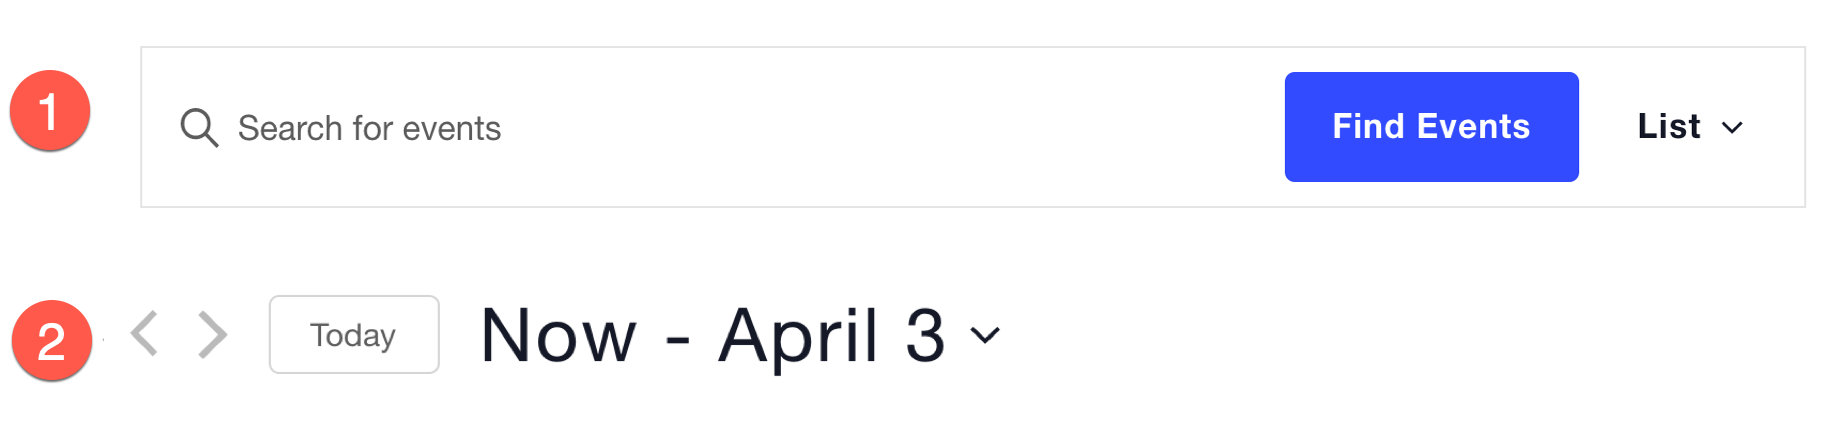
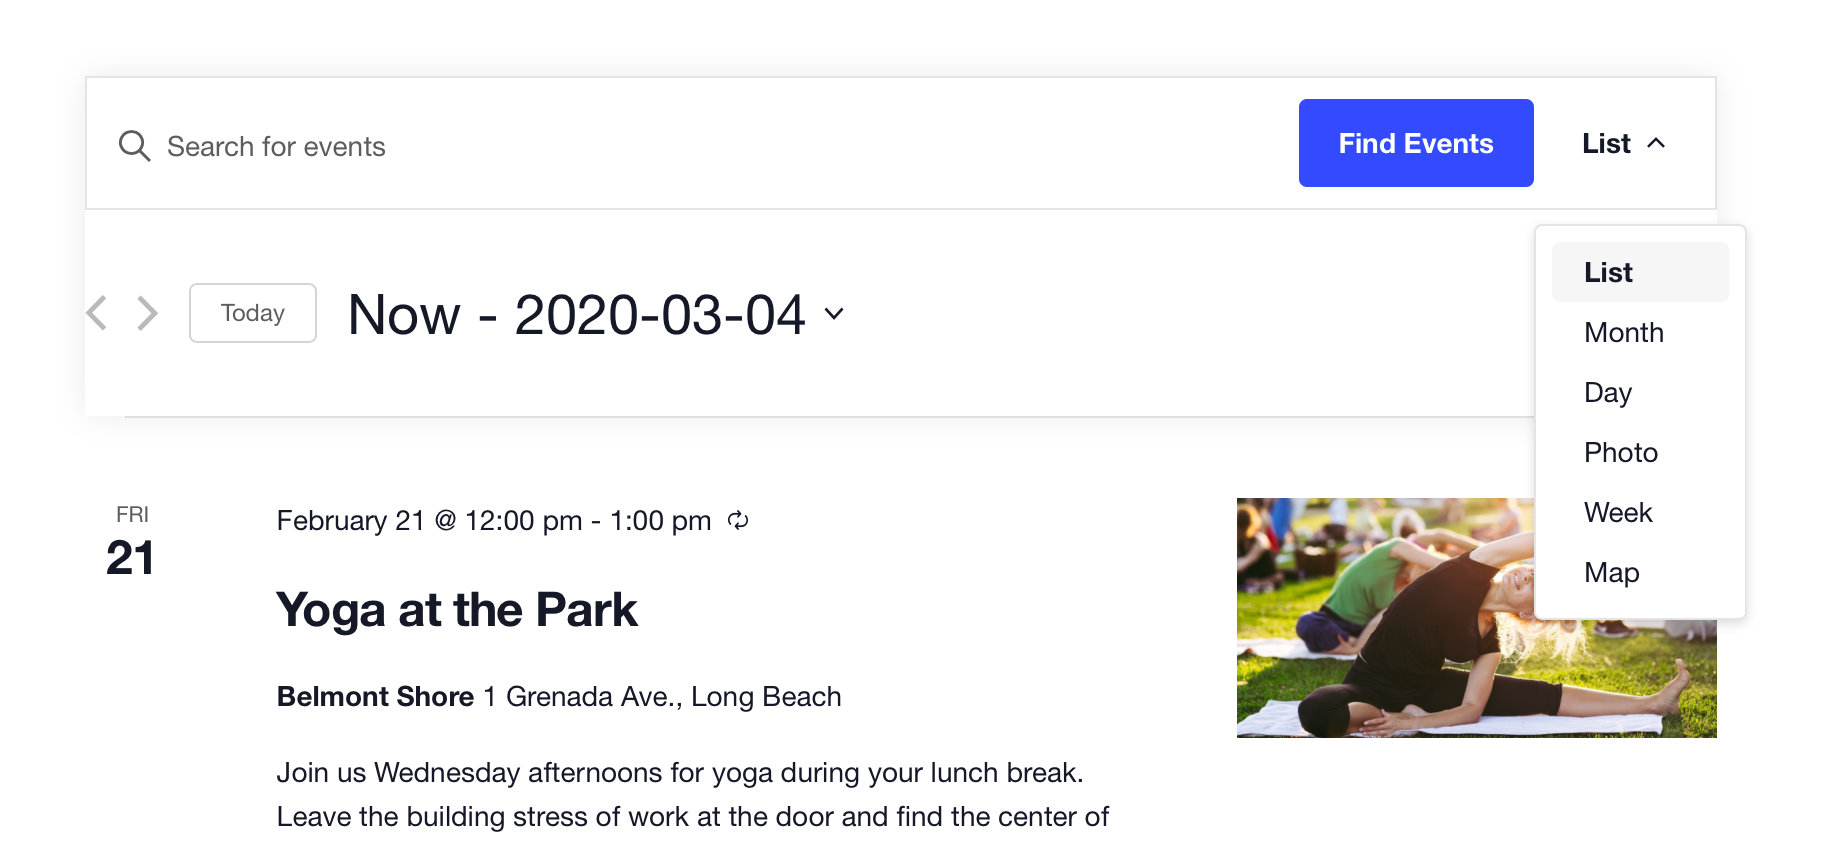
The calendar header appears at the top of every view. It has two parts: the Events Bar at the top (keyword search and view switcher) and a bottom row with pagination and a date picker.
Via Settings
To hide the search bar entirely, go to Events → Settings → Display → Calendar Display and check Disable the Event Search Bar.

If you’re using a Google Maps API key, the Events Bar will also include a location search field. To hide that, check Hide location search on the same settings screen.


Via Templates
The view switcher in the Events Bar displays as a tab row when three or fewer views are active, and as a dropdown when more views are active (which is typical when ECP is installed).

To control this, create a template override of:
/wp-content/plugins/the-events-calendar/src/views/v2/components/events-bar/views.php
Find this line:
$is_tabs_style = empty( $disable_event_search ) && 3 >= count( $public_views );
To always show a dropdown, change 3 to 1. To always show tabs, replace the line with:
$is_tabs_style = true;
To hide a specific view from the switcher menu without disabling it entirely, find the foreach loop in the same file and add a continue conditional. The example below hides List View from the menu:
<?php foreach ( $public_views as $public_view_slug => $public_view_data ) : ?>
    <?php if ( 'list' === $public_view_slug ) : ?>
        <?php continue; ?>
    <?php endif; ?>
    <?php $this->template(
        'components/events-bar/views/list/item',
        [ 'public_view_slug' => $public_view_slug, 'public_view_data' => $public_view_data ]
    ); ?>
<?php endforeach; ?>
If only one view is active, its button will still appear in the switcher but essentially refreshes the page. To suppress it, override:
/wp-content/plugins/the-events-calendar/src/views/v2/components/events-bar/views/list.php
to [your-theme]/tribe/events/v2/components/events-bar/views/list.php, then add just before the closing ?>:
return; // hiding this!
Via CSS
For simple style tweaks to the header, CSS is often the quickest approach. All calendar views inherit styles from the WordPress Customizer settings, but you can also target header elements directly in your stylesheet.
Change the keyword search input text color:
#tribe-events-events-bar-keyword {
    color: blueviolet;
}

Change the Events Bar border color:
.tribe-events-header__events-bar.tribe-events-c-events-bar.tribe-events-c-events-bar--border {
    border-color: blueviolet;
}

Change the search button background and text color (useful when a theme overrides the default button styles):
.tribe-common-c-btn.tribe-events-c-search__button {
    background-color: blueviolet;
    color: #fff;
}

Some themes have their own CSS class prefixes that can be used for more targeted overrides. For example, targeting the search button specifically on the Twenty Twenty theme:
.tribe-theme-twentytwenty .tribe-common .tribe-common-c-btn {
    background-color: blueviolet;
    color: #000;
}