Event Aggregator lets you automatically import events from outside calendar sources into The Events Calendar on your WordPress site. This guide covers everything you need to configure, run, and manage imports — from selecting the right source to scheduling automatic refreshes.
Separate articles cover importing from a CSV file (included with the free The Events Calendar plugin), importing from Eventbrite (which has its own set of dev-level considerations), and importing attendees via CSV.
Supported Sources
Event Aggregator supports the following import origins:
- CSV File — A file type generated from spreadsheets. Available with the free The Events Calendar plugin. See Importing Calendar Data From a CSV File.
- Google Calendar — Fetches events published to a Google Calendar account via its public iCal URL.
- iCalendar — Fetches events from any calendar application that publishes a valid iCalendar feed.
- ICS File — A file containing iCalendar data, uploaded directly to your site.
- Meetup — Fetches events from a Meetup.com group or specific event.
- Eventbrite — Fetches events published on Eventbrite.com. See Importing Events from Eventbrite for full details, including dev-level workarounds.
- Other URL — Fetches events from another website running The Events Calendar.
All sources except CSV require a valid Event Aggregator license. Verify your license under Events → Settings → Licenses before starting.
Import Settings
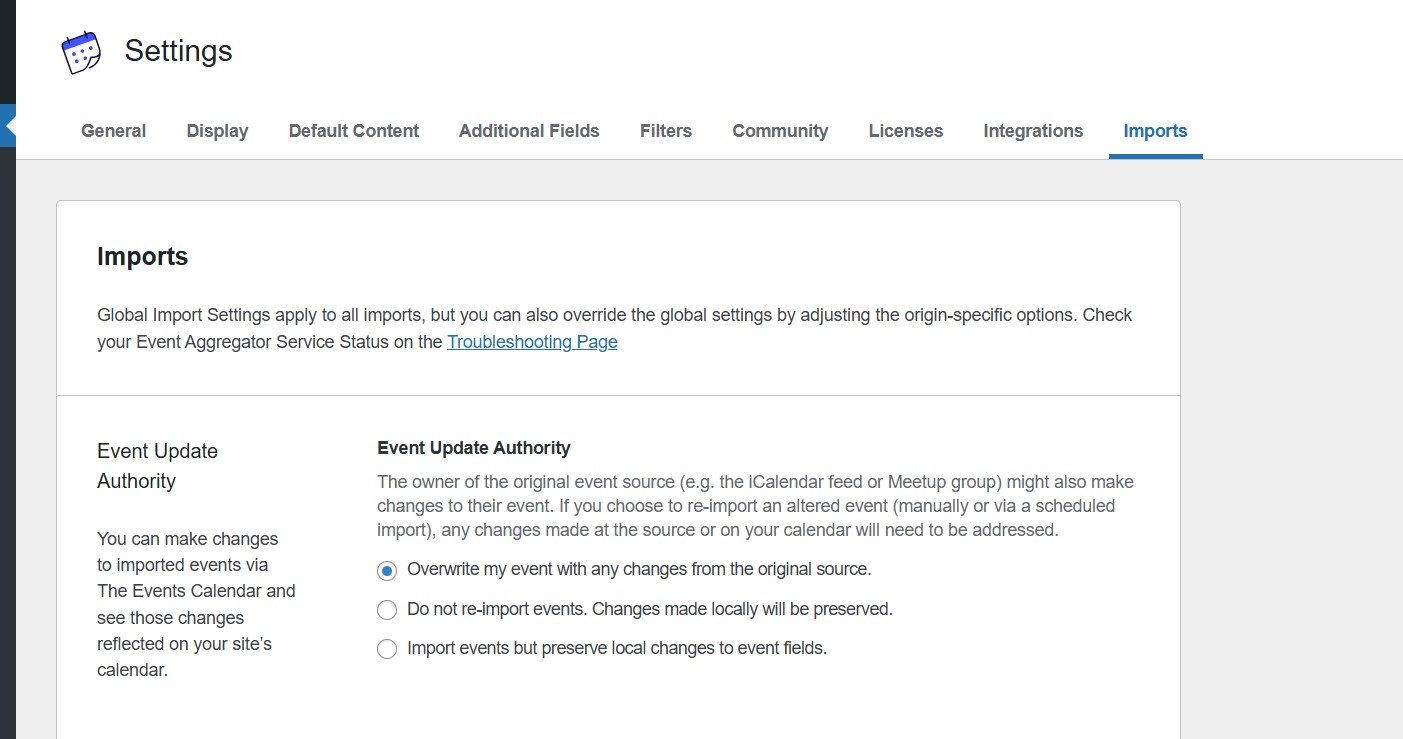
Before running an import, configure your default import behavior at Events → Settings → Imports. These settings apply globally and can be overridden per source.
Event Update Authority
Event Update Authority controls what happens when an event that was previously imported gets re-imported (for example, through a scheduled import). There are three options:
- Overwrite my event with any changes from the original source — Always replace local edits with source changes on re-import.
- Do not re-import events. Changes made locally will be preserved — Import only new events; preserve all local edits.
- Import events but preserve local changes to event fields — Update unchanged fields while keeping your custom edits intact.
If you edit imported events locally and want those edits to survive future imports, select option 2 or option 3. Any other setting allows Event Aggregator to overwrite your edits.
Global and Source-Specific Settings
- Default status — Published, Draft, or Pending Review.
- Default category — Assigns a category globally or per source.
- Show Google Map — Controls map display for imported venues.
- Import limits — Configure by date range (only events within a set window), by number (cap per run), or unlimited (not recommended).
💡 Tip: Always use a limited import strategy to reduce server load and prevent timeouts on large feeds.
WordPress Status Options
When running an import, you can set the WordPress status for imported events:
- Published — Content is published to your site right away.
- Draft — Content is saved but not published; available for editing after import.
- Pending Review — Content is flagged for review by an editor or administrator before publishing.
- Private — Content is published immediately but only accessible to logged-in users with appropriate permissions.
The status you choose applies to the event as well as any new organizer or venue created by the import. You can also assign an Event Category, which is added in addition to any categories defined by the feed itself.
Running an Import
The general flow is the same across all sources. Specific sources have additional setup steps covered in the next section.
Step 1: Go to the Import Screen
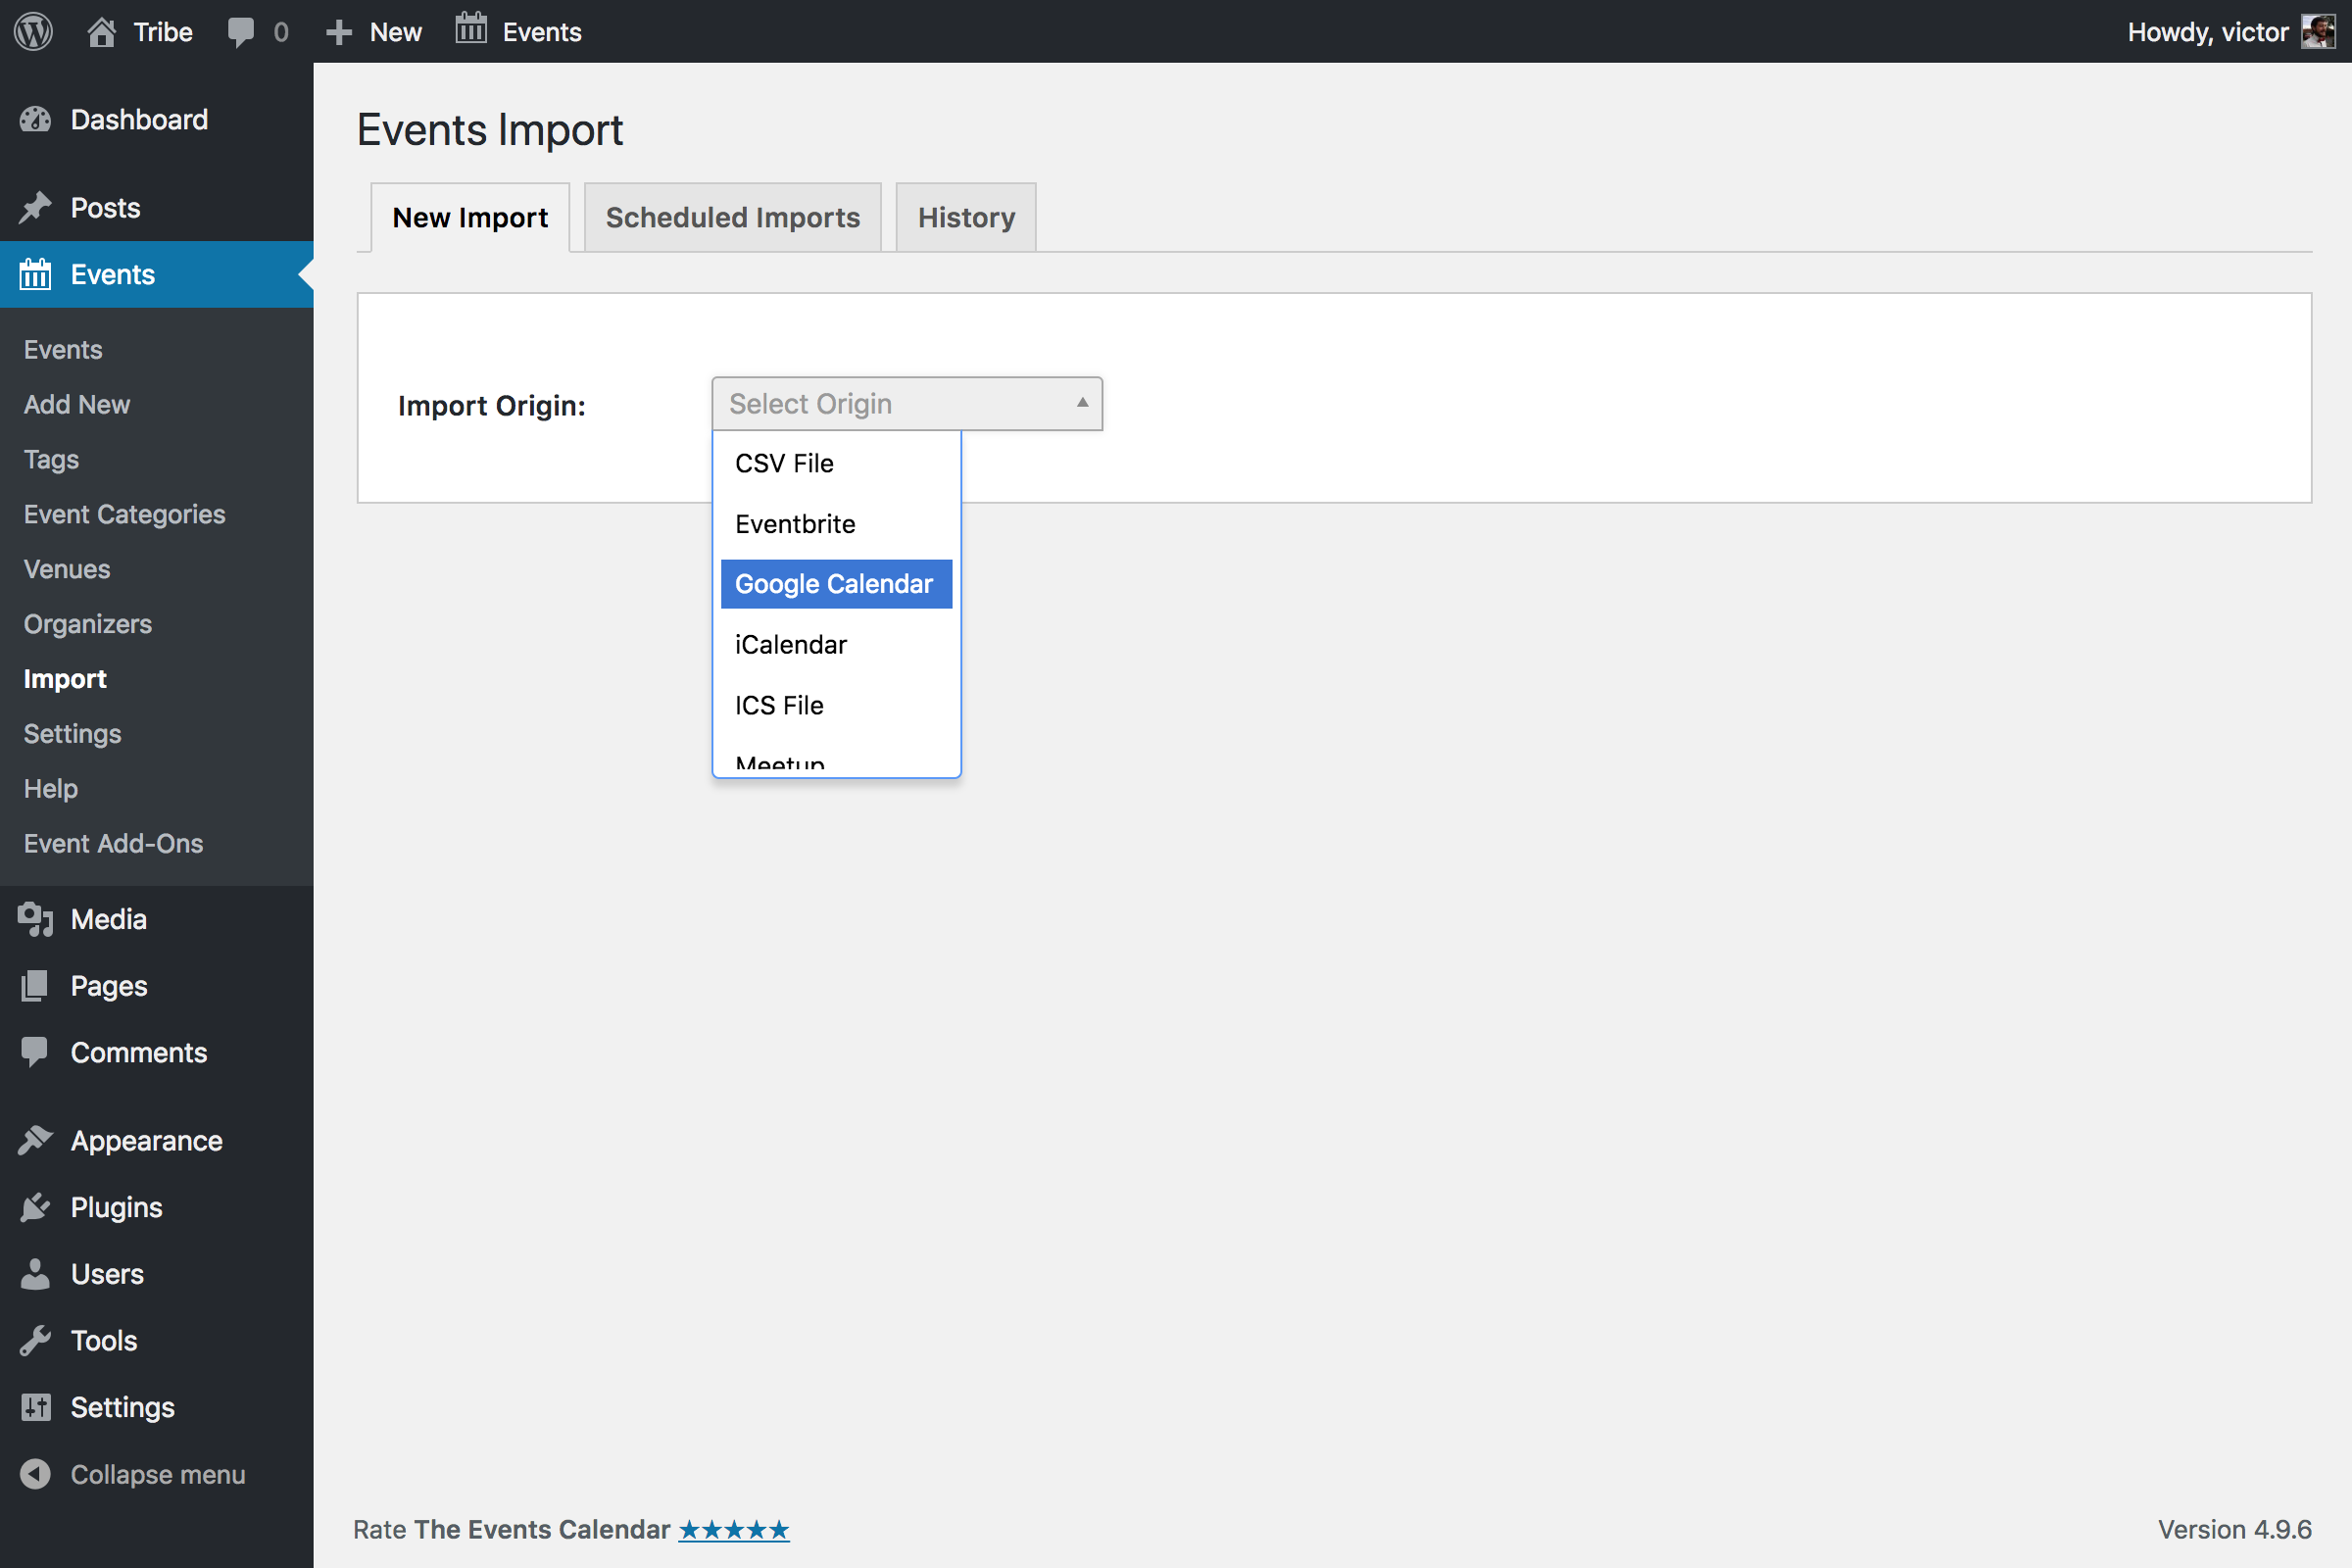
From the WordPress dashboard, navigate to Events → Import.
Step 2: Select the Import Origin
Click the Import Origin field and select your source (Google Calendar, iCalendar, Meetup, Eventbrite, Other URL, ICS File, or CSV File).
Step 3: Select the Import Type
Choose whether this is a one-time manual import or a scheduled import that runs on a repeating schedule. If you select Scheduled Import, specify how frequently (hourly, daily, weekly, etc.) Event Aggregator should check for new or updated events. The first scheduled run happens immediately; subsequent runs follow your schedule.
Step 4: Provide the Import URL (or File)
Paste the feed URL or upload the file you’re importing from. You can optionally name your import; if you don’t, the name defaults to the feed or file’s name.
For iCalendar and Google Calendar imports, you can also filter the events feed by keyword, date, or location. This is particularly useful for feeds with a very large number of events when you only need a subset.

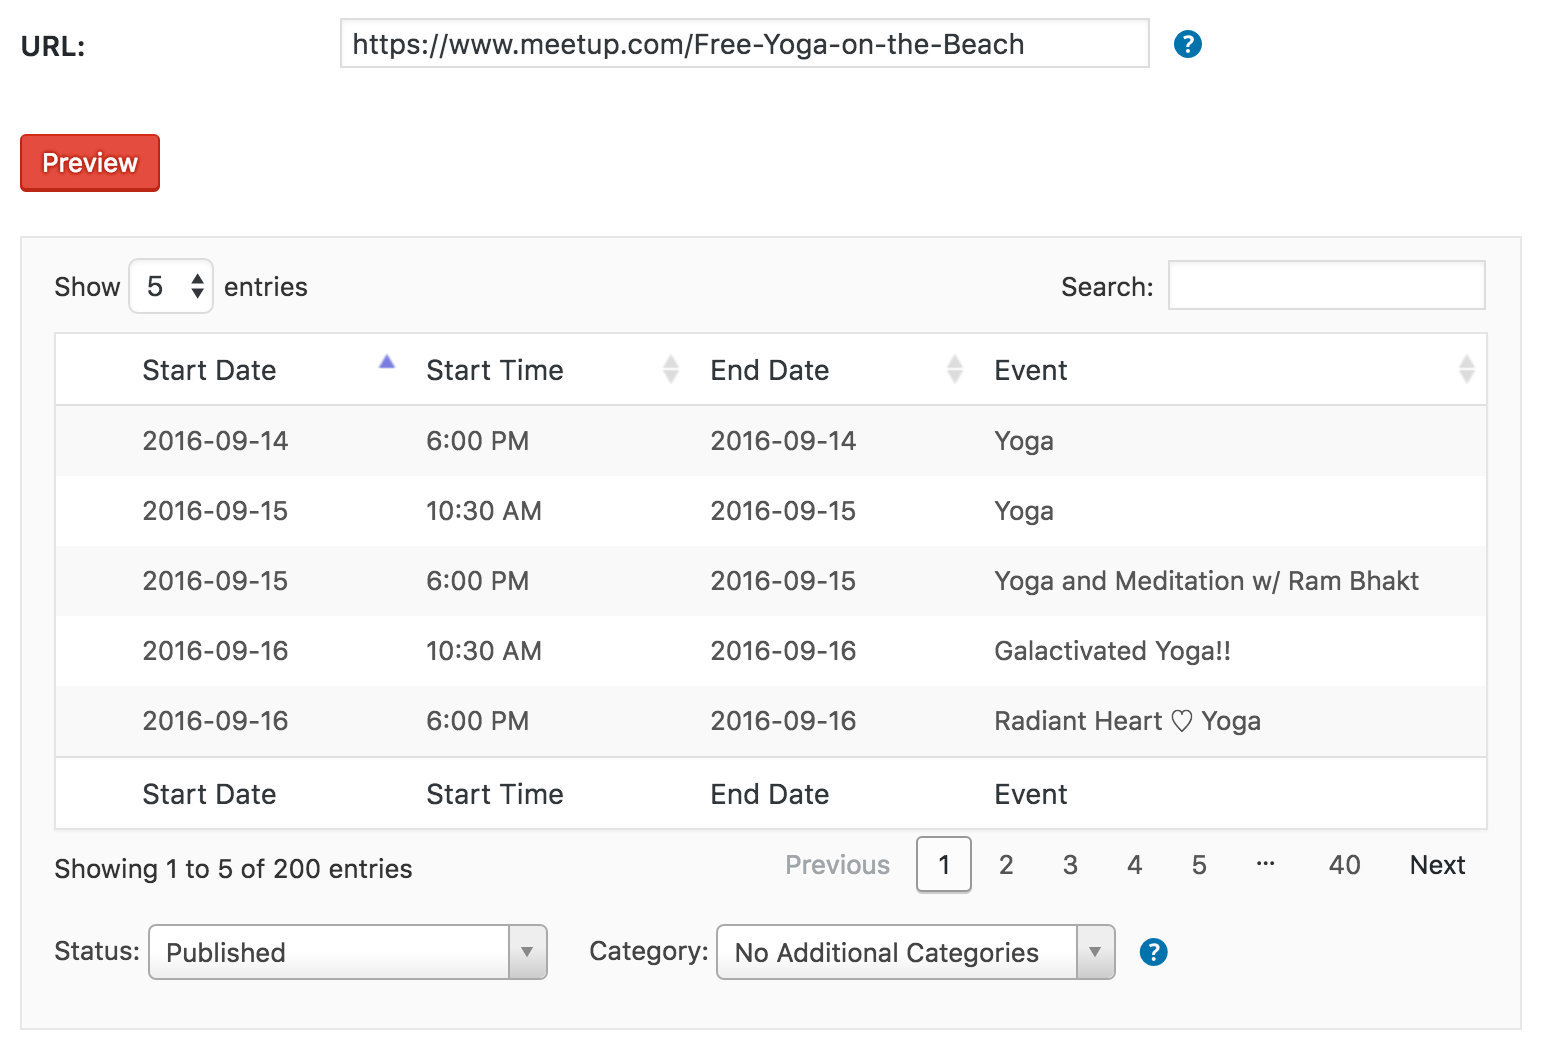
Step 5: Preview the Import
Click Preview and Event Aggregator will produce a list of available events from your source. Use this step to search for specific events, select which events to import, or verify the content before importing.
During the preview, set the WordPress status and category for the imported events (see WordPress Status Options above).
Step 6: Run the Import
Click Import All (for one-time imports) or Save Scheduled Import (for scheduled imports) to complete the setup.
Source-Specific Setup
Each source has its own requirements for finding the right URL or file and, in some cases, authenticating with the source service. Jump to the source you’re working with below.
Google Calendar
Find the Import URL
- Open Google Calendar and click the three dots next to the calendar you’d like to export.
- Select Settings and Sharing.
- Scroll down to the Integrate Calendar section.
- Copy the Public Address in iCal format (or the Secret Address, if you need to share a private calendar).
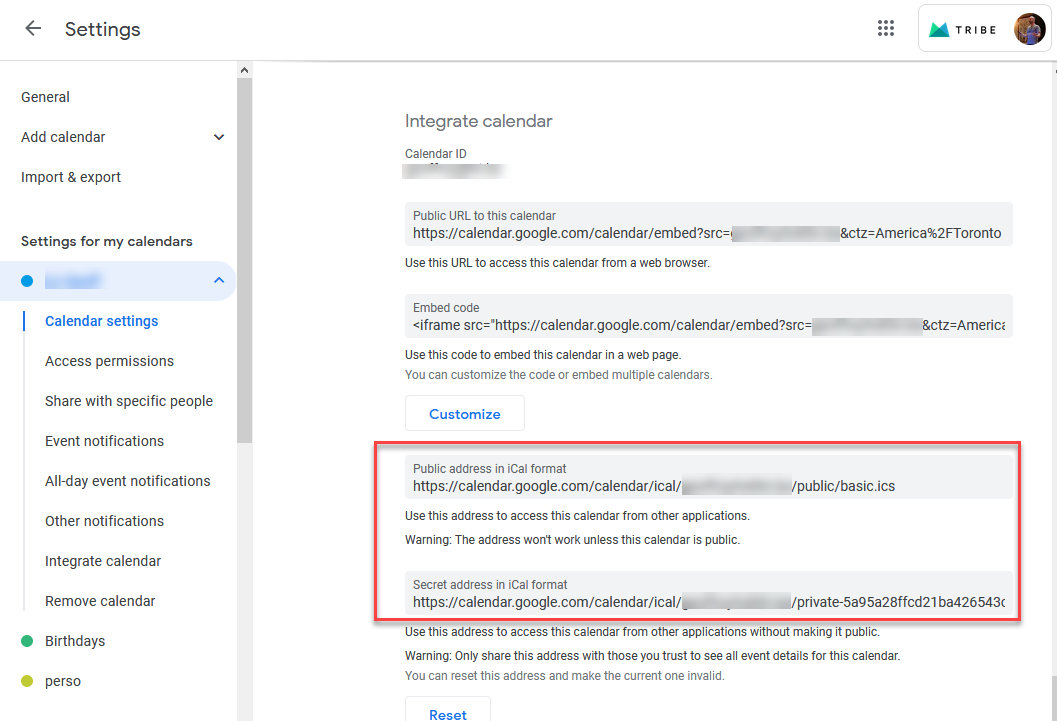
Back in WordPress, select Google Calendar as your Import Origin and paste the URL into the URL field.
Google Calendar Limitations
Recurring events import as single events. Event Aggregator works from the feed Google generates from your calendar, which is essentially a snapshot at the time the feed is pulled. Google does not include recurrence rule information in that feed — only a list of individual events with their date, time, title, and description. Because of this, Event Aggregator cannot recreate recurrence rules for imported events.
Images cannot be imported from Google Calendar. Google Calendar doesn’t offer a dedicated field for event images — unlike platforms like Eventbrite or Meetup where featured images are structured as part of the event data. Google Calendar only allows adding images inside the event’s description/content field, which Event Aggregator does not extract as featured images.
iCalendar Feeds
iCalendar is a standardized format for exchanging calendar data between applications. Any calendar service that publishes a valid iCalendar feed URL can be imported this way — including Outlook, Apple Calendar, and third-party calendar services.
Select iCalendar as your Import Origin and paste the feed URL. For finding feed URLs in specific applications, see the ICS File section below — the export steps for Outlook, Apple Calendar, and others produce either a downloadable ICS file or a feed URL.
Meetup
Connect to Meetup
The first time you import from Meetup, you’ll be prompted to connect Event Aggregator to Meetup. Go to Events → Settings → Integrations and complete the connection.
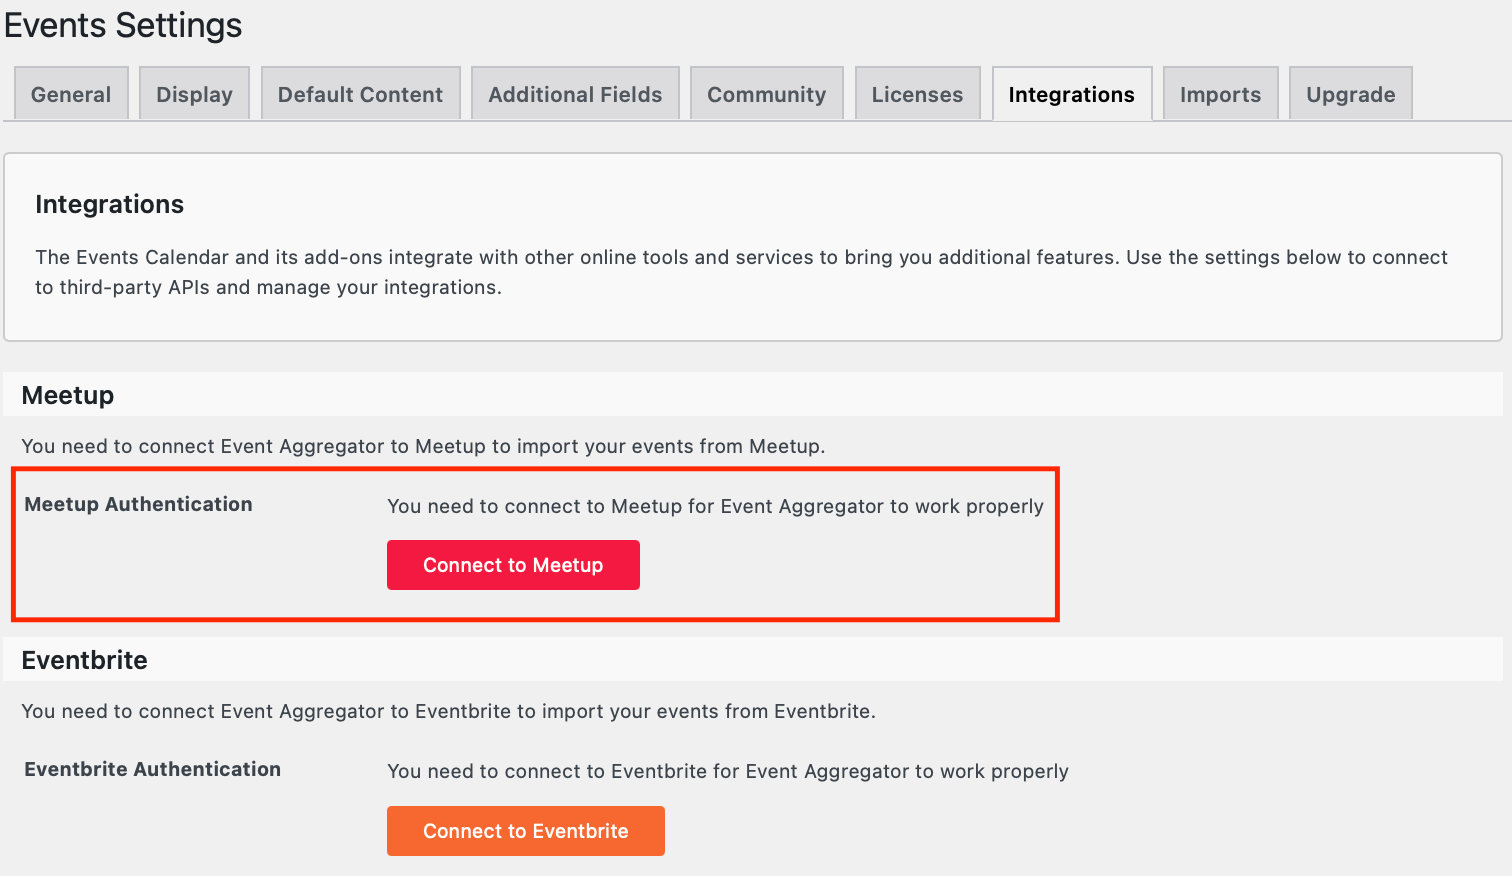
Provide the Meetup URL
Select Meetup as your Import Origin. In the URL field, paste either:
- The URL of the Meetup group you want to import events from, or
- The URL of a specific event.
Eventbrite
Eventbrite has two import options: Eventbrite Import (which lets you display tickets through Eventbrite.com embedded on your site) and Other URL (which imports event details without ticket display). Both require connecting your Eventbrite account at Events → Settings → Integrations on first use.
Because Eventbrite has a number of dev-level considerations — supported event types, empty cost field workarounds, currency mismatch handling, token error recovery, and Music-platform limitations — a full walkthrough is covered in its own article: Importing Events from Eventbrite.
Other URL (Another Events Calendar Site)
The Other URL source lets you fetch events from another website running The Events Calendar. Select Other URL as your Import Origin and paste the URL of the source site’s events archive (e.g., https://example.com/events/).
The source site must have the WordPress REST API enabled and be running an up-to-date version of The Events Calendar. If you run into REST API errors, see Troubleshooting Event Imports.
ICS File
An ICS file contains calendar data in the iCalendar format. Most major calendar applications can export an ICS file or publish an ICS feed.
Select ICS File as your Import Origin, then click Upload and select the file from your Media Library (or upload it from your computer). You can optionally refine the import by keyword, date, or location before previewing.
Finding Your ICS File or Feed
The process for exporting an ICS file or finding an iCal feed URL varies by calendar application. Here are the most common sources:
Google Calendar: Calendar Settings → Integrate Calendar → Public Address in iCal format. See the Google Calendar section above for detailed steps.
Microsoft Outlook (desktop): Calendar → select the calendar → Save Calendar → Save As, and select iCalendar format.
Outlook 365 / Outlook on the Web:
- Log in to Office 365 or Outlook.com.
- Click the Calendar app.
- Open the Calendar Settings menu by clicking the cog icon at the top right.
- Click Options at the bottom of the settings menu.
- Click Calendar publishing (under Calendar → Shared Calendars).
- Select the calendar you want to publish from the dropdown.
- Under Shows availability, titles and locations, copy the ICS link.
You can use this link directly as an iCalendar feed URL, or download it as an ICS file and upload it to your site.
Apple Calendar: File → Export → Export… and select the save location.
If your calendar application isn’t listed, check the application’s documentation for “export iCalendar” or “publish iCal feed” — the format is a widely supported standard, though not every calendar supports it.
Use Case: Importing Public and Holiday Calendars
Event Aggregator isn’t only for your own events — you can also use it to import public calendars (holidays, sports schedules, topical event feeds) alongside your regular events. Any public calendar that publishes an iCal/ICS feed is importable.
Google Calendar’s “Interesting Calendars” library is a reliable starting point. To find and subscribe to one:
- Log in to Google Calendar.
- In the left sidebar, click the plus sign next to Other calendars.
- Click Browse Calendars of Interest.
- Find the calendar you want (e.g., a national holidays calendar) and check the box to subscribe.
- Return to the Calendars tab of your Google Calendar settings. The newly-subscribed calendar appears under Other Calendars.
- Click the three dots next to the calendar name to open its settings page.
- Scroll to Integrate calendar and copy the Public address in iCal format.
Back in WordPress, use that URL with the iCalendar import source. For calendars like public holidays that don’t change often, a monthly scheduled import is usually plenty — frequent enough to catch updates, infrequent enough not to churn through your import limits.
Many other public calendars can be found by searching “[your keywords] ical calendar” in any search engine. Verify the contents of any public calendar before importing it to a live site.
This setting does not affect events already on your site — it only prevents future imports from running.
Import Limits
Your Event Aggregator license limits the number of scheduled import tasks you can run each day. Each successful run counts as a single import, regardless of how many events are included — for example, a 100-import license allows 100 total scheduled tasks per day of any size.
What Counts Toward Your Daily Limit
- Scheduled imports — Every run of a scheduled import counts, whether automatic or manually triggered.
- Manually-triggered instances of scheduled imports — Clicking Run Import before the next scheduled run counts.
- Staging sites — Each import request counts against your limit, regardless of whether it’s from a live or staging site.
What Doesn’t Count
- Individual events — A single import of 90 new events counts as one import, not 90.
- Previews — Previewing an import’s contents before saving or running it does not count.
- One-time manual imports — Manual imports from any source don’t count against your daily limit.
- Initial saves of scheduled imports — The first submission that creates a scheduled import doesn’t count; only subsequent runs do.
Optimization Tips
- Always preview before importing. The preview lets you catch bad data, mapping errors, or unexpected events before they hit your live calendar.
- Use sensible limits. Date-range or event-count limits prevent timeouts on large feeds and reduce server load.
- Schedule wisely. Daily or weekly is usually the right cadence — hourly imports are rarely necessary and consume your daily import limit quickly.
- Pick the right Event Update Authority. If you edit events locally, choose the “preserve local changes” option to avoid losing your edits on re-import.
- Stick with one source per calendar. Importing the same events from multiple sources (e.g., both a Google Calendar feed and an iCal feed that mirrors it) is a common cause of duplicate events.
For troubleshooting duplicate events, silently skipped imports, or “Other URL” REST API errors, see Troubleshooting Event Imports.