When Event Tickets Plus creates a ticket, it generates a corresponding WooCommerce product behind the scenes. By default, these ticket products have some limitations in how they display — no featured image, no event context in the product list, and hidden from shop and archive pages. The snippets in this article let you address all three.
Show Tickets in the WooCommerce Shop
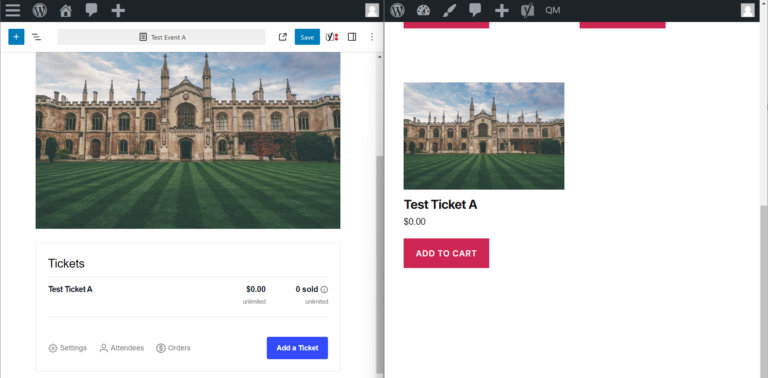
By default, the WooCommerce products that correspond to tickets created with Event Tickets Plus are hidden from displaying in the shop pages. WooCommerce products can be configured to show in the shop pages by editing the product in WooCommerce > Products and changing the “catalog visibility” settings in the product’s “publish” panel. This snippet will change the default visibility of ticket products to be “visible” instead of “hidden” when creating or saving a ticket within an event.
Note: this will only affect tickets when creating a new ticket or saving an existing ticket. For existing tickets, you can either re-save the tickets within the event, or manually change the visibility of the WooCommerce product.
Copy the below code into your (child) theme’s functions.php file (or wherever you usually put custom code).
add_action( 'event_tickets_after_save_ticket', function( $post_id, $ticket ) {
    $product = wc_get_product( $ticket->ID );
    $product->set_catalog_visibility( 'visible' );
    $product->save();
}, 100, 2 );
Sell Tickets From the WooCommerce Products Page
When you sell tickets with Tickets Plus and WooCommerce, each individual ticket is actually a fully-fledged WooCommerce product. However, to provide a nice, smooth experience for your customers we do not normally let them view the actual WooCommerce-generated product page. Instead, they choose the number of tickets they wish to have from right on the event page and then proceed straight to the cart/checkout screens.
That’s not always desirable – you might wish to make use of a WooCommerce add-on (or even a built-in feature) that only swings into effect in the context of the actual WooCommerce product page. The good news is that you can set things up so customers can view that page and order tickets from there.
First, you need to allow customers to access the actual product pages for tickets. This can by done by adding the following PHP snippet to your theme’s functions.php file or a functionality plugin.
<?php
/*
 * Description: Prevent hijacking WooCommerce product pages for tickets.
 *
 * Usage: Add the snippet to your functions.php file or with a plugin like Code Snippets.
 *        Make sure to NOT have duplicate opening <?php tags.
 *
 * Plugins required: Event Tickets, Event Tickets Plus
 */
add_action('init', function() {
    if (!class_exists('WooCommerce')) {
        return;
    }
    if (!class_exists('Tribe__Tickets_Plus__Commerce__WooCommerce__Main')) {
        return;
    }
    $woo_tickets = Tribe__Tickets_Plus__Commerce__WooCommerce__Main::get_instance();
    remove_filter('post_type_link', [$woo_tickets, 'hijack_ticket_link'], 10, 4);
});
Next, you’ll probably still want to link to the relevant product pages from within the single event page. To do that, create a custom template in [your-theme]/tribe/tickets/v2/tickets.php. Here is a basic example of how you could display ticket/product details in the template:
<ul>
	<?php
	foreach ( $tickets as $ticket ) {
		$product = new WC_Product( $ticket->ID );
		$price = $product->get_price_html();
		$link = '<a href="' . $product->get_permalink() . '">Buy Now!</a>';
		echo "<li>$ticket->name $price $link</li>";
	}
	?>
</ul>
With that done, customers can now proceed to the product page to make their ticket purchases, helping you to leverage other add-ons or implement special customizations.
Note
The astute reader may realize that we now have a template that lists all tickets for an event and links directly to the actual product page – and wonder why we can’t provide those same links directly from a different view, such as list view (thus further reducing the number of steps the visitor has to follow).
In fact, this is relatively easy and, as a further customization, a custom template can be created to add our custom ticket links in the calendar list view. To do this, copy event-tickets/src/views/v2/list/event/cost.php to [your-theme]/tribe/tickets/v2/list/event/cost.php. Replace the contents of this file with the following code in addition to your custom code to display links to product(s). (You can use the snippet above to display the products.)
<?php
$this->template( 'v2/tickets', [
	'tickets' => Tribe__Tickets__Tickets::get_all_event_tickets( get_the_ID() )
] );

//Your custom code to display links to product(s) goes here
Please do remember that this is only a rough guide and the idea is to give you a starting point. If you need to do something slightly different or build something more advanced then we’ll need to leave it to you to work out the details!
Show Event Title in the WooCommerce Product List
If you’re using WooCommerce alongside the Event Tickets Plus plugin, you might have noticed a common challenge when managing Ticket Products. When multiple events offer tickets with the same name, such as “General Entry,” it can be challenging to quickly identify which ticket belongs to which event in the WooCommerce Products list.
To improve this experience, you can add a new column to the product table in your WordPress admin. This short guide walks you through how to implement this enhancement with a simple code snippet.
Adding an Event Title column:
- Makes it easy to link ticket products to their respective events at a glance.
- Reduces confusion when managing tickets with the same name.
- Improves backend organization and saves time during product management.
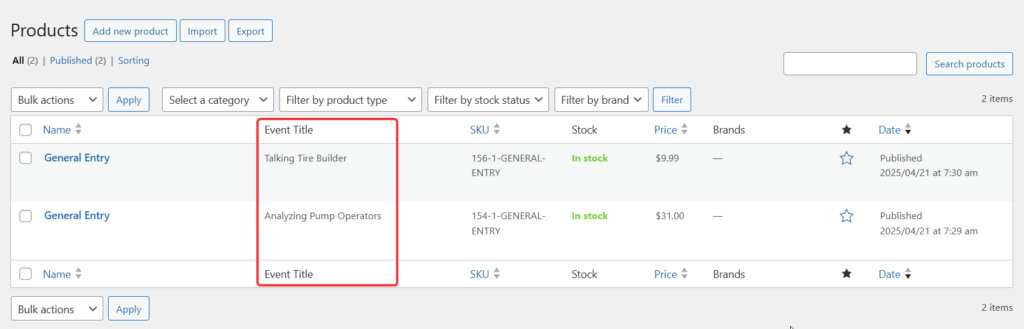
Add the following code to your site, and you’ll see the event title appear right next to each ticket title:
<?php //Do not copy this line

add_filter( 'manage_edit-product_columns', function ( $columns ) {
	$name_index = array_search( 'name', array_keys( $columns ) );
	if ( $name_index !== false ) {
		$columns = array_slice( $columns, 0, $name_index + 1, true )
		           + [ 'event_title' => 'Event Title' ]
		           + array_slice( $columns, $name_index + 1, null, true );
	}

	return $columns;
} );

add_action( 'manage_product_posts_custom_column', function ( $column, $post_id ) {
	if ( $column === 'event_title' && tribe_events_product_is_ticket( $post_id ) ) {
		$event_id = tribe_events_get_ticket_event( $post_id );
		if ( $event_id ) {
			echo esc_html( get_the_title( $event_id ) );
		}
	}
}, 10, 2 );
Add the code snippet to the functions.php file of your theme, or use your preferred method for integrating snippets into your WordPress site, such as the free Code Snippets plugin.
Auto-Assign Featured Image to the Ticket Product
When using Event Tickets Plus with WooCommerce as the payment gateway, each ticket created becomes a WooCommerce product listed in the WooCommerce shop and is referred to as Ticket Product. However, by default, no featured image is assigned to the ticket product. As a result, the fallback thumbnail will be used in the shop and the cart.
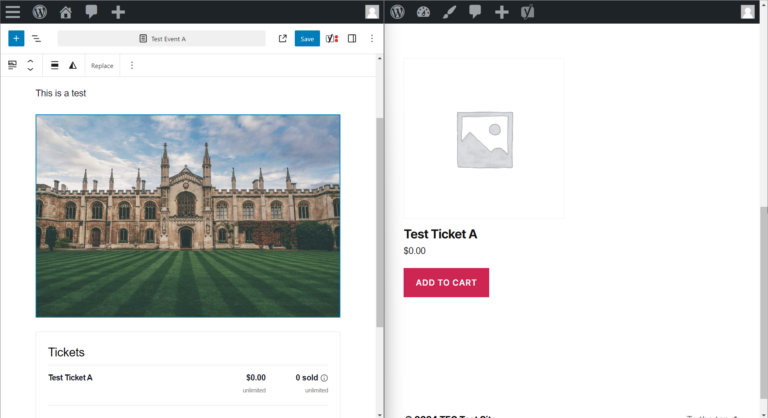
As tickets are frequently associated with events, it is desirable for the featured image of an event to be automatically assigned to a WooCommerce product created for the event’s tickets. This can be accomplished by adding the following PHP snippet to the site.
add_action( 'save_post_tribe_events', function ( $post_id, $post, $update ) {
    // Ensure this is not an autosave
    if ( wp_is_post_autosave( $post_id ) || wp_is_post_revision( $post_id ) ) {
        return;
    }

    // Get the event's featured image
    $event_thumbnail_id = get_post_thumbnail_id( $post_id );
    error_log('Event ID: ' . $post_id . ' - Thumbnail ID: ' . $event_thumbnail_id);

    // Check if a featured image exists
    if ( !$event_thumbnail_id ) {
        error_log('No featured image found for event.');
        return;
    }

    // Get all tickets linked to this event
    $tickets = Tribe__Tickets__Tickets::get_all_event_tickets( $post_id );

    foreach ( $tickets as $ticket ) {
        // Ensure it's a WooCommerce ticket
        if ( $ticket->provider_class !== 'Tribe__Tickets_Plus__Commerce__WooCommerce__Main' ) {
            continue;
        }

        // If the ticket product has no image, set the event's image
        if ( ! has_post_thumbnail( $ticket->ID ) ) {
            set_post_thumbnail( $ticket->ID, $event_thumbnail_id );

            // Force WooCommerce to recognize the change
            wp_update_post( array(
                'ID'           => $ticket->ID,
                'post_status'  => get_post_status( $ticket->ID )
            ));

            error_log('Set featured image for product ID: ' . $ticket->ID);
        } else {
            error_log('Product ID: ' . $ticket->ID . ' already has an image.');
        }
    }
}, 10, 3 );
Add the code snippet to the functions.php file of your theme, or use your preferred method for integrating snippets into your WordPress site, such as the free Code Snippets plugin.
By automatically assigning the event’s featured image to WooCommerce ticket products, time is saved by eliminating the need for a site editor to assign featured images to all created tickets manually.