Display Specific Additional Fields Using Shortcodes
Our Elementor Additional Fields widget will show all the additional fields for an event in one block. You may want to display only certain Additional Fields on an event, or display them in different areas. This guide will help you achieve just that. By using this custom code snippet, you will be able to display the event’s Additional Fields by using a shortcode. Here are step-by-step instructions on how to do this.
While this guide is specific for Elementor, the code will create a shortcode that you can use anywhere on the site where there is a single event even without Elementor.
Step 1: Add The Shortcode Code To Your Site
Before you can use the shortcode in Elementor, you’ll need to add the code to your website. Follow these steps:
- Log in to WordPress.
- Go to your Theme’s
functions.phpfile: From the WordPress dashboard, navigate to Appearance > Theme Editor. - On the right, find and select the
functions.phpfile. - Add the code: Copy the provided PHP code below and paste it at the end of your
functions.phpfile.
Note: Additionally, you can read our Using Custom Code Snippets for a more detailed explanation of this.
// Define the shortcode
function custom_event_custom_fields_shortcode( $atts ) {
    // Get the current event ID
    $post_id = get_the_ID();

    // Get the custom fields for the event
    $custom_fields = tribe_get_custom_fields( $post_id );

    // Get custom field name from the shortcode attribute
    $atts = shortcode_atts(
        array(
            'field' => '', // Default is empty
        ),
        $atts
    );

    // Initialize the output string
    $output = '';

    // Check if the custom field exists based on the attribute 'field'
    if ( ! empty( $atts['field'] ) && isset( $custom_fields[$atts['field']] ) ) {
        $output .= '<div class="custom-field-section">';
        $output .= '<h3>' . esc_html( $atts['field'] ) . '</h3>';
        $output .= '<p>' . esc_html( $custom_fields[$atts['field']] ) . '</p>';
        $output .= '</div>';
    }

    // Return the output
    return $output;
}

// Register the shortcode
add_shortcode( 'event_custom_fields', 'custom_event_custom_fields_shortcode' );
- Save the changes to the
functions.phpfile.
Step 2: Add The Shortcode In Elementor
Now that the shortcode is set up, you can easily display custom fields on any Elementor page. Follow these steps:
- Edit the Page in Elementor: Go to the page or post where you want to display the custom field in Elementor.
- Add the Shortcode Widget: Drag the Shortcode widget into the section where you want the custom field to appear.
- Insert the Shortcode: In the Shortcode widget, type the following shortcode:
[event_custom_fields field="Custom Field"] - Replace “Custom Field” with the exact name of the custom field you want to display (e.g., “Event Website” or “Location”). You can find this by going to Events > Settings > Additional Fields and checking the label there. Whatever you named it there, is a custom field name that needs to be replaced.
Step 3: Customize And Display Multiple Fields
You can add multiple shortcodes on the same page to display different custom fields. Just copy the shortcode widget and change the field attribute to the name of the custom field you want to display. For example, to display a field called “Dress Code” you can use [event_custom_fields field="Dress Code"] or to display a field called Parking, use [event_custom_fields field="Parking"] (these are just examples, you can use whatever field name you need).
Here’s an example of me using it on my site with a field called “Unique Value”: (Visual Example/Screenshot normally appears here)
And this is what it looks like: (Visual Example/Screenshot normally appears here)
If you don’t like how it looks, and you’re comfortable with HTML – you can change what is outputted in this function:
    // Check if the custom field exists based on the attribute 'field'
    if ( ! empty( $atts['field'] ) && isset( $custom_fields[$atts['field']] ) ) {
        $output .= '<div class="custom-field-section">';
        $output .= '<h3>' . esc_html( $atts['field'] ) . '</h3>';
        $output .= '<p>' . esc_html( $custom_fields[$atts['field']] ) . '</p>';
        $output .= '</div>';
    }
Integrating Event Tickets With Elementor: Crafting Custom Ticket Layouts
Enhancing your WordPress event pages with custom ticket layouts can significantly improve user experience and boost ticket sales. By integrating Event Tickets Plus plugin with Elementor, you can design visually appealing and functional ticket sections without delving into code. This guide will walk you through the process of creating custom ticket layouts using Elementor.
Prerequisites
Before you begin, ensure you have the following plugins activated:
- The Events Calendar
- Event Tickets
- Event Tickets Plus
- Elementor or Elementor Pro
1. Create an Event and Add Tickets
- Navigate to your WordPress dashboard.
- Go to Events > Add New to create a new event.
- Fill in the event details such as title, description, date, and time.
- Scroll down to the Tickets section and click on + New Ticket.
- Enter ticket details like name, price, stock, and sale dates.
- Click Save Ticket to add it to your event.
Review Creating Tickets article for further information.
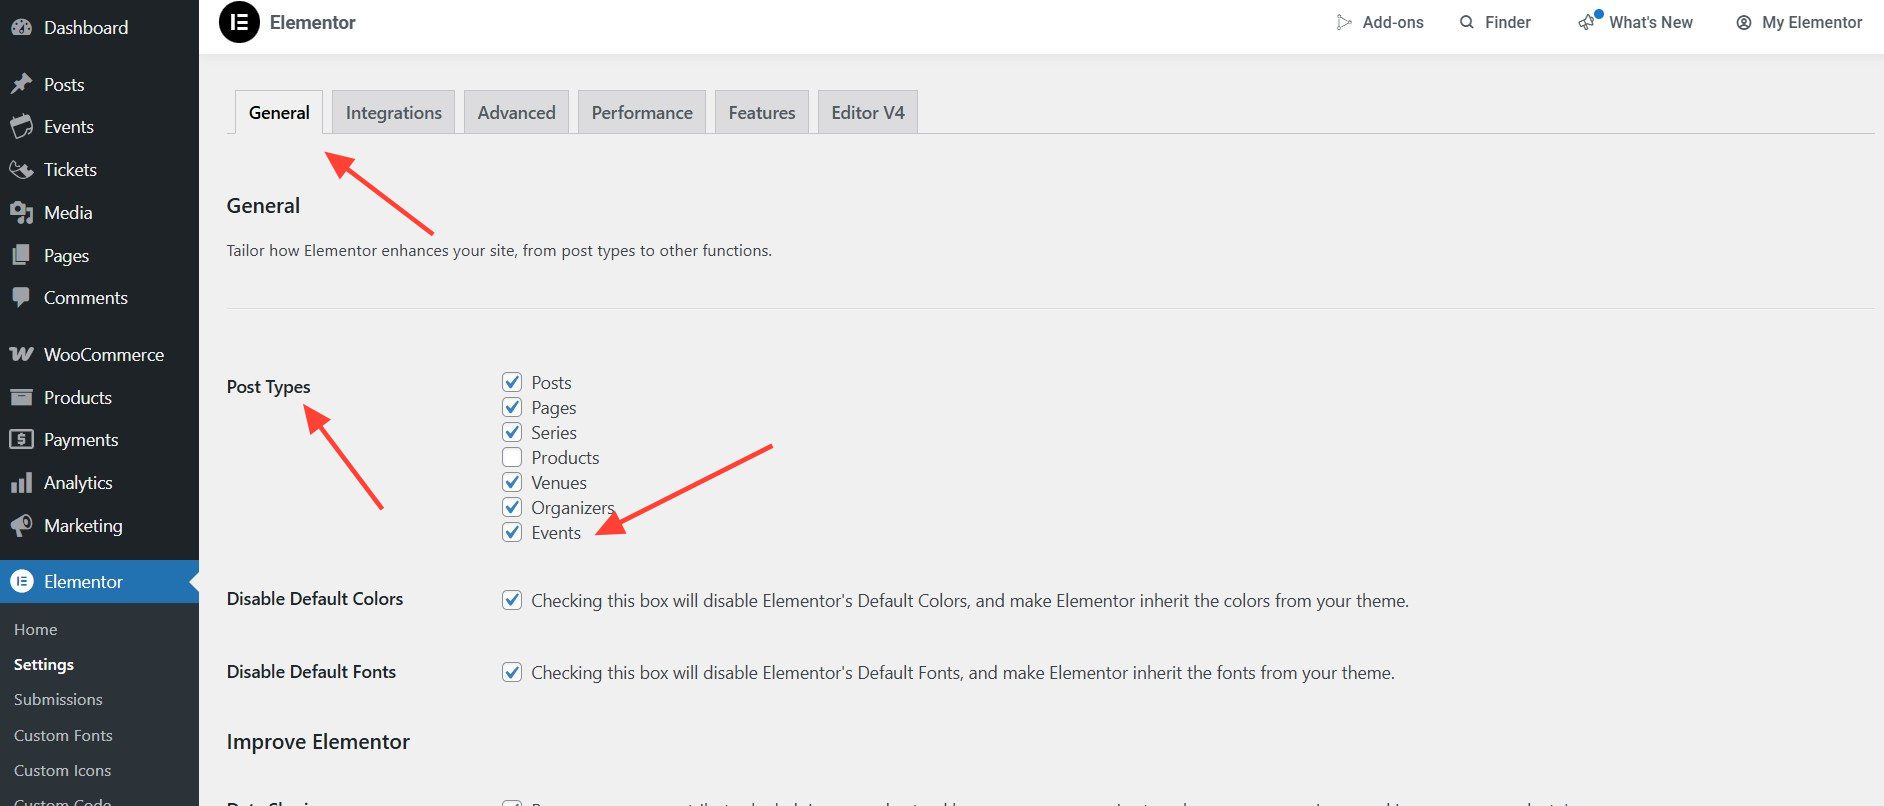
2. Enable Elementor for Events
- Go to Elementor > Settings.
- Under the General tab, check the box for Events to enable Elementor editing for event post types.
- Click Save Changes.
3. Design the Event Page with Elementor
- Navigate to Events > All Events and select the event you created.
- Click on Edit with Elementor to open the Elementor editor.
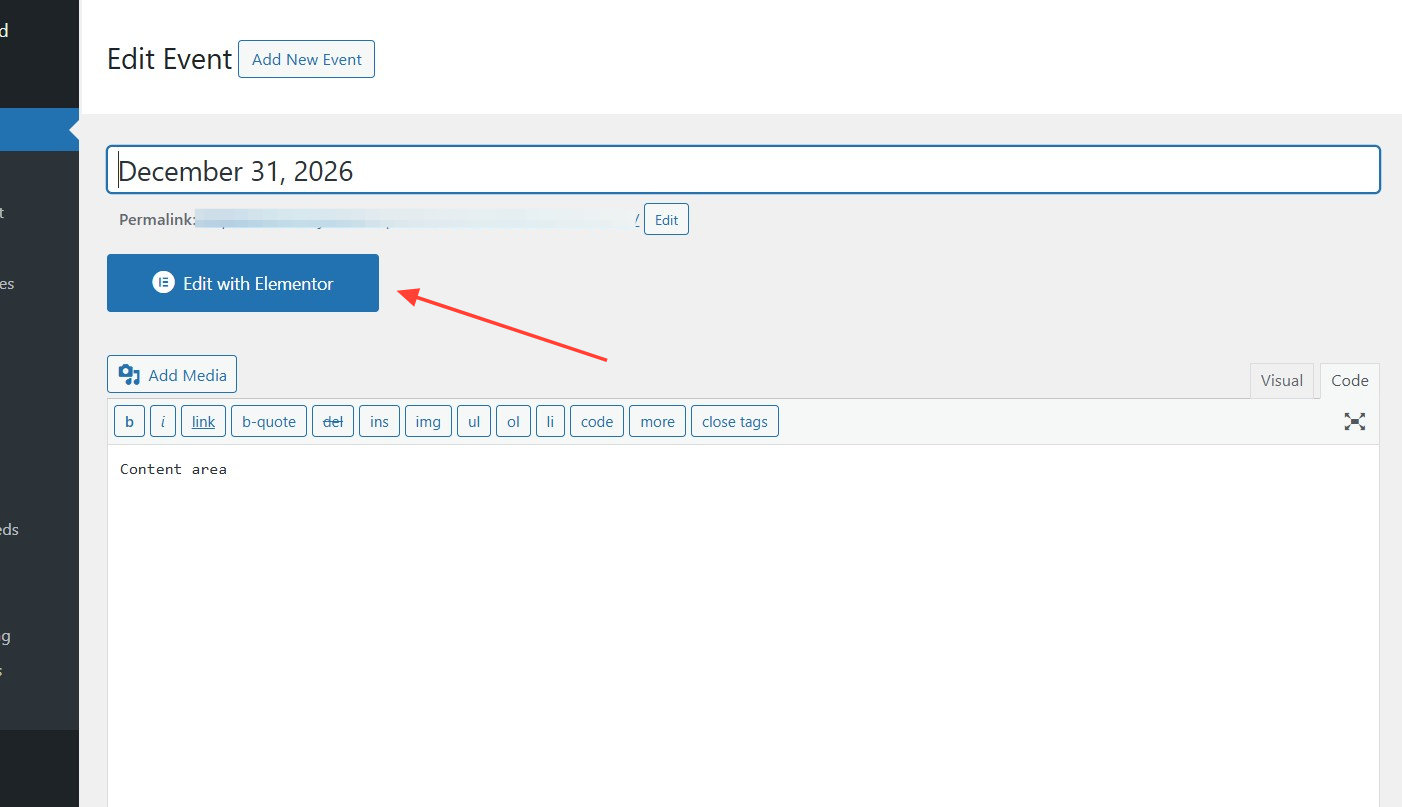
- Use Elementor widgets to design your event page layout, including headings, images, and descriptions.
4. Add the Event Tickets Widget
- In the Elementor editor, search for the Event Tickets widget in the sidebar.
- Drag and drop the widget into your desired section on the page.
- Configure the widget settings to display the ticket form appropriately.

5. Customize the Ticket Layout
Once satisfied with the design, click Publish to make the event page live with your custom ticket layout.
Use Elementor’s styling options to customize the appearance of the ticket section. Extend the customization by using custom CSS.
Adjust typography, colors, spacing, and other design elements to match your site’s branding.
Preview the changes to ensure the ticket layout is visually appealing and functional.
Display Only The Next Upcoming Recurring Event In Elementor Loop Grid Widget
In Elementor, when using Loop Grid or the Loop Carousel Widget to show an event that is set to recurring, the widget shows all the instances of that event. To only show the next upcoming event and to remove recurring events from the Loop Grid or the Loop Carousel Widget, the below PHP snippet is helpful:
<?php
function hide_subsequent_recurrences($query) {
    $query->set("hide_subsequent_recurrences", true);
}

add_action("elementor/query/hide_subsequent_recurrences", "hide_subsequent_recurrences");
Adding The Code
You can add the above code snippet directly to your theme’s or child theme’s functions.php file. If you’re not comfortable editing your theme’s functions.php file, you can use the Code Snippets plugin to safely add custom code without directly modifying theme files.
Here’s how:
- Install and activate the Code Snippets plugin from the WordPress repository or directly download the plugin here: https://wordpress.org/plugins/code-snippets/
- Go to Snippets > Add New in your WordPress dashboard.
- Copy and paste the code snippet above into the code editor.
- Name your snippet (e.g., “Remove Recurring Events Loop Grid”) and click Save and Activate.
Configuring The Widget
Add the below to the Query ID of the widget: hide_subsequent_recurrences
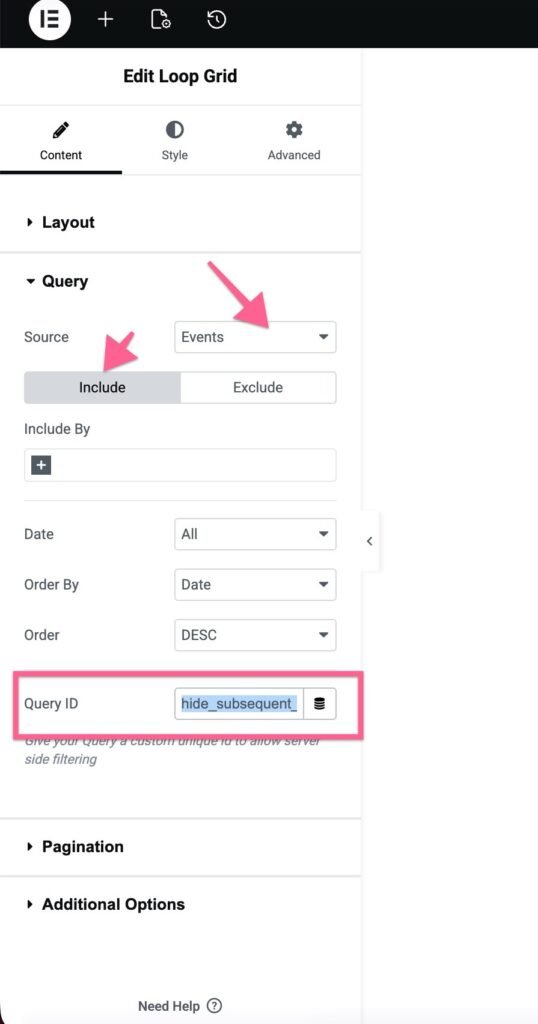
That’s it! Now, only the next upcoming recurring event will display in the Elementor’s Loop Grid or Loop Carousel Widget.