The Events Calendar and Event Tickets include a built-in REST API that lets you read, create, update, and delete event data from outside WordPress — whether from a mobile app, an external site, a script, or another service. This article covers what a REST API is, how the TEC endpoints are structured, how to make your first requests, how to authenticate, how to create events via POST, how to customize API responses, and how to explore the full self-documenting API reference on your own site.
What is a REST API
REST (REpresentation State Transfer) API (Application Programming Interface) is a great tool for enabling communication and data exchange between your site and other applications or services using standard web protocols. REST APIs typically use JSON (JavaScript Object Notation) for data interchange — a lightweight format that is easy for humans to read and easy for machines to parse.
The “REST” part means that the state of each transaction between a client and the server is wholly contained in the response the client receives. HTTP protocol-based communications are the domain where REST APIs live, and they make full use of HTTP methods:
GET— retrieve data from the serverPOST— send new data to the server (create)PUT/PATCH— update existing data on the serverDELETE— remove data from the server
Almost any REST API — including WordPress and The Events Calendar — uses authorization to allow or restrict what a user can do. GET requests are often public; operations that create, update, or delete data typically require authentication. HTTP response codes tell you what happened: 200 means success, 404 means not found, 403 means not authorized, 500 means a server error occurred. See the full list of HTTP status codes for reference.
For more background on the WordPress REST API specifically:
The Events Calendar REST API
We built The Events Calendar REST API to allow our users and ourselves to consume and manage events from anywhere. In its most basic form, a REST API separates the content from its presentation, freeing developers and users from the constraints of a WordPress site and a WordPress theme. Some examples of what this enables:
- Themes can access events, venues, and organizers’ data without using plugin PHP functions — developers can present that data in any way they want.
- Sites not using PHP or WordPress can use a WordPress installation as a CMS to manage events while the front-end is maintained in a different language or framework.
- Android, iOS, and other mobile developers can use a WordPress backend to manage events and present the same information across different platforms.
- External applications and services can create, update, or sync events directly into your site programmatically.
Since The Events Calendar REST API is built on top of the WordPress REST API, it inherits its code, robustness, and security.
The Events Calendar REST API is free and bundled with The Events Calendar plugin. It requires WordPress 4.5 or above. Once you have installed and activated The Events Calendar, you are ready to get started.
Endpoints and Base URL
All TEC REST API calls follow the same URL structure. For events:
[your-site-URL]/wp-json/tribe/events/v1/{endpoint}
Breaking this down:
[your-site-URL]/— the server you are making the request to/wp-json/tribe/events/v1—/wp-jsonis the WordPress Core REST API prefix;/tribe/events/v1identifies The Events Calendar plugin and API version/{endpoint}— optional, adds specificity to what the call returns (e.g./events,/events/6,/venues)
To access the tickets API instead of events, switch /events for /tickets:
[your-site-URL]/wp-json/tribe/tickets/v1/{endpoint}
For the full list of available endpoints for both events and tickets, see the REST API endpoints documentation. You can also explore all available endpoints on your own site by visiting /wp-json/tribe/events/v1/doc — more on this in the Self-Documenting API Reference section below.
Example GET Requests
The simplest request is a GET to return all events. You can test this by pasting the URL directly into your browser:
GET https://demo.theeventscalendar.com/wp-json/tribe/events/v1/events
This returns a JSON response that looks like this (truncated for brevity):
{
  "events": [
    {
      "id": 1762,
      "global_id": "demo.theeventscalendar.com?id=1762",
      "author": "2",
      "status": "publish",
      "date": "2022-12-01 12:36:40",
      "url": "https://demo.theeventscalendar.com/event/hosted-dinner-with-chef-monica-geller/",
      "rest_url": "https://demo.theeventscalendar.com/wp-json/tribe/events/v1/events/1762",
      "title": "Hosted Dinner with Chef Monica Geller",
      "description": "<p>Join Chef Monica Geller for a Hosted Dinner!</p>",
      "all_day": false,
      "start_date": "2017-09-21 08:00:00",
      "end_date": "2017-09-21 17:00:00",
      "timezone": "UTC+0",
      "cost": "$5",
      "categories": [...],
      "tags": [...],
      "venue": {...},
      "organizer": [...]
    }
  ],
  "rest_url": "...",
  "total": 1,
  "total_pages": 1
}
To return a single event, pass its post ID as a path parameter:
GET https://demo.theeventscalendar.com/wp-json/tribe/events/v1/events/1762
Many of the WordPress and TEC REST API parameters share names with those used in WP_Query. You can use standard query parameters to filter results — for example, per_page and page for pagination:
GET https://demo.theeventscalendar.com/wp-json/tribe/events/v1/events?per_page=2&page=2
Query Parameter Example: Tickets
The same approach works for the tickets endpoint. For example, to return only tickets that have Individual Attendee Collection enabled:
GET https://demo.theeventscalendar.com/wp-json/tribe/tickets/v1/tickets?attendee_information_available=true
👋 You may notice that the attendees attribute for each ticket returns as an empty array even when you know attendees exist. This is because attendee data requires authentication to retrieve — see the Authentication section below.
Authentication
Some REST API requests require authentication to return data. For example, this endpoint is valid:
GET https://demo.theeventscalendar.com/wp-json/tribe/tickets/v1/attendees
But without authentication, a site with attendees will still return:
{
  "rest_url": "https://demo.theeventscalendar.com/wp-json/tribe/tickets/v1/attendees/",
  "total": 0,
  "total_pages": 0,
  "attendees": []
}
Since our REST API is built on top of the WordPress API, the same authentication practices are baked in. This ensures that sensitive information — such as attendees’ personal data — remains protected. Regardless of which method you choose, you are setting up a secret token that grants access to otherwise protected information or actions.
Authentication Methods
Three options are available:
- Basic Auth plugin — Recommended for simple authentication. Allows you to use your WordPress admin credentials for API requests.
- JWT Authentication plugin — For more advanced JSON Web Token authentication.
- Nonce Authentication — Create a nonce using
wp_create_nonce()with the action set to'wp_rest'. More technical to set up, but very versatile and built into WordPress.
Making a Request with cURL (Basic Auth)
With the Basic Auth plugin installed and activated, you can authenticate a GET request using cURL by passing your WordPress username and password with the --user flag:
curl --user user:pass -X GET \
    -H "Content-Type: application/json" \
    https://www.yoursite.url/wp-json/tribe/tickets/v1/attendees
An authenticated response with one attendee looks like this:
{
  "rest_url": "https://stable.dev.lndo.site/wp-json/tribe/tickets/v1/attendees/",
  "total": 1,
  "total_pages": 1,
  "attendees": [
    {
      "id": 33,
      "post_id": 29,
      "ticket_id": 30,
      "title": "Steve Harvey",
      "email": "[email protected]",
      "checked_in": false,
      "ticket": {
        "id": "30",
        "title": "Entree",
        "raw_price": 20,
        "formatted_price": "20.00",
        "start_sale": "2024-06-01",
        "end_sale": "2024-07-01"
      },
      "payment": {
        "provider": "woo",
        "price": 20,
        "currency": "$",
        "date": "2024-06-06 15:36:16"
      }
    }
  ]
}
Making a Request with AJAX (Nonce)
For front-end JavaScript usage, nonce authentication is the standard WordPress approach. In your PHP where the script is enqueued, pass the nonce as a localized variable using wp_localize_script():
// Localize the script with the nonce
wp_localize_script( 'handle-of-script', 'localized_script_variables', array(
    'ajax_url'      => admin_url( 'admin-ajax.php' ),
    'rest_endpoint' => '/wp-json/tribe/tickets/v1/attendees/',
    'nonce'         => wp_create_nonce( 'wp_rest' ),
) );
Then in your JavaScript file, set the X-WP-Nonce header on the request:
$.ajax({
    url: localized_script_variables.ajax_url,
    type: 'GET',
    dataType: 'json',
    headers: {
        'X-WP-Nonce': localized_script_variables.nonce,
    },
    success: renderAttendees
});
You can test that authentication is working by triggering the AJAX call as a logged-in user versus in an incognito window.
Authentication in a Theme: Full JavaScript Example
The following is a complete example of cookie-based nonce authentication used in a child theme to fetch and display events via the REST API. In functions.php, enqueue your script and localize the REST API root URL and nonce:
// file functions.php

add_action( 'wp_enqueue_scripts', 'twentyseventeen_parent_theme_enqueue_styles' );

function twentyseventeen_parent_theme_enqueue_styles() {
    wp_enqueue_style( 'twentyseventeen-style', get_template_directory_uri() . '/style.css' );
    wp_enqueue_style( 'rest-style',
        get_stylesheet_directory_uri() . '/style.css',
        array( 'twentyseventeen-style' )
    );

    // Enqueue the theme script...
    wp_enqueue_script( 'rest-theme-js', get_stylesheet_directory_uri() . '/js/rest-theme.js', array( 'jquery' ) );

    // ...and localize The Events Calendar REST API root URL and nonce
    wp_localize_script( 'rest-theme-js', 'restTheme',
        array(
            'root'  => esc_url_raw( tribe_events_rest_url() ),
            'nonce' => wp_create_nonce( 'wp_rest' )
        )
    );
}
In /js/rest-theme.js, fetch and render the next 3 upcoming events when the page loads:
( function( $ ) {
    if ( undefined === restTheme ) {
        return;
    }

    var renderEvents = function( response ) {
        var eventsNode;

        if ( response.events.length > 0 ) {
            eventsNode = $( '<ul>' );
            for ( var event of response.events ) {
                var eventNode = $( '<li>' );
                eventNode.text( event.title );
                eventNode.appendTo( eventsNode );
            }
        } else {
            eventsNode = $( '<p>' );
            eventsNode.text( 'No upcoming events found!' );
        }

        eventsNode.appendTo( $( '#rest-events' ) );
    };

    var showEvents = function() {
        $.ajax( {
            url: restTheme.root + 'events',
            method: 'GET',
            beforeSend: function( xhr ) {
                xhr.setRequestHeader( 'X-WP-Nonce', restTheme.nonce );
            },
            data: { 'page': 1, 'per_page': 3 }
        } ).done( renderEvents );
    };

    $( document ).ready( function() { showEvents(); } );
} )( jQuery );
By default, visitors and subscribers see only public events. Users with the edit_posts capability (Editor, Administrator) will also see private and draft events — this is true for any authentication method, not just cookie-based.
Creating Events via POST
The REST API supports creating new events by sending a POST request to the events endpoint. Because you are modifying data on the server, this operation requires authentication and appropriate user permissions (Editor or Administrator role).
The examples below use Application Passwords for authentication. Application Passwords authenticate REST requests without exposing your main login password — they are per-user, revocable, and designed for use over HTTPS. If you prefer a different method, you can adapt the examples to use Cookie/Nonce authentication instead.
Prerequisites
- WordPress 5.6 or above
- Site served over HTTPS (or a local development environment). Note: some hosts or security plugins may disable this feature.
Generate an Application Password
- Log in to your WordPress dashboard with an Editor or Administrator account.
- Go to Users → Profile.
- Scroll to Application Passwords.
- Enter a descriptive name (e.g. “My Script” or “Zapier”) and click Add Application Password.
- Copy the generated password now — you will not see it again. You can revoke it at any time from the same screen.
POST Endpoint Reference
| Detail | Value |
|---|---|
| Method | POST |
| Endpoint | /wp-json/tribe/events/v1/events |
| Authentication | Required (e.g. Application Passwords) |
| Content-Type | application/json |
Required Parameters
| Parameter | Type | Description | Example |
|---|---|---|---|
title | string | The title of the event | “Annual Developer Meetup” |
start_date | string | Event start date and time | “2025-11-20 14:00:00” |
end_date | string | Event end date and time | “2025-11-20 17:00:00” |
Setting Event Status
By default, newly created events are saved as draft. To publish immediately, include the status parameter:
| Parameter | Value | Result |
|---|---|---|
status | "publish" | Event is created and immediately published |
status | "draft" | Event is saved as a draft (default) |
Example JSON Payload
{
    "title": "REST API Event Creation Sample",
    "description": "A deep dive into new features of The Events Calendar REST API.",
    "start_date": "2025-11-20 09:00:00",
    "end_date": "2025-11-20 11:30:00",
    "all_day": false,
    "status": "publish",
    "website": "https://your-site.com/rest-api-workshop",
    "categories": [12, 34]
}
Complete cURL Example
Replace your-site.com, WP_USERNAME, and APPLICATION_PASSWORD with your actual values. The --user flag automatically handles Basic Auth encoding.
curl -X POST 'https://your-site.com/wp-json/tribe/events/v1/events' \
  --header 'Content-Type: application/json' \
  --user 'WP_USERNAME:APPLICATION_PASSWORD' \
  --data-raw '{
    "title": "Event Created from REST API",
    "description": "This event was created via a POST request to the events REST API.",
    "start_date": "2025-11-25 10:00:00",
    "end_date": "2025-11-25 11:00:00",
    "status": "publish"
}'
For the complete list of available fields and their data structures — including how to set Venues, Organizers, and other attributes — see the REST API endpoints documentation.
Using the REST API to Manage Event Attendees
If you haven’t already, before diving into this guide you should start with our other articles about using the REST API with The Events Calendar and Event Tickets. Get started with the basics and then learn how to add authentication to your requests. Up to this point, we’ve mostly been talking about just retrieving information (GET requests), but in this guide we’re going to dive into POST requests to create new attendees and PUT requests to update existing attendees.
Create a New Attendee
First, set up an authenticated call – in this example we’ll be using an authenticated AJAX call. In your script file, this is what your JS will look like:
$.ajax( {
		method: 'POST',
		url: 'https://your-site/wp-json/tribe/tickets/v1/attendees',
		beforeSend: function ( xhr ) {
			xhr.setRequestHeader( 'X-WP-Nonce', ajax_variable.nonce );
		},
		data: {
			ticket_id: '50',
			full_name: 'Bob Saget',
			email: '[email protected]',
		}
	} )
} );
Let’s break this down:
method: 'POST'– This establishes that we want to add something new to the database (in this case, a new attendee).url: ‘https://your.site/wp-json/tribe/tickets/v1/attendees’– This is the endpoint for the REST API. Make sure to replace “your.site” with your site’s actual URL. The rest of the endpoint is pointing to the Event Tickets API for attendees.beforeSend: function (xhr)– This function is used to add headers to the AJAX request. In this case, we are adding an authentication token (nonce) to the request, which is necessary to validate that the user making the request has the right permissions to create an attendee. Make sure you update the localized variable name (ajax_variable.nonce) if you used something different.data: {…}– This is the body of the request, where you send the actual information needed to create the new attendee. Each key in the object corresponds to a required parameter expected by the API. There are other attendee-specific parameters you can optionally add, but these three are required:ticket_id: ‘50’– Theticket_idis a string or integer that must correspond to thepost_idof an existing ticket in your system. The attendee you’re creating will be associated with this ticket. Without a validticket_id, the request will fail.full_name: ‘Bob Saget’– This is the name of the attendee you’re creating. It will appear in the list of attendees associated with the event.email: ‘[email protected]’– This is the attendee’s email address. Make sure this is a valid email, as it will be used for communication and sending the tickets, which you will have to either send manually on the attendee page or through a different customization.
Update an Existing Attendee
The process for updating an attendee is very similar to creating a new attendee with two key differences: the request type is a PUT request (instead of a POST request), and you have to identify which attendee you want to update in the REST API.
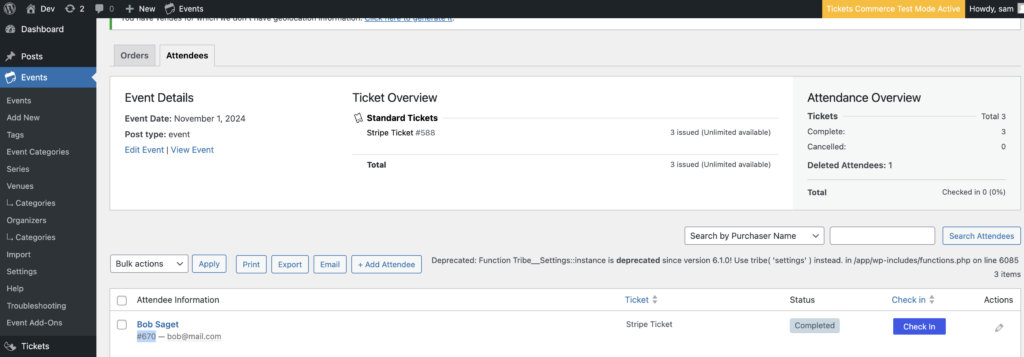
To find the id of a given attendee, you can either use a REST API GET request, or go to the Attendee Page and find the attendee you want to update and their id will be the number under their name:
This is what the AJAX call looks like with those adjustments:
$.ajax( {
		method: 'PUT', // For updating existing item in database
		url: 'https://your-site/wp-json/tribe/tickets/v1/attendees/670', // Add the id of the attendee
		beforeSend: function ( xhr ) {
			xhr.setRequestHeader( 'X-WP-Nonce', ajax_variable.nonce );
		},
		data: {
			ticket_id: '50',
			full_name: 'Updated Name',
			email: '[email protected]',
		}
	} )
} );
Customizing API Responses
The TEC REST API exposes filters you can use to modify what is returned in responses — for both events and the API documentation itself.
Adding Custom Fields to Event Responses
Use the tribe_rest_single_event_data filter to add custom meta fields to single-event responses. The following example adds a custom _raccoon_suspect_level meta field:
add_filter( 'tribe_rest_single_event_data', 'my_plugin_add_suspect_level' );

function my_plugin_add_suspect_level( array $event_data ) {
    $event_id = $event_data['id'];
    $level = get_post_meta( $event_id, '_raccoon_suspect_level', true );

    if ( empty( $level ) ) {
        $level = '4';
    }

    $event_data['raccoon_suspect_level'] = $level;
    return $event_data;
}
Removing Fields from Event Responses
The same filter can be used to remove fields you do not want returned. For example, to strip the json_ld data that is included in single-event responses:
add_filter( 'tribe_rest_single_event_data', 'my_plugin_remove_json_ld' );

function my_plugin_remove_json_ld( array $event_data ) {
    unset( $event_data['json_ld'] );
    return $event_data;
}
Filters exist throughout the src/Tribe/REST/V1 folder of the plugin for events, venues, and organizers, so there is almost always a way to shape the response to your needs.
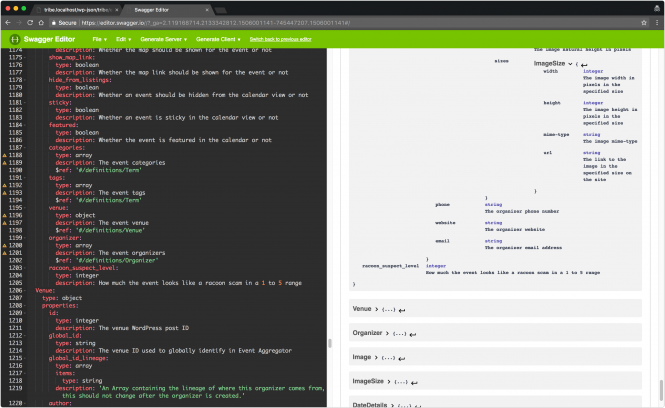
Self-Documenting API Reference
The Events Calendar REST API includes a live documentation endpoint available on your own site:
https://your-site.com/wp-json/tribe/events/v1/doc
Hitting this endpoint returns a JSON object in Swagger 2.0 format that documents every available endpoint, parameter, and response structure — and because it is generated from the code itself, it is always up to date.
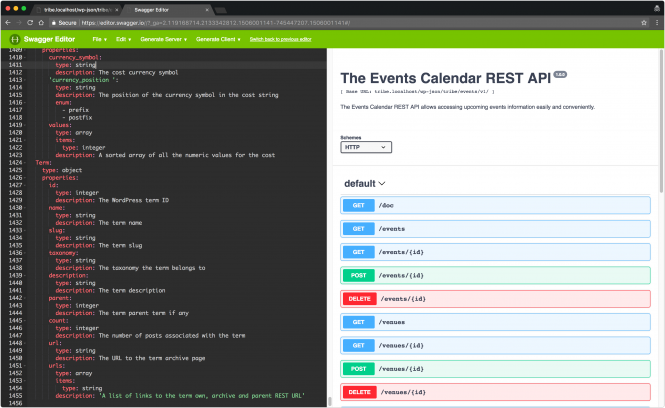
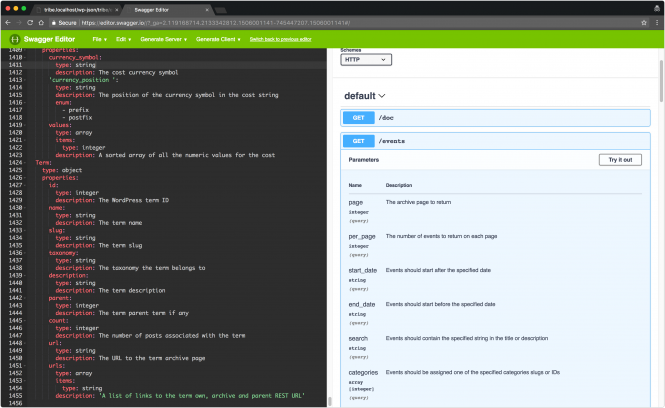
To use it, copy the entire JSON output from your /doc endpoint and paste it into the Swagger.io online editor. If prompted to convert JSON to YAML, click OK — after a moment you will see fully rendered, navigable documentation on the right side.
Documenting Custom Fields in Swagger
If you add custom fields to the response (as shown in the previous section), you can also document them in the Swagger output using the tribe_rest_swagger_event_documentation filter:
add_filter( 'tribe_rest_swagger_event_documentation', 'my_plugin_document_suspect_level' );

function my_plugin_document_suspect_level( array $documentation ) {
    $documentation['properties']['raccoon_suspect_level'] = array(
        'type'        => 'integer',
        'description' => __( 'Suspicion level on a 1 to 5 scale', 'my-plugin' ),
    );
    return $documentation;
}
One-Click Client Generation
Because the documentation is in Swagger format, you can generate a REST API client in the language of your choice directly from the Swagger.io editor. Copy your /doc endpoint JSON, paste it into the Swagger.io editor, then click Generate Client from the top menu and select your target language.
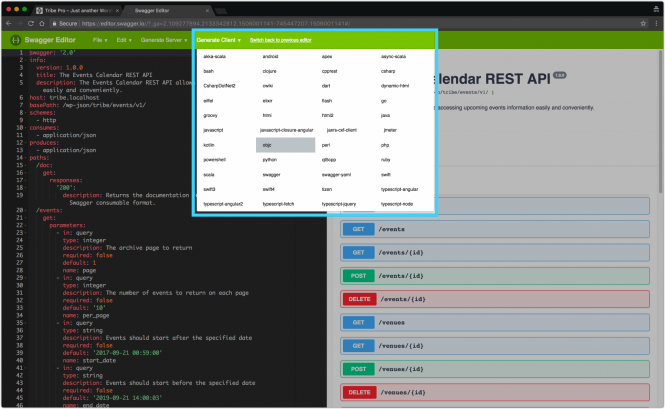

You will receive a downloadable archive containing The Events Calendar REST API client code in your selected language.
Note: If the Swagger editor does not work with your endpoint output, installing the WP API SwaggerUI plugin may help.