Custom Subscribe and Export Button Labels
Let’s say you want to change the labels for the Google Calendar, iCal, and Outlook download buttons on a single event page. You’ve seen them before when looking at one of the events on your site. They pop up just below the content for the event and look a little something like this:
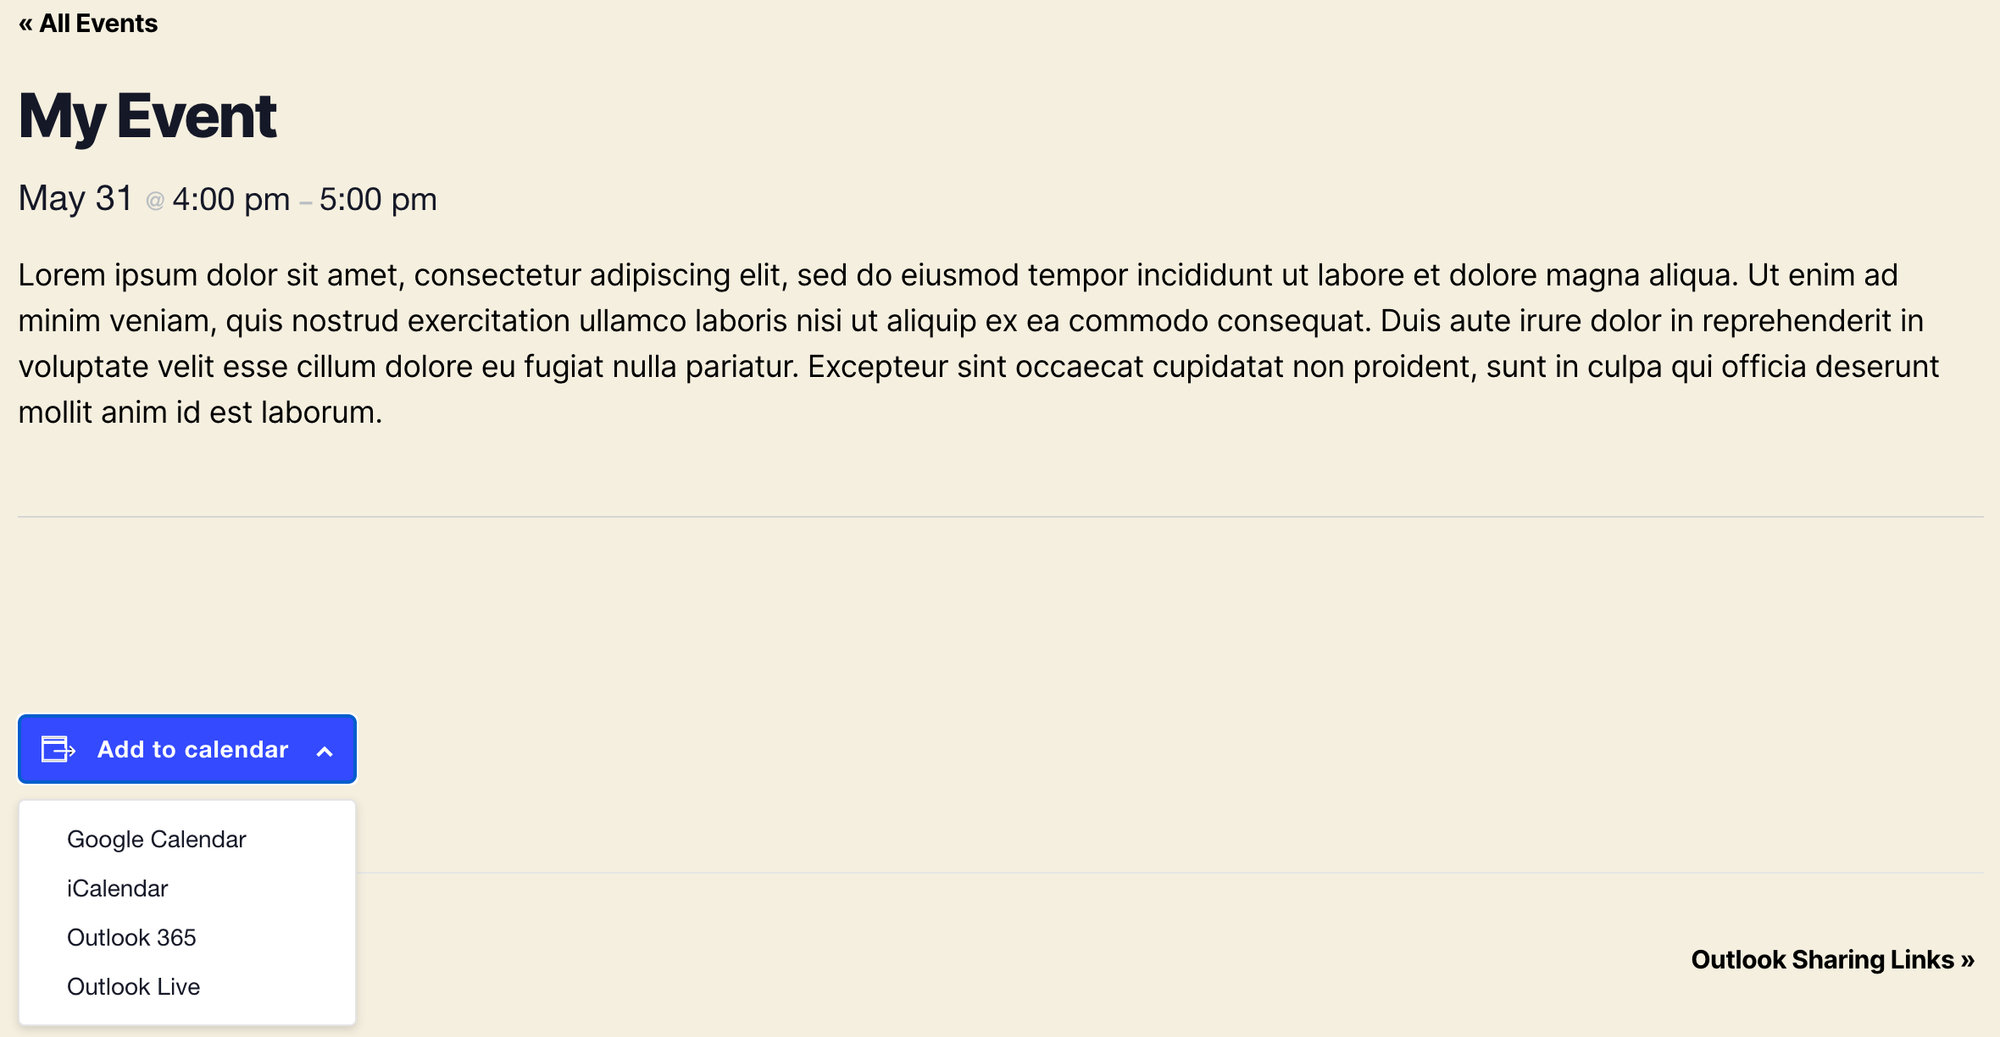
Here’s a pretty handy snippet you can add to your theme’s functions.php file to change those labels.
This snippet does the following:
- Changes “Add to Google Calendar” to “Subscribe Here”
- Changes “Add to iCalendar” to “Export Here”
Of course, you can edit the snippet to have those labels say anything you want.
add_filter(
    'tec_views_v2_subscribe_links_gcal_label',
    function ( $label, $link_obj, $view ) {
		if ( !is_singular( 'tribe_events' ) ) { return $label; }
        return $link_obj->get_single_label( $view );
    },
    10,
    3
);
You can also change the labels for the various Outlook options. Simply replace the Google Calendar and iCalendar filters with one of the following:
Outlook 365: tec_views_v2_subscribe_link_outlook-365_visibility
Outlook Live: tec_views_v2_subscribe_link_outlook-live_visibility
Outlook ICS File: tec_views_v2_subscribe_link_outlook-ics_visibility
Removing the “Add to Calendar” Option
Removing the Option Everywhere
To hide all of the “add to calendar” dropdown from the front end, you can use the following snippet:
// Hide subscribe box on all event pages/views.
add_filter( 'tec_views_v2_subscribe_links',
  function( $subscribe_links ) {
    // When passed an empty array, the template will bail and not display.
    return [];
    },
  100
);
Removing the Option from Single Event Pages
To hide all of the “add to calendar” dropdown from only the single-event front end, you can use the following snippet:
// Hide subscribe box on single event pages.
add_filter(
	'tec_views_v2_subscribe_link_visibility',
	function( $subscribe_links ) {
		return ! is_singular( Tribe__Events__Main::POSTTYPE );
	},
	100
);
Remove Select Options from the Dropdown
If you’d like, you can customize which links display. Here are some filters that you can add to your theme’s functions.php file in order to do that.
To remove the Google Calendar link from the dropdown, use this snippet:
add_filter( 'tec_views_v2_subscribe_link_gcal_visibility', '__return_false', 12 );
To remove the iCalendar link from the dropdown, use this snippet:
add_filter( 'tec_views_v2_subscribe_link_ical_visibility', '__return_false', 12 );
To remove the Outlook 365 link from the dropdown, use this snippet:
add_filter( 'tec_views_v2_subscribe_link_outlook-365_visibility', '__return_false', 12 );
To remove the Outlook Live link from the dropdown, use this snippet:
add_filter( 'tec_views_v2_subscribe_link_outlook-live_visibility', '__return_false', 12 );
To remove the .ics file download link, use this snippet:
add_filter( 'tec_views_v2_subscribe_link_ics_visibility', '__return_false', 12 );
To remove the Outlook .ics file download link, use this snippet:
add_filter( 'tec_views_v2_subscribe_link_outlook-ics_visibility', '__return_false', 12 );
Rearrange Subscribe / Export Options in Dropdown
If you’d like to reorder the subscription options that appear in the Subscribe dropdown on your calendar (for example, showing iCal first instead of Google Calendar), you can do this with a simple snippet.
By default, the calendar sets its own order for subscription options. Some sites may prefer to highlight a specific platform (like iCal) for their audience. With a filter, you can easily adjust which option appears first.
Add the following code to your site. You can place it in your theme’s functions.php file via Appearance → Theme File Editor, or for a safer option, use the Code Snippets plugin.
/**
 * Reorder the subscribe links to place iCal first.
 *
 * @param array $subscribe_links An array of subscribe/export link objects.
 * @return array The reordered array of subscribe/export link objects.
 */
function my_custom_reorder_subscribe_links( array $subscribe_links ): array {
    $target= null;

    // Check if the 'ical' item exists and remove it from its current position.
    if ( isset( $subscribe_links['ical'] ) ) {
        $target= $subscribe_links['ical'];
        unset( $subscribe_links['ical'] );
    }

    // If the 'ical' item was found, add it to the beginning of the array.
    if ( null !== $target) {
        $subscribe_links = [ 'ical' => $target] + $subscribe_links;
    }

    return $subscribe_links;
}
add_filter( 'tec_views_v2_subscribe_links', 'my_custom_reorder_subscribe_links', 10 );
This will move the iCal option to the top of the dropdown.
If you’d like to move a different option to the top, simply replace 'ical' in the snippet with one of these keys:
gcal= Google Calendaroutlook-365= Outlook 365outlook-live= Outlook Liveics= ICSoutlook-ics= Outlook ICS file
For example, if you want Google Calendar to appear first, replace every instance of ical with gcal.
Adding a Custom Google Calendar Button to Your Site
The Events Calendar includes built-in Subscribe and Add to Calendar links on calendar views and single event pages. But sometimes you want a Google Calendar button somewhere else on your site — inside a blog post, a sidebar, a landing page, or anywhere shortcodes can be used. This approach creates a link that opens Google Calendar and prompts the user to subscribe to your entire events feed. Once subscribed, new events you publish will appear in their Google Calendar automatically (Google typically syncs every 24 hours).
Your subscribe URL follows this pattern:
https://www.google.com/calendar/render?cid=webcal://yourdomain.com/?post_type=tribe_events&ical=1&eventDisplay=list
Replace yourdomain.com with your actual domain. Keep webcal:// at the start of the cid parameter — do not use http:// or https:// here, or it won’t work correctly in Google Calendar.
Next, add the button to a page or post
Using the Block Editor: Add a Button block and paste the URL above as its link. Set it to open in a new tab and customize the button text (e.g., “Subscribe to Calendar”).
Using raw HTML: Paste this into any HTML block or widget:
<a href="https://www.google.com/calendar/render?cid=webcal://yourdomain.com/?post_type=tribe_events&ical=1&eventDisplay=list"
   target="_blank"
   style="display:inline-block; padding:10px 20px; background:#0073aa; color:#fff; text-decoration:none; border-radius:5px;">
  Subscribe to Calendar
</a>
Display a Single Event Card with Add to Google Calendar Button
This approach creates a button that imports one specific event into Google Calendar. It’s a one-time snapshot — the event details are baked into the link at the time the user clicks it, so if you later update the event on your site, those changes won’t sync to the user’s calendar.
Step 1: Add the Custom Shortcode
Add this code to your theme’s functions.php file or using the Code Snippets plugin:
function custom_add_to_calendar_button($atts) {
    $atts = shortcode_atts(array(
        'post_id' => get_the_ID(),
    ), $atts, 'add_to_calendar');

    $event_id = intval($atts['post_id']);

    if (!$event_id || get_post_type($event_id) !== 'tribe_events') {
        return '';
    }

    $title = get_the_title($event_id);
    $start = tribe_get_start_date($event_id, false, 'Ymd\THis');
    $end = tribe_get_end_date($event_id, false, 'Ymd\THis');
    $location = tribe_get_venue($event_id);
    $description = get_the_excerpt($event_id);

    $google_calendar_url = "https://calendar.google.com/calendar/render?action=TEMPLATE" .
        "&text=" . urlencode($title) .
        "&dates=" . $start . "/" . $end .
        "&details=" . urlencode($description) .
        "&location=" . urlencode($location) .
        "&sf=true&output=xml";

    ob_start(); ?>
    <a href="<?php echo esc_url($google_calendar_url); ?>" target="_blank" class="add-to-calendar-button">
        Add to Calendar
    </a>
    <style>
        .add-to-calendar-button {
            display: inline-block;
            padding: 10px 15px;
            background-color: #0073aa;
            color: #fff;
            text-decoration: none;
            border-radius: 5px;
        }
    </style>
    <?php
    return ob_get_clean();
}
add_shortcode('add_to_calendar', 'custom_add_to_calendar_button');
Step 2: Use the Combined Shortcodes
You can now use [tribe_event_inline] to display a mini event preview, and insert the [add_to_calendar] button right below it like this:
[tribe_event_inline id="167"]

{thumbnail}

{title:linked}

Time: {start_date} @ {start_time} – {end_date} @ {end_time}

{excerpt}

[/tribe_event_inline]

[add_to_calendar post_id="167"]
Make sure to replace 167 with the actual post ID of your event.
Example Output:

Additional Filters
You can also use the following filters to further customize the subscribe and export behavior with Google Calendar and Outlook:
tec_views_v2_single_event_gcal_link_base_url: allows filtering the base URL used for the single event (import) linktec_views_v2_single_event_gcal_link_parameters: allows altering the params passed to gCal in the linktec_views_v2_single_gcal_subscribe_link: allows altering the link itself once params have been addedtec_events_ical_outlook_single_event_import_url: allows altering the Outlook’s export URL .