You picked up the Eventbrite add-on and now you might be thinking, how the heck do I create a ticket? Good news, my friend, because that’s what we’re going to cover in this article.
Sound good? Let’s get started!
Note: Eventbrite Tickets is not yet compatible with the block editor. Only events made in the classic editor can be published to your account on Eventbrite.com.
Publishing an event with tickets
Before you can get to making tickets, you’ll need to have created at least a draft event. If you haven’t made an event before or need help, check out our tutorial on creating events. Of course, you’ll also need Eventbrite Tickets installed and active and have configured your Eventbrite Application settings.
Ready to go? Open your Edit Event page and scroll down to the Eventbrite section:

The first step to publishing an event and connecting it to Eventbrite is to change the option “Register this event with eventbrite.com” to “Yes.” This is where all the magic happens and all your event and ticket-creating powers are revealed. Associating the event with Eventbrite will open a set of options that allow you to publish the event to Eventbrite and create tickets for the event. Let’s go over those options one-by-one.
- Name: The name of your first ticket, e.g. “General Admission” or “Seniors.” This will be shown in the ticket options on the event page.
- Description: A description for the ticket you’re creating. For example, a description for your General Admission ticket might be something like, “Gets you in the door.”
- Date to Start/End Ticket Sales: When ticket sales will begin and end. These need to both be before the event itself begins, and must both be set sometime in the future. The end date also may not exceed the actual date of the event. That makes sense, right? We can’t sell tickets for an event that’s already happened!
- Type: A “Set Price” is one where you determine the cost. “Donation Based” means people can decide how much they want to pay, if anything. “Free” makes the event free and allows people to register for the event (almost like an RSVP) instead of actually buying a ticket. Notice that selecting the “Free” option makes the payment options below disappear. Pretty slick huh?
- Cost: Set a price for this ticket. Is it $1? $100? $1,000,000? You get to decide, though you may want to check that Eventbrite can handle a million-dollar payment first. Just saying.
- Quantity: This allows you to set a cap on how many tickets can be sold. It’s a nice way of not overbooking your event with too many guests.
- Include Fee In Price: Eventbrite charges a service fee for tickets sold through their system. This option allows you to decide whether to show that fee in the advertised price, or have it listed as a separate line item.
- Payment Methods: Formerly, with the older API, payments methods and additional information (such as PayPal email) could be set within your WordPress dashboard and sent to Eventbrite when creating tickets for an event. You can still control the payment methods on a per event basis, however, this is now managed within the event settings on Eventbrite.com rather than from within your WordPress dashboard
After all the ticket details, there is one more option left. It’s a biggie because it tells Eventbrite whether you want to publish the event as a Draft or a Live event on eventbrite.com.

Please note that the ticket form will not display on your WordPress event page until the status has been updated from Draft to Live because Eventbrite can only sell tickets for live events. You can always move the event from Draft to Live on your Eventbrite.com account, at which point the ticket will show on your WordPress event.
Save your event by clicking the “Publish” button in the WordPress editing screen and pat yourself on the back because you just created your first event with a ticket and added the event to Eventbrite. High fives all around!
Publishing additional tickets
You might be wondering whether you are able to add more than one ticket to an event. The answer is a big fat yes. You absolutely can.
Additional tickets can be added after you have saved your Event post. We understand that can be a little confusing and we’re looking into a smoother way to handle this that works with Eventbrite. For now, this is how it works:
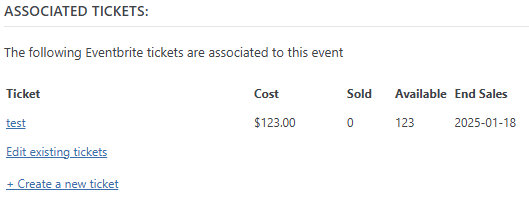
Create additional tickets by clicking the “Create a new ticket” link in the Eventbrite section of the WordPress editing screen. This will take you to the event in Eventbrite (off your WordPress site), where you can add or edit tickets. Any changes you make in Eventbrite will automatically be imported to your site.
Please note that you will be prompted to log into your Eventbrite account if you are not already logged in.
Editing an event
You can edit the content for your event directly in the WordPress editing screen for a particular event and have the changes save both on your site and Eventbrite.
However, once you’ve published an event, you will see new options in the WordPress editing screen that help you manage the event on both your site and Eventbrite as well.
Let’s go over these options:
- Leave this event associated with eventbrite.com? Any saved changes in WordPress will be saved in Eventbrite as well, as long as the “Leave this event associated with eventbrite.com” option is set to “Yes.” If this option is set to “No” then you will have to edit the event in both places. Note that once you select “No” there is no going back. It’s an all-or-nothing sort of thing. Only select “no” if you no longer want the events to be associated and you no longer need the tickets.
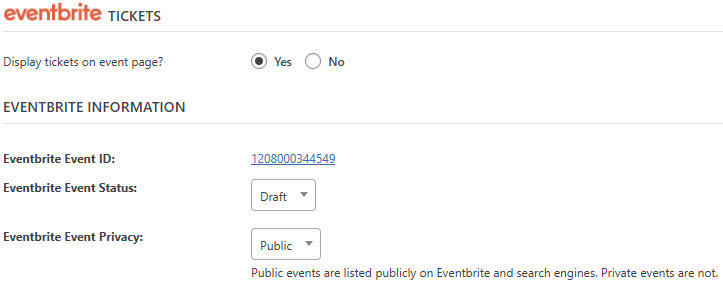
- Display tickets on event page? This option lets you decide whether to show the tickets on your events page. Select the default “Yes” and the tickets will display in a fancy form that allows your visitors to select the number of tickets they want and proceed to checkout.
- When this post is updated, how do you want the featured image to be handled? Pretty self-descriptive, right? Choose between the options: “Try to update eventbrite.com so it shares the same image as used locally”, “Import the event image from eventbrite.com and overwrite the local one” and “Never synchronize the images”.
- Eventbrite Event ID. This isn’t really an option as much as it is a handy piece of information. This tells you the ID number of your event and links you directly to it on Eventbrite. This is extremely helpful if you ever need to find and modify tickets or details on the Eventbrite site.
- Eventbrite Event Status. Set this option to “Live” and the event will be a live functioning event on Eventbrite and start taking ticket orders. Select “Draft” and the event gets moved back to Draft status on Eventbrite, which disables ticket sales but leaves the event published on your site.
- Eventbrite Event Privacy. Do you want this event to be listed publicly on the Eventbrite website? If so, hit the “Edit event privacy settings” link and you’ll be taken to exact spot in the Eventbrite website where you can change that setting.
Wrapping up
Hopefully, you now not only feel capable of creating and publishing tickets for your events using the Eventbrite add-on, but have a sense of all the superhuman powers and options that come along with it. This plugin really brings the Eventbrite experience directly to you in WordPress, while giving you convenient, one-stop access to your Eventbrite account in the event you need to make changes over there. There are a ton of options that give you ultimate control over how you manage tickets on your website.
💡Note: As of March 1st, 2021, Eventbrite is deprecating the description field. Importing new events from Eventbrite will work as expected, however, we do recommend that you publish new events and make changes to your existing events through Eventbrite for now, which will allow you to take advantage of the structured content available there.
Still have some questions about any of the ticket publishing options and how they work? Open a topic at our help desk and one of our support specialists would be happy to help you out.