We’re going to take a look at the Events Calendar widget, also known as the Mini Calendar. We’ll cover the basics of adding this Pro-specific widget to a sidebar, how to configure it, and some tips and tricks on how to customize the widget further.
So, let’s get started.
Adding the Widget to a Sidebar
The Events Calendar widget is a feature that comes bundled with The Events Calendar PRO. To activate it, you’ll need to make sure that The Events Calendar PRO is first installed and active on your site.
From there, head over to Appearance → Widgets from the WordPress dashboard. You’re looking for a widget called Events Calendar. Click on the “+” button/”Add Block,” and then search for the widget. Careful, because this could be easily confused with the Calendar widget, which is packaged with WordPress and not related to The Events Calendar at all.
See the Events Calendar widget? Drag it over to the sidebar widget area of your choice, then save your settings.
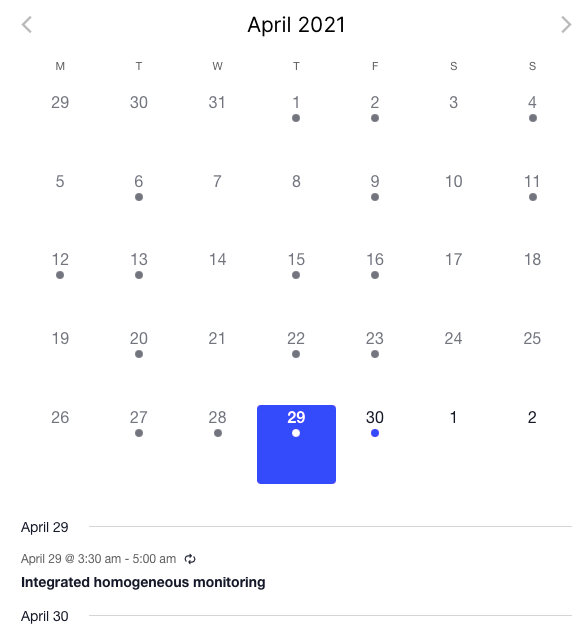
There we have it. Now we can go to the front end of our website and see the Mini Calendar in all its mini and mighty glory.
Widget Settings
First thing you might notice when adding the widget to the sidebar is that there are a few options that allow us to customize things a bit. These are the available options:
- Title: This is the heading that sits above the widget on the front end of the site. By default, it is “Events Calendar,” but can be changed to anything we’d like.
- Number of Events to Show: This allows you to set the maximum number of events that display in the list below the calendar at any given time. By default, this is set to five, but can be any number between one and ten.
- Add a filter: This option allows you to limit the events that display in the widget to certain categories and tags. Let’s say we only want events categorized as Conference to display in the widget. Perfect, add a filter! How about Conferences and Workshops? Add two filters!
Widget Block
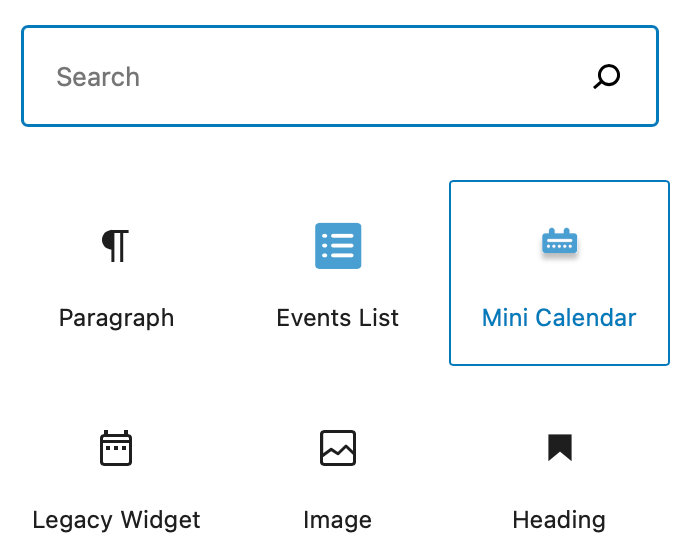
When using the Block Editor, you can add the Mini Calendar as a block instead. Simply search for Mini Calendar under blocks and you’ll find all of the same available options.
Embedding the Widget via Shortcode
Another awesome thing about the Events Calendar widget is that it can be embedded on any page or post outside of the sidebar. In other words, we can place it anywhere we want!
Embedding the widget can be as easy as pasting this shortcode into any page or post:
[tribe_mini_calendar]
Of course, the calendar widget also comes complete with an advanced set of filtering options, and these can also be used with the shortcode. Here’s an example that looks for events in the party category:
[tribe_mini_calendar category="party"]
We can supply a list of several categories or tag slugs (we just need to separate them with commas), and we can also use IDs by prefixing them with the # symbol:
[tribe_mini_calendar categories="party, black-tie" tag="#512"]
Note how we used categories (plural), there. Singular and plural forms are interchangeable – and the same goes for tags. Last but not least, we can use the count attribute to control how many events are listed below the mini calendar:
[tribe_mini_calendar count="15"]
You can also add a tax-operand attribute to the calendar so that multiple categories or tags can display at once:
[tribe_mini_calendar tags="cabbage, broccoli" tax-operand="AND"]
Note: You can also embed the regular calendar Month View with the shortcode [tribe_events view=“month”]
Troubleshoot the Calendar Widget
The Calendar Widget Overflows a Sidebar
Sometimes the calendar widget is larger than your sidebars. Commonly this is because the theme’s stylesheet has added padding to all table cells. This can be countered by adding a rule that strips that padding back out of our mini calendar grids specifically.
.tribe-mini-calendar td,
.tribe-mini-calendar th {
padding: 0;
}
If you find that the mini calendar grids are still too big on iPad sized screens and would like to shrink it, you can reduce the font size with this:
@media (max-width: 850px) {
.tribe-mini-calendar {
font-size: 10px;
}
}
That will target the mini calendar grids font size after the screen size of the viewing device is below 850px in width. You can change that number to whatever size you would like. In addition, you may have to add more selectors to that CSS to get it to work with your theme.
Customizing the Widget
Styling with CSS
You can apply custom CSS to the Events Calendar widget. The widget’s styles are loaded from widget-shortcode-skeleton.css (or widget-shortcode-full.css if you’re loading the full stylesheet). To target the widget with your own CSS rules, use the base class:
.tribe-events-widget-shortcode-events-month {
    /* your styles here */
}
For guidance on where to add custom CSS and how widget stylesheets work, see our Customizing CSS guide.
Using Calendar Views
The Events Calendar Widget will take styles from the main calendar Month View, so any template changes that you make to the Month View will impact the widget as well.
If you’d like to make changes, you can create a template override of the corresponding Month View template.
Change the ‘View Calendar’ Link
The ‘View Calendar’ link in the Events Calendar widget defaults to the main events archive page set under Events > Settings > General > Viewing. By default, this is the /events/ slug.
If you have created a custom page to display your calendar using a shortcode, or if you’ve simply changed the main calendar slug, you’ll need to update this link to point to your new URL.
This guide provides a simple code snippet to update the destination URL for the ‘View Calendar’ link in the Events Calendar widget.
This snippet uses jQuery to select the ‘View More’ link in the Events Calendar widget (.tribe-events-widget-events-month__view-more) and updates its href attribute to a custom URL.
add_action( 'wp_footer', function() {
?>
<script>
jQuery(document).ready(function($) {
  // Replace 'https://example.com/new-page/' with your desired custom URL
  var customCalendarUrl = 'https://example.com/new-page/';

  // Target the 'View Calendar' link in the Events Calendar widget
  $('.tribe-events-widget-events-month__view-more a')
    .attr('href', customCalendarUrl);
});
</script>
<?php
} );
How to Use the Code
Replace the URL: Change the dummy URL 'https://example.com/new-page/' to the exact URL of your custom calendar page.
Add the snippet:
- Add the code to your child theme’s
functions.phpfile. - Or, preferably, use a dedicated Code Snippet plugin for easier management.
Clear any site cache (plugin, server, or CDN) to ensure the new code is loaded on the front end.
For more information, please see our guide on the best practices for implementing custom code snippets.
This approach is simpler than overriding the widget’s template file, and ensures the ‘View Calendar’ link points to your custom URL.
Hide the “View Calendar” Link
You can completely disable the link using a PHP snippet. Add the following code to your theme’s functions.php file or through a plugin like Code Snippets. Using this method if you want to remove the link from the DOM entirely (cleaner code output).
add_filter( 'tribe_template_pre_html:events-pro/v2/widgets/shortcodes/components/view-more', '__return_false' )This method removes the link from the HTML entirely, so it won’t be rendered on the frontend.
If you’d rather keep the markup and just visually hide the link, you can use this CSS snippet instead. Use this method if you prefer a non-invasive method that only affects the visual display.
.tribe-events-widget-events-month__view-more {display: none !important;}You can add the CSS code in one of the following ways:
- Via Customizer: Appearance → Customize → Additional CSS
- In your theme or child theme’s
style.cssfile - Through a custom CSS plugin
Show Event Content in the Widget
The Scenario
Let’s say we have placed the Events Calendar widget in the sidebar of a page. We can expect to see a lot of information about our events, including the dates, times, location, and more, depending on our widget settings.
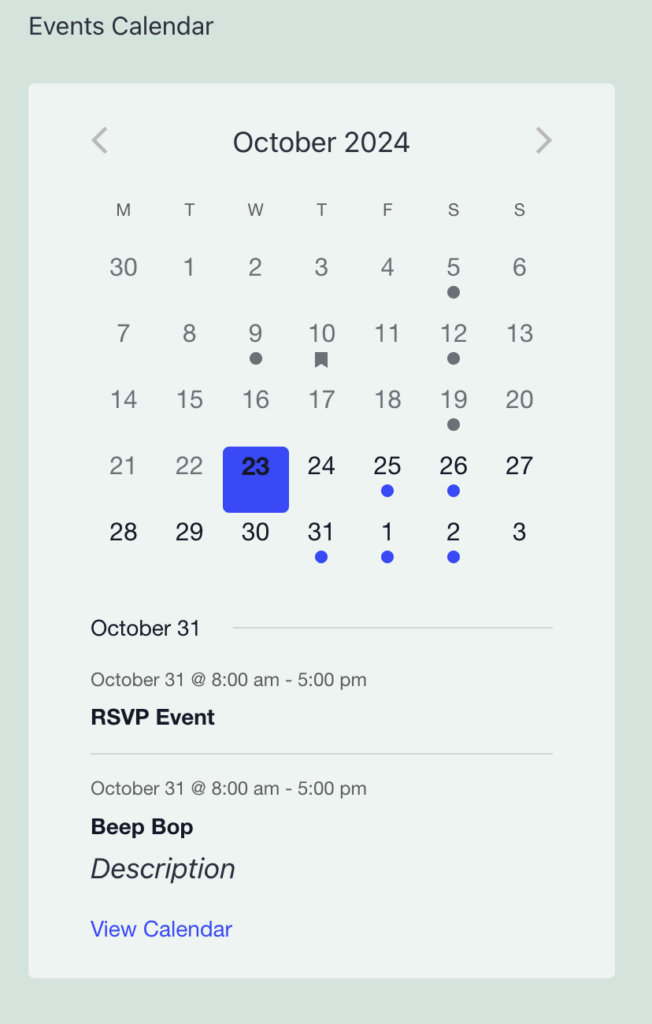
That’s nice and dandy, but what if we want to include a little more information about our events? Specifically, let’s find a way to add the event’s excerpt below the dates.
Before:
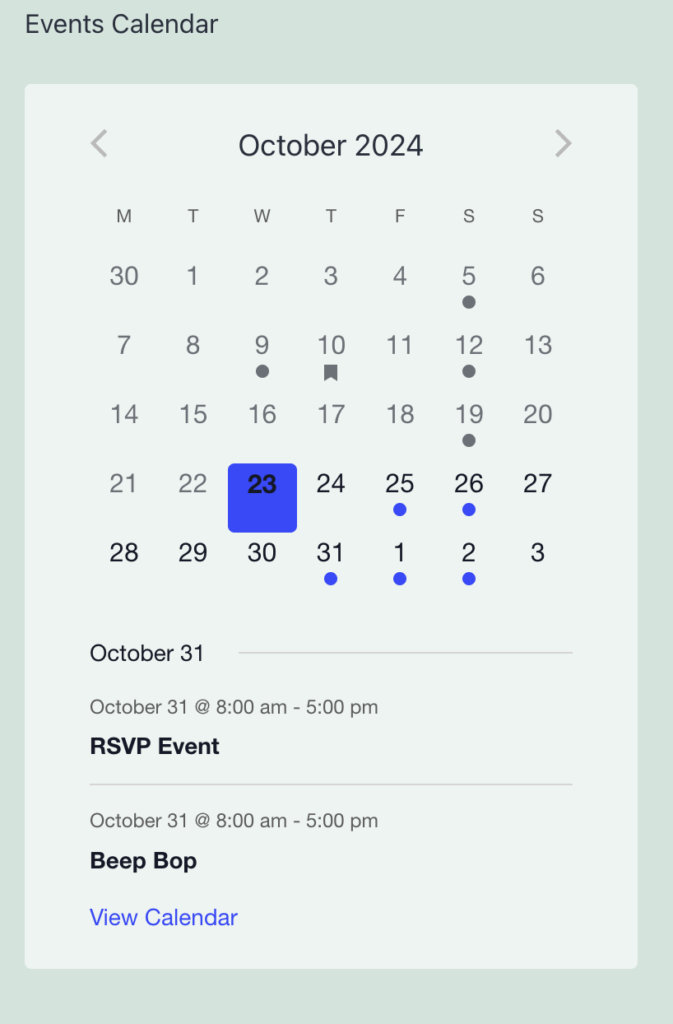
After:
How it’s Done
The key here is that we can use the default WordPress function for the_excerpt() to display content from the event directly in the widget. For this use case, we will be changing the mobile view templates, so please note that this will affect the widget and the mobile month view of your calendar.
This will require a template override. If you’re new to overriding calendar templates, then it’s a good idea to check out our Themer’s Guide, which will walk you through the process step-by-step. The basic idea is that we will be creating a copy of one of the plugin’s templates, then adding it to our theme files. This allows us to override the template without touching the core code of the plugin.
- Make a copy of the Mobile View’s mobile-event.php file. This is located in
plugins/the-events-calendar/src/views/v2/month/mobile-events/mobile-day/mobile-event.php. - Make a new folder in your theme directory. Call it tribe.
- Make a new folder in that one. Call it events.
- Make a new folder in that one. Call it v2.
- Make a new folder in that one. Call it month.
- Make a new folder in that one. Call it mobile-events.
- Make one last new folder in that one. Call it mobile-day.
- Add the file. Drop the copied mobile-event.php file in that last folder.
Presto! Now that the template is in our theme directory, we can modify to suit our needs. In this case, we will add this:
<?php the_excerpt(); ?>…right below the single event cost. As of this writing, that is after Line 30 of the template.
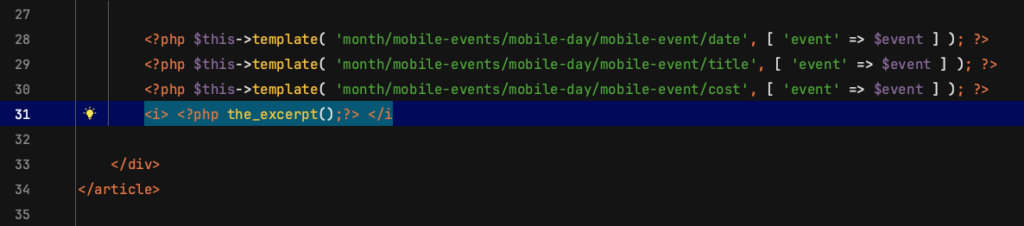
Note – we have added some italics, but you can style this however you see fit. Now, we can save our work, head back to our widget and see the event’s excerpt displays with the rest of the event’s information. Nice work!
Show Today’s Events
If you use a Mini Calendar Widget on your site then on the first-page load it will show you the number of events from the month that you set up in the back-end. If you set up 5 events and there are less than that on the current day, it will show you events from the coming days as well.
If you click on a specific date in the calendar, then you will only see the events for that day.
If you would like to show only today’s events on the first-page load as well, then the below snippet will help you.
Copy the below code into your (child) theme’s functions.php file (or wherever you usually put custom code).
add_action( 'pre_get_posts', 'tribe_andras_custom_mini_calendar_starting_query' );

function tribe_andras_custom_mini_calendar_starting_query( $query ) {

	$is_widget = $query->get( 'is_tribe_widget' );
	$event_display = $query->get( 'eventDisplay' );

	if ( $is_widget && $event_display == 'custom' ) {
		$query->set( 'eventDisplay', 'day' );
	}
}
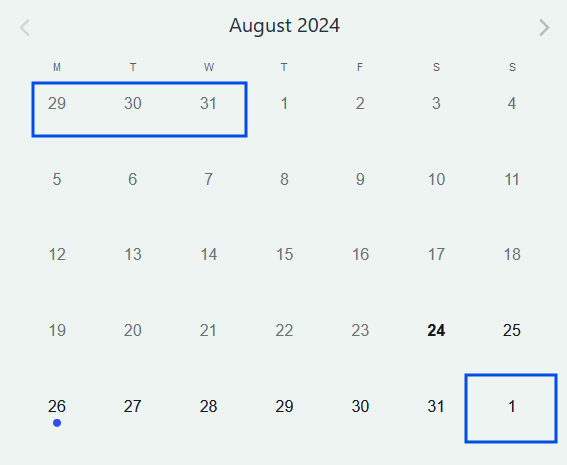
Remove Next Month’s Dates from Current Month
Sometimes the next month’s first few days appear on the Mini Calendar View calendar, depending on how each month is structured. If you’d like, you can remove these dates by adding a PHP snippet on your site and then using custom CSS added to your theme’s stylesheet. We’ll provide you with the snippets you need to make this happen.
First, you’ll need to add the following PHP snippet on your functions.php theme file or using the Code Snippets plugin:
add_filter(
	'tribe_events_views_v2_view_month_template_vars',
	function( $template_vars, $view ) {
		// current time.
		$now = Tribe__Date_Utils::build_date_object( $template_vars['now'] );
		// requested date - for month view this is the first of the month.
		$request_date = $template_vars['request_date'];

		// if requested date isn't the same as the current date
		if ( $now->format( 'Y-m-d' ) !== $request_date->format( 'Y-m-d' ) ) {
			// pass the requested date as the current date
			$template_vars['today_date'] = $template_vars['request_date']->format( 'Y-m-d' );
		}

		return $template_vars;
	},
	10,
	2
);
This snippet is needed to make sure that hiding the respective days works in other months as well, not only the current one.
The Template Override
Create a mobile-day.php file on your /wp-content/themes/[your-theme or child-theme folder]/tribe/events/v2/month/mobile-events folder (you may need to create the folders if you haven’t already done so). After that, place the following as the content of the mobile-day.php file.
<?php
use Tribe__Date_Utils as Dates;

$events = ! empty( $day['events'] ) ? $day['events'] : [];
if ( ! empty( $day['multiday_events'] ) ) {
	$events = array_filter( array_merge( $day['multiday_events'], $events ) );
}
$mobile_day_id = 'tribe-events-calendar-mobile-day-' . $day['year_number'] . '-' . $day['month_number'] . '-' . $day['day_number'];

$classes = [ 'tribe-events-calendar-month-mobile-events__mobile-day' ];

if ( $today_date === $day_date ) {
	$classes[] = 'tribe-events-calendar-month-mobile-events__mobile-day--show';
}
?>

<div <?php tribe_classes( $classes ); ?> id="<?php echo sanitize_html_class( $mobile_day_id ); ?>">

	<?php if ( count($events) ) : ?>

		<?php foreach ( $events as $event ) : ?>
			<?php
				$first_day_of_month = date( 'Y-m-d', strtotime ( 'first day of' . $today_date ) );

				$end_day_of_month = date( 'Y-m-d', strtotime( 'last day of' . $today_date ) );

				if ( $event->dates->start->format ('Y-m-d') < $first_day_of_month || $event->dates->start->format ('Y-m-d') > $end_day_of_month ) {
					continue;
				}
				else {
			?>

			<?php $event_date = $event->dates->start->format( Dates::DBDATEFORMAT ); ?>

			<?php $this->template( 'month/mobile-events/mobile-day/day-marker', [ 'events' => $events, 'event' => $event, 'request_date' => $day_date ] ); ?>

			<?php $this->setup_postdata( $event ); ?>

			<?php $this->template( 'month/mobile-events/mobile-day/mobile-event', [ 'event' => $event ] ); ?>

			<?php } ?>

		<?php endforeach; ?>

		<?php $this->template( 'month/mobile-events/mobile-day/more-events', [ 'more_events' => $day['more_events'], 'more_url' => $day['day_url'] ] ); ?>

	<?php else : ?>

		<?php
		$this->template(
			'components/messages',
			[
				'classes' => [ 'tribe-events-header__messages--mobile', 'tribe-events-header__messages--day' ],
				'messages' => $mobile_messages,
			]
		);
		?>

	<?php endif; ?>
</div>
The CSS Snippet
There are a few different ways to add custom CSS to your WordPress site. For more information on how to do that, check out the Customizing CSS knowledge base article.
To remove the next and previous month’s dates from the calendar, use this CSS snippet:
.tribe-events-view--shortcode div.tribe-events-calendar-month__day--next-month {
  visibility: hidden !important;
}
To remove the previous month’s dates from the calendar, use this snippet:
.tribe-events-view--shortcode div.tribe-events-calendar-month__day--past-month {
    visibility: hidden !important;
}
And, to remove both the previous month and upcoming month dates from the calendar, use this snippet:
.tribe-events-view--shortcode div.tribe-events-calendar-month__day--next-month,
.tribe-events-view--shortcode div.tribe-events-calendar-month__day--past-month  {
     visibility: hidden !important;
}