One of the handiest features of our Community Tickets plugin is its support for split payments, powered by PayPal’s chained payments. This feature is briefly touched on in another of our Knowledgebase articles, but this article is a more detailed walk-through of setting up the feature.
A handy companion piece to this article is the PayPal Developer documentation for API credentials, here.
Please note:
- Chained payments configurations require PayPal’s approval in a live production application. Although you can obtain Sandbox credentials without manual approval, you will need to apply for Live credentials at www.paypal-apps.com before being able to actually use Community Tickets’ split payments functionality in production. (Make sure that you apply under the same email as your PayPal account. You also need to make sure that the “chained payments” option is selected.)
- If you are using Sandbox credentials for testing purposes, please note that Sandbox accounts are strictly prohibited from sending or receiving funds from live accounts. You’ll want to ensure that you’ve created Personal and Business Sandbox accounts to represent both buyer and merchant when testing transactions with this setup.
- As having multiple active PayPal payment gateways can create issues with handling split payments, we recommend disabling all other PayPal gateways when using Community Tickets.
Please allow up to 15 days for PayPal to complete the application process, though many times the process takes far less time. PayPal also has its own Terms and Conditions for using its chained payments service that we encourage you to read as well. Once PayPal approves your application, you will receive an email from Paypal Developer containing your Live App ID (which starts with APP-xxxxxx).
Obtaining Sandbox Credentials for Testing
- Login to https://developer.paypal.com/.
- Click Dashboard.
- In the sidebar on the left side of the page, under the Sandbox heading, click Accounts to display the existing sandbox credentials for your developer account.
- Click on your “you-facilitator@email.com” email address. Click the Profile link that appears under it to display the Account Details pop-up.
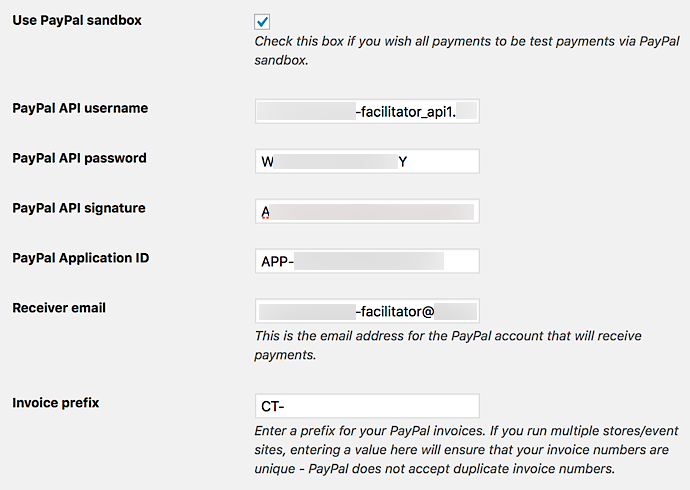
- Click the API Credentials tab to display the API credentials for this account. You’ll want to enter this information into the fields that appear when Enable split payments and Use PayPal sandbox are both checked in your Community settings (under Events > Settings > Community in your WordPress admin).
- Username > PayPal API username
- Password > PayPal API password
- Signature > PayPal API signature
- Click the Profile tab to display the basic profile information for this account. Under Email ID, select the email address that is displayed for the account and copy it into the Receiver email field in your Community settings.
- Click the close button or click anywhere outside of the pop-up to dismiss it.
- Returning to the sidebar on the left side of the page, click My Apps & Credentials.
- Scroll down until you see the heading NVP/SOAP API apps and click Manage NVP/SOAP API apps to open your NVP/SOAP applications listing. (You may be prompted to log in or confirm your credentials.)
- Under the heading FOR APP TESTING, select the test app ID (which begins in “APP-“) and copy it into the PayPal Application ID field in your Community settings.
Now that your settings are configured properly, you should test that Community Tickets is working as desired, including how PayPal is handling the fake money.
Here’s an example of how your PayPal Split Payments settings might look for Sandbox mode:

Obtaining Credentials for Live Mode
Once you’ve tested in Sandbox mode and you’re ready to start handling real money:
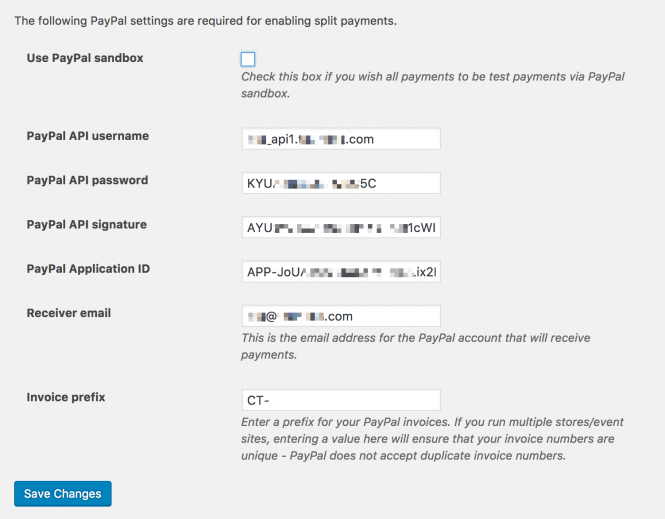
- Uncheck the Use PayPal sandbox checkbox, clear out all the Sandbox credentials, and save the fields as empty/blank. This helps make sure that you don’t make errors mixing Sandbox credentials with Live credentials.
- Login to https://developer.paypal.com/.
- Click Dashboard.
- Scroll down until you see the heading NVP/SOAP API apps and click Manage NVP/SOAP API apps to open your NVP/SOAP applications listing. (You may be prompted to log in or confirm your credentials.)
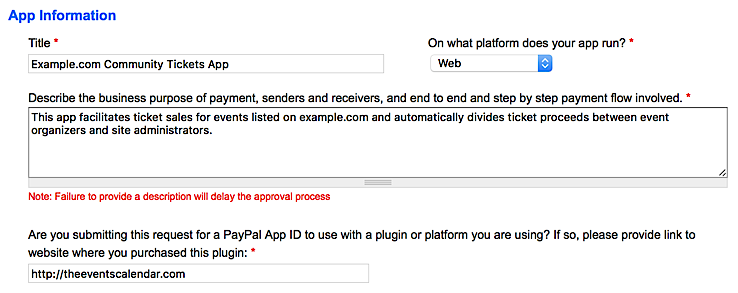
- Click New Application to open the NVP/SOAP app application form.
- In the Title field, enter a descriptive name for your application (for example, “Example.com Community Tickets App”).
- In the text area field below, provide a brief description outlining the functionality of your application.
- In the text field below this, enter the URL for The Events Calendar website (https://theeventscalendar.com).

- Click the Industry and Use Cases heading to open the next pane of form fields. If any of the listed industries apply to your business, select that industry. Otherwise, you may leave None of the Below selected.
- From the drop-down menu provided for Use Case, select Event Registration.
- Under Services used by this app, click Adaptive Payments.
- Select the check box for Chained Payments to display the form fields for this option.
- Under Who pays the fee?, select Secondary receiver. Fill in the form fields for primary and secondary receiver below. Your primary receivers will be your event organizers; your secondary receiver will be the site administrator who receives a portion of ticket payments.
- Enter your best estimates for your expected monthly payment volume and average transaction amount in the fields provided.
- Under Who is responsible for chargebacks or refunds?, enter “Primary receiver”.
- Enter the URL for your site’s terms of service in the field provided.
- Scroll down until you see the heading Testing Information.
- Under Step-by-step Payment Flows Instructions, provide instructions on how a user can select one or more tickets and complete a purchase on your site. If a login is required to complete a purchase on your site, enter test credentials into the Supply Test Account Name and Password field.
- Under the heading Business Information, upload any text files, images, or PDF scans that may be helpful in demonstrating the legitimacy of your business. This may include business registration documents, proof of address, or other identifying paperwork.
- If your site is already live and accessible to the public, enter its URL in the text field provided.
- Click Submit App to submit your application for review.
Once your application is submitted, PayPal will review the information you’ve provided and return with a decision once processing has completed. This review can take up to several weeks, and approval is not guaranteed. If your application is approved, you’ll receive your API credentials that you can use for processing real payments on your site. You can access your approved applications at any time by returning to the NVP/SOAP API apps page from your developer dashboard and clicking View/Manage My Apps in the sidebar.
Here’s an example of how your PayPal Split Payments settings might look for Live mode:

We hope this walkthrough will help you to configure, test, and successfully deploy split payments with Community Events and PayPal! If you should have any questions that aren’t answered here or if you should encounter any issues while setting things up, please don’t hesitate to pay us a visit over at our help desk!