Creating conference schedules just became easier than ever with the introduction of our new product, Event Schedule Manager. Manage Sessions, Speakers, Sponsors, Tracks, and other event details from within WordPress. Check out our blog post to learn more.
In this article, we’ll walk you through all of the steps you need in order to turn your WordPress site into a conference event website.
What you’ll need:
- The Events Calendar (free)
- Event Tickets (free)
- Kadence Theme (free, with premium add-ons)
- Virtual Events (premium, optional)
- Event Tickets Plus (premium, optional)
What you’ll learn:
- Create a single-day conference
- With optional virtual event functionality
- Display individual events for each talk of the day using the Block Editor
- Modify the behavior from Organizer to Speaker
- Add support for two talks occurring at the same time
- Includes template modifications and changing default Venue behavior
- Allow filtering by categories and tags using a third-party extension
- Sell tickets using PayPal integration
- Allow users to RSVP to each talk individually
- Control attendance to the conference
- Require user registration before purchasing
- And more!
Install and configure the Kadence Theme
The first thing you’ll want to do is install the Kadence Theme. You can search for the theme under Appearance > Themes. Once this is installed, make sure you also install the starter templates and select the Events template. You can change the colors, fonts, and styles of the template and apply them to your site, using the Full Site option.
Set up The Events Calendar and Event Tickets
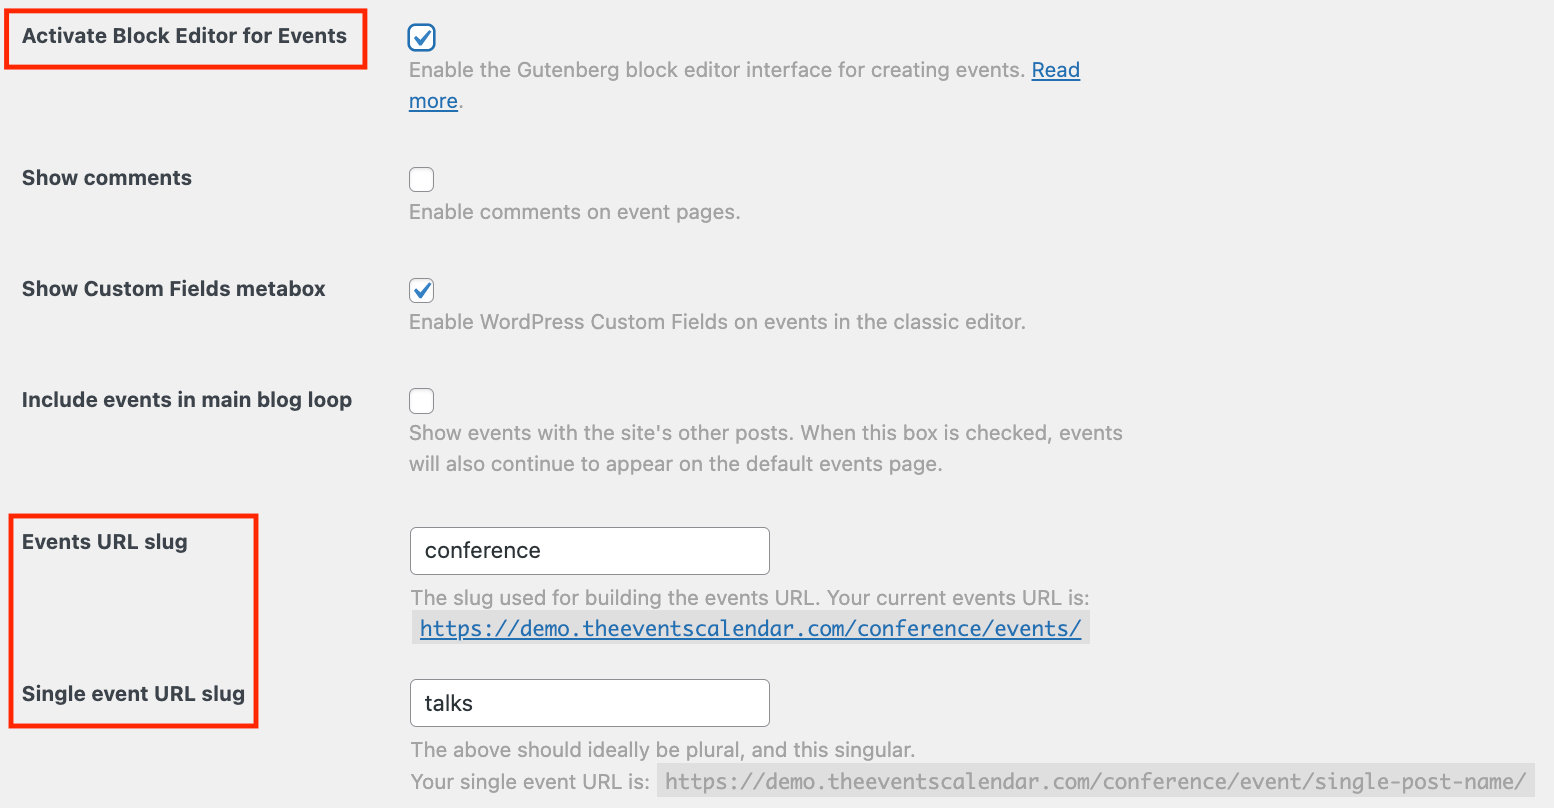
Next, we’ll show you which settings to use, once you have The Events Calendar and Event Tickets installed and activated on your site. Under Events Settings > General, make sure that the Block Editor is activated. Change the Events URL to conference and the Single Event URL to talks.
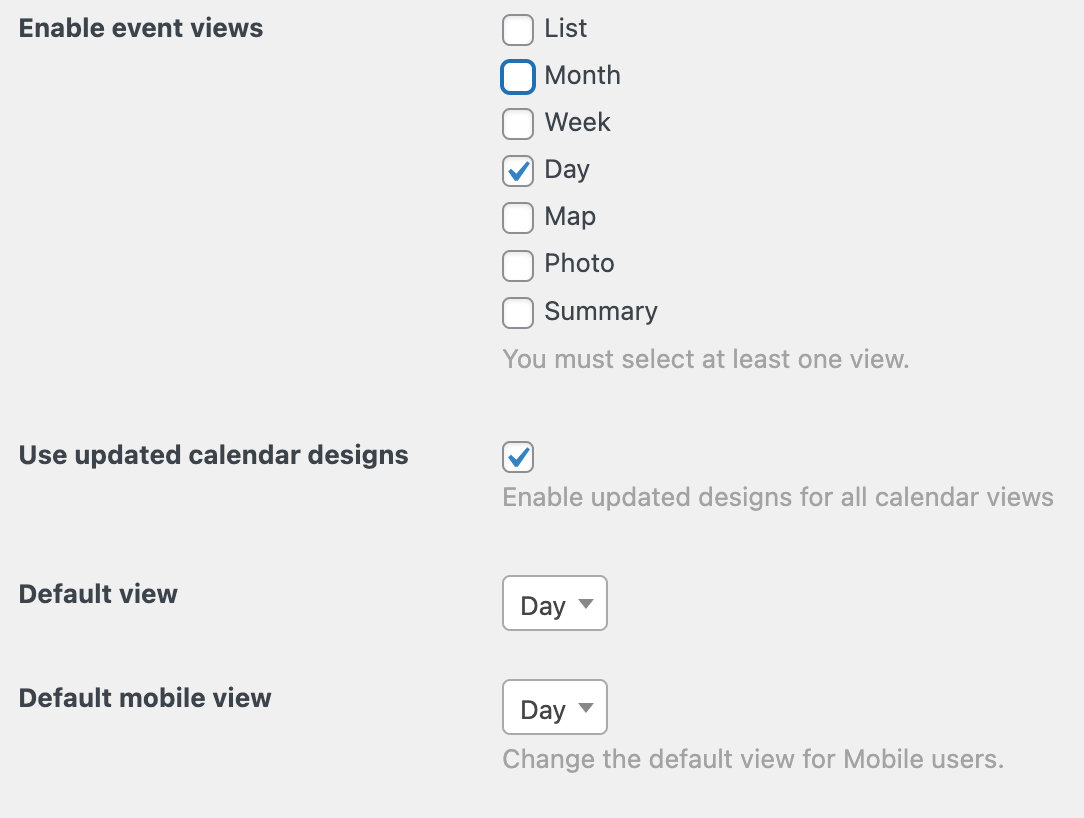
Under Events Settings > Display, use updated calendar designs, uncheck List and Month View, and set Day View as the default calendar view.
Under Tickets > Settings > General > Login Requirements, check the box to require users to log in before they can RSVP.

Set Up Venue and Conference Tracks
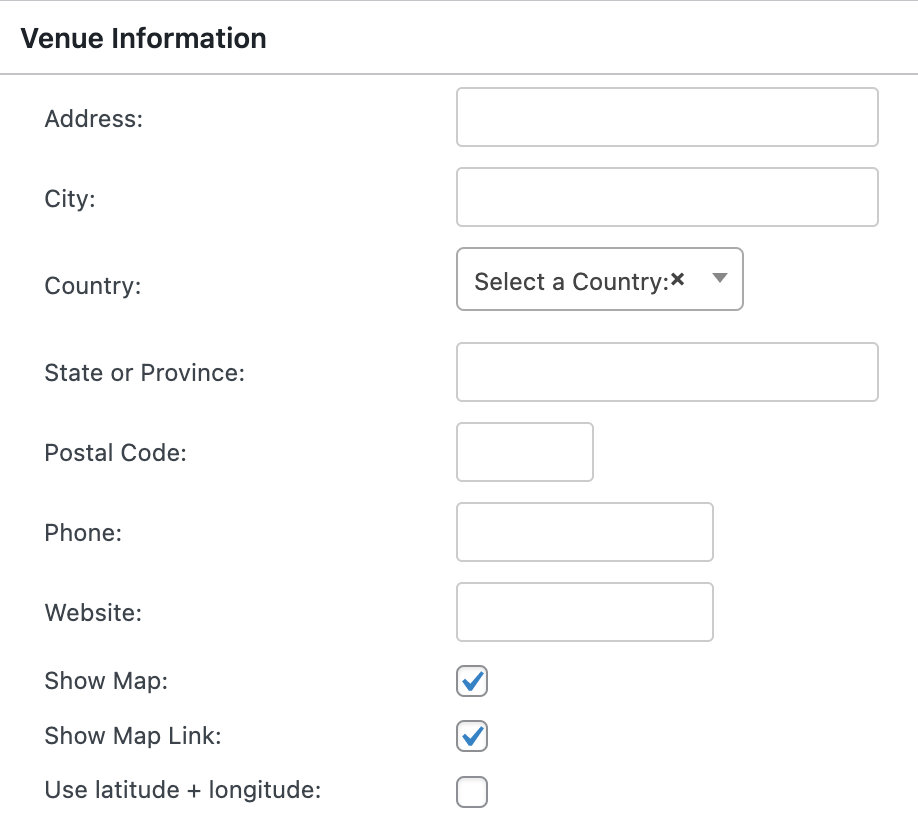
Create the main venue where the event will take place under Events > Venues. Make sure you fill in all of the venue information. Then, add venues for each of the conference tracks (for example the main auditorium and a side room).
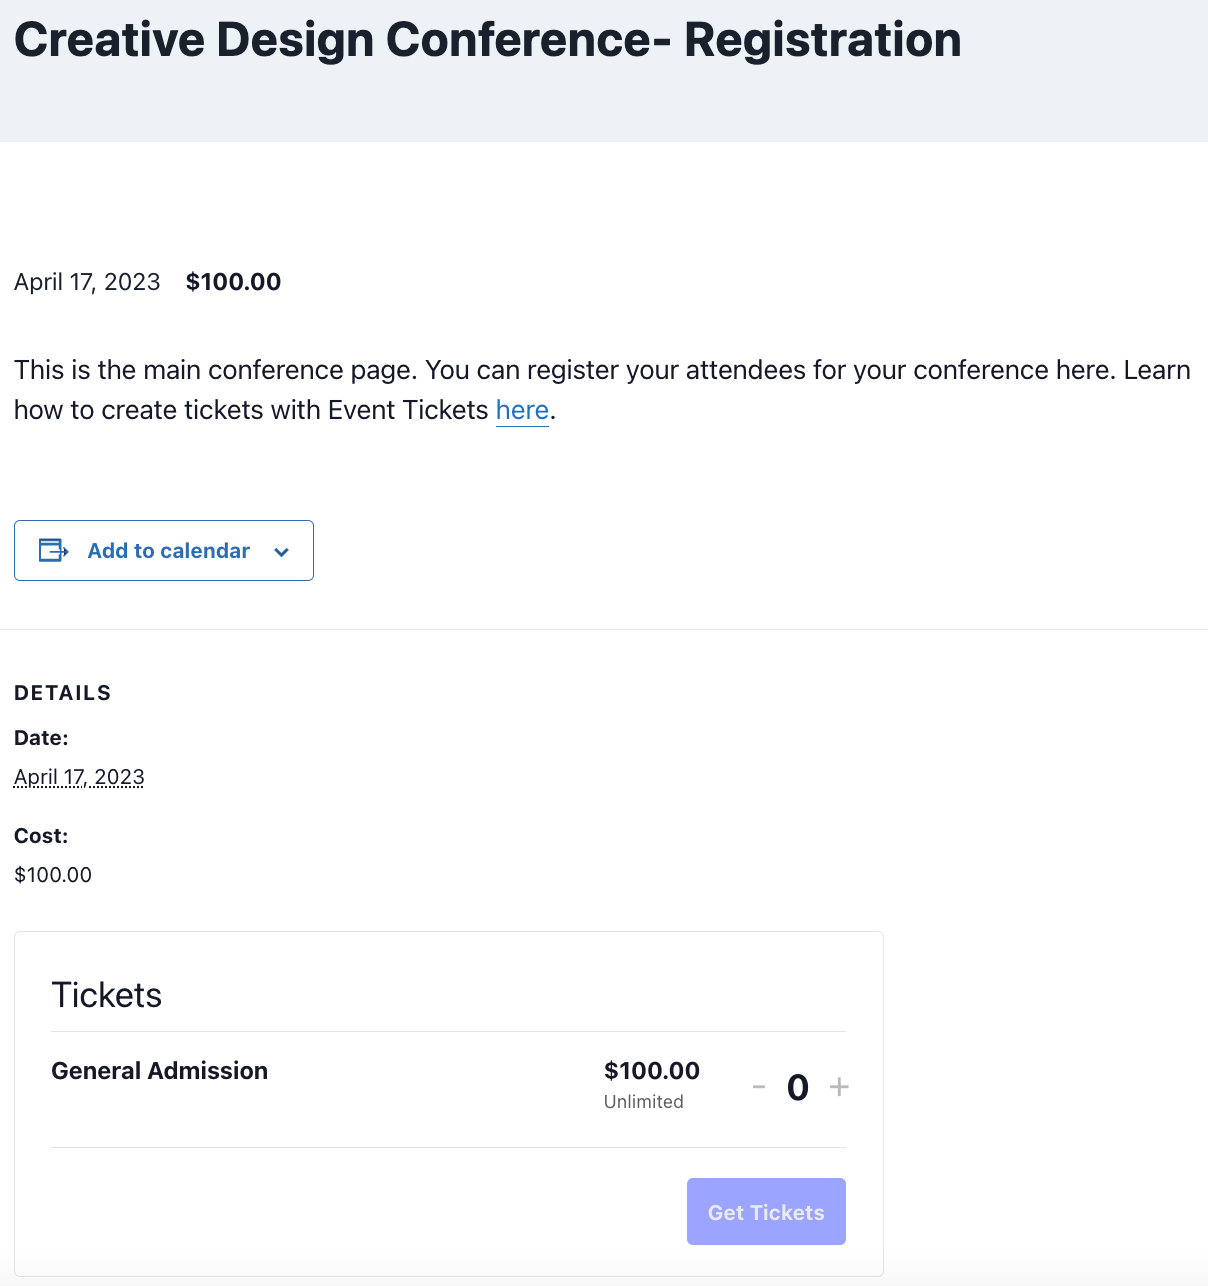
Set Up the Main Conference Event
Now you’re all ready to create the main conference event. Using the Block Editor, add in all of your event details and use the main venue as the location. You can learn more about creating events with The Events Calendar here.
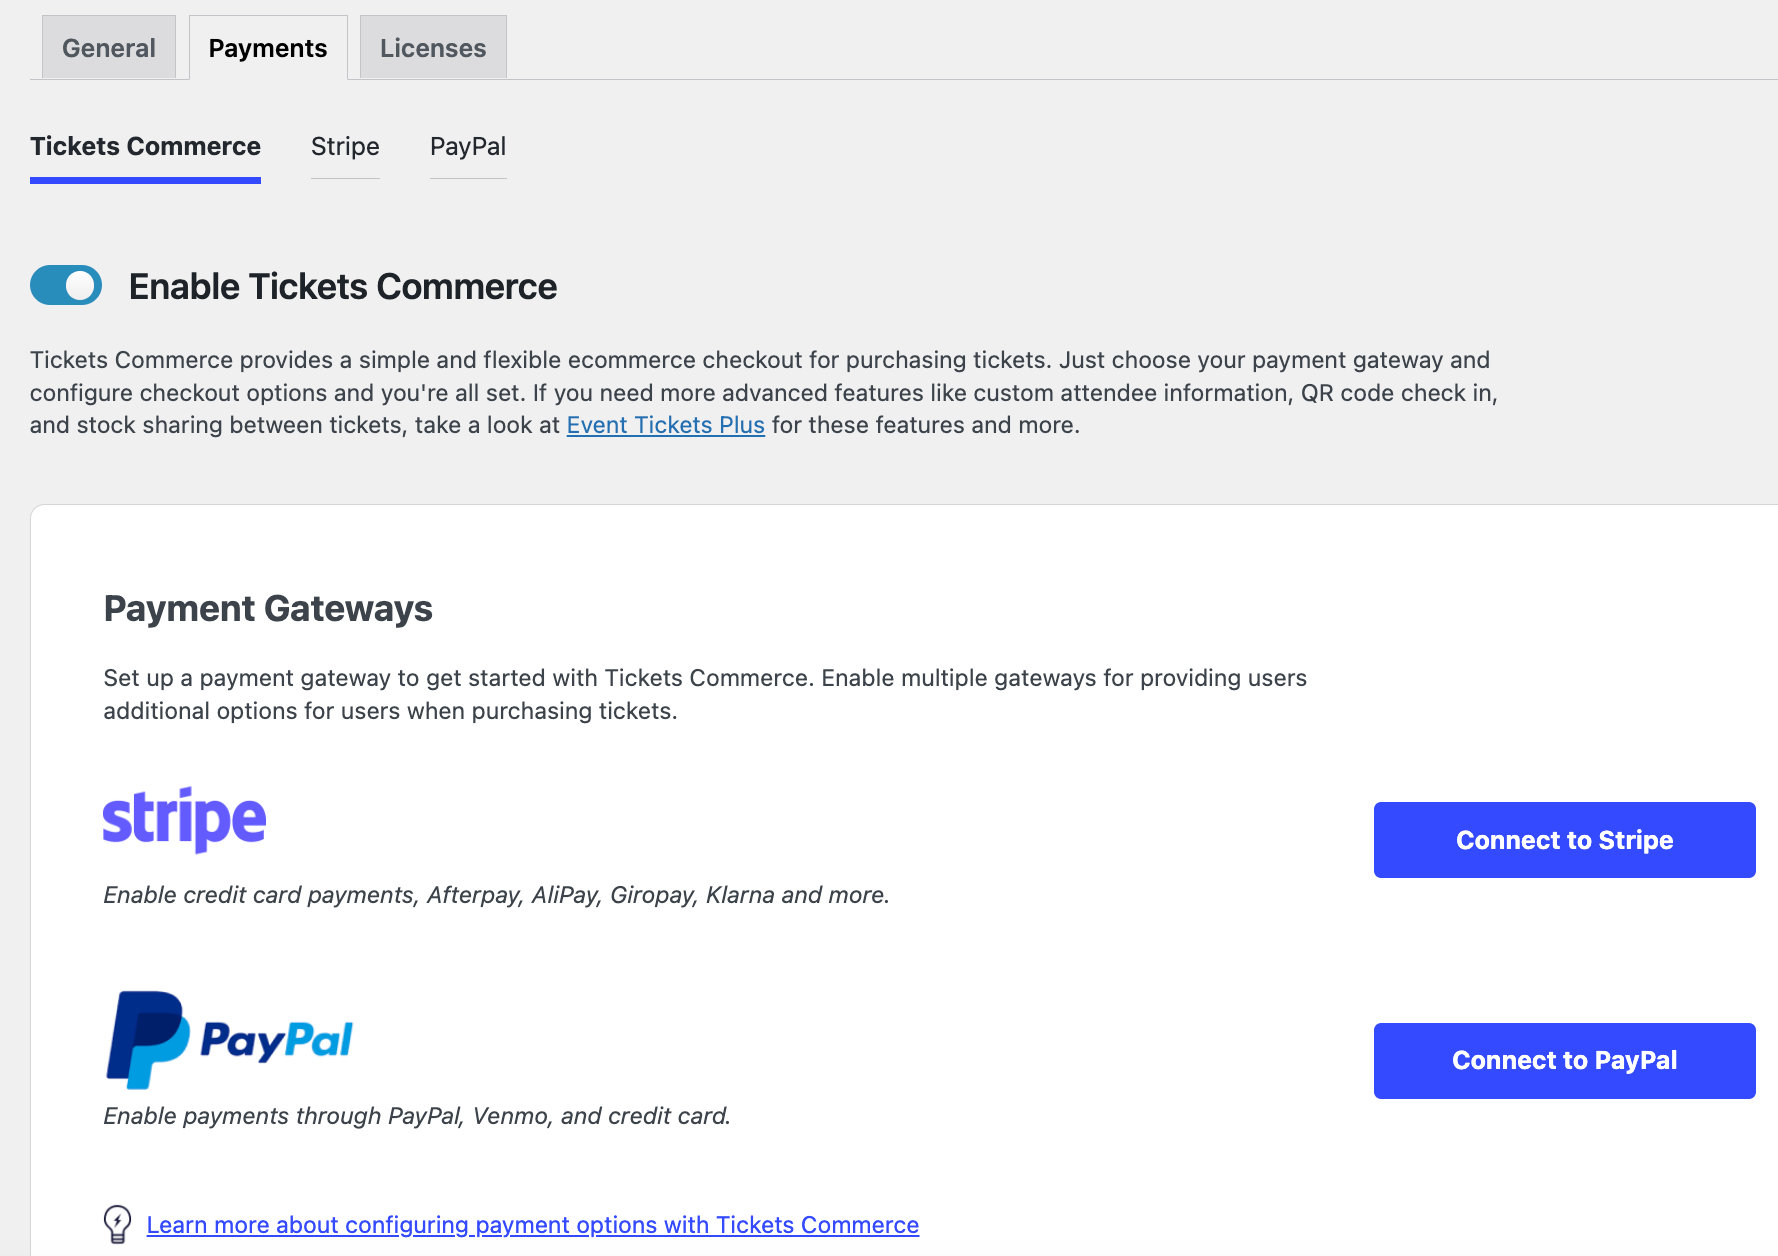
Configuring Tickets Commerce with PayPal
Go to Tickets > Settings > Payments and click Connect Automatically with PayPal. Create a Business Pro account, return to your website, and follow the PayPal prompts to set up Tickets Commerce. You will see a message saying “You’re now connected to PayPal” once you have successfully connected. You can also choose to configure Stripe for Tickets Commerce as well.
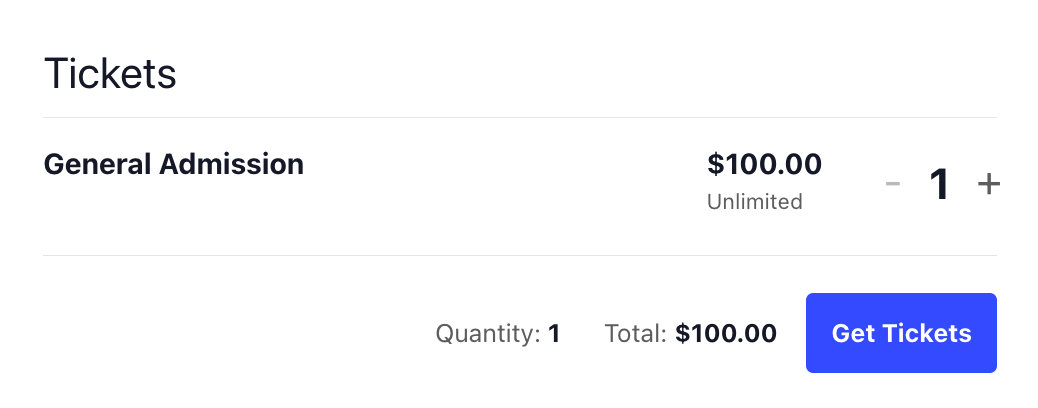
Create Tickets
Head over to your main event page and add a ticket to that page. This will be the ticket that users can purchase for the entire event as a whole. Learn all about creating tickets in our Knowledgebase article.
Create an Event for Each Talk
Create a new event for each of your talks, using the same date for each talk, but changing the time to the exact time of the individual talk. The only other piece of information needed for each event is the venue, which should be the conference room where the event will take place.
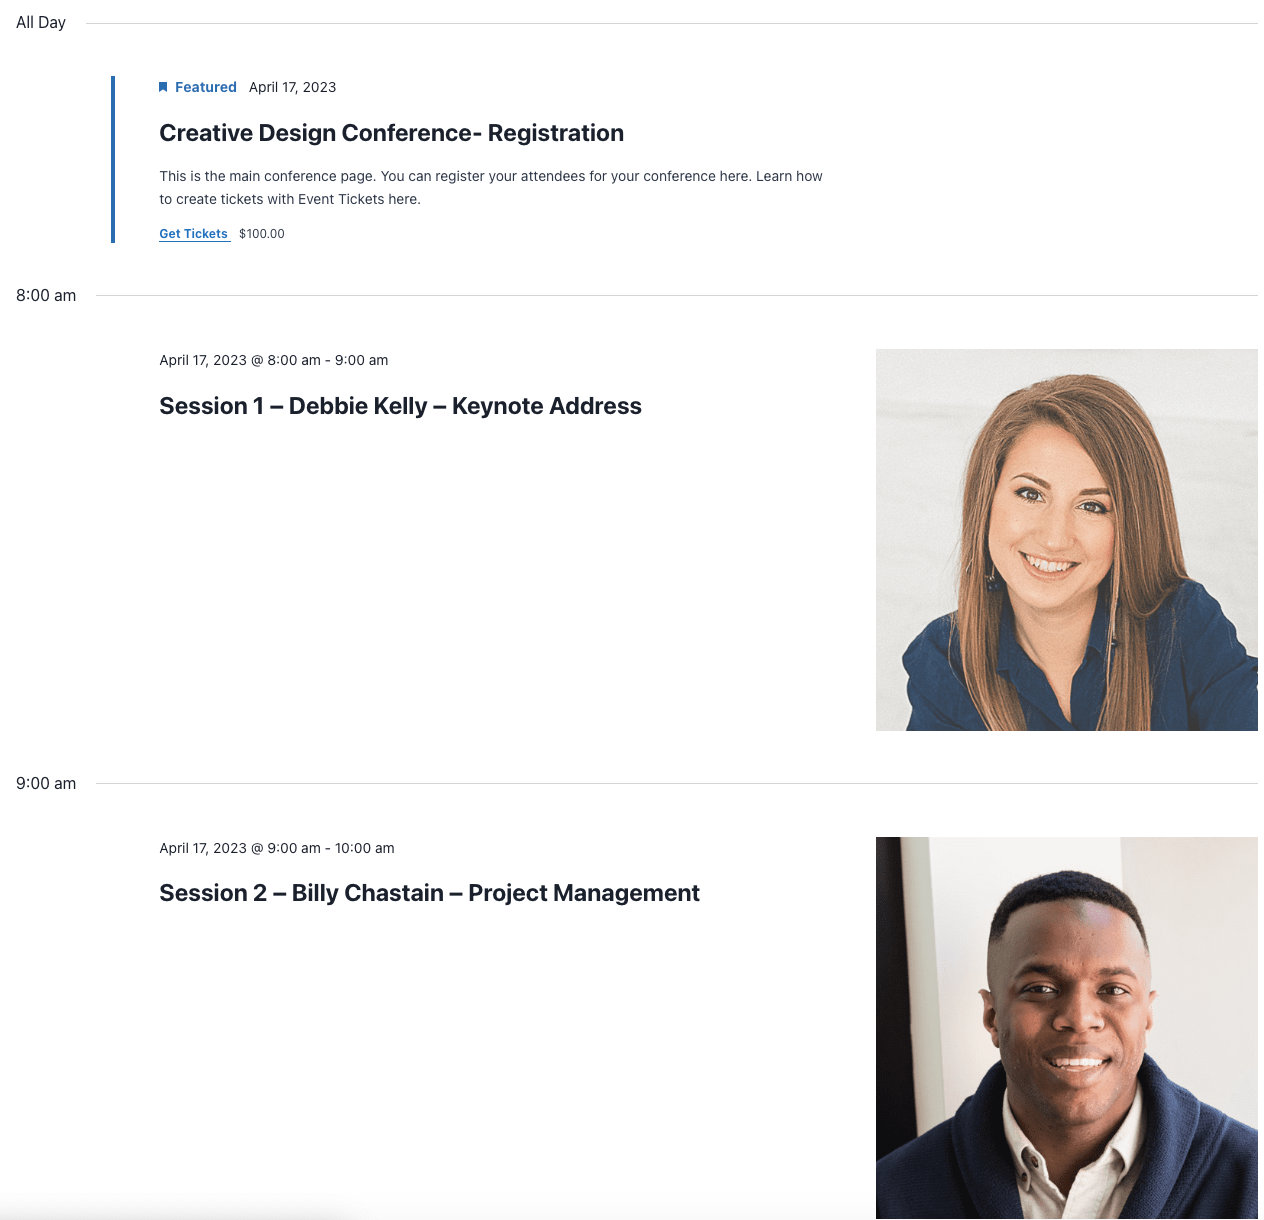
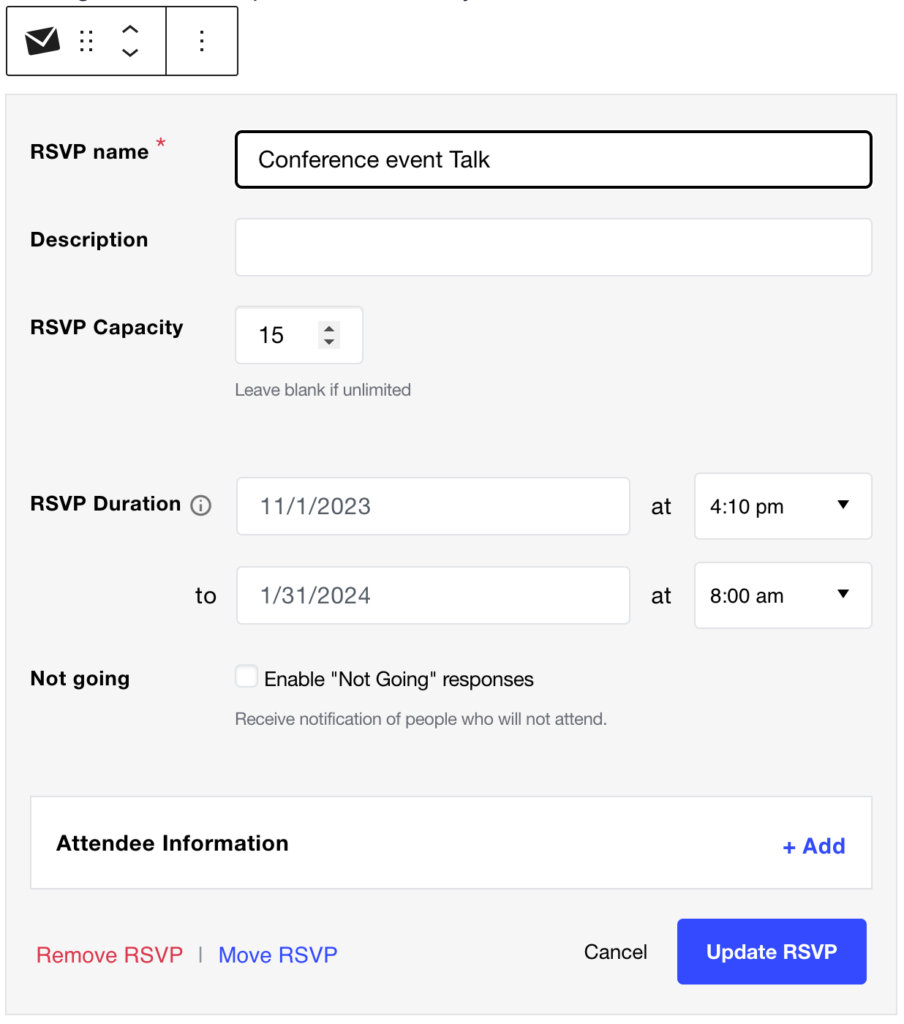
Add an RSVP for Each Talk
Create an RSVP for each of your talks. Feel free to add a capacity for each one as well.
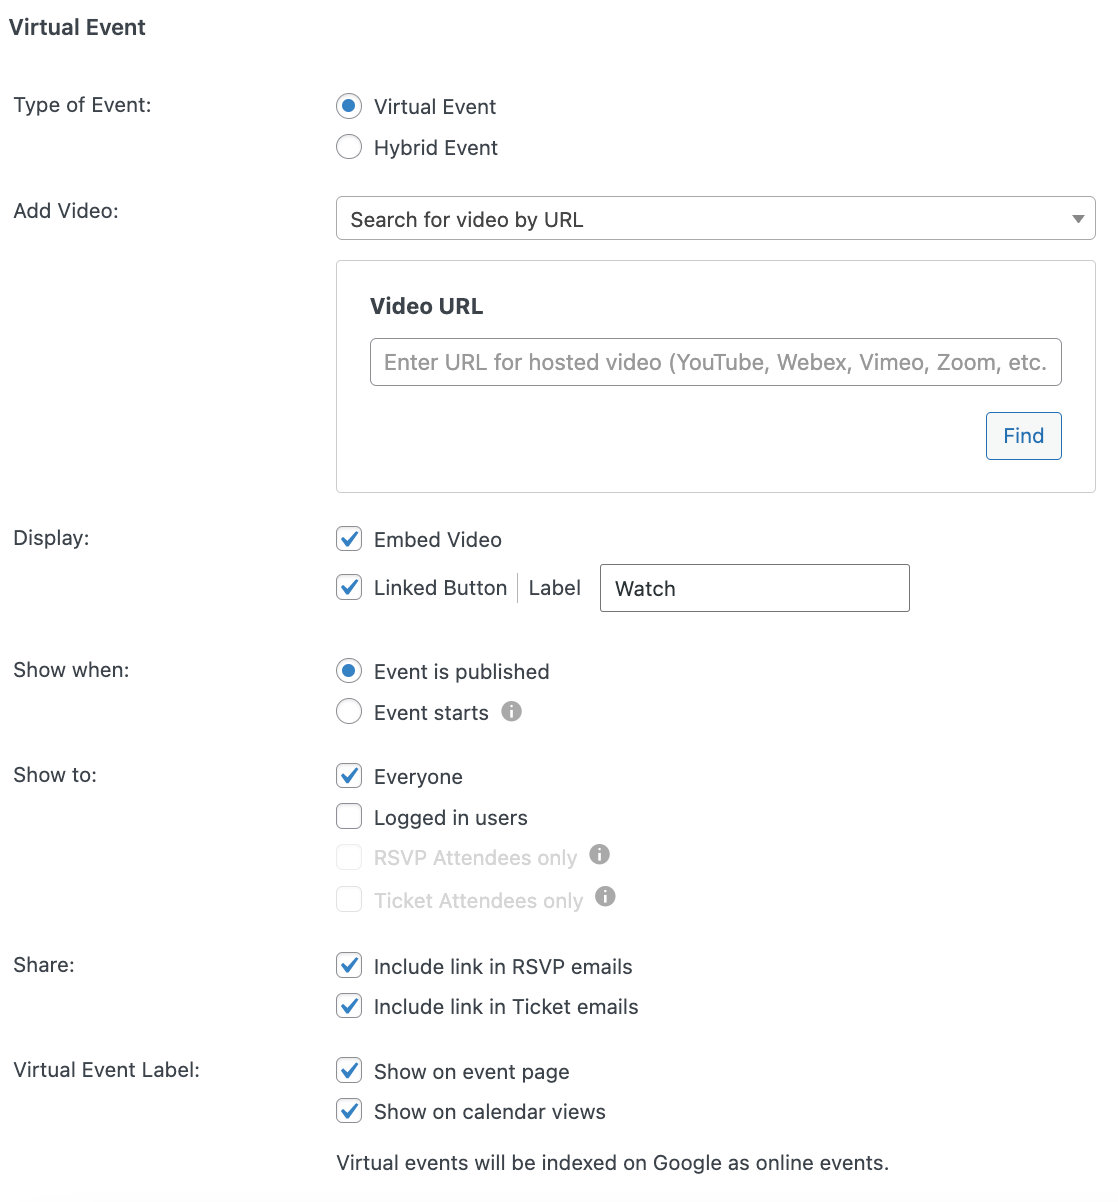
Creating Virtual Events
If your conference will be virtual, you can use our premium add-on, Virtual Events, in order to create a virtual conference. With that plugin installed, click on Configure Virtual Event on the main event page. You can set this as a virtual or hybrid event.
Customizing the Conference
You can add additional styles to your conference using CSS and PHP. To add the CSS file, you can use this third-party plugin. To add PHP to your website, you can use this plugin.
To improve the styling of the conference, you can add the following CSS snippet:
.tribe-common .tribe-events-c-search__button {
	margin-right: var(--tec-spacer-2);
}

.tribe-common .tribe-events-c-subscribe-dropdown__button {
	background: var(--global-palette-btn-bg);
	color: var(--global-palette-btn);
}

.tribe-common .tribe-events-c-subscribe-dropdown__button:hover {
	color: var(--global-palette-btn-hover);
	background: var(--global-palette-btn-bg-hover);
}

.tribe-common .tribe-events-c-subscribe-dropdown__button button {
	background: transparent;
}


@media only screen and (min-width: 768px) {
	.tribe-block__venue.tribe-block__venue--has-map .tribe-block__venue__map {
		width: 62%;
	}
}

.tribe-common--breakpoint-medium.tribe-events .tribe-events-calendar-day__event ~ .tribe-events-calendar-day__event {
	float:left;
	width: 50%;
}

.tribe-common--breakpoint-medium.tribe-events .tribe-events-calendar-day__event-details {
	width: calc(var(--tec-grid-width-1-of-8)*8);
}
.tribe-common--breakpoint-medium.tribe-events .tribe-events-calendar-day__time-separator + .tribe-events-calendar-day__event,
.tribe-common--breakpoint-medium.tribe-events .tribe-events-calendar-day__type-separator + .tribe-events-calendar-day__event {
	margin-top: var(--tec-spacer-9);
}

.postid-1521 .tribe-events-before-html,
.tribe-common--breakpoint-medium.tribe-events .tec-buy-ticket-mobile {
	display: none;
}

.tribe-common .tribe-events-before-html h2 {
	margin-bottom:var(--tec-spacer-4);
}

.tribe-events-view.tribe-events .tribe-events-header {
	margin-top: var(--tec-spacer-6);
}

.tribe-common--breakpoint-medium.tribe-events .tribe-events-calendar-day__event::before {
	width: auto;
}

.tribe-events-calendar-day__time-separator,
.tribe-events-c-subscribe-dropdown {
	clear:both;
}

.tribe-events-c-small-cta__price {
	display:none;
}

.tribe-block__venue {
	padding: 15px 0;
}

.tribe-block__venue .tribe-block__venue__meta {
	margin-bottom: 0;
}

.tribe-block__venue .tribe-block__venue__meta .tribe-block__venue__name h3 {
	font-size: var(--tec-font-size-5);
}

.tribe-block__organizer__details {
	margin-bottom: 0;
	padding: 15px 0;
}

#legend_box {
	font-size: 16px;
}

.tribe-block__organizer__details h3 {
	font-size: var(--tec-font-size-5);
}

.tribe-blocks-editor .event-tickets .tribe-tickets__rsvp-wrapper {
	max-width: none;
}

.tribe-events-view:before,
.tribe-events-view:after {
  content: "";
  display: table;
}
.tribe-events-view:after {
  clear: both;
}
.tribe-events-view {
  zoom: 1; /* For IE 6/7 (trigger hasLayout) */
}
You can find additional PHP snippets to add functionality to your conference here.
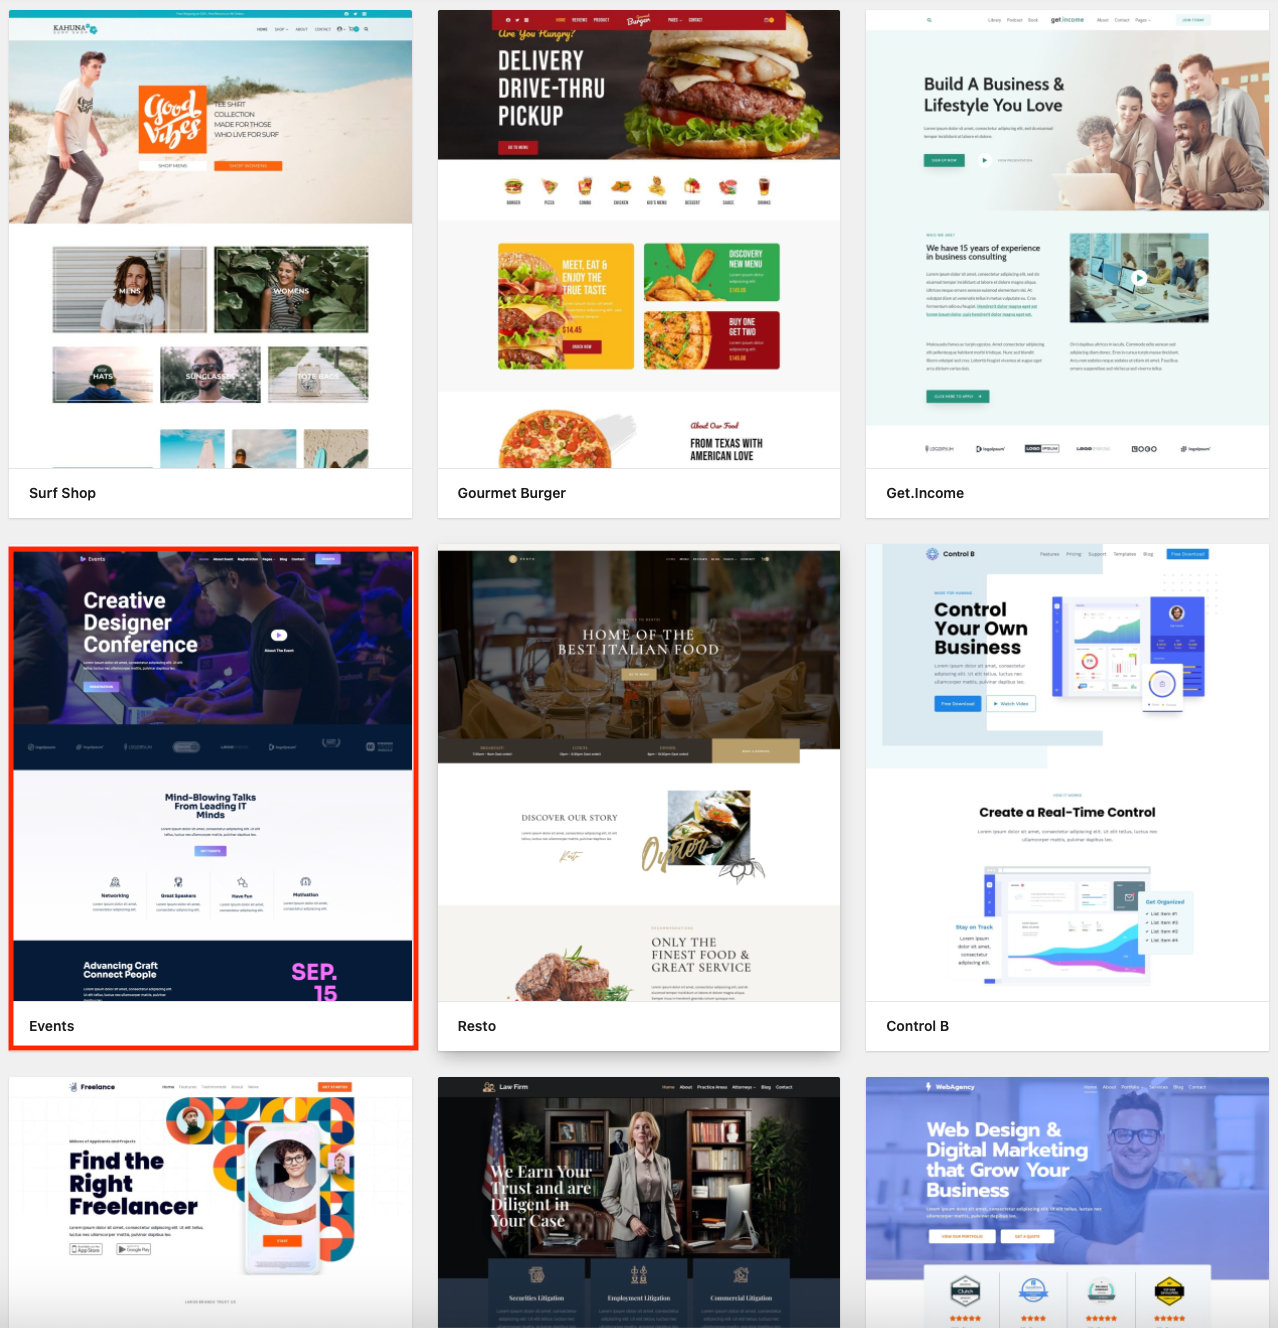
Check out our Conference Event demo site to see the finished product ✨