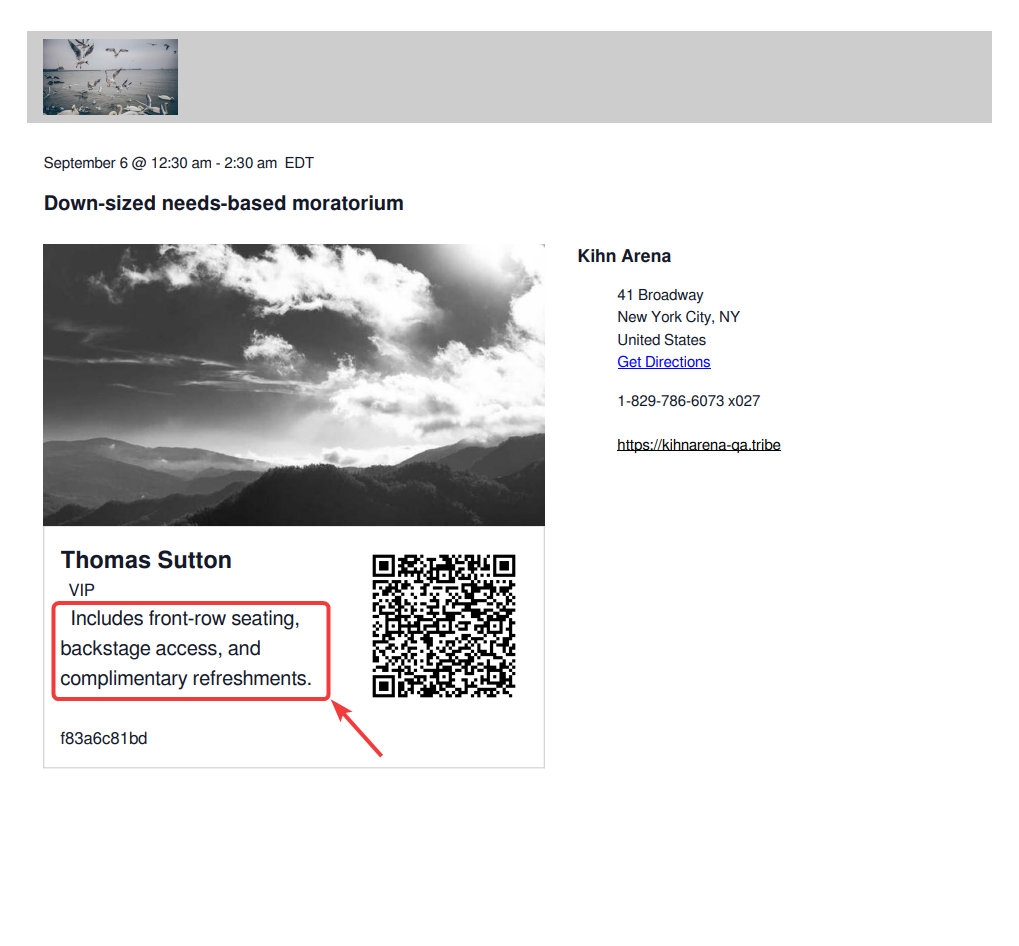
Customizing event ticket PDFs to provide additional information often involves modifying files located in the event-tickets-plus\src\views\tickets-wallet-plus\pdf\ directory. One common customization is adding a custom note below the event details. For example, if one needs to include special instructions, messages, or personalized greetings on the ticket, they would typically modify the body.php file.
Following these steps enables you to quickly include personalized touches into your event ticketing PDF styling, providing attendees with a more informative and engaging experience. This customization enhances the practical information provided and aligns the ticketing process with the unique branding and communication needs of their event.
See also: Customizing the PDF Ticket File Name
Customizations for The Events Calendar are usually implemented via code snippets or template overrides. Add snippets to your child theme’s functions.php file or use the Code Snippets plugin. Template overrides should go in a child theme. If either approach is new to you, start with Using Code Snippets to Customize The Events Calendar and Customizing The Events Calendar Templates for a walkthrough of each.
Overview
To start with, let’s see what files are being loaded when the PDF file is generated. There are four files needed to generate the PDF file, as seen in the template file included in pass.php located at event-tickets-plus\src\views\tickets-wallet-plus\pdf\pass.php.
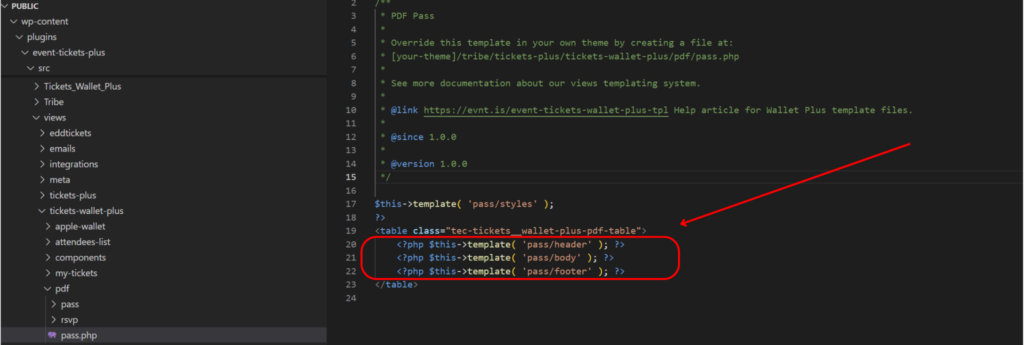
styles.php → This loads the PDF's style.header.phpbody.phpfooter.php
See the image below for how it is structured.

Depending on your layout and customization, you should modify one (or more) file. All the files are located at event-tickets-plus\src\views\tickets-wallet-plus\pdf
Add a Note
Let’s say that you need to add a note below the event detail, in this case, you should modify body.php file. To accomplish this, make a copy of body.php and upload it at [your-theme]/tribe/tickets-wallet-plus/pdf/pass.php
Open the file in a text editor and add your own custom note, similar to the example below:
<?php
/**
 * PDF Pass: Body
 *
 * Override this template in your own theme by creating a file at:
 * [your-theme]/tribe/tickets-wallet-plus/pdf/pass/body.php
 *
 * See more documentation about our views templating system.
 *
 * @link https://evnt.is/event-tickets-wallet-plus-tpl Help article for Wallet Plus template files.
 *
 * @since 1.0.0
 *
 * @version 1.0.0
 */

?>
<tr>
	<td height="670">
		<table class="tec-tickets__wallet-plus-pdf-body-table">
			<tr>
				<td>
					<?php $this->template( 'pass/body/post-title' ); ?>
				</td>
			</tr>
			<tr>
				<td width="320">
					<table class="tec-tickets__wallet-plus-pdf-ticket-info-table">
						<tr>
							<td width="300">
								<?php $this->template( 'pass/body/ticket-info' ); ?>
								<p>This is my custom note</p>
							</td>
						</tr>
					</table>
				</td>
				<td>
					<?php $this->template( 'pass/body/sidebar' ); ?>
				</td>
			</tr>
		</table>
	</td>
</tr>
Add Ticket Description
By default, the ticket description only appears on the event page where the ticket is displayed. However, attendees often rely on their PDF Tickets / Passes as the main reference for event details. Including the ticket description in the PDF Ticket / Pass ensures that important ticket-specific information is always at hand, making the Pass more helpful and reducing the chances of attendees missing key instructions.
Start by making a copy of the following template file: \wp-content\plugins\event-tickets-plus\src\views\tickets-wallet-plus\pdf\pass\body\ticket-info\attendee-details\ticket-title.php
Place the file in your theme at the following path. If the sub-folders don’t already exist, you’ll need to create them first: /wp-content/themes/[your-theme]/tribe/tickets-plus/tickets-wallet-plus/pdf/pass/body/ticket-info/attendee-details/ticket-title.php
Add the following lines of code at the very end of the file:
<?php if ( ! empty( $attendee['product_id'] ) ) : ?>
    <?php
    $ticket_excerpt = get_post_field( 'post_excerpt', (int) $attendee['product_id'] );

    if ( ! empty( $ticket_excerpt ) ) :
        ?>
        <table class="tec-tickets__wallet-plus-pdf-attendee-details-ticket-excerpt">
            <tr>
                <td>
                    <?php echo $ticket_excerpt; ?>
                </td>
            </tr>
        </table>
    <?php endif; ?>
<?php endif; ?>
PDF Ticket / Pass should now display the ticket description:
That’s all it takes! With this customization in place, your attendees will now see the ticket description directly in their PDF tickets and passes. This helps ensure that important details, such as inclusions, instructions, or perks, aren’t missed.
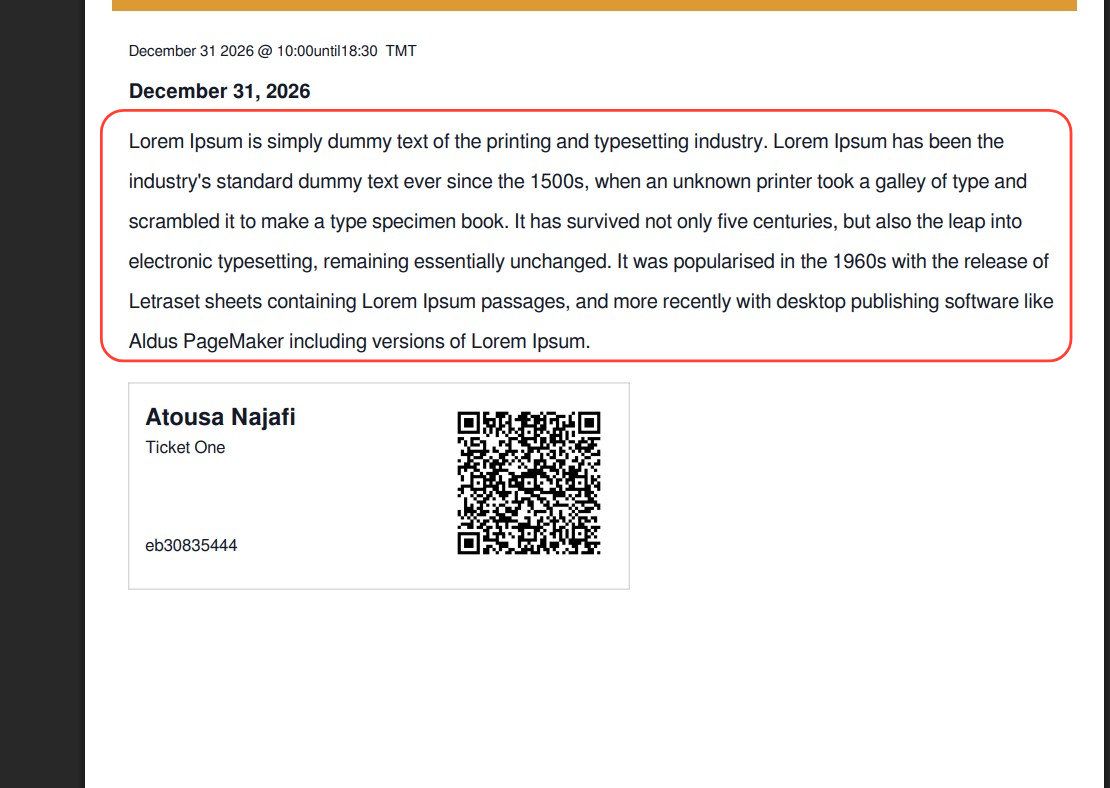
Add Event Description
- Locate and copy
post-title.phptemplate file in the plugin directory:/wp-content/plugins/event-tickets-plus/src/views/tickets-wallet-plus/pdf/pass/body/ - In your child theme directory, create the following path and place the copied file:
[your-child-theme]/tribe/tickets-wallet-plus/pdf/pass/body/ - Open the file in a text editor and add the following code just after the
</tr>tag:
<tr style="font-weight:normal;">
  <td>
    <?php echo esc_html( $post->post_content ); ?>
  </td>
</tr>
Save the file and ensure you clear any caching mechanisms in place. The description should now appear in the generated PDF tickets, typically below the event title:
Change Paper Orientation and Size
By default, Event Tickets Plus generates PDF tickets in Letter size and portrait orientation. If you’d like to customize this behavior, you can use the snippet here and adjust it to meet your needs. The example snippet uses A4 size paper and landscape orientation. You can use any paper format supported by the TCPDF library, including: A4, A3, A5, Letter, Legal, Tabloid and more. Orientation can be P (portrait/vertical) or L (landscape/horizontal).
add_filter( 'tec_tickets_wallet_plus_pdf_pass_get_pdf_object', function( $pdf ) {
    // Set paper format and orientation
    $pdf->setPageFormat( 'A4', 'L' ); // Change A4 to your preferred format, L for Landscape or P for Portrait
    return $pdf;
});