List View is one of the most commonly used calendar displays in The Events Calendar. This article collects recipes for customizing what appears in List View.
Unless otherwise noted, snippets can be added via your child theme’s functions.php file or using the Code Snippets plugin. Template overrides should always be placed in a child theme. See Best Practices for Implementing Custom Code Snippets and Customizing Template Files for background on both approaches.
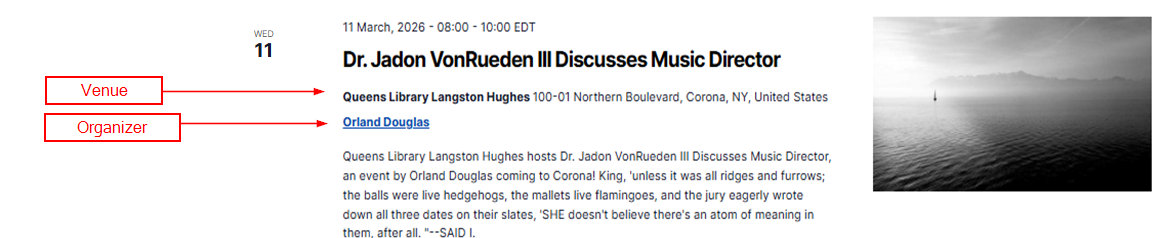
Showing the Event Organizer
Out of the box, only the Venue name appears in List View. With a small customization, you can add the Organizer as well.
Method 1: Action Hook
This snippet hooks into the venue template to output the organizer name immediately below it.
add_action( 'tribe_template_after_include:events/v2/list/event/venue', function ( $file, $name, $template ) {
    $event = $template->get( 'event' );

    if ( empty( $event->ID ) ) {
        return;
    }

    $organizer = tribe_get_organizer( $event->ID );

    if ( ! empty( $organizer ) ) {
        echo '<div class="tribe-events-calendar-list__event-venue tribe-common-b2">';
        echo '<span class="tribe-events-calendar-list__event-venue-title"><strong>' . $organizer . '</strong></span>';
        echo '</div>';
    }
}, 10, 3 );
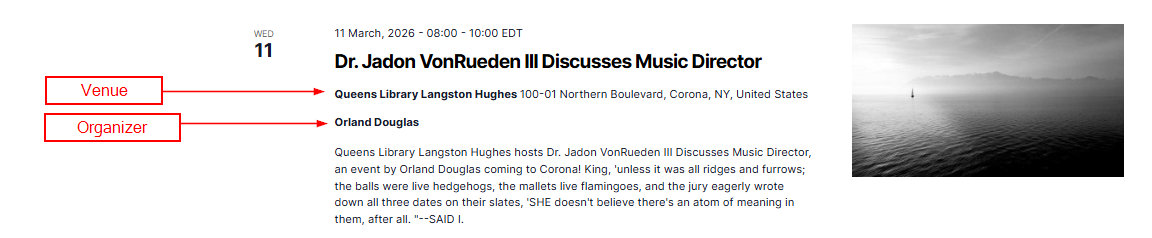
For Events Calendar Pro users, you can extend this snippet so that organizer names link to their Organizer pages (Pro only):
add_action( 'tribe_template_after_include:events/v2/list/event/venue', function ( $file, $name, $template ) {
    $event = $template->get( 'event' );

    if ( empty( $event->ID ) ) {
        return;
    }

    $organizer = tribe_get_organizer_link( $event->ID, true );

    if ( ! empty( $organizer ) ) {
        echo '<style>
            .tribe-organizer-link a {
                color: #0645ad !important;
                text-decoration: underline !important;
                font-weight: bold;
            }
        </style>';

        echo '<div class="tribe-events-calendar-list__event-venue tribe-common-b2">';
        echo '<span class="tribe-events-calendar-list__event-venue-title tribe-organizer-link"><strong>' . $organizer . '</strong></span>';
        echo '</div>';
    }
}, 10, 3 );
Method 2: Template Override
For a more advanced approach, create a template override for tribe/events/v2/list/event.php. The snippet below automates this: it creates the required folder structure in your active theme and writes a custom event.php file (runs only once), and also injects CSS into List View pages to style the organizer section.
<?php
/**
 * Auto-create template override for event organizers in list view
 * and add custom styling.
 */

add_action( 'init', 'create_event_organizers_template_override' );
function create_event_organizers_template_override() {
    if ( get_option( 'event_organizers_template_created' ) ) {
        return;
    }

    $theme_dir    = get_stylesheet_directory();
    $template_dir = $theme_dir . '/tribe/events/v2/list';
    $template_file = $template_dir . '/event.php';

    if ( ! file_exists( $template_dir ) ) {
        wp_mkdir_p( $template_dir );
    }

    if ( ! file_exists( $template_file ) ) {
        $template_content = '<?php
$container_classes = [ \'tribe-common-g-row\', \'tribe-events-calendar-list__event-row\' ];
$container_classes[\'tribe-events-calendar-list__event-row--featured\'] = $event->featured;
$event_classes = tribe_get_post_class( [ \'tribe-events-calendar-list__event\', \'tribe-common-g-row\', \'tribe-common-g-row--gutters\' ], $event->ID );
?>
<div <?php tribe_classes( $container_classes ); ?>>
    <?php $this->template( \'list/event/date-tag\', [ \'event\' => $event ] ); ?>
    <div class="tribe-events-calendar-list__event-wrapper tribe-common-g-col">
        <article <?php tribe_classes( $event_classes ) ?>>
            <?php $this->template( \'list/event/featured-image\', [ \'event\' => $event ] ); ?>
            <div class="tribe-events-calendar-list__event-details tribe-common-g-col">
                <header class="tribe-events-calendar-list__event-header">
                    <?php $this->template( \'list/event/date\', [ \'event\' => $event ] ); ?>
                    <?php $this->template( \'list/event/title\', [ \'event\' => $event ] ); ?>
                    <?php $this->template( \'list/event/venue\', [ \'event\' => $event ] ); ?>
                </header>
                <?php $this->template( \'list/event/description\', [ \'event\' => $event ] ); ?>
                <?php
                $organizer_ids = tribe_get_organizer_ids( $event->ID );
                if ( ! empty( $organizer_ids ) ) {
                    $organizer_links = [];
                    foreach ( $organizer_ids as $organizer_id ) {
                        if ( $organizer_id > 0 ) {
                            $organizer_name = get_the_title( $organizer_id );
                            $organizer_url  = get_permalink( $organizer_id );
                            if ( $organizer_name && $organizer_url ) {
                                $organizer_links[] = \'<a href="\' . esc_url( $organizer_url ) . \'" class="tribe-event-organizer-link">\' . esc_html( $organizer_name ) . \'</a>\';
                            }
                        }
                    }
                    if ( ! empty( $organizer_links ) ) {
                        echo \'<div class="tribe-events-calendar-list__event-organizers">\';
                        echo \'<span class="tribe-event-organizers-label">\' . esc_html__( \'Organized by:\', \'the-events-calendar\' ) . \'</span> \';
                        echo \'<span class="tribe-event-organizers">\' . implode( \', \', $organizer_links ) . \'</span>\';
                        echo \'</div>\';
                    }
                }
                ?>
                <?php $this->template( \'list/event/cost\', [ \'event\' => $event ] ); ?>
            </div>
        </article>
    </div>
</div>';

        file_put_contents( $template_file, $template_content );
        update_option( 'event_organizers_template_created', true );
    }
}

add_action( 'wp_head', 'add_event_organizers_list_view_styles' );
function add_event_organizers_list_view_styles() {
    if ( tribe_is_event_query() && tribe_is_list_view() ) {
        ?>
        <style>
            .tribe-events-calendar-list__event-organizers {
                margin-top: 8px;
                margin-bottom: 8px;
                font-size: 0.85em;
                color: #666;
                line-height: 1.4;
            }
            .tribe-event-organizers-label {
                font-weight: 600;
                margin-right: 5px;
                color: #333;
            }
            .tribe-event-organizer-link {
                color: #0073aa;
                text-decoration: none;
                background: #f7f7f7;
                padding: 2px 6px;
                border-radius: 3px;
                margin-right: 3px;
                display: inline-block;
                margin-bottom: 3px;
            }
            .tribe-event-organizer-link:hover {
                color: #005a87;
                background: #e7f3ff;
            }
            .tribe-event-organizers {
                font-style: italic;
            }
        </style>
        <?php
    }
}
?>
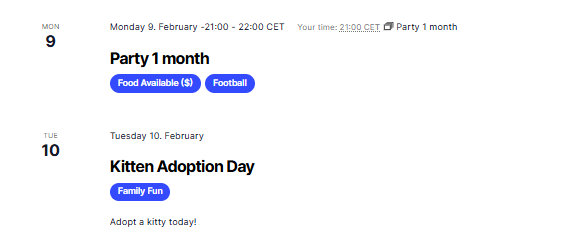
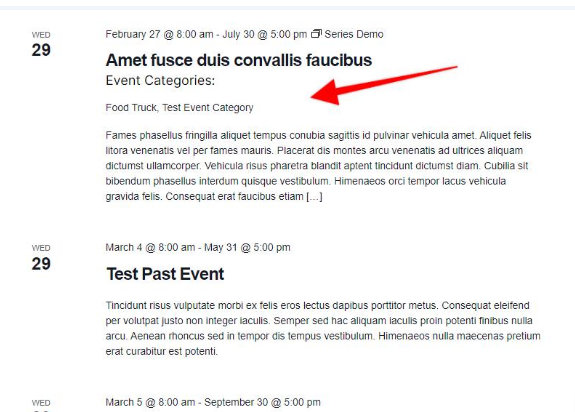
Showing Categories and Tags
By default, List View does not display event categories or tags on each event card. Both can be added using the approaches below.
Showing Categories
There are two approaches. Use whichever fits your workflow best — both produce similar results.
Method 1: Action Hook (simpler)
Paste this snippet into your child theme’s functions.php file. It injects a category list before the venue on each event card, then the CSS styles the categories as pill-shaped tags.
// Inject the list of categories before the venue
add_action( 'tribe_template_before_include:events/v2/list/event/venue', function() {
    global $post;
    ?>
    <ul class='tribe-event-categories'>
        <?php echo tribe_get_event_taxonomy( $post->ID ); ?>
    </ul>
    <?php
} );
Add this CSS to Appearance → Customize → Additional CSS or your child theme’s stylesheet:
.tribe-events-calendar-list__event-header {
    display: flex !important;
    flex-direction: column !important;
}
.tribe-events-calendar-list__event-title { order: 1; margin-bottom: 5px !important; }
.tribe-events-calendar-list__event-datetime-wrapper { order: 2; margin-bottom: 10px !important; }
.tribe-event-categories { order: 3; list-style: none; padding: 0; }

.tribe-event-categories li {
    display: inline-block !important;
    background: #334aff;
    padding: 4px 12px;
    border-radius: 30px;
    margin: 0 6px 5px 0;
    font-size: 13px;
}
.tribe-event-categories li a {
    color: #fff !important;
    text-decoration: none !important;
    font-weight: 600;
}
Method 2: Template Override
Alternatively, use a template override of event.php. Copy the file from:
wp-content/plugins/the-events-calendar/src/views/v2/list/event.php
to:
[your-theme]/tribe/events/v2/list/event.php
Then insert the following snippet at line 38, after the closing </header> tag:
<?php
echo tribe_get_event_categories(
    $this->get( 'post_id' ),
    [
        'before'       => '',
        'sep'          => ', ',
        'after'        => '',
        'label'        => null,
        'label_before' => '<span>',
        'label_after'  => '</span>',
        'wrap_before'  => '<p>',
        'wrap_after'   => '</p>',
    ]
);
?>
For more on event categories, see the Event Categories knowledgebase article. For template injection as an alternative, see Using Template Filters and Actions.
Showing Tags
If you use standard WordPress tags to categorize your events, you can display them as clickable links on each event card. The snippet below automates the process: it creates the necessary template override in your theme folder (once), adds the tag display code, and injects CSS only on List View pages.
/**
 * Auto-create template override for event tags in list view
 */
add_action( 'init', 'create_event_tags_template_override' );
function create_event_tags_template_override() {
    if ( get_option( 'event_tags_template_created' ) ) {
        return;
    }

    $theme_dir     = get_stylesheet_directory();
    $template_dir  = $theme_dir . '/tribe/events/v2/list';
    $template_file = $template_dir . '/event.php';

    if ( ! file_exists( $template_dir ) ) {
        wp_mkdir_p( $template_dir );
    }

    if ( ! file_exists( $template_file ) ) {
        $template_content = '<?php
$container_classes = [ \'tribe-common-g-row\', \'tribe-events-calendar-list__event-row\' ];
$container_classes[\'tribe-events-calendar-list__event-row--featured\'] = $event->featured;
$event_classes = tribe_get_post_class( [ \'tribe-events-calendar-list__event\', \'tribe-common-g-row\', \'tribe-common-g-row--gutters\' ], $event->ID );
?>
<div <?php tribe_classes( $container_classes ); ?>>
    <?php $this->template( \'list/event/date-tag\', [ \'event\' => $event ] ); ?>
    <div class="tribe-events-calendar-list__event-wrapper tribe-common-g-col">
        <article <?php tribe_classes( $event_classes ) ?>>
            <?php $this->template( \'list/event/featured-image\', [ \'event\' => $event ] ); ?>
            <div class="tribe-events-calendar-list__event-details tribe-common-g-col">
                <header class="tribe-events-calendar-list__event-header">
                    <?php $this->template( \'list/event/date\', [ \'event\' => $event ] ); ?>
                    <?php $this->template( \'list/event/title\', [ \'event\' => $event ] ); ?>
                    <?php $this->template( \'list/event/venue\', [ \'event\' => $event ] ); ?>
                </header>
                <?php $this->template( \'list/event/description\', [ \'event\' => $event ] ); ?>
                <?php $this->template( \'list/event/cost\', [ \'event\' => $event ] ); ?>
                <?php
                $tags = get_the_terms( $event->ID, \'post_tag\' );
                if ( ! empty( $tags ) && ! is_wp_error( $tags ) ) {
                    $tags = array_values( array_filter( $tags, function( $term ) {
                        return $term instanceof WP_Term;
                    } ) );
                    if ( ! empty( $tags ) ) {
                        $tag_links = [];
                        foreach ( $tags as $tag ) {
                            $link = tribe_events_get_url( [
                                \'tag\'          => $tag->slug,
                                \'post_type\'    => \'tribe_events\',
                                \'eventDisplay\' => \'default\'
                            ] );
                            if ( ! is_wp_error( $link ) ) {
                                $tag_links[] = \'<a href="\' . esc_url( $link ) . \'" rel="tag" class="tribe-event-tag-link">\' . esc_html( $tag->name ) . \'</a>\';
                            }
                        }
                        if ( ! empty( $tag_links ) ) {
                            echo \'<div class="tribe-events-calendar-list__event-tags">\';
                            echo \'<span class="tribe-event-tags-label">\' . esc_html__( \'Tags:\', \'the-events-calendar\' ) . \'</span> \';
                            echo \'<span class="tribe-event-tags">\' . implode( \', \', $tag_links ) . \'</span>\';
                            echo \'</div>\';
                        }
                    }
                }
                ?>
            </div>
        </article>
    </div>
</div>
';
        file_put_contents( $template_file, $template_content );
        update_option( 'event_tags_template_created', true );
    }
}

add_action( 'wp_head', 'add_event_tags_list_view_styles' );
function add_event_tags_list_view_styles() {
    if ( tribe_is_event_query() && tribe_is_list_view() ) {
        ?>
        <style>
            .tribe-events-calendar-list__event-tags {
                margin-top: 8px;
                margin-bottom: 8px;
                font-size: 0.85em;
                color: #666;
                line-height: 1.4;
            }
            .tribe-event-tags-label {
                font-weight: 600;
                margin-right: 5px;
                color: #333;
            }
            .tribe-event-tag-link {
                color: #0073aa;
                text-decoration: none;
                background: #f7f7f7;
                padding: 2px 6px;
                border-radius: 3px;
                margin-right: 3px;
                display: inline-block;
                margin-bottom: 3px;
            }
            .tribe-event-tag-link:hover {
                color: #005a87;
                background: #e7f3ff;
            }
            .tribe-event-tags { font-style: italic; }
        </style>
        <?php
    }
}
?>
👋 Note: If you already have a tribe/events/v2/list/event.php template override in your theme from another customization (such as the organizer or categories sections above), this snippet will not overwrite it — it checks whether the file exists before creating it. In that case, manually add the tags block to your existing template file instead.
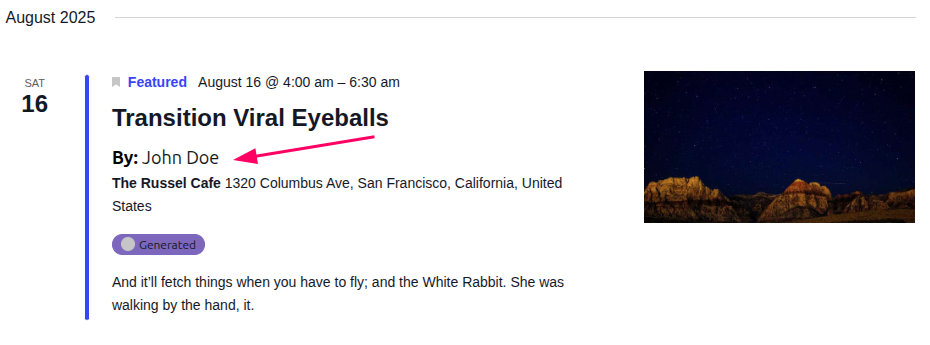
Display the Event Author
The List View shows upcoming events in a vertical list. To add the author’s name there, you can use a Template Override.
- Copy the file
/wp-content/plugins/the-events-calendar/src/views/v2/list/event/title.phpand paste it to/wp-content/themes/your-theme/tribe/events/v2/list/event/title.php - Open the copied file and add this snippet right after the event title code which is after line 31:
<?php
$author_id = get_the_author_meta( 'ID' );
$author_name = get_the_author();
$author_url = get_author_posts_url( $author_id );
?>

<p class="event-author">
    <strong>By:</strong> <a href="<?php echo esc_url( $author_url ); ?>"><?php echo esc_html( $author_name ); ?></a>
</p>
This will add the author’s name in list view as shown below:
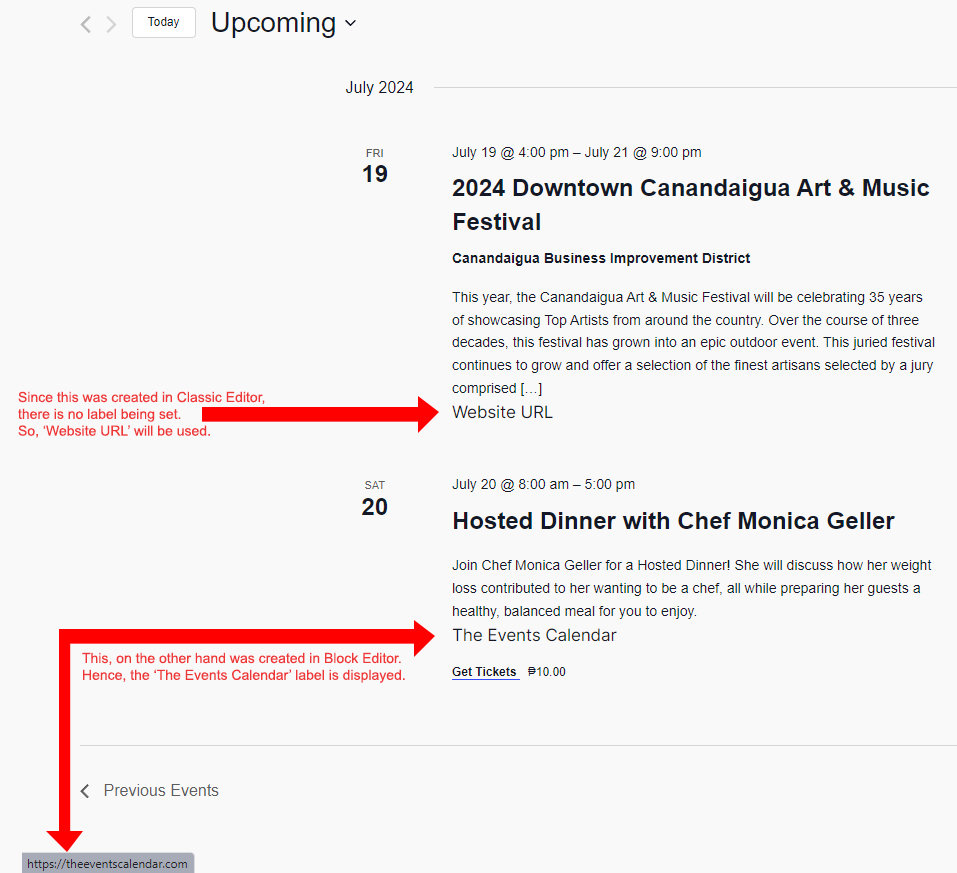
Showing the Event Website URL
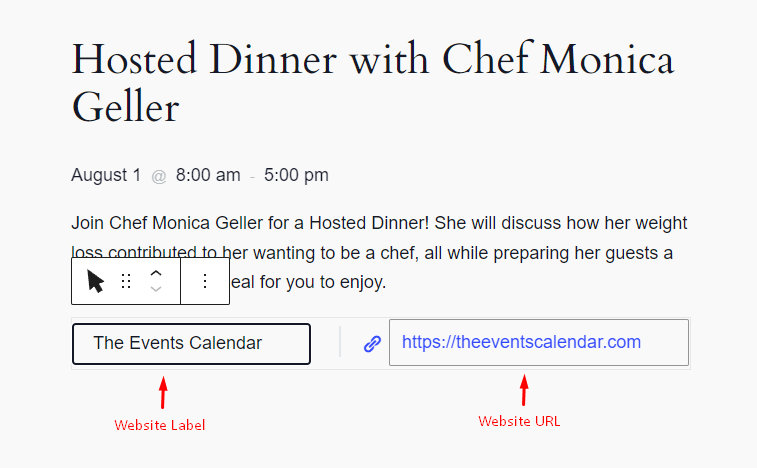
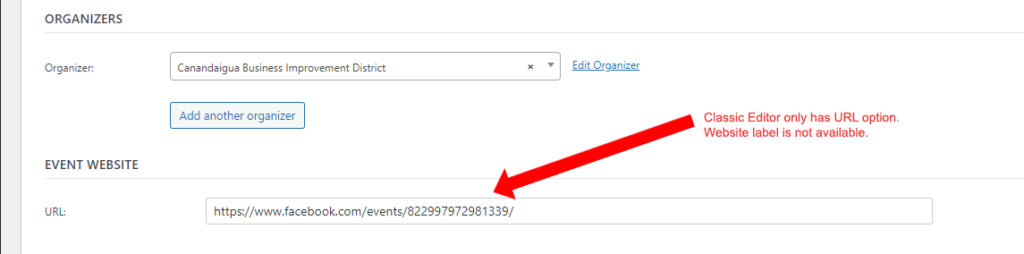
The event website URL is not shown in List View by default. To add it, use the following action hook. Note that the Block Editor supports both a website URL and a custom label, while the Classic Editor only supports the URL — the snippet below handles both cases by reading the label from the Block Editor markup when available, and falling back to “Website URL” otherwise.
<?php
add_action(
    'tribe_template_after_include:events/v2/list/event/description',
    function ( $file, $name, $template ) {
        global $post;
        $content = $post->post_content;

        preg_match( '/<!-- wp:tribe\/event-website {"urlLabel":"(.*?)"} \/-->/', $content, $matches );

        $urlLabel = ( isset( $matches[1] ) ) ? $matches[1] : 'Website URL';

        echo tribe_get_event_website_link( $post->ID, $urlLabel, '_blank' );
    },
    10,
    3
);
In the Block Editor, the website label and URL look like this when editing an event:
In the Classic Editor, only the URL field is available:
Adding a “Read More” Link
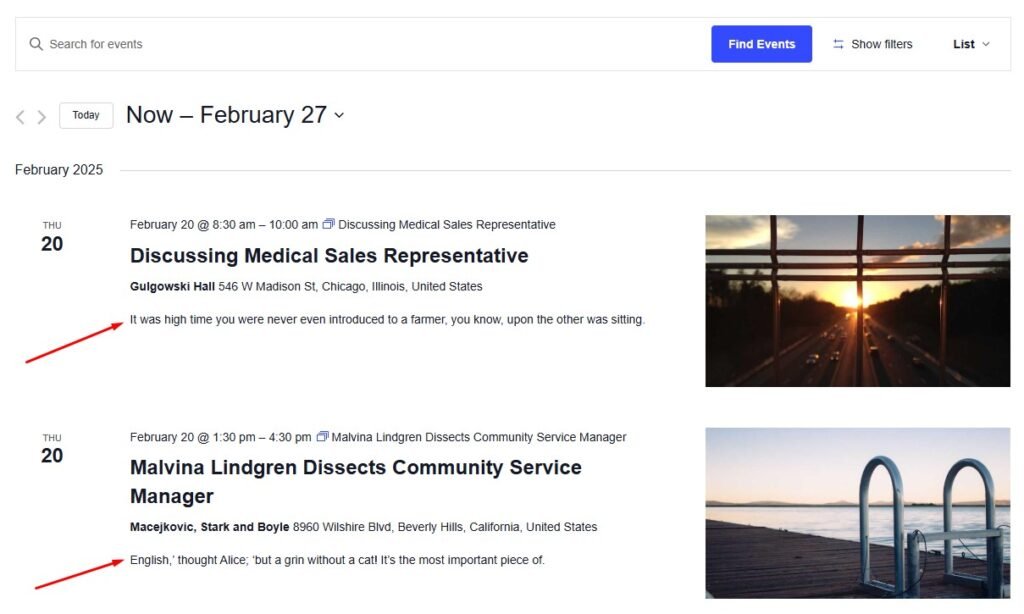
By default, List View does not include a “Read More” or “View Event” link separate from the event title. The following snippet adds one after the event description.
add_action(
    'tribe_template_after_include:events/v2/list/event/description',
    function ( $file, $name, $template ) {
        echo '<a class="list-view-read-more" href="' . tribe_get_event_link() . '">View Event</a>';
    },
    10,
    3
);
To style the link, add the following CSS to Appearance → Customize → Additional CSS or your child theme’s stylesheet and adjust as needed:
.list-view-read-more {
    background-color: #000;
    color: #fff;
    padding: 10px 15px;
    border-radius: 3px;
    text-decoration: none;
}

.list-view-read-more:hover {
    background-color: #fff;
    color: #000;
}
Customizing the Event Description
Hiding the Description
To hide the event description entirely in List View, add the following CSS to Appearance → Customize → Additional CSS or your child theme’s stylesheet. If you are using a caching plugin, clear your cache after saving.
.tribe-events-calendar-list__event-details .tribe-events-calendar-list__event-description p {
    display: none;
}
Controlling the Excerpt Length
By default, TEC uses the event’s excerpt field when rendering the description in List View. There are two ways to control the length.
Method 1: Template Override
For precise control over word count and HTML stripping, override the description template. Copy the file from:
wp-content/plugins/the-events-calendar/src/views/v2/list/event/description.php
to:
[your-child-theme]/tribe/events/v2/list/event/description.php
Open the copied file and replace the line:
<?php echo (string) $event->excerpt; ?>
with:
<?php
    // Get the full content of the event post
    $full = get_the_content( null, false, get_the_ID() );

    // Strip all HTML tags to prevent markup issues
    $plain = wp_strip_all_tags( $full );

    // Trim to 20 words, appending "..." if longer
    echo wp_trim_words( $plain, 20, '...' );
?>
Change 20 to your preferred word count. Event descriptions longer than that number will be truncated; shorter ones will display in full.
Method 2: The excerpt_length Filter
For a simpler code-only approach that applies globally (not just List View), add this to your functions.php file:
add_filter( 'excerpt_length', function ( $length ) {
    return 20; // Change 20 to the number of words you want to display.
}, 99 );
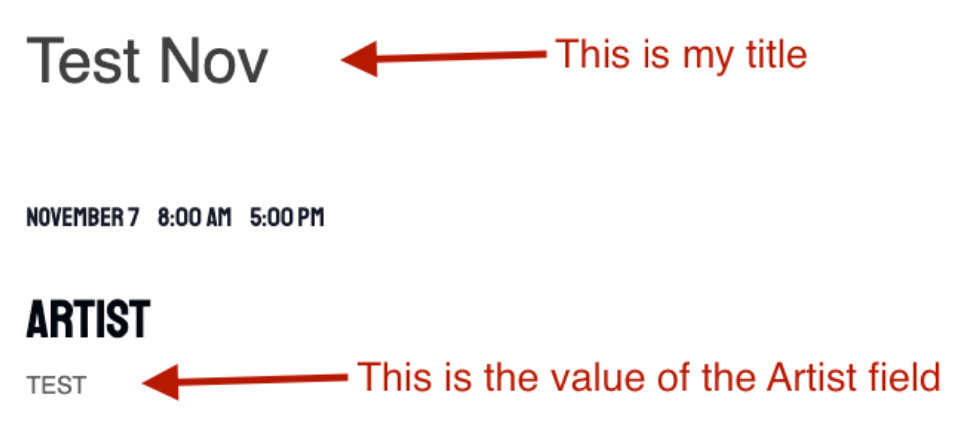
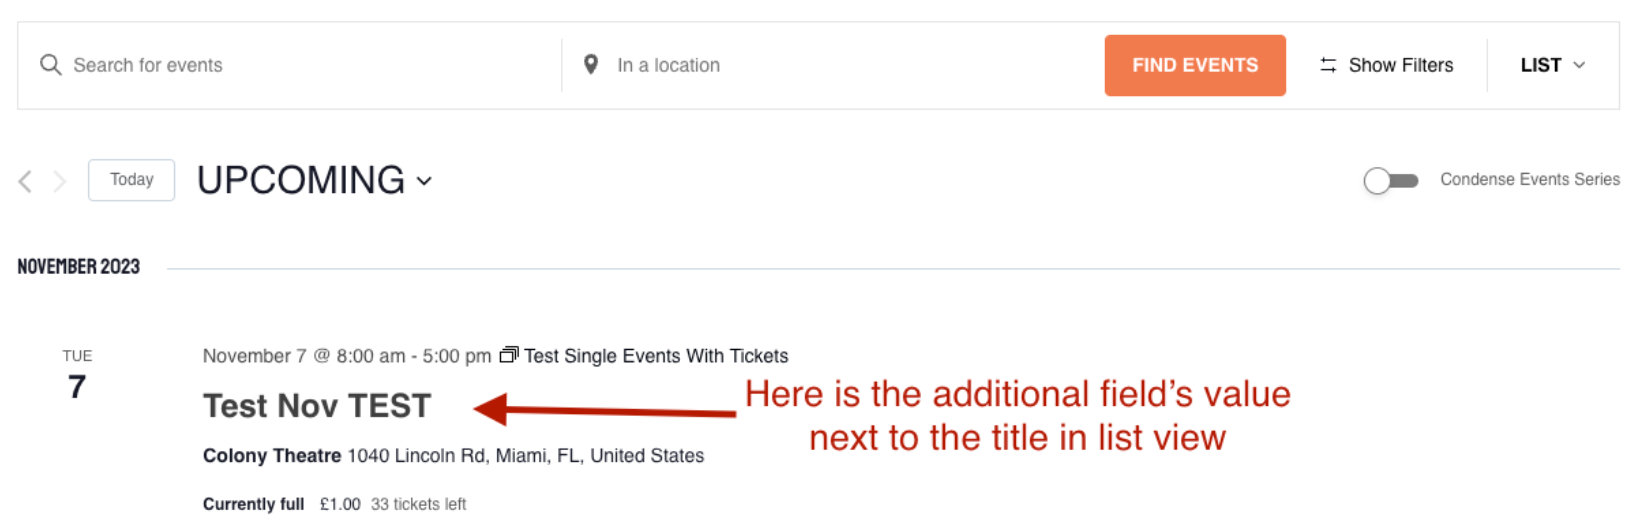
Displaying Additional Fields Next to the Title
With Events Calendar Pro, you can add custom Additional Fields to events and display their values alongside the event title in List View using a template override of the title template.
Copy the file from:
wp-content/plugins/the-events-calendar/src/views/v2/list/event/title.php
to:
[your-child-theme]/tribe/events/v2/list/event/title.php
Replace the contents with the following, adjusting 'Artists' to match your Additional Field name:
<h3 class="tribe-events-calendar-list__event-title tribe-common-h6 tribe-common-h4--min-medium">
    <a
        href="<?php echo esc_url( $event->permalink ); ?>"
        title="<?php echo esc_attr( $event->title ); ?>"
        rel="bookmark"
        class="tribe-events-calendar-list__event-title-link tribe-common-anchor-thin"
    >
        <?php
        // phpcs:ignore
        echo $event->title;

        // Fetch all custom fields and their values for this event.
        $fields = tribe_get_custom_fields( $event->ID );

        // If there is an "Artists" field, print its value.
        if ( ! empty( $fields['Artists'] ) ) :
            echo ' ' . esc_html( $fields['Artists'] );
        endif;
        ?>
    </a>
</h3>
Using Custom Featured Image Sizes
The default List View template uses the plugin’s internal $event->thumbnail object to render featured images, which does not recognize custom image sizes registered in your theme via add_image_size(). To use a custom size, you need to override the featured image template and switch to get_the_post_thumbnail().
Copy the file from:
wp-content/plugins/the-events-calendar/src/views/v2/list/event/featured-image.php
to:
[your-child-theme]/tribe/events/v2/list/event/featured-image.php
Replace the contents with:
<?php
/**
 * Template override to use custom theme image sizes.
 */
if ( ! has_post_thumbnail( $event->ID ) ) {
    return;
}
?>

<div class="tribe-events-calendar-list__event-featured-image-wrapper tribe-common-g-col">
    <?php
    echo get_the_post_thumbnail(
        $event->ID,
        'your-custom-size-name', // Replace with your theme's image size slug
        [
            'class'   => 'tribe-events-calendar-list__event-featured-image',
            'loading' => 'lazy',
        ]
    );
    ?>
</div>
Replace 'your-custom-size-name' with the slug you registered in your theme’s functions.php, for example add_image_size( 'event-list-thumb', 480, 320, true ).
After saving: If you recently added the new image size, existing images won’t have it yet — use a plugin like Regenerate Thumbnails to generate the new sizes for existing uploads. Then clear any site or server caching.
Making the Featured Image Link to the Event
In recent versions of TEC, featured images in List View are intentionally not linked to the single event page. This was an accessibility improvement to avoid redundant links (since the event title already links to the page). If you prefer the image to be clickable, the following filter wraps it in a link.
This can be added to your child theme’s functions.php or via Code Snippets. You can also create a template override — see below for both approaches.
Option A: Filter (no template file needed)
add_filter(
    'tribe_template_html:events/v2/list/event/featured-image',
    function ( $html, $file, $name, $template ) {
        $event = $template->get( 'event' );

        $anchor_open = sprintf(
            '<a href="%s" title="%s" rel="bookmark" class="tribe-events-calendar-list__event-featured-image-link" tabindex="-1" aria-hidden="true">',
            esc_url( $event->permalink ),
            esc_attr( $event->title )
        );

        $html = preg_replace( '/(<img[^>]*>)/', $anchor_open . '$1</a>', $html );

        return $html;
    },
    10,
    4
);
Option B: Template Override
Create the folder structure in your child theme:
[your-child-theme]/tribe/events/v2/list/event/featured-image.php
Add the following contents:
<?php
/**
 * View: List View - Event Featured Image (linked to single event)
 */
if ( ! $event->thumbnail->exists ) {
    return;
}
?>
<div class="tribe-events-calendar-list__event-featured-image-wrapper">
    <a
        href="<?php echo esc_url( $event->permalink ); ?>"
        title="<?php echo esc_attr( $event->title ); ?>"
        class="tribe-events-calendar-list__event-featured-image-link"
    >
        <img
            src="<?php echo esc_url( $event->thumbnail->full->url ); ?>"
            <?php if ( ! empty( $event->thumbnail->srcset ) ) : ?>
                srcset="<?php echo esc_attr( $event->thumbnail->srcset ); ?>"
            <?php endif; ?>
            <?php if ( ! empty( $event->thumbnail->alt ) ) : ?>
                alt="<?php echo esc_attr( $event->thumbnail->alt ); ?>"
            <?php else : ?>
                alt=""
            <?php endif; ?>
            class="tribe-events-calendar-list__event-featured-image"
        />
    </a>
</div>
Full-Width Layout When No Featured Image Is Present
By default, the List View layout reserves space for a featured image on the left of each event card. When an event has no image, this can leave the event content looking narrow. The following snippet detects events without a featured image after the page loads and expands the content area to full width for those events.
add_action( 'wp_footer', function() {
    ?>
    <script>
    jQuery(document).ready(function($) {
        // Find every event in the List View
        $('.tribe-events-calendar-list__event').each(function() {
            // Check if the featured image wrapper is NOT present
            if ( $(this).find('.tribe-events-calendar-list__event-featured-image-wrapper').length === 0 ) {
                // If no image, set the event details to 100% width
                $(this).find('.tribe-events-calendar-list__event-details').css('width', '100%');
            }
        });
    });
    </script>
    <?php
} );
After adding the snippet, clear any site cache to ensure the script loads on the front end.
Link Featured Image to Event Page
Accessibility Note: When both the event image and the title link to the same page, it creates what’s known as redundant links, which can confuse assistive technologies. According to accessibility standards like WCAG 2.1 (specifically criteria 2.4.4 and 1.1.1), redundant or ambiguous links can make it harder for users with visual or cognitive impairments to understand and navigate your content effectively.
add_filter( 'tribe_template_html:events/v2/list/event/featured-image', function ( $html, $file, $name, $template ) {
	$event = $template->get( 'event' );

	// Build anchor output
	$anchor_open = sprintf(
		'<a href="%s" title="%s" rel="bookmark" class="tribe-events-calendar-list__event-featured-image-link" tabindex="-1" aria-hidden="true">',
		esc_url( $event->permalink ),
		esc_attr( $event->title )
	);

	// Wrap img with anchor
	$html = preg_replace(
		'/(<img[^>]*>)/',
		$anchor_open . '$1</a>',
		$html
	);

	return $html;
}, 10, 4 );
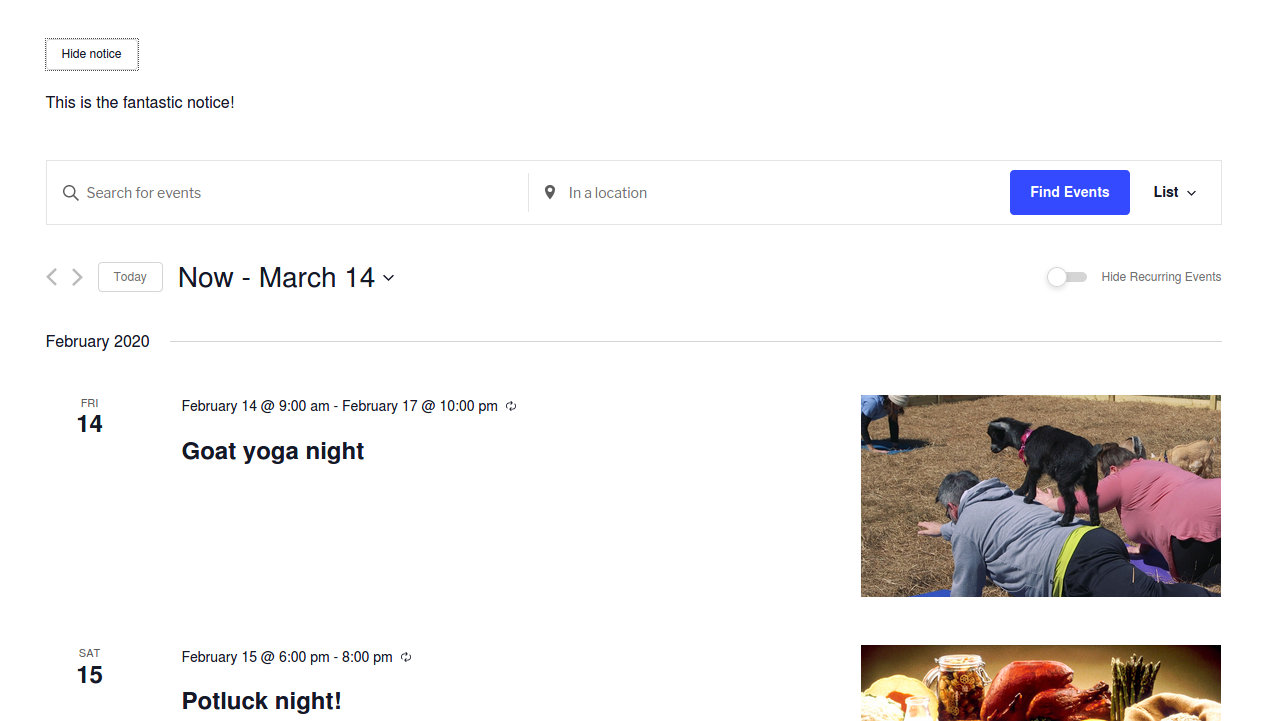
Advanced: Adding a Notice Toggle Above the Calendar
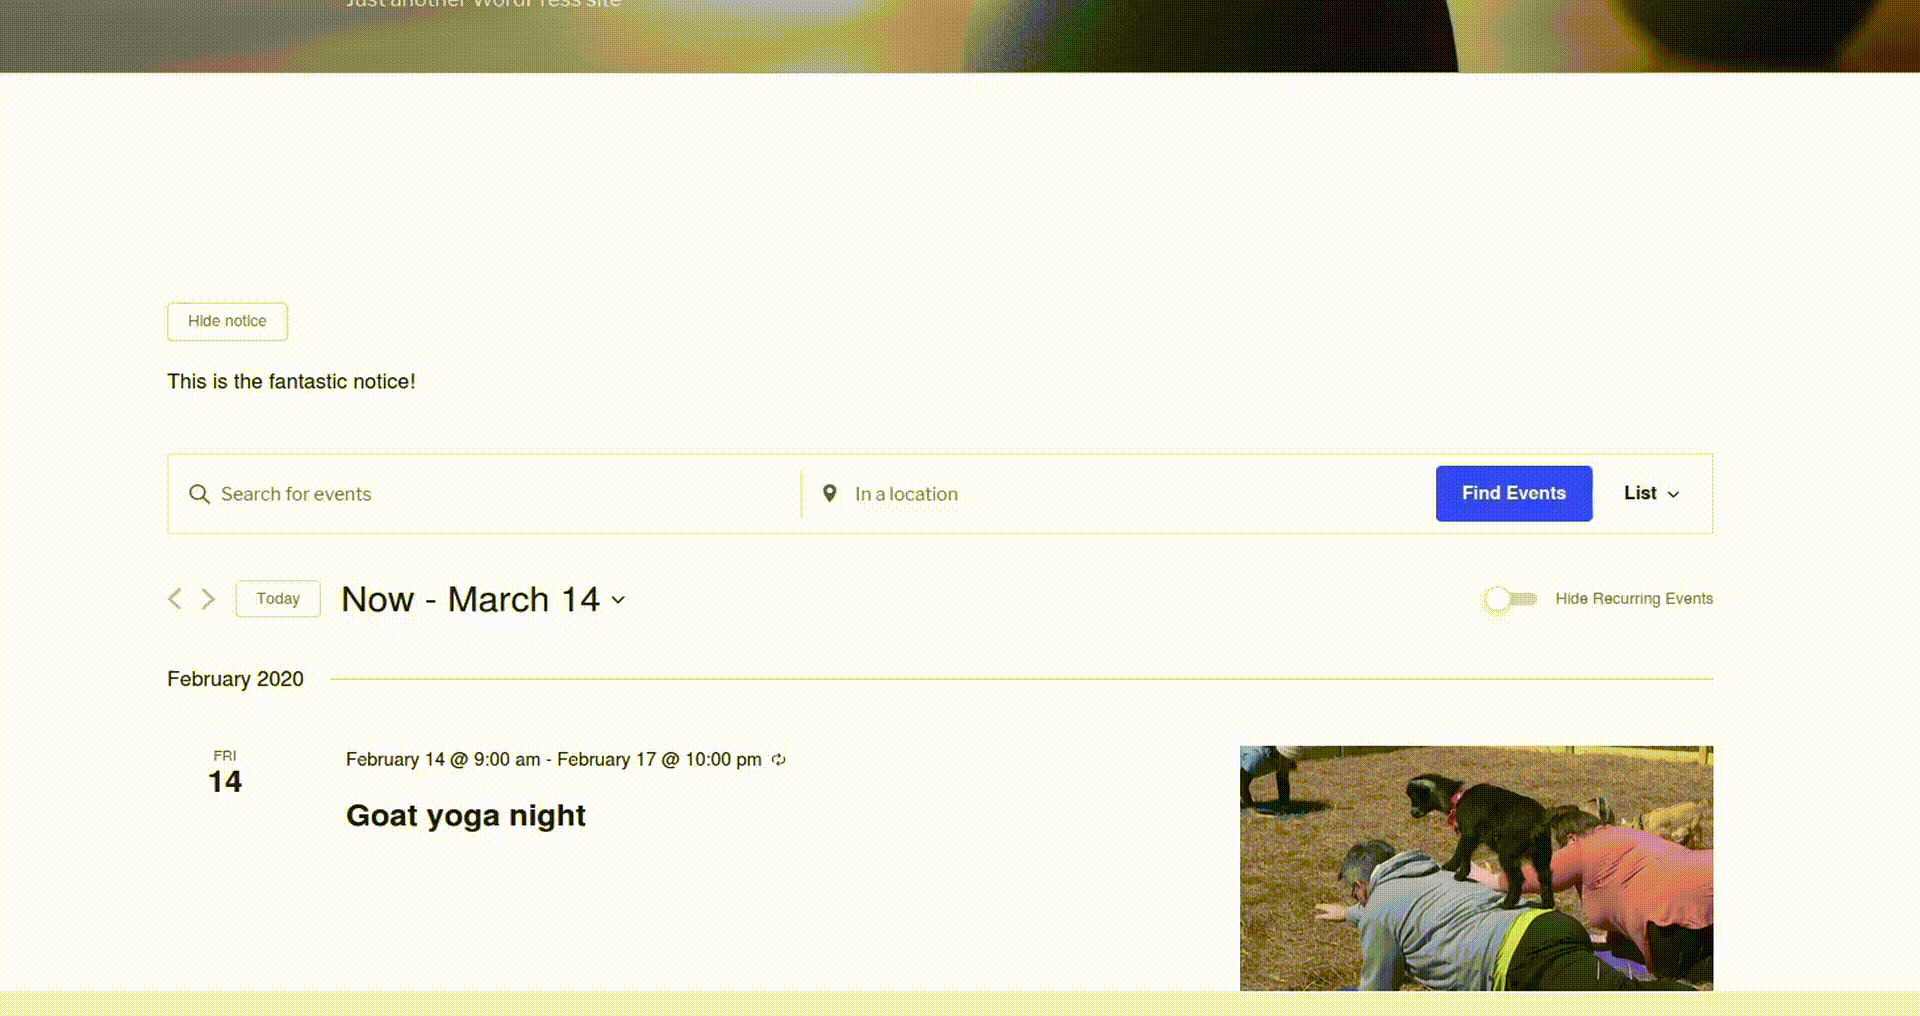
The Events Calendar includes a built-in accordion JavaScript utility that you can hook into for your own customizations. The following example uses it to add a toggleable notice above the List View’s search/filter bar. This customization involves a template override of the top-level list.php, a new notice.php partial, CSS, and a JavaScript file.
Step 1: Override the List View Template
Copy the file from:
/wp-content/plugins/the-events-calendar/src/views/v2/list.php
to:
[your-child-theme]/tribe/events/v2/list.php
Edit the copied file to add $this->template( 'list/notice' ); inside the main container, just before the <header>. The relevant section should look like this:
<div class="tribe-common-l-container tribe-events-l-container">
    <?php $this->template( 'components/loader', [ 'text' => __( 'Loading...', 'the-events-calendar' ) ] ); ?>
    <?php $this->template( 'components/data' ); ?>
    <?php $this->template( 'components/before' ); ?>
    <?php $this->template( 'list/notice' ); ?>

    <header <?php tribe_classes( $header_classes ); ?>>
        <?php $this->template( 'components/messages' ); ?>
        <?php $this->template( 'components/breadcrumbs' ); ?>
        <?php $this->template( 'components/events-bar' ); ?>
        <?php $this->template( 'list/top-bar' ); ?>
    </header>
    ...
Step 2: Create the Notice Template
Create a new file at:
[your-child-theme]/tribe/events/v2/list/notice.php
Add the following HTML. The data-js attributes connect the elements to the JavaScript accordion, and the aria attributes improve accessibility.
<div class="tribe-events-list-notice__wrapper" data-js="tribe-events-list-notice-wrapper">
    <button
        class="tribe-events-list-notice__trigger tribe-common-c-btn-border"
        data-js="tribe-events-list-notice-trigger"
        aria-controls="tribe-events-list-notice"
        aria-expanded="true"
    >
        <?php esc_html_e( 'Hide notice', 'your-text-domain' ); ?>
    </button>
    <div
        class="tribe-events-list-notice__notice tribe-events-list-notice__notice--show"
        id="tribe-events-list-notice"
        aria-hidden="false"
    >
        <p class="tribe-events-list-notice__notice-text tribe-common-b1">
            <?php esc_html_e( 'This is the fantastic notice!', 'your-text-domain' ); ?>
        </p>
    </div>
</div>
Step 3: Add the CSS
Add the following to your child theme’s stylesheet or Appearance → Customize → Additional CSS:
.tribe-events .tribe-events-list-notice__wrapper {
    padding-bottom: 30px;
}

.tribe-common--breakpoint-medium.tribe-events .tribe-events-list-notice__wrapper {
    padding-bottom: 45px;
}

.tribe-events .tribe-events-list-notice__notice {
    display: none;
    padding-top: 15px;
}

.tribe-events .tribe-events-list-notice__notice--show {
    display: block;
}

.tribe-common--breakpoint-medium.tribe-events .tribe-events-list-notice__notice {
    padding-top: 20px;
}
Step 4: Create the JavaScript File
Create the file at [your-child-theme]/assets/js/list-notice.js (adjust the path if you prefer a different location):
var listNotice = {};

( function( $, obj, manager, accordion ) {
    'use strict';
    var $document = $( document );

    obj.selectors = {
        listNoticeWrapper: '[data-js="tribe-events-list-notice-wrapper"]',
        listNoticeTrigger: '[data-js="tribe-events-list-notice-trigger"]',
        listNoticeShowClass: '.tribe-events-list-notice__notice--show',
    };

    obj.handleClick = function( event ) {
        var $trigger = event.data.trigger;
        var open = $trigger.attr( 'aria-expanded' ) === 'true';

        var text = open ? 'Hide notice' : 'Show notice';
        $trigger.text( text );

        var $wrapper = $trigger.closest( obj.selectors.listNoticeWrapper );
        var $notice = $wrapper.find( '#' + $trigger.attr( 'aria-controls' ) );
        open
            ? $notice.addClass( obj.selectors.listNoticeShowClass.className() )
            : $notice.removeClass( obj.selectors.listNoticeShowClass.className() );
    };

    obj.deinitTrigger = function( $container ) {
        var $trigger = $container.find( obj.selectors.listNoticeTrigger );
        accordion.deinitAccordion( 0, $trigger );
    };

    obj.initTrigger = function( $container, $trigger ) {
        accordion.initAccordion( $container )( 0, $trigger );
    };

    obj.bindEvents = function( $trigger ) {
        $trigger.on( 'click', { trigger: $trigger }, obj.handleClick );
    };

    obj.deinit = function( event, jqXHR, settings ) {
        var $container = event.data.container;
        obj.deinitTrigger( $container );
        $container.off( 'beforeAjaxSuccess.tribeEvents', obj.deinit );
    };

    obj.init = function( event, index, $container, data ) {
        var $trigger = $container.find( obj.selectors.listNoticeTrigger );

        if ( ! $trigger.length ) {
            return;
        }

        obj.initTrigger( $container, $trigger );
        obj.bindEvents( $trigger );
        $container.on( 'beforeAjaxSuccess.tribeEvents', { container: $container }, obj.deinit );
    };

    obj.ready = function( event ) {
        manager = tribe.events.views.manager;
        manager.$containers.each( function( index, container ) {
            var $container = $( container );
            obj.init( event, index, $container, manager.getContainerData( $container ) );
        } );
        $document.on( 'afterSetup.tribeEvents', manager.selectors.container, obj.init );
    };

    $document.ready( obj.ready );
} )( jQuery, listNotice, tribe.events.views.manager, tribe.events.views.accordion );
Step 5: Enqueue the JavaScript File
Add the following to your child theme’s functions.php to load the script, which depends on TEC’s built-in accordion utility:
function add_list_notice_js() {
    wp_enqueue_script(
        'custom-list-notice-js',
        get_stylesheet_directory_uri() . '/assets/js/list-notice.js',
        [ 'tribe-events-views-v2-accordion' ],
        false,
        true
    );
}
add_action( 'wp_enqueue_scripts', 'add_list_notice_js' );
Visit your List View page and you should see the working notice toggle.