Customizing Styles with CSS and PHP
Sometimes the default styling of Community Events needs to be customized to fit a particular theme. There are two main methods for writing CSS that only targets Community Events pages: using CSS only, or using a combination of CSS and PHP.
CSS Only: Body Classes
Any correctly-made WordPress theme will make use of the WordPress Core function body_class(), which allows plugins and themes to add custom CSS classes to the HTML body tag.
Community Events adds the following class names to the body of Community Events pages:
.tribe_community_edit: This class is only used on Community Events submission pages..tribe_community_list: This class is only used on Community Events “My Events” pages.
☝️ For a quick example of using these classes effectively, here’s a bit of example code that would make the Event Title label text on the Community Events submission form red:
body.tribe_community_edit .events-community-post-title label {
  color: red;
}
CSS and PHP: Template Tags
The above method — using HTML body classes — allows you to easily write custom CSS for Community Events pages with just CSS. No PHP is required.
You could use PHP to print CSS directly onto Community Events pages, though. There are a number of reasons why one might want to do this, and these same methods could be used to print JavaScript onto Community Events pages, too, so they’re worth describing.
The two main template tags you’ll want to be aware of in this sort of situation are as follows:
tribe_is_community_edit_event_page(): Returns true only if the Community Events submission page is currently being viewed.tribe_is_community_my_events_page(): Returns true only if the Community Events “My Events” page is currently being viewed.
You could use these template tags to print CSS or JavaScript onto Community Events pages with a PHP snippet like the following, which hooks into WordPress’ wp_head action to print CSS if you’re on either the submission page or the “My Events” list page.
<?php
/**
 * Adds CSS or JS to the top of Community Events' submission and "My Events" pages.
 */
function teckb_events_community_css() {

  if ( ! tribe_is_community_edit_event_page() && ! tribe_is_community_my_events_page() ) {
    return;
  }
?>

<style>
.insert-your-custom-css-here {
    background: black;
    color: blue;
}
</style>

<script>
console.log( 'You can also insert JavaScript, although this may be best in the wp_footer hook' );
</script>

<?php
}

add_action( 'wp_head', 'teckb_events_community_css' );
Make Form Fields Required
This tutorial is only suggested as a starting place. You’ll need to customize the code examples for your own specific needs.
By default, only the Event Title and Event Description fields are required on the Community Events submission form. But you can use plugin filters to modify what fields are required and/or what error messages display when a required field hasn’t been filled out by the submitter.
You can specify event fields for requirement by using this filter: tribe_events_community_required_fields
To make the Event URL field required for submission, for example, you could add the following snippet of code to your site:
add_filter( 'tribe_events_community_required_fields', 'my_community_required_fields', 10, 1 );

function my_community_required_fields( $fields ) {

  if ( ! is_array( $fields ) ) {
    return $fields;
  }

  $fields[] = 'EventURL';

  return $fields;
}
The (required) label should automatically be added after the field label, if the field is required.
You can see a full list of the default fields below. It’s worth mentioning that there are also two “shortcut” fields you can specify for the tribe_events_community_required_fields filter: venue and organizer. These two shortcuts make the entire venue section or organizer section required, respectively. If either is added via the tribe_events_community_required_fields filter, then the user has to pick an existing venue or organizer option or create a new one—the venue or organizer can’t be left.
Default Event Fields
- post_content
- event_image
- EventStartDate
- EventStartHour
- EventStartMinute
- EventStartMeridian
- EventEndDate
- EventEndMinute
- EventEndHour
- EventEndMeridian
- is_recurring
- EventCurrencySymbol
- tax_input.tribe_events_cat (for event categories)
- venue
- organizer
- EventShowMapLink
- EventURL
Venue Fields
You can specify venue fields for requirement by using this filter:
- tribe_events_community_required_venue_fields
To make the venue URL and phone number required, for example, you could write the following snippet:
add_filter( 'tribe_events_community_required_venue_fields', 'my_venue_community_required_fields' );

function my_venue_community_required_fields( $fields ) {

  if ( ! is_array( $fields ) ) {
    return $fields;
  }

  $fields[] = 'Phone';
  $fields[] = 'URL';

  return $fields;
}
In order for the above snippet to work, it is necessary to also require the venue field itself. You can do that with the following snippet:
add_filter( 'tribe_events_community_required_fields', 'my_community_required_fields' );

function my_community_required_fields( $fields ) {

  if ( ! is_array( $fields ) ) {
    return $fields;
  }

  $fields[] = 'venue';

  return $fields;
}
Default Venue Fields
- Venue (the Venue Name)
- Address
- City
- Province
- State
- Zip
- Phone
- URL
Organizer Fields
You can specify organizer fields for requirement by using this filter:
- tribe_events_community_required_organizer_fields
To make the organizer email address required, for example, you could write the following snippet:
add_filter( 'tribe_events_community_required_organizer_fields', 'my_organizer_community_required_fields' );

function my_organizer_community_required_fields( $fields ) {

  if ( ! is_array( $fields ) ) {
    return $fields;
  }

  $fields[] = 'Email';

  return $fields;
}
In order for the above snippet to work, it is necessary to also require the organize field itself. You can do that with the following snippet:
add_filter( 'tribe_events_community_required_fields', 'my_community_required_fields' );

function my_community_required_fields( $fields ) {

  if ( ! is_array( $fields ) ) {
    return $fields;
  }

  $fields[] = 'organizer';

  return $fields;
}
Default Organizer Fields
- Organizer (the organizer name)
- Phone
- Website
Additional Fields
If you are using Events Calendar Pro along with The Events Calendar, then you can make use of the Additional Fields feature to collect extra information for Events. You can make any additional field a required field by using the following example snippet.
Note: you will need to get the names (e.g. _ecp_custom_2) of the fields after setting them up and change them in the code.
add_filter( 'tribe_events_community_required_fields', 'my_community_required_fields' );

function my_community_required_fields( $fields ) {
  if ( ! is_array( $fields ) ) {
    return $fields;
  }
  $fields[] = '_ecp_custom_2'; // this is the field name for the input you want to require
  $fields[] = '_ecp_custom_3'; // this is another input you wish to require
  return $fields;
}
The “required” label will not show up automatically for Additional Fields. You can fix that with the following sample snippet:
add_filter( 'tribe_community_events_field_label_text', 'tec_additional_fields_required_labels', 10, 2 );

function tec_additional_fields_required_labels( $text, $field ) {
  // Bail, if it's not the Additional Field.
	if ( ! strstr( $field, '_ecp_custom_2' ) ) {
		return $text;
	}

  // Add the "required" label.
	return $text . ' <span class="req">(required)</span>';
}
The last step is to add the snippet that includes the custom field in the list of allowed fields.
add_filter( 'tec_events_community_allowed_fields', 'my_community_allowed_fields' );

function my_community_allowed_fields( $fields ) {
  if ( ! is_array( $fields ) ) {
    return $fields;
  }
  $fields[] = '_ecp_custom_2';
  return $fields;
}
☝️ Note: Make sure to change _ecp_custom_2 to a field

Customize the “(required)” Label
Customizing the label is also possible through a filter. See the below example, which changes the label to “must be filled”.
add_filter( 'tribe_community_required_field_marker', 'tec_ce_custom_required_label', 10, 2 );

function tec_ce_custom_required_label ( $html, $field ) {
	$html = ' <span class="req">' . '(must be filled)' . '</span>';

	return $html;
}
It is possible to customize the label for certain fields only. For that you can use the $field parameter that is being passed.
Custom Error Messages
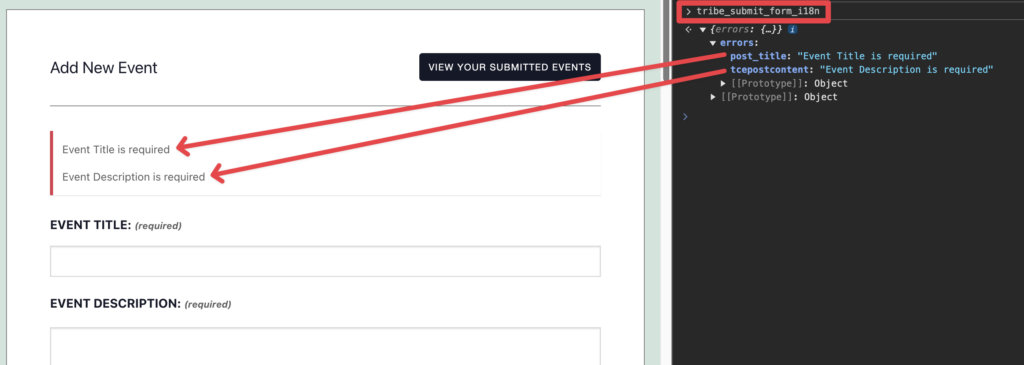
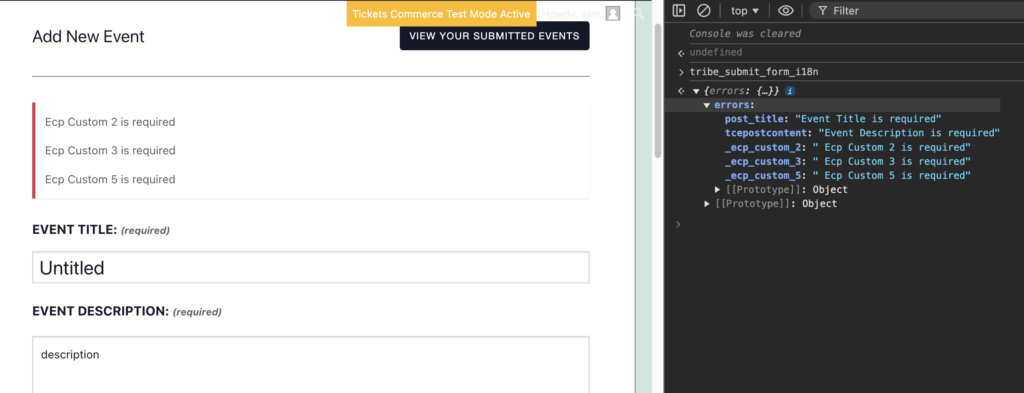
First, let’s understand where these error messages are coming from. If you go to your Event Submission page and try to submit an event without a title and description, you can use Chrome Dev Tools to inspect the page and use the console to enter tribe_submit_form_i18n . This will show the object errors where all the errors are stored. They all have key-value pair – in this case the key is the label for the field and the value is the error message to be output.
Since these errors are added through a script, we can use a snippet that modifies the script to update error messages:
add_action( 'wp_enqueue_scripts', function ( ) {
// Ensure the script is enqueued
	wp_enqueue_script( 'tribe_events-community' );

// Modify the localization data
	wp_add_inline_script( 'tribe_events-community', '
        if ( tribe_submit_form_i18n.errors[ "post_title" ] ) { // Tweak to match which field you want to change
        tribe_submit_form_i18n.errors[ "post_title" ] = "You cannot submit an event without a title"; // Tweak to match what message you want to output
        }
    ', 'before' );
}, 20 );
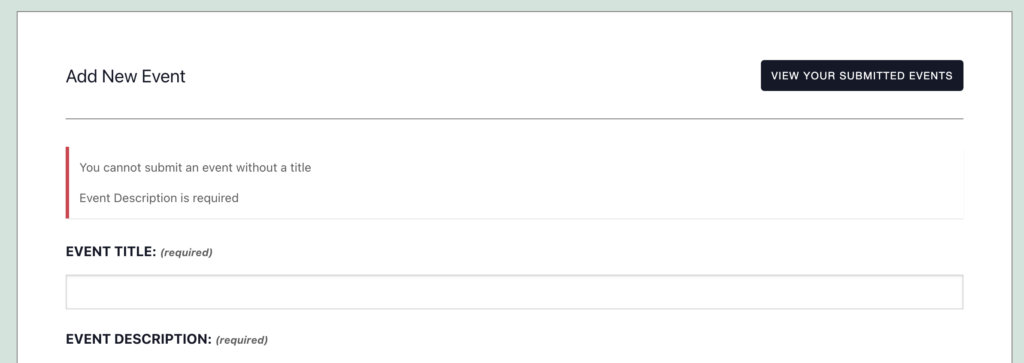
Here is how that would affect the frontend:
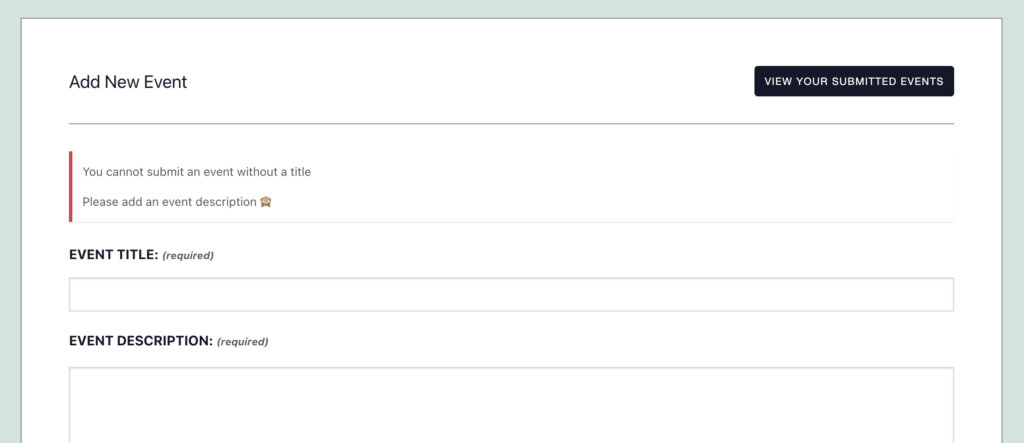
Let’s add to the Event Description to the same example:
add_action( 'wp_enqueue_scripts', function ( ) {
		// Ensure the script is enqueued.
		wp_enqueue_script( 'tribe_events-community' );

		// Modify the localization data.
		wp_add_inline_script(
			'tribe_events-community',
			'if ( tribe_submit_form_i18n.errors["post_title"] ) {
        tribe_submit_form_i18n.errors[ "post_title" ] = "You cannot submit an event without a title";
        }
        if ( tribe_submit_form_i18n.errors[ "tcepostcontent" ] ) {
        tribe_submit_form_i18n.errors[ "tcepostcontent" ] = "Please add an event description 🙈";
        }',
			'before'
		);
	}
);
And here is how that would affect the frontend:
Custom Errors for Custom Fields
In the case where you have set up requiring fields other than the default, it is still possible to tweak the error message(s). For this example, these are the Additional Fields we will be requiring and altering the error message:
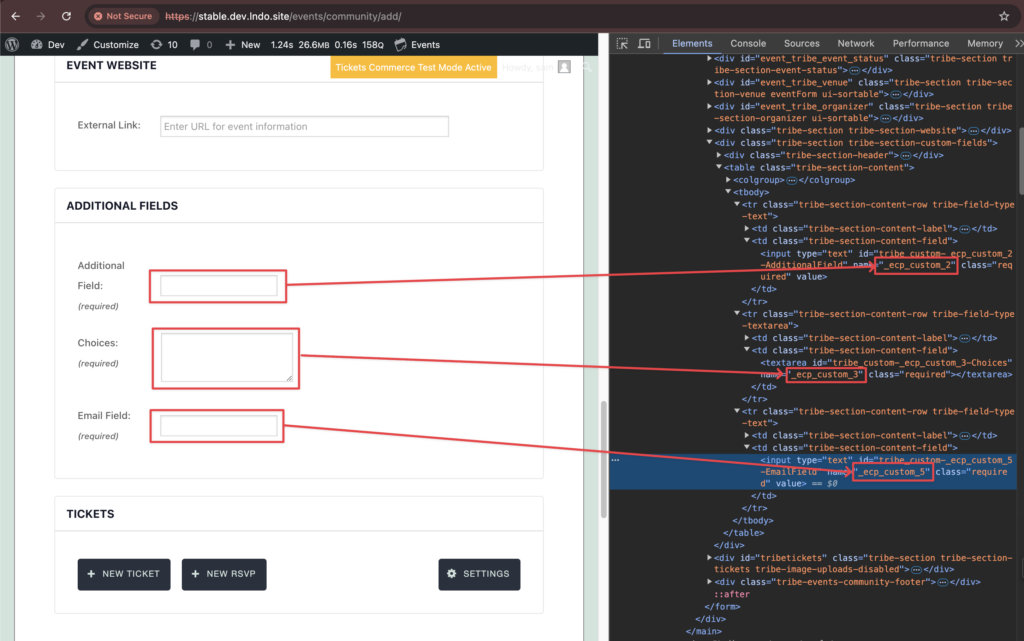
Here’s an example using the required addition fields from above:
function my_community_required_fields( $fields ) {
	if ( ! is_array( $fields ) ) {
		return $fields;
	}
	$fields[] = '_ecp_custom_2';
	$fields[] = '_ecp_custom_3';
	$fields[] = '_ecp_custom_5';
	return $fields;
}

add_filter( 'tec_events_community_allowed_fields', 'my_community_allowed_fields' );

function my_community_allowed_fields( $fields ) {
	if ( ! is_array( $fields ) ) {
		return $fields;
	}
	$fields[] = '_ecp_custom_2';
	$fields[] = '_ecp_custom_3';
	$fields[] = '_ecp_custom_5';
	return $fields;
}

add_filter( 'tribe_community_events_field_label_text', 'tec_additional_fields_required_labels', 10, 2 );

function tec_additional_fields_required_labels( $text, $field ) {
	// Add required label if it is one of the Additional Fields.
	if ( strstr( $field, '_ecp_custom_2') ) {
		return $text . ' <span class="req">(required)</span>';
	}
	if ( strstr( $field, '_ecp_custom_3') ) {
		return $text . ' <span class="req">(required)</span>';
	}
	if ( strstr( $field, '_ecp_custom_5') ) {
		return $text . ' <span class="req">(required)</span>';
	}

    // If it's not one of the Additional Fields we require, just return the label
    return $text;
}
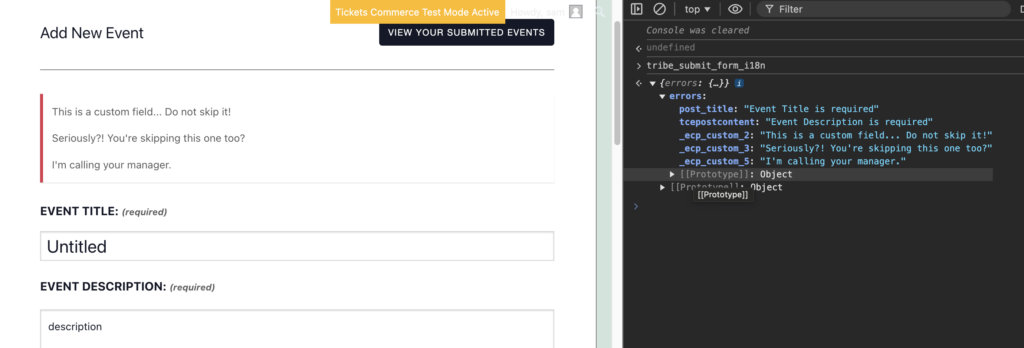
Without adding our snippet to change the error messages, this is what will now show when these required fields are empty and someone tries to submit the event:
To enhance the clarity of your error messages by pinpointing the required fields, you can integrate the following code snippet into your site:
<?php //Do not copy this line

add_filter( 'tribe_community_form_field_label', function ( $label, $field ) {
	// Check if the field does not match '_ecp_custom_X' pattern
	if ( ! preg_match( '/^_ecp_custom_\d+$/', $field ) || ! tribe_is_community_edit_event_page() ) {
		return $label;
	}

	$custom_fields = tribe_get_option( 'custom-fields', array() );

	foreach ( $custom_fields as $custom_field ) {
		if ( in_array( $field, $custom_field ) ) {
			$label = $custom_field['label'];
		}
	}

	return $label;
}, 10, 2 );
With the snippet added, the error message will change from “Ecp custom 2 is required” to “Additional Field is required,” as the snippet replaces the field key (_ecp_custom_2) with the field label.
Another approach is to customize the error message completely; however, this works only for fields that don’t require a page reload. This is the snippet that we can add to adjust those error messages:
add_action(
	'wp_enqueue_scripts',
	function ( ) {
		// Ensure the script is enqueued.
		wp_enqueue_script( 'tribe_events-community' );

		// Modify the localization data.
		wp_add_inline_script(
			'tribe_events-community',
			'if ( tribe_submit_form_i18n.errors[ "_ecp_custom_2" ] ) {
        tribe_submit_form_i18n.errors[ "_ecp_custom_2" ] = "This is a custom field... Do not skip it!";
        }
        if (tribe_submit_form_i18n.errors[ "_ecp_custom_3" ] ) {
        tribe_submit_form_i18n.errors[ "_ecp_custom_3" ] = "Seriously?! You\'re skipping this one too?";
        }
        if (tribe_submit_form_i18n.errors[ "_ecp_custom_5" ] ) {
        tribe_submit_form_i18n.errors[ "_ecp_custom_5" ] = "I\'m calling your manager.";
        }',
			'before'
		);
	}
);
And here is how that snippet will change those error messages:
You should tweak that snippet to match the additional field you want to change and adjust the error message(s) to be how you want them to show on your site.
Remove Fields from the Submission Form
The tec_events_community_form_layout filter hook is a powerful tool that controls the layout and available fields in the submission form. Using this filter hook, you can customize the form to suit your specific needs.
The following code allows you to easily modify the list of fields to remove by editing the $fields_to_remove array.
add_filter( 'tec_events_community_form_layout', function ( $fields ) {

	// Define the fields/modules you want to remove
	$fields_to_remove = [
		'image',                    // Event Image
		'event-taxonomy_event',     // Event Categories
		'event-taxonomy_tag',       // Event Tags
		'event-cost',               // Event Cost
		'terms',                    // Terms and Conditions
	];

	// Remove the specified fields/modules
	return array_diff_key( $fields, array_flip( $fields_to_remove ) );

}, 20 );
Removable Submission Form Fields
Below is a list of fields available in the Community events submission form that you can control with the tec_events_community_form_layout filter hook:
| Field Key | Description |
|---|---|
title | Event Title |
description | Event Description |
event-datepickers | Event Date & Time Pickers |
image | Event Image |
event-taxonomy_event | Event Categories |
event-taxonomy_tag | Event Tags |
event-venue | Event Venue |
event-organizer | Event Organizer |
event-website | Event Website URL |
event-series | Event Series |
event-custom | Custom Fields |
event-cost | Event Cost |
spam-control | Spam Control (reCAPTCHA or similar) |
terms | Terms and Conditions Acceptance |
Remove the Event Status Field
The Event Status field allows users to set the status of an event (e.g., Postponed or Moved Online). To remove this field from the submission form, use the following code:
add_filter( 'tribe_community_events_event_status_enabled', '__return_false' );
Remove Virtual Event Field
If you do not want users to leverage the virtual events functionality, you can disable this field with the following code:
add_filter( 'tribe_community_events_virtual_events_integration_enabled', '__return_false' );
Exclude Specific Event Categories & Tags from Form
You might want to prevent users from selecting specific categories or tags when submitting an event. This is useful for hiding internal-use-only categories or tags that shouldn’t be publicly visible. This guide shows you how to use a single code snippet to hide both event categories and event tags from the submission form dropdowns.
The following code uses the tribe_dropdown_search_terms filter, which specifically targets the AJAX-powered dropdowns in The Events Calendar. By using this filter, you can control what options are available to event submitters, keeping internal or restricted terms hidden from view.
The snippet allows you to define the IDs for categories and tags you wish to exclude.
<?php

add_filter(
    'tribe_dropdown_search_terms',
    function( $data, $search, $page, $args, $source ) {

        $taxonomy = $args['taxonomy'];

        // IDs to exclude
        $exclude_map = [
            'tribe_events_cat' => [ 1, 2, 3, 4, 5 ], // Event category IDs
            'post_tag'         => [ 6, 7 ],       // Event tag IDs
        ];

        if ( ! isset( $exclude_map[ $taxonomy ] ) ) {
            return tribe( 'ajax.dropdown' )->search_terms( $search, $page, $args, $source );
        }

        $exclude_ids = $exclude_map[ $taxonomy ];

        $args['exclude'] = isset( $args['exclude'] )
            ? (array) $args['exclude']
            : [];

        $args['exclude'] = array_unique(
            array_merge(
                array_map( 'intval', $args['exclude'] ),
                $exclude_ids
            )
        );

        // Return modified dropdown search terms
        return tribe( 'ajax.dropdown' )->search_terms( $search, $page, $args, $source );
    },
    10,
    5
);
Note: You can exclude only one of these (category or tag) by tweaking the code. For example, if you want to only exclude categories, you can remove this line of code, so tags aren’t affected 'post_tag' => [ 6, 7 ], // Event tag IDs
How to Find IDs
To find the ID of any category or tag:
- In your WordPress dashboard, navigate to Events > Event Categories or Events > Tags.
- Hover your mouse over the name of the term you want to find the ID for. The
tag_IDin the URL is the ID, as shown below:

How to Use the Code
- Find the IDs of the categories and tags you want to hide.
- Add the snippet to your site’s
functions.phpfile or use a code snippet plugin. - Replace the placeholder IDs (e.g. 1,2,3,4,5,6,7) in the snippet with your own. You can add as many IDs as you need, separated by commas. The
'tribe_events_cat'array should contain your event category IDs. The'post_tag'array should contain your event tag IDs.
Modify the Successful Submission Message
To change the message that appears after successfully creating a new event with the Events Community “add event”, you can add the following PHP code snippet to your site:
add_filter( 'tribe_community_events_form_errors', function ( $errors ) {
    if ( empty( $errors ) ) {
        return $errors;
    }

    return array_map( function ( $error ) {
        if ( isset( $error['type'] ) && $error['type'] === 'success' ) {
            $error['message'] = '<p>Event Submitted.</p><p>Submitted events are published after review.</p>';
        }

        return $error;
    }, $errors );
} );
Limit the File Size Upload
To change the file size upload, simply add the following snippet to your theme’s functions.php file or via Code Snippets plugin:
add_filter( 'tribe_community_events_max_file_size_allowed', function() {
    return 1048576; // 1MB
} );
This will display both the file size restriction label and the corresponding error message upon submission, as shown below:

You can alter the number after the “return” portion of the snippet to customize the file size upload. The above option will give you a file size of 1MB.
Note: This snippet can be overridden by your server settings. If your server has a more restrictive setting, this will NOT override that. For example, if your server is already set to a max size of 1MB and you try to change it to 2MB, your server may block this from occurring.
Allow WebP Image Uploads
By default, the Community submission form allows to upload images in the following formats:
- GIF (
image/gif) - JPEG (
image/jpeg) - PNG (
image/png)
If you’d like to also allow WebP image uploads, you can do so by using the tec_events_community_image_mime_types filter to extend the accepted MIME types.
Add the following snippet to your theme’s functions.php file or use a plugin like Code Snippets:
add_filter( 'tec_events_community_image_mime_types', function( $mime_types ) {
    $mime_types[] = 'image/webp';
    return $mime_types;
} );
This snippet adds image/webp to the list of MIME types accepted by the Community Events image uploader. This enables users to submit images in the WebP format, which offers better compression and smaller file sizes compared to JPEG and PNG.
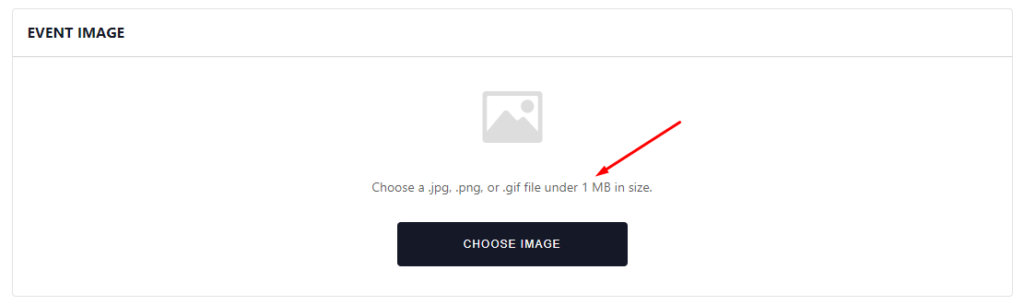
You may also want to update the image upload field text. The default image upload field text says:
“Choose a .jpg, .png, or .gif file under 300 MB in size.”
To reflect that WebP is also accepted, you’ll need to override the template that outputs this text.
Template to override: /wp-content/plugins/the-events-calendar-community-events/src/views/community/modules/image.php
Steps to override the template:
- Copy that file to your theme:
/wp-content/themes/your-theme/tribe-events/community/modules/image.php - Open the file and edit the text on line 50 to include .webp.
<p><?php echo esc_html( sprintf( __( 'Choose a .jpg, .png, .gif or .webp file under %1$s in size.', 'tribe-events-community' ), $size_format ) ); ?></p>
For Developers
- tec_events_community_form_layout
- tribe_community_events_event_status_enabled
- tribe_community_events_virtual_events_integration_enabled