The Events Calendar provides simple but robust timezone capabilities, allowing you to have events in many different timezones. Use this article to get familiar with all of the controls available to you, and to learn what kinds of output to expect from certain timezone configurations.
WordPress Timezones
There are two primary types of time zone in WordPress: locations (a.k.a. “named timezones”), and UTC offsets.
- Location timezones are usually in the format of
{Region}/{City}, likeAmerica/New_York, orEurope/Zurich. These are often the recommended time zones to use, as they accommodate daylight saving time. - UTC offsets, meanwhile, are usually in the format of
UTC±X, likeUTC-5orUTC+4:30. UTC offsets do not accommodate daylight saving time.
Location timezones are contextual, and say, “this is the time in this location.”
UTC offsets are absolute, meanwhile, and simply add or subtract hours from Coordinated Universal Time; no matter where the event is taking place, or whether daylight saving time is in effect, a timezone UTC-5 simply says, “get the UTC value and subtract five hours from it.”
In order for The Events Calendar to work properly, you must use a location-based timezone and avoid using UTC offsets. Using UTC offsets can cause problems with Daylight Saving Time, event imports, and event data handling.
If you don’t see your specific city in the dropdown list, just choose a different city in the same time zone and you’re set.
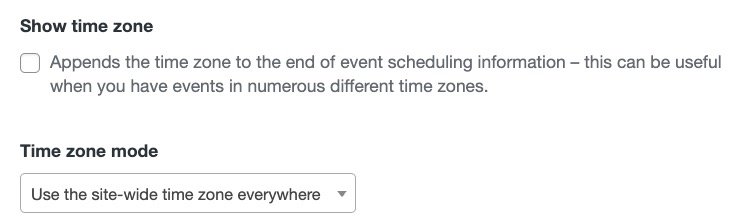
Choosing a Timezone Mode
If you go to Events → Settings → Display → Date & Time in your wp-admin and scroll down to the Date Format Settings section, you’ll see that there are two settings for the Time Zone Mode option: “Use the site-wide time zone everywhere”, and “Use manual time zones for each event”.
The Time Zone Mode tells The Events Calendar what time zone to display the event times in.
The Events Calendar’s Time Zone Settings
- In the “Use manual time zones for each event” mode, event times will be displayed in whatever timezone is selected for the event. Every event can use a different timezone (which we’ll cover in the next section), and will have their time displayed in terms of that timezone. You don’t have to manually set a timezone for every event. The default timezone will be whatever time zone you set in your WordPress general settings . Then, if you want to change that on any given event, you can.
- In the “Use the site-wide time zone everywhere” mode, all event times will be displayed in terms of whatever time zone you set in your WordPress general settings. For example, if your site timezone is set to Los Angeles (PST) and you create an event at 3:00 pm and set the timezone in the event editor to New York (EST), that event will show on the calendar at 12:00 pm PST because it is adjusted to be in the site time zone.
If you’re not sure which option is best for you, we generally recommend the “Use manual time zones for each event” mode. In this mode, you don’t have to specify event time zones — set your site time zone in your WordPress general settings. But then if you ever want to adjust the time zone for an individual event, the ability to do so is there.
Setting the Timezone for an Individual Event
If you’d like to change an event’s time zone, view the “edit” screen for the event and locate the time and date fields — you should notice a link that labels the event’s time zone, as shown in the following screenshot.
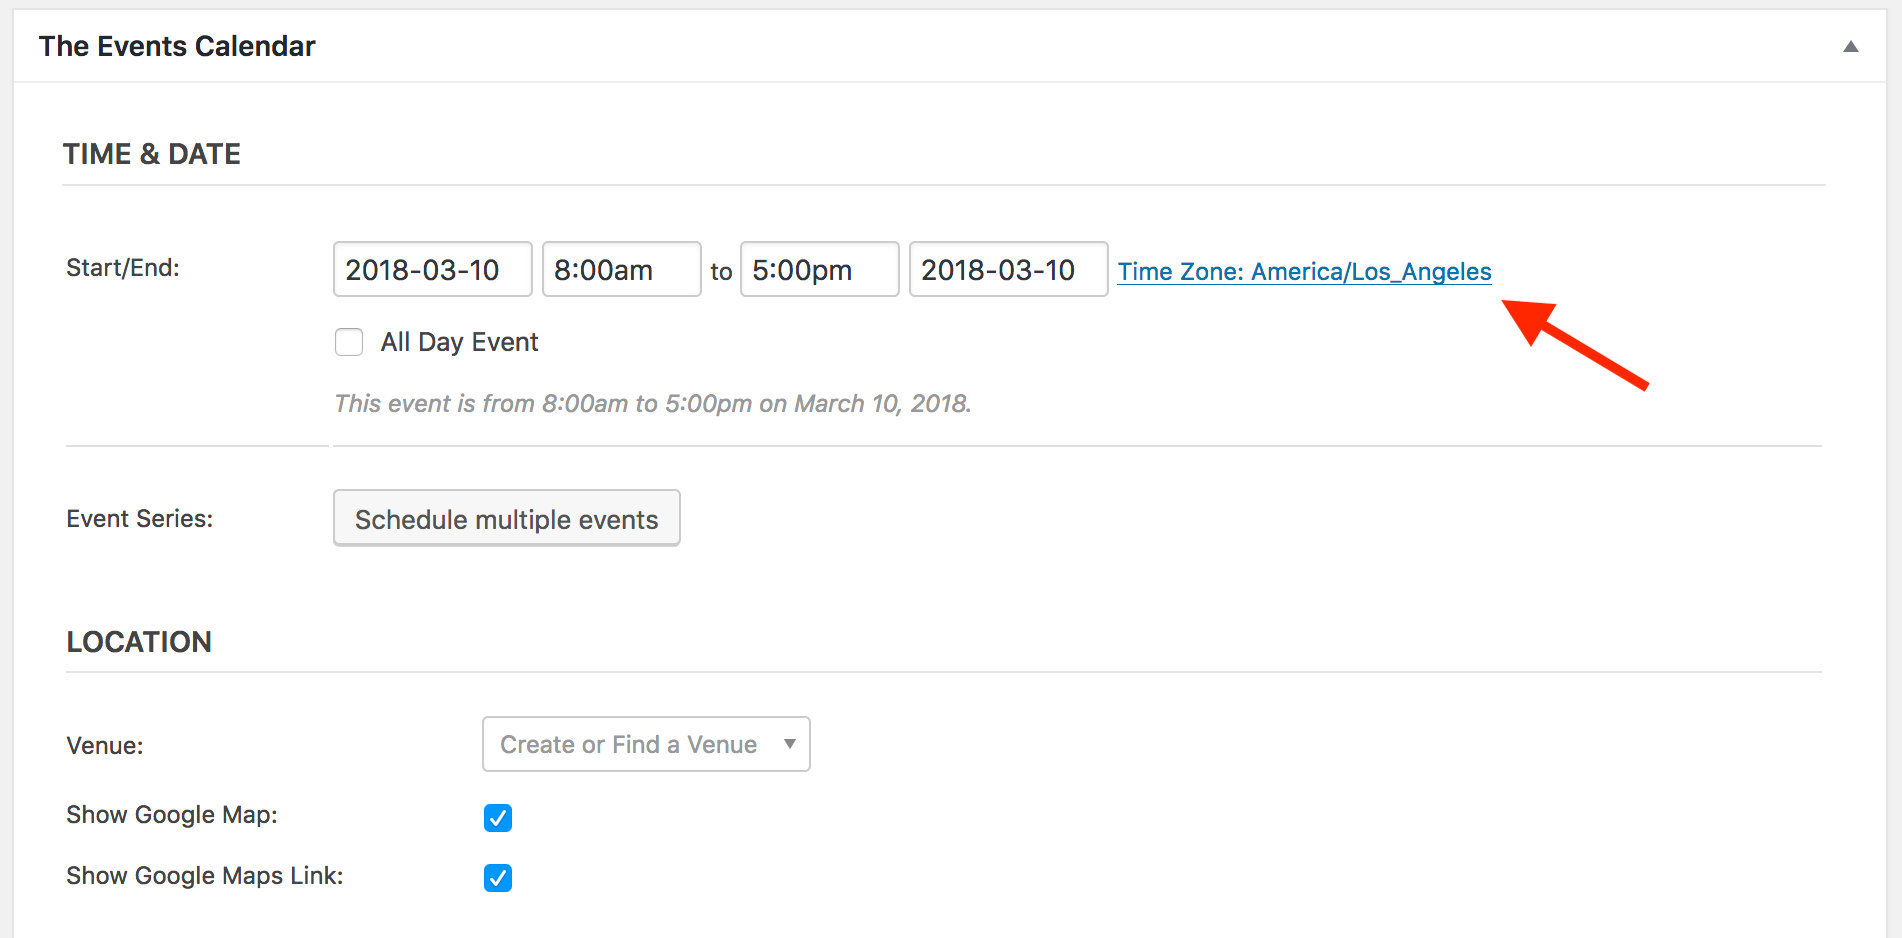
Click that link to reveal a drop-down menu of all of the available timezones; choose one for the event, then save the event for the new time zone to take effect.
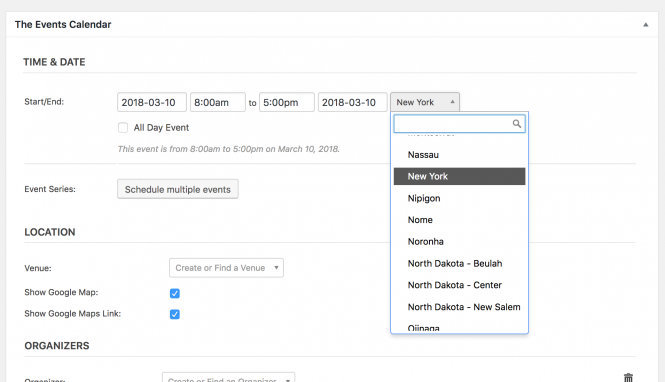
If you are using the Block Editor, the drop-down menu of time zones will appear on the right when editing the time zone.

👋 If your site is in the “Use the site-wide time zone everywhere” mode, changing an individual event’s time zone will make no difference in how the time displays on the front end; you’ll have to change the time zone mode to “Use manual time zones for each event.”
How Daylight Saving Time Affects Events
Many parts of the world (including most of the US and Canada) use Daylight Saving Time which means that the time changes twice a year. You’ll want to make sure that your events are set up to handle this change as needed so your calendar is always displaying the correct start and end times for events.
The single best thing you can do to accommodate Daylight Saving Time is to use location-based time zones for all your events. This kind of time zone setting will adjust for DST, while a UTC-based time zone (e.g. UTC -8) is an absolute time and will not adjust for DST. If you choose to use a UTC-based option, you may need to manually adjust the time on your events.
💡 Series Engine users: Please reference this knowledgebase post to learn about event time compatibility with that plugin and the special setting they have for you to use.
How UTC Time Zones Clash with DST: An Example Explained
Let’s say your WordPress site time zone is UTC-5, but you have a recurring event whose event time zone is America/New_York. Some of the events happen before DST starts, some after.
If the time zone mode is “Use site-wide time zone everywhere”, then events will display as shown in the following screenshot:
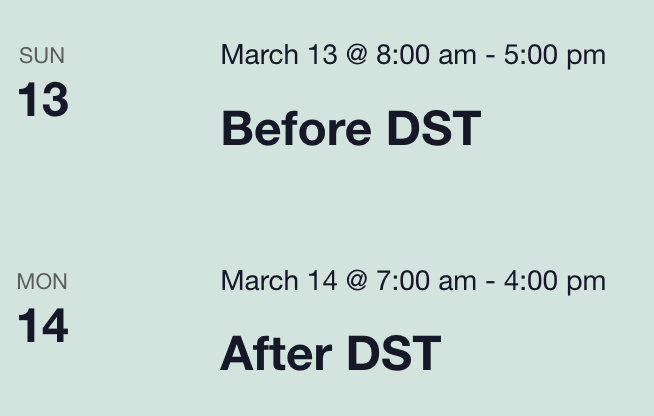
What’s happened is as follows:
- The first event happens in the America/New_York time zone before DST starts, so the clock time for that region is UTC-5
- The next event happens in the America/New_York time zone after DST starts; for this region, DST changes its offset to UTC-4
- So the first event is 8am UTC-5 in local time, while the second time is 8am UTC-4 in local time
- Since the time zone mode is “Use site-wide time zone everywhere”, the times will all display in terms of the site-wide time zone, which is UTC-5 in this case
- So 8am UTC-5 will display as-is for the first event, because 8am UTC-5 = 8am UTC-5. But 8am UTC-4, the start time for the second event, will actually be displayed as 7am UTC-5, since 7am UTC-5 = 8am UTC-4
- DST has made the event’s UTC offset change from UTC-5 to UTC-4, but the site time zone is still UTC-5, so the times will display in terms of UTC-5
Other Examples
| Time Zone Mode | Site Time Zone | Event Time Zone | Expected Output |
|---|---|---|---|
| Site-wide | UTC-5 | New_York | Screenshot |
| Local Event | UTC-5 | New_York | Screenshot |
| Site-wide | UTC-5 | Los_Angeles | Screenshot |
| Local Event | UTC-5 | Los_Angeles | Screenshot |
| Site-wide | New_York | UTC-5 | Screenshot |
| Local Event | New_York | UTC-5 | Screenshot |
| Site-wide | Los_Angeles | UTC-5 | Screenshot |
| Local Event | Los_Angeles | UTC-5 | Screenshot |
Resources
- Something that may help is our free Extension for The Events Calendar, Allow Only Location-Based Time Zones for Events, to ensure that UTC offsets are never used in your events. This may help to reduce confusing time outputs.
Timezones and Caching
If you’re experiencing timezone issues and haven’t been able to get to the bottom of it, it’s worth noting that sometimes we see issues related to caching. This can include seeing a wrong timezone than your indicated settings, despite setting the timezone display to site-wide.
If that is the case, we’d recommend temporarily disabling your caching plugin to see if that makes a difference. If it does, you can likely tweak your caching plugin’s settings and exclusions in order to keep the plugin working with The Events Calendar.
For more information, take a look at the recommended settings in some popular caching plugins.
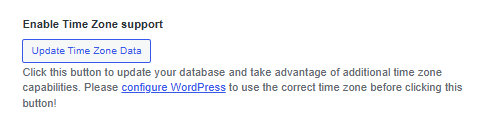
Updating Timezone Data
In some cases, like if you’ve just updated your version of The Events Calendar after a long time of not updating it, it will be necessary to update your time zone data before you can fully take advantage of The Events Calendar’s time zone features.
Don’t worry if that sounds complicated! It’s a one-click process:
- Simply return to the “Date Format Settings” section at the bottom of Events → Settings → Display → Date & Time in your wp-admin
- Look for the “Update Time Zone Data” button there
- If it’s not visible, your time zone data is up-to-date, and no action is required
- If it is visible, you can click the button to perform the update
Customization: Showing Events in the Visitor Time Zone
👋 Please note that this implementation uses cookies! If you would like to use this on your website you will need to include information in your cookie policy and ask for user consent!
Showing the events in the time zone of the visitor is a bit more tricky as we somehow need to get that information, preferably automatically. Fortunately JavaScript can help us in that as it can grab the time zone of the visitor’s browser.
This is where the user consent comes in! We need to ask for the visitors permission so that we can grab that piece of information and store it in a cookie. Implementing the cookie consent is beyond the scope of this tutorial. It is something that you will need to implement on your own if you decided to use this solution.
Here I’m going to show you how you can implement this on the single event page using both the Classic or the Block editor. (You can find the relevant setting under Events → Settings → General tab → Activate Block Editor for Events) The approach would be similar on different calendar views as well. (There are some notes about this at the end of this tutorial.)
1. The template override
We want this functionality to remain available even after a plugin update, so we will make use of the template override system of The Events Calendar.
If you are using the Classic editor grab the following file:
wp-content/plugins/the-events-calendar/src/views/single-event.php
Make a copy of it and place it in this folder:
wp-content/themes/[your-child-theme]/tribe-events/single-event.php
If you are using the Block editor grab the following file:
wp-content/plugins/the-events-calendar/src/views/blocks/event-datetime.php
Make a copy of it and place it in this folder:
wp-content/themes/[your-child-theme]/tribe/events/blocks/event-datetime.php
Placing the file under your child theme folder will ensure that these changes will stay in place in the event of a theme or a plugin update.
Please note though that if the original template file receives an update you might need to implement those changes in your override as well.
2. The code
Open the override file for editing and look for this line:
$event_id = get_the_ID();
For the Classic Editor, the line is:
$event_id = Tribe_Events_Main::postIdHelper(
get_the_ID() );
Below that line add the following piece of code (line included for reference):
$event_id = get_the_ID();

/**
 * Setting up the cookie if it doesn't exist yet and grabbing the browser time zone string.
 */
if ( ! isset( $_COOKIE['tribe_browser_time_zone'] ) ) { ?>
	<script type="text/javascript">
		if ( navigator.cookieEnabled ) {
			document.cookie = "tribe_browser_time_zone=" + Intl.DateTimeFormat().resolvedOptions().timeZone + "; path=/";
		}
	</script>
<?php }

/**
 * Calculating the event start time and time zone based on the browser time zone of the visitor.
 */

// Setting default values in case the cookie doesn't exist.
$user_time_output = "<small>Your time zone couldn't be detected. Try <a href=''>reloading</a> the page.</small>";
$browser_time_zone_string = "not detected";

if ( isset( $_COOKIE['tribe_browser_time_zone'] ) ) {
	// Grab the time zone string from the cookie.
	$browser_time_zone_string = $_COOKIE['tribe_browser_time_zone'];

	// Grab the event time zone string.
	$event_time_zone_string = Tribe__Events__Timezones::get_event_timezone_string( $event_id );

	// Grab the event start date in UTC time from the database.
	$event_start_utc = tribe_get_event_meta( $event_id, '_EventStartDateUTC', true );

	// Set up the DateTime object.
	$event_start_date_in_utc_timezone = new DateTime( $event_start_utc, new DateTimeZone( 'UTC' ) );

	// Convert the UTC DateTime object into the browser time zone.
	$event_start_date_in_browser_timezone = $event_start_date_in_utc_timezone->setTimezone( new DateTimeZone( $browser_time_zone_string ) )->format( get_option( 'time_format' ) );

	// Grab the time zone abbreviation based on the browser time zone string.
	$browser_time_zone_abbreviation = Tribe__Timezones::abbr( 'now', $browser_time_zone_string );

	// Compile the output string with time zone abbreviation.
	$user_time_output = $event_start_date_in_browser_timezone . " " . $browser_time_zone_abbreviation;

	// Compile the string of the time zone for the tooltip.
	$browser_time_zone_string .= ' detected';
}
3. The markup
We’re still working in the same file.
Classic editor
Look for this line:
<?php echo tribe_events_event_schedule_details( $event_id, '<h2>', '</h2>' ); ?>
Add the following below the line (line included for reference):
<?php echo tribe_events_event_schedule_details( $event_id, '<h2>', '</h2>' ); ?>
<?php
/**
* Adding the event start time in the visitor's time zone.
*/
if ( ! tribe_event_is_all_day( $event_id ) ) {
echo "<div class='tribe-events-schedule--browser-time-zone'><p>";
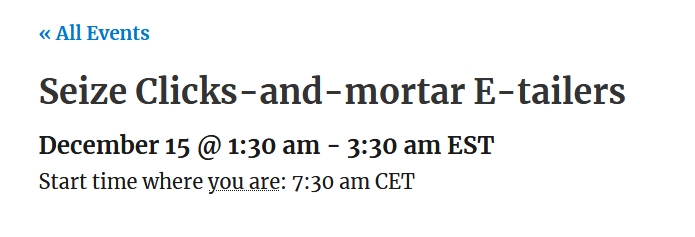
echo "Start time where <span style='text-decoration-style: dotted; text-decoration-line: underline; cursor: help;' title='This is based on your browser time zone (" . $browser_time_zone_string . ") and it might not be fully accurate.'>you are</span>: " . $user_time_output;
echo "</p></div>";
}
?>
Block editor
Go to the end of the file and paste the code between the </h2> and the closing </div> tags, like this (lines included for reference):
	</h2>
	<?php
	/**
	 * Adding the event start time in the visitor's time zone.
	 */
	if ( ! tribe_event_is_all_day( $event_id ) ) {
		echo "<div class='tribe-events-schedule--browser-time-zone'><p>";
		echo "Start time where <span style='text-decoration-style: dotted; text-decoration-line: underline; cursor: help;' title='This is based on your browser time zone (" . $browser_time_zone_string . ") and it might not be fully accurate.'>you are</span>: " . $user_time_output;
		echo "</p></div>";
	}
	?>
</div>
If you would like you can change the content of that sting of course. If you are running your website in a different language, then you will probably want to do that as there are no translations provided for this custom part.
Note, with the above code the time will not show up for all day events. You can remove that constraint if you would like or you can add a similar one for multi-day, recurring, featured events based on your needs.
4. The magic …
After you have saved the file the event pages should look like this:
Cookie Data
As pointed out at the beginning of this tutorial this implementation uses a cookie for which you might need to ask for user consent. This us up to you to implement.
The name of the cookie is:
tribe_browser_time_zone
It will store the value of the time zone string of the visitor’s browser. Here are a couple of examples what it may look like:
Europe/Zurich
America/New_York
Asia/Hong_Kong
The cookie is valid for the full domain of the website and does not have a set expiry date. It automatically expires when the browser is closed.
Implementing in Other Views
The code uses the post ID of the specific event. In the above example this was already available as $event_id. In other templates this might be different though so the code might need to be adjusted. One of the possibilities is adding a line like this in the beginning:
$event_id = $event->ID;
If you would like to implement this for the list view with the updated calendar design this would be a good file:
the-events-calendar/src/views/v2/list/event/date.php
Here is the code for the updated data.php file that would accomplish that:
<?php
/**
 * View: List View - Single Event Date
 *
 * Override this template in your own theme by creating a file at:
 * [your-theme]/tribe/events/v2/list/event/date.php
 *
 * See more documentation about our views templating system.
 *
 * @link http://evnt.is/1aiy
 *
 * @since 4.9.9
 * @since 5.1.1 Move icons into separate templates.
 *
 * @var WP_Post $event The event post object with properties added by the `tribe_get_event` function.
 *
 * @see tribe_get_event() For the format of the event object.
 *
 * @version 5.1.1
 */
use Tribe__Date_Utils as Dates;

$event_date_attr = $event->dates->start->format( Dates::DBDATEFORMAT );
?>
<div class="tribe-events-calendar-list__event-datetime-wrapper tribe-common-b2">
	<?php $this->template( 'list/event/date/featured' ); ?>
	<time class="tribe-events-calendar-list__event-datetime" datetime="<?php echo esc_attr( $event_date_attr ); ?>">
		<?php echo $event->schedule_details->value(); ?>
	</time>
	<?php $this->template( 'list/event/date/meta', [ 'event' => $event ] ); ?>

    <?php
    // Use the event ID from the event object.
    $event_id = $event->ID;

    /**
     * Check for the visitor's time zone cookie.
     * (Remember: if you haven't implemented a cookie consent mechanism, you should do so.)
     */
    if ( ! isset( $_COOKIE['tribe_browser_time_zone'] ) ) { ?>
        <script type="text/javascript">
            if ( navigator.cookieEnabled ) {
                document.cookie = "tribe_browser_time_zone=" + Intl.DateTimeFormat().resolvedOptions().timeZone + "; path=/";
            }
        </script>
    <?php }

    // Set up a default message in case the cookie is not set.
    $user_time_output = "<small>Your time zone couldn't be detected. Try <a href=''>reloading</a> the page.</small>";
    $browser_time_zone_string = "not detected";

    if ( isset( $_COOKIE['tribe_browser_time_zone'] ) ) {
        // Retrieve the visitor's time zone from the cookie.
        $browser_time_zone_string = $_COOKIE['tribe_browser_time_zone'];

        // Retrieve the event's UTC start time and event time zone string.
        $event_time_zone_string = Tribe__Events__Timezones::get_event_timezone_string( $event_id );
        $event_start_utc = tribe_get_event_meta( $event_id, '_EventStartDateUTC', true );

        // Create a DateTime object from the UTC time.
        $event_start_date_in_utc_timezone = new DateTime( $event_start_utc, new DateTimeZone( 'UTC' ) );

        // Convert the UTC time to the visitor's local time zone.
        $event_start_date_in_browser_timezone = $event_start_date_in_utc_timezone->setTimezone( new DateTimeZone( $browser_time_zone_string ) )->format( get_option( 'time_format' ) );

        // Get the time zone abbreviation using the IntlDateFormatter class.
        $formatter = new IntlDateFormatter(
            null,
            IntlDateFormatter::NONE,
            IntlDateFormatter::NONE,
            $browser_time_zone_string,
            IntlDateFormatter::GREGORIAN,
            'zzz'
        );
        $browser_time_zone_abbreviation = $formatter->format(new DateTime('now', new DateTimeZone($browser_time_zone_string)));

        // Combine the time with the abbreviation.
        $user_time_output = $event_start_date_in_browser_timezone . " " . $browser_time_zone_abbreviation;

        // Update the time zone string for tooltip purposes.
        $browser_time_zone_string .= ' detected';
    }
    ?>

    <div class="tribe-events-schedule--browser-time-zone">
        <p>
            Start time where
            <span style="text-decoration: underline dotted; cursor: help;" title="Based on your browser time zone (<?php echo esc_attr( $browser_time_zone_string ); ?>) – might not be fully accurate.">
                you are
            </span>
            : <?php echo $user_time_output; ?>
        </p>
    </div>
</div>
Advanced Functionality: Bulk-update Timezone Data via Database Query
If you happen to find the need to update the timezone of your events in bulk, the SQL query below might just be what you need.
UPDATE wp_postmeta SET meta_value="America/New_York" WHERE meta_key="_EventTimezone";