The Events Calendar works well alongside most performance, caching, and SEO plugins — but each one requires a few specific settings to avoid conflicts with calendar pages and assets. This article covers the recommended configuration for every supported plugin. The core rule that applies to all caching plugins is the same: exclude The Events Calendar’s CSS and JavaScript files from minification, and set event pages to expire within 12 hours.
Yoast SEO
The Events Calendar works with Yoast SEO, but there is one known compatibility limitation with the main calendar page, and several useful features for customizing event-specific SEO titles.
The Main Calendar Title Conflict
Yoast’s settings usually work correctly across your site, but the main calendar page may ignore your preferred title separator or wording.
Incorrect Separators: Yoast may use a different symbol (like a pipe | instead of a dash -) than what you configured in global settings.
The “Event Archives” label: Instead of a dynamic title like “Events for April 2026”, you may see generic text.
The meta title is the HTML tag that defines the text shown in the browser tab for a webpage:

It is also what appears in search engine results:

Yoast provides the ability to customize the meta title for pages, posts, and archives, including custom post types like Events. These settings are found under SEO → Titles & Metas.
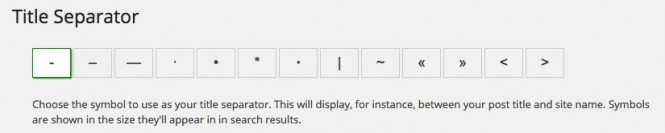
For example, if you configure Yoast to use a dash as the title separator globally, The Events Calendar respects that setting on all pages except the main calendar page. Single event posts, paginated views, and all other calendar pages will use the dash correctly — but the main calendar archive page will continue to show the previous separator.
Main calendar page (incorrect separator):

Subsequent calendar page (correct separator):

This issue also applies to the wording in the meta title, not just the separator.
Removing “Event Archives” From the Title in Yoast SEO
To stop Yoast SEO from rewriting the event archives title, you can download this little plugin file and activate it on your site.
Custom Archive Title
If you want full control of the archive title, then here’s a code snippet you can use:
<?php
// Custom title for events archive pages
add_filter( 'tribe_events_v2_view_title', 'custom_events_archive_title', 10, 4 );
function custom_events_archive_title( $title, $depth, $context, $posts ) {
    if ( is_post_type_archive( 'tribe_events' ) ) {
        // Set your custom title here
        return 'Your Custom Events Title';
    }
    return $title;
}
With the code above, you can set a fully custom title instead of the default Events for August 2025 or similar.
Using Custom Event Variables in Yoast SEO Title Templates
When running an events-focused website, you can enhance your event listings by using Yoast SEO’s custom variables to populate title tags with event-specific data automatically. This improves click-through rates in search results and streamlines your SEO workflow across all events.
Prerequisites:
- The Events Calendar installed and active
- Yoast SEO installed and active
- Existing events created under Events → All Events
Available Custom Event Variables
The Events Calendar integrates with Yoast SEO to provide the following dynamic variables:
| Variable | What It Inserts |
|---|---|
%event_start_date% | The event’s start date |
%event_end_date% | The event’s end date |
%venue_title% | The venue name |
%venue_city% | The venue city |
%venue_state% | The venue state |
%organizer_title% | The organizer name |
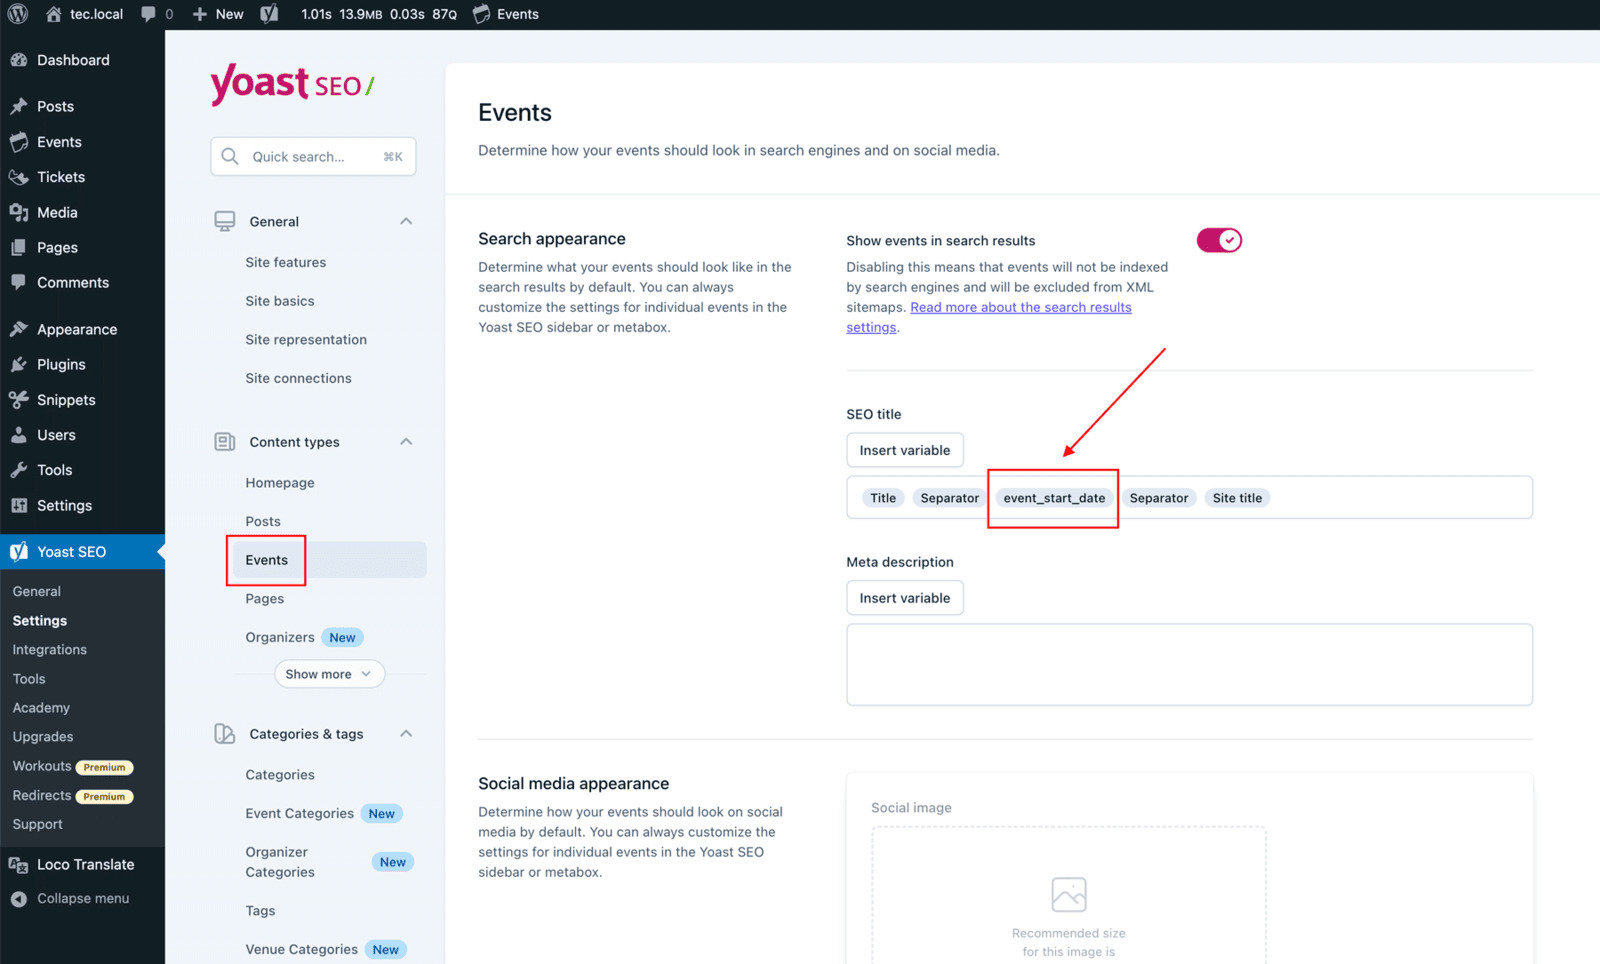
Configure Site-Wide Event Title Templates
- Go to Yoast SEO → Settings in your WordPress admin.
- Navigate to the Content Types section.
- Locate the Events post type. (This option only appears if The Events Calendar is active.)
- In the SEO Title field, click the “Insert variable” button.
- Start typing your desired variable (e.g.,
%event_start_date%) or choose from the suggestions list. - Select the variable and press Enter.
- Rearrange variables, add separators, or include static text as needed.
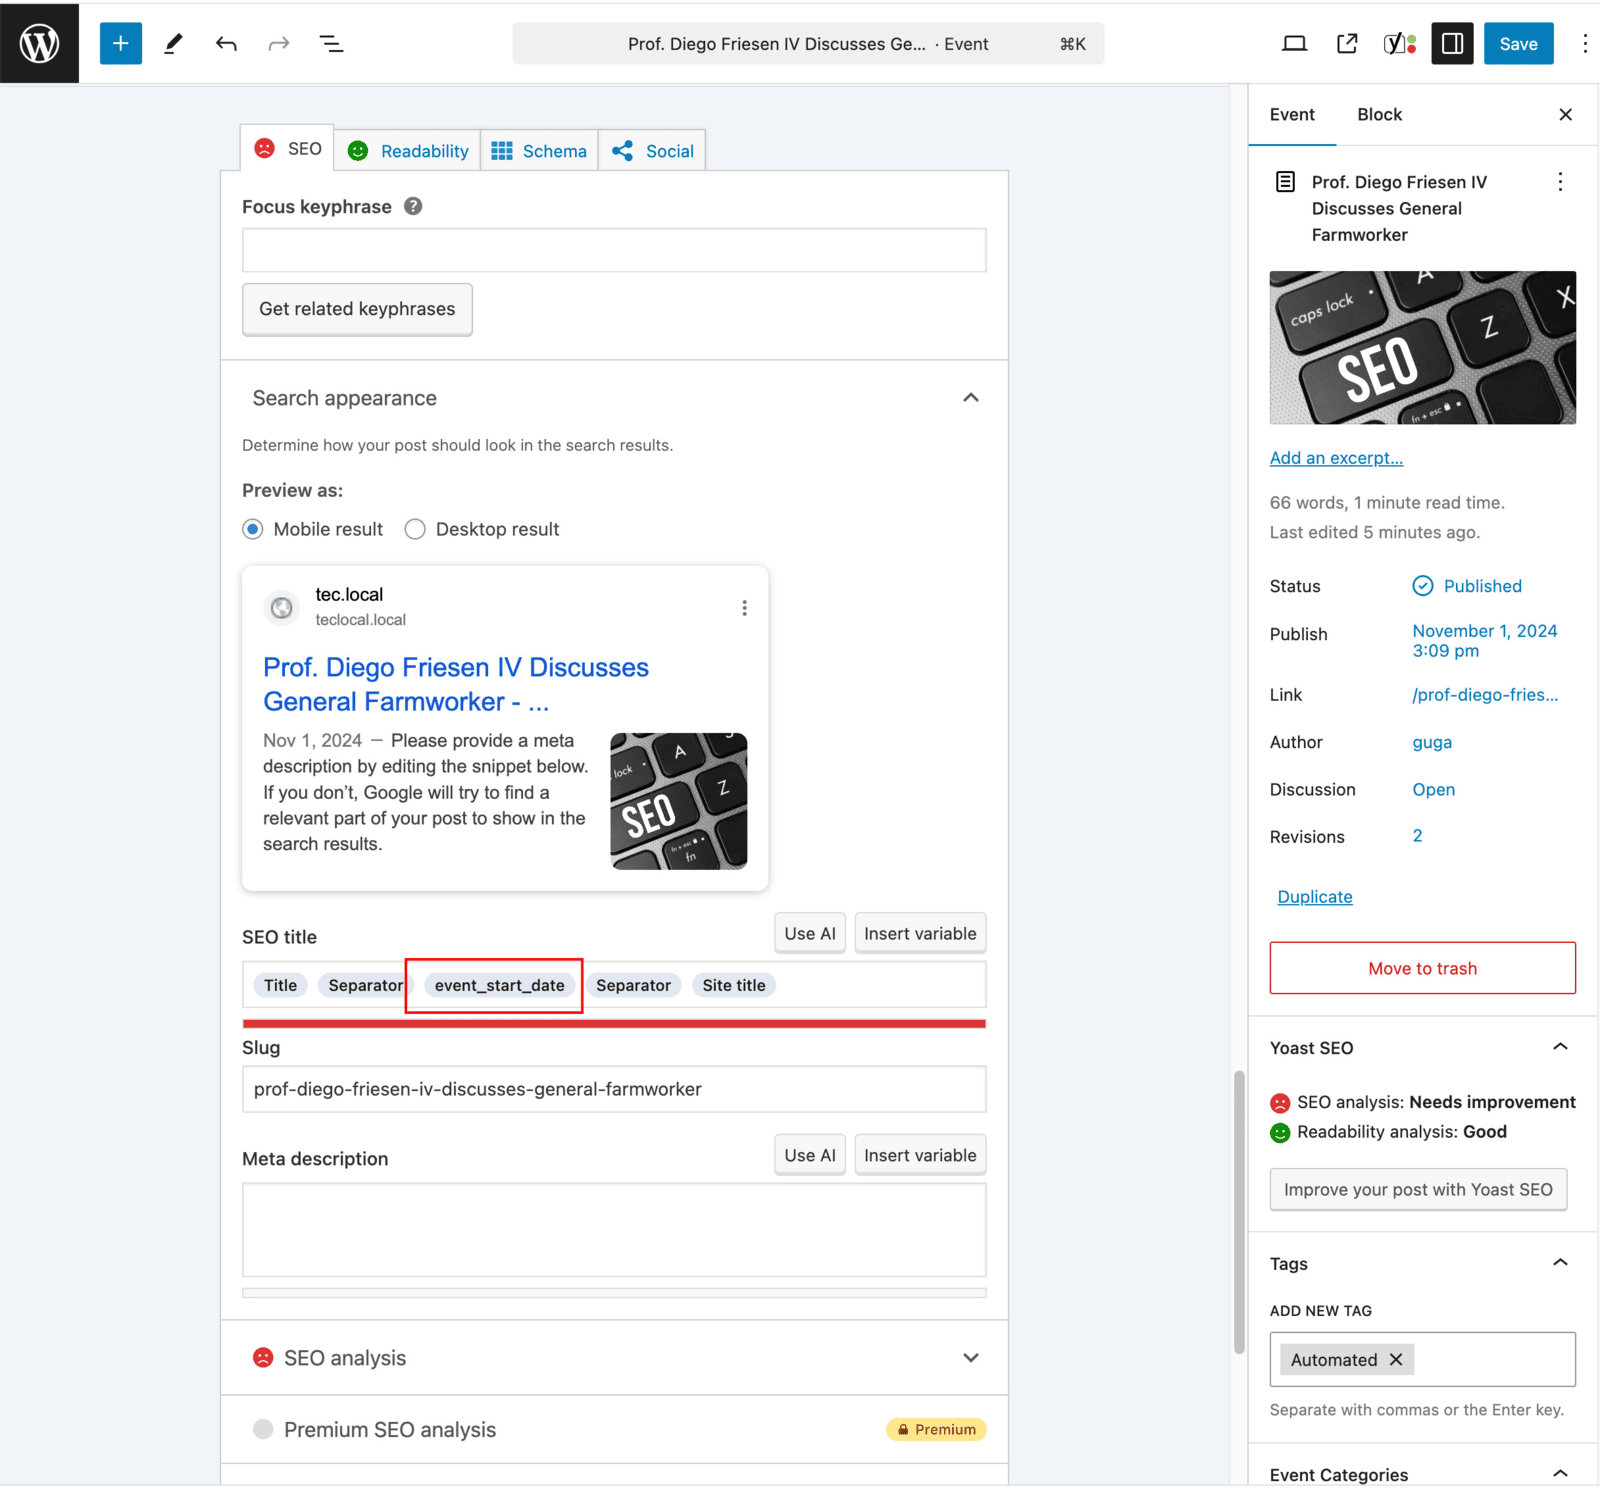
Override the Title on a Per-Event Basis
- Go to Events → All Events and click Edit on the desired event.
- Scroll down to the Yoast SEO meta box.
- Click the SEO tab.
- In the SEO Title field, click “Insert variable” and select your desired variable (e.g.,
%event_start_date%).
This overrides the global SEO title pattern for this specific event only.
By using custom event variables in Yoast SEO, you can dynamically populate titles with relevant, event-specific information — improving click-through rates and providing a consistent branding experience across all your event listings.
SiteGround Speed Optimizer
The SiteGround Speed Optimizer is a caching and performance plugin designed to link WordPress to SiteGround’s performance services. It can improve your site performance in just a few clicks. However, some of its default settings are not compatible with The Events Calendar.
Note: The Speed Optimizer plugin is designed for sites hosted on SiteGround servers and will not work properly on other hosts.
What You Need
Minify CSS, HTML, and JavaScript
The best way to keep everything working well together is to exclude The Events Calendar plugin files from the Minify CSS and Minify JavaScript options so they don’t interfere with TEC’s files.
On the Speed Optimizer plugin, use the Exclude from CSS minification, Exclude from JS minification, Exclude from CSS combination, and Exclude from JS combination options to exclude specific scripts from modification.
Note: When clicking the pencil edit icon, the plugin files are not listed there — this appears to be a bug in the Speed Optimizer plugin. As a workaround, you will need to manually exclude them using a filter in your theme’s functions.php. See the SiteGround support forums for the procedure.
Excluding CSS files
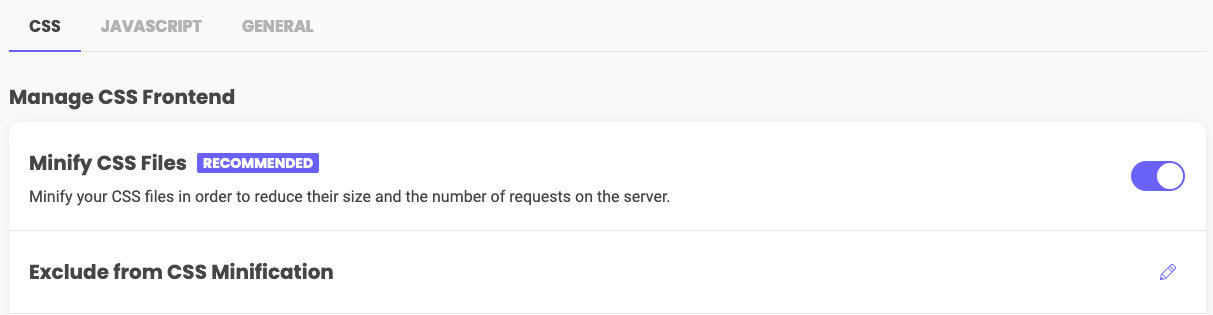
Click the pencil edit icon next to the Exclude from CSS Minification section and add the CSS file paths listed in the Plugin Folders section below.
Excluding JS files
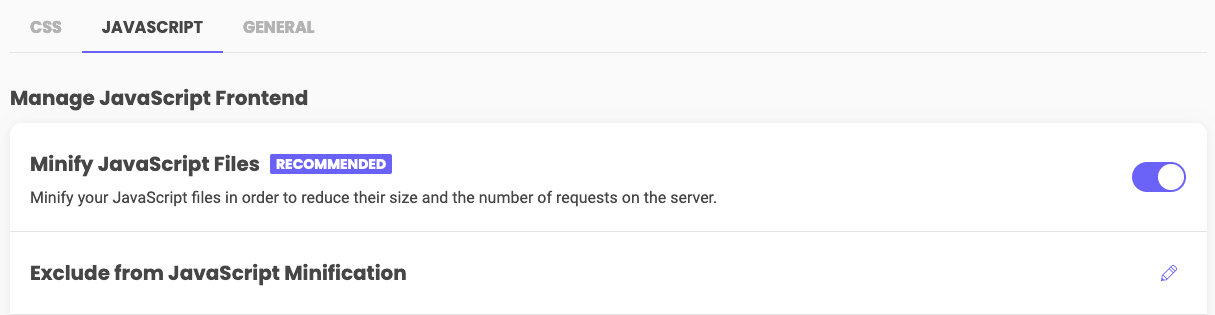
Click the pencil edit icon next to the Exclude from JavaScript Minification section and add the JS file paths listed in the Plugin Folders section below.
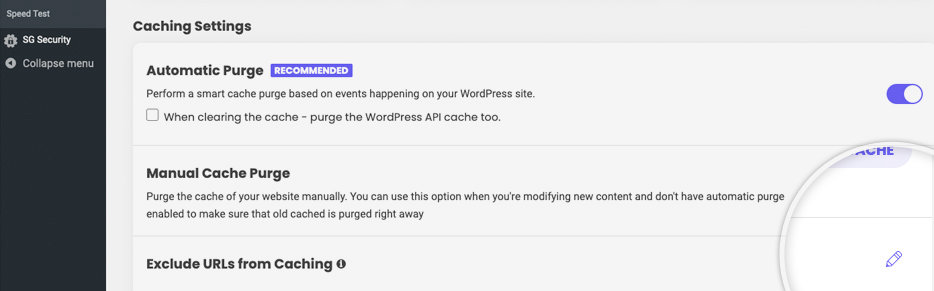
Exclude URLs from Caching
Click the pencil edit icon next to Exclude URLs from Caching and add /events/* and /event/*.
Plugin Folders
Here is a list of the asset folders for each plugin that should be excluded:
| Plugin Name | Assets Folder |
|---|---|
| The Events Calendar | /wp-content/plugins/the-events-calendar/(.*).css/wp-content/plugins/the-events-calendar/(.*).js |
| Events Calendar Pro | /wp-content/plugins/events-calendar-pro/(.*).css/wp-content/plugins/events-calendar-pro/(.*).js |
| Event Tickets | /wp-content/plugins/event-tickets/(.*).css/wp-content/plugins/event-tickets/(.*).js |
| Event Tickets Plus | /wp-content/plugins/event-tickets-plus/(.*).css/wp-content/plugins/event-tickets-plus/(.*).js |
| Filter Bar | /wp-content/plugins/the-events-calendar-filterbar/(.*).css/wp-content/plugins/the-events-calendar-filterbar/(.*).js |
| Community Events | /wp-content/plugins/the-events-calendar-community-events/(.*).css/wp-content/plugins/the-events-calendar-community-events/(.*).js |
| Eventbrite Tickets | /wp-content/plugins/the-events-calendar-eventbrite-tickets/(.*).css/wp-content/plugins/the-events-calendar-eventbrite-tickets/(.*).js |
Copy-Paste Asset Paths
/wp-content/plugins/the-events-calendar/(.*).css
/wp-content/plugins/events-calendar-pro/(.*).css
/wp-content/plugins/event-tickets/(.*).css
/wp-content/plugins/event-tickets-plus/(.*).css
/wp-content/plugins/the-events-calendar-filterbar/(.*).css
/wp-content/plugins/events-virtual/(.*).css
/wp-content/plugins/the-events-calendar-community-events/(.*).css
/wp-content/plugins/the-events-calendar-community-events-tickets/(.*).css
/wp-content/plugins/the-events-calendar-eventbrite-tickets/(.*).css
/wp-content/plugins/the-events-calendar/(.*).js
/wp-content/plugins/events-calendar-pro/(.*).js
/wp-content/plugins/event-tickets/(.*).js
/wp-content/plugins/event-tickets-plus/(.*).js
/wp-content/plugins/the-events-calendar-filterbar/(.*).js
/wp-content/plugins/events-virtual/(.*).js
/wp-content/plugins/the-events-calendar-community-events/(.*).js
/wp-content/plugins/the-events-calendar-community-events-tickets/(.*).js
/wp-content/plugins/the-events-calendar-eventbrite-tickets/(.*).js
Solid Performance
Solid Performance is a powerful WordPress plugin designed to optimize site speed and overall performance. It provides tools to cache pages, minify CSS and JavaScript, and compress images, resulting in faster load times and a smoother user experience.
What You Need
- The Events Calendar (free)
- Solid Performance (free)
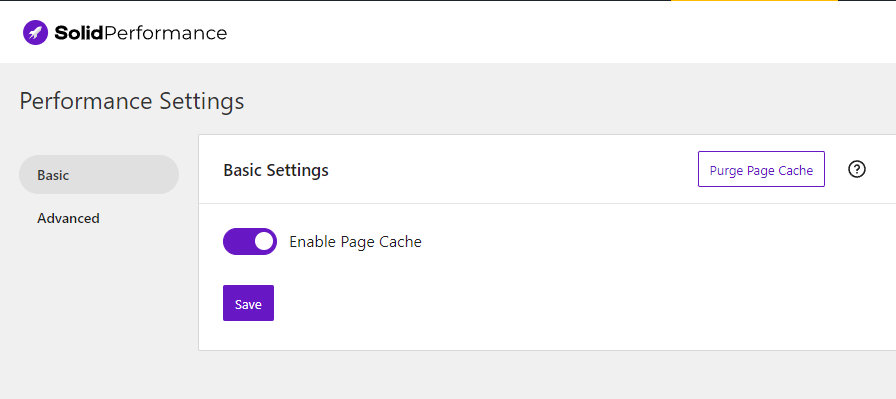
Basic Performance Settings
Go to Settings → Solid Performance. There are two key options: Enable/Disable Page Cache and Purge Page Cache. By default, Enable Page Cache is turned on — keep it enabled for optimal performance.
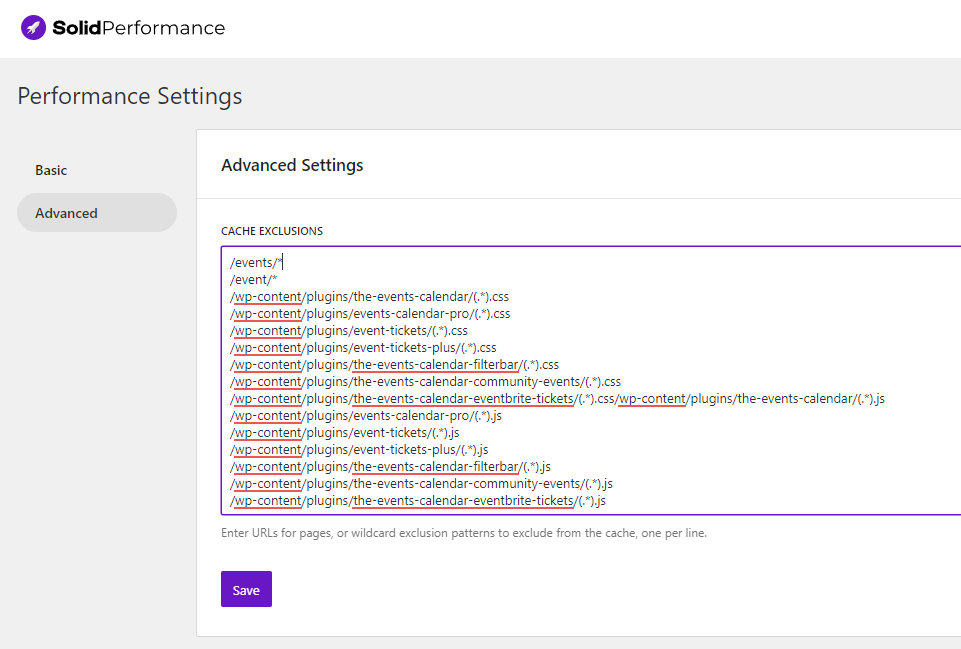
Advanced Performance Settings
Under Cache Exclusions, add the plugin asset paths below to prevent Solid Performance from re-minifying TEC’s already-minified files.
You can also exclude specific pages from caching here. For example:
- Enter
/event/*to prevent caching on all single event pages. - Enter
/eventsto exclude the event listings page.
Plugin Folders
| Plugin Name | Assets Folder |
|---|---|
| The Events Calendar | /wp-content/plugins/the-events-calendar/(.*).css/wp-content/plugins/the-events-calendar/(.*).js |
| Events Calendar Pro | /wp-content/plugins/events-calendar-pro/(.*).css/wp-content/plugins/events-calendar-pro/(.*).js |
| Event Tickets | /wp-content/plugins/event-tickets/(.*).css/wp-content/plugins/event-tickets/(.*).js |
| Event Tickets Plus | /wp-content/plugins/event-tickets-plus/(.*).css/wp-content/plugins/event-tickets-plus/(.*).js |
| Filter Bar | /wp-content/plugins/the-events-calendar-filterbar/(.*).css/wp-content/plugins/the-events-calendar-filterbar/(.*).js |
| Community Events | /wp-content/plugins/the-events-calendar-community-events/(.*).css/wp-content/plugins/the-events-calendar-community-events/(.*).js |
| Eventbrite Tickets | /wp-content/plugins/the-events-calendar-eventbrite-tickets/(.*).css/wp-content/plugins/the-events-calendar-eventbrite-tickets/(.*).js |
Copy-Paste Asset Paths
/wp-content/plugins/the-events-calendar/(.*).css
/wp-content/plugins/events-calendar-pro/(.*).css
/wp-content/plugins/event-tickets/(.*).css
/wp-content/plugins/event-tickets-plus/(.*).css
/wp-content/plugins/the-events-calendar-filterbar/(.*).css
/wp-content/plugins/the-events-calendar-community-events/(.*).css
/wp-content/plugins/the-events-calendar-eventbrite-tickets/(.*).css
/wp-content/plugins/the-events-calendar/(.*).js
/wp-content/plugins/events-calendar-pro/(.*).js
/wp-content/plugins/event-tickets/(.*).js
/wp-content/plugins/event-tickets-plus/(.*).js
/wp-content/plugins/the-events-calendar-filterbar/(.*).js
/wp-content/plugins/the-events-calendar-community-events/(.*).js
/wp-content/plugins/the-events-calendar-eventbrite-tickets/(.*).js
WP Engine
Current Status: compatible
WP Engine is a popular WordPress hosting solution with powerful built-in caching. Once you host your WordPress site with WP Engine, you gain access to caching features right from the WordPress Dashboard.
What You Need
- The Events Calendar
- WP Engine hosting
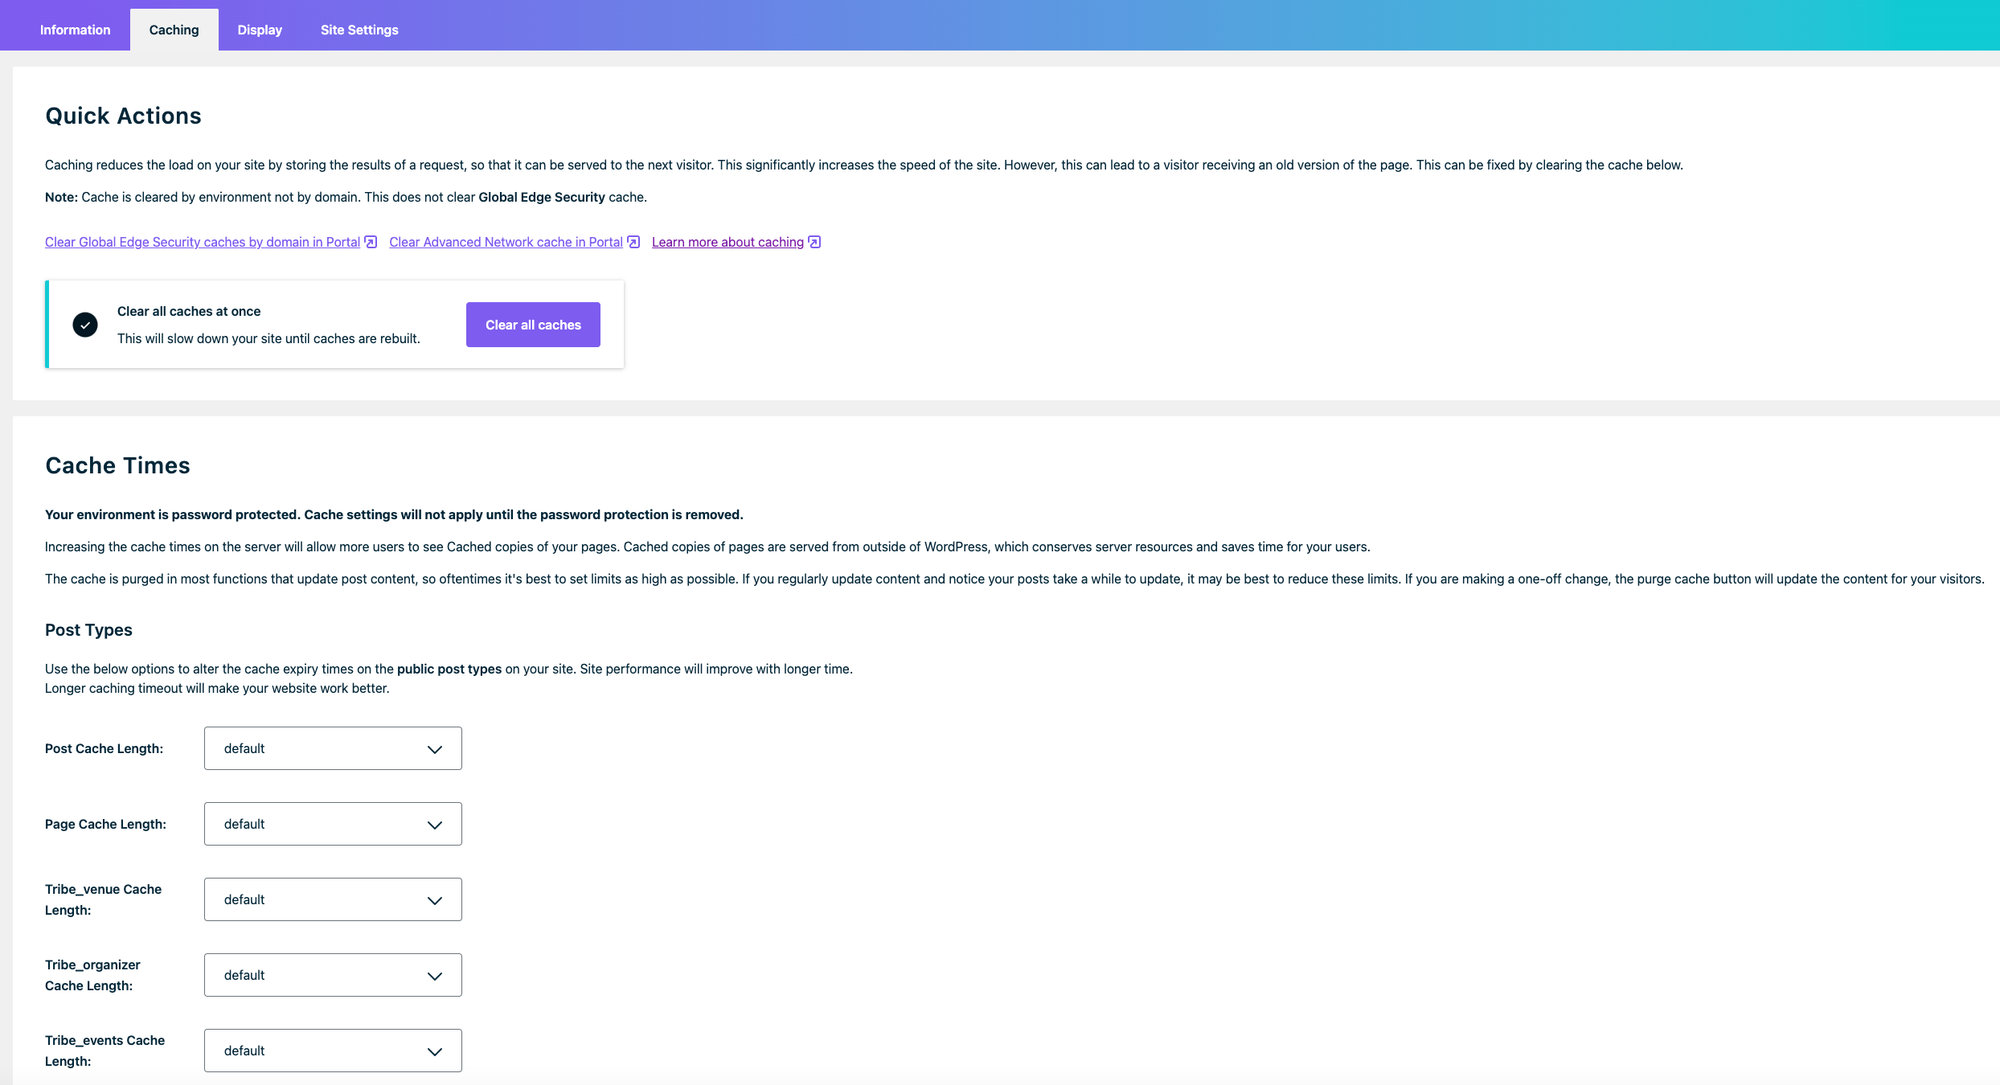
WordPress Dashboard Settings
Go to WP Engine → Caching in the WordPress Dashboard. You can clear all caches at once or customize caching per post type.
Set Tribe_events Cache Length to 12 hours.
WP Engine and The Events Calendar
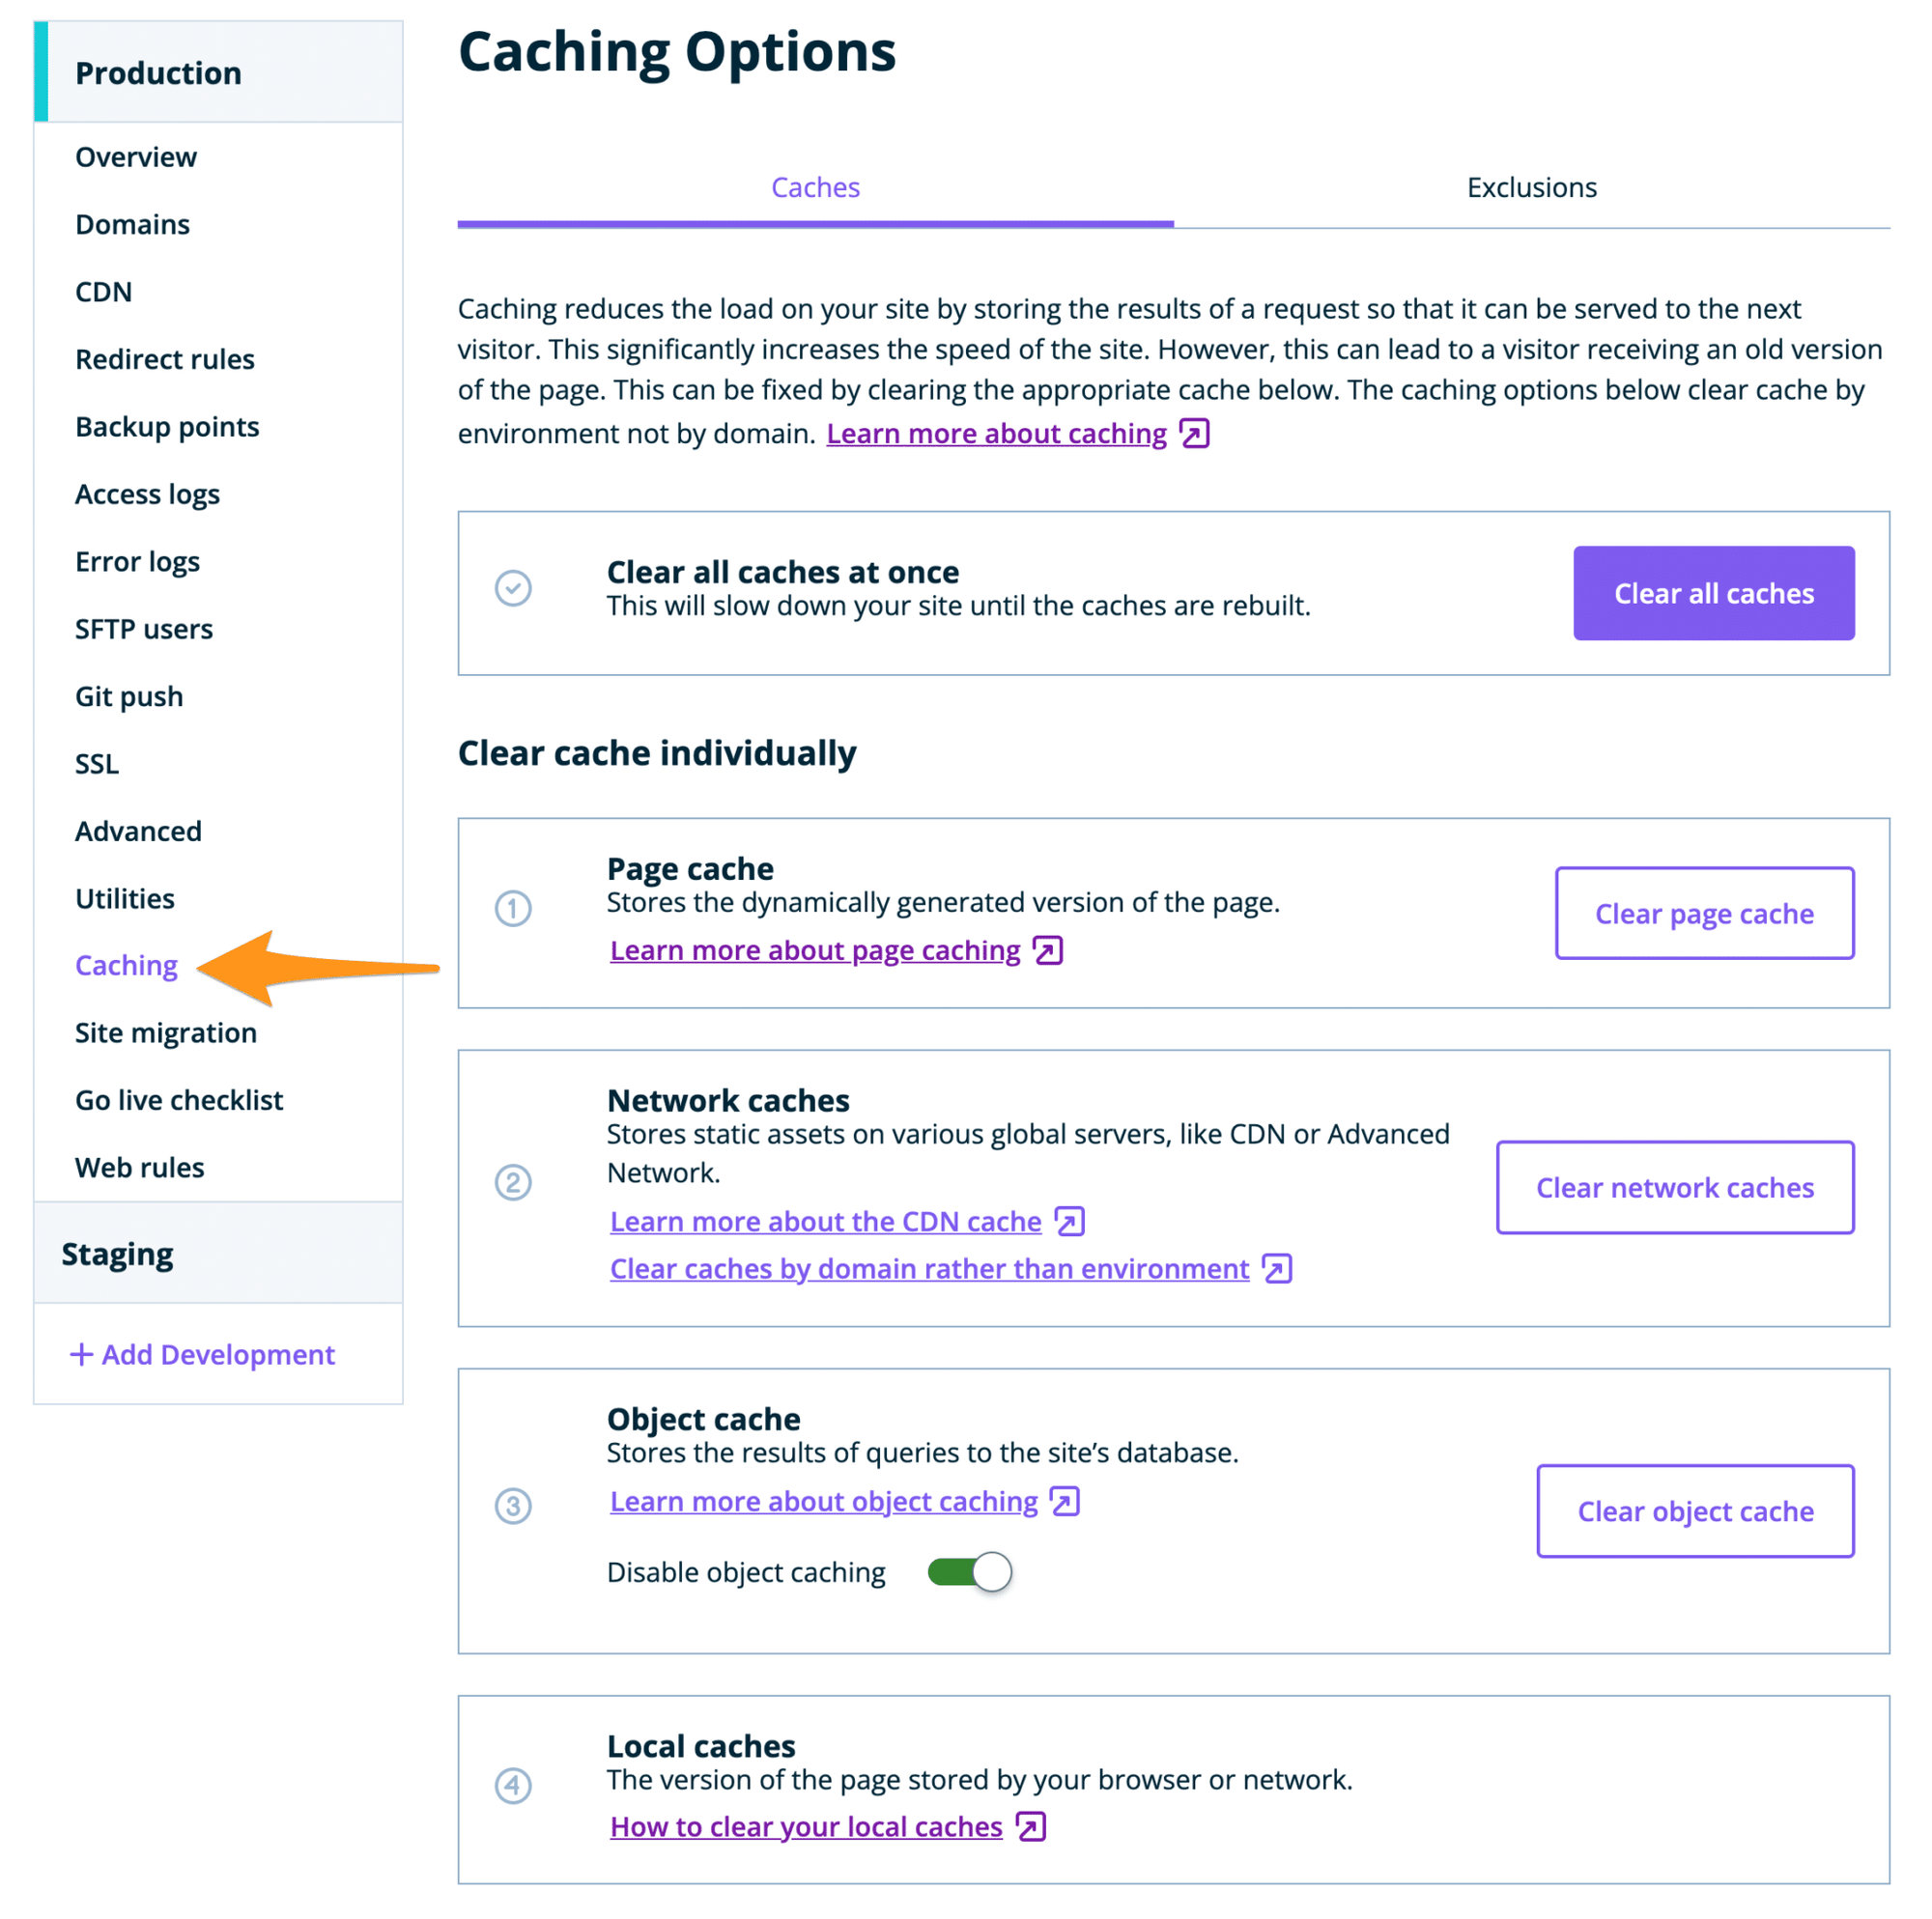
As with other caching plugins, we recommend excluding event pages from caching. This cannot be done from the WordPress Dashboard — follow these steps in the WP Engine User Portal instead:
- Log in to the WP Engine User Portal.
- Select your environment name.
- Click Caching.
- Click Cache Exclusions.
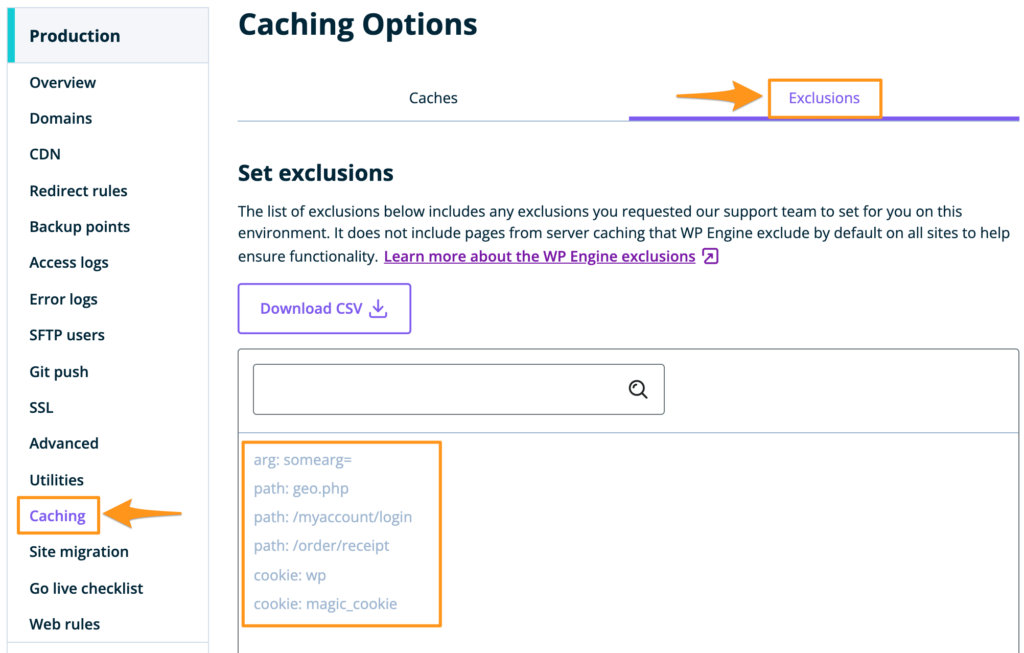
To add additional exclusions beyond what is already listed, contact WP Engine’s support team.
WP Engine and Event Tickets
When using Tickets Commerce (the eCommerce solution built into Event Tickets), the checkout page must also be excluded from caching. Otherwise, some checkout fields may not appear and ticket purchases cannot be completed. Add ^/tickets-checkout/? to the exclusion list.
Use these values when contacting WP Engine support to request exclusions:
path: ^/series/?
path: ^/wp-content/plugins/the-events-calendar/(.*).css
path: ^/wp-content/plugins/the-events-calendar/(.*).js
path: ^/wp-content/plugins/events-calendar-pro/(.*).css
path: ^/wp-content/plugins/events-calendar-pro/(.*).js
path: ^/wp-content/plugins/event-tickets/(.*).css
path: ^/wp-content/plugins/event-tickets/(.*).js
path: ^/wp-content/plugins/event-tickets-plus/(.*).css
path: ^/wp-content/plugins/event-tickets-plus/(.*).js
path: ^/wp-content/plugins/the-events-calendar-filterbar/(.*).css
path: ^/wp-content/plugins/the-events-calendar-filterbar/(.*).js
path: ^/wp-content/plugins/the-events-calendar-community-events/(.*).css
path: ^/wp-content/plugins/the-events-calendar-community-events/(.*).js
path: ^/wp-content/plugins/the-events-calendar-eventbrite-tickets/(.*).css
path: ^/wp-content/plugins/the-events-calendar-eventbrite-tickets/(.*).js
path: ^/tickets-checkout/?
Plugin Folders
| Plugin Name | Assets Folder |
|---|---|
| The Events Calendar | /wp-content/plugins/the-events-calendar/(.*).css/wp-content/plugins/the-events-calendar/(.*).js |
| Events Calendar Pro | /wp-content/plugins/events-calendar-pro/(.*).css/wp-content/plugins/events-calendar-pro/(.*).js |
| Event Tickets | /wp-content/plugins/event-tickets/(.*).css/wp-content/plugins/event-tickets/(.*).js |
| Event Tickets Plus | /wp-content/plugins/event-tickets-plus/(.*).css/wp-content/plugins/event-tickets-plus/(.*).js |
| Filter Bar | /wp-content/plugins/the-events-calendar-filterbar/(.*).css/wp-content/plugins/the-events-calendar-filterbar/(.*).js |
| Community Events | /wp-content/plugins/the-events-calendar-community-events/(.*).css/wp-content/plugins/the-events-calendar-community-events/(.*).js |
| Eventbrite Tickets | /wp-content/plugins/the-events-calendar-eventbrite-tickets/(.*).css/wp-content/plugins/the-events-calendar-eventbrite-tickets/(.*).js |
Copy-Paste Asset Paths
/wp-content/plugins/the-events-calendar/(.*).css
/wp-content/plugins/events-calendar-pro/(.*).css
/wp-content/plugins/event-tickets/(.*).css
/wp-content/plugins/event-tickets-plus/(.*).css
/wp-content/plugins/the-events-calendar-filterbar/(.*).css
/wp-content/plugins/the-events-calendar-community-events/(.*).css
/wp-content/plugins/the-events-calendar-eventbrite-tickets/(.*).css
/wp-content/plugins/the-events-calendar/(.*).js
/wp-content/plugins/events-calendar-pro/(.*).js
/wp-content/plugins/event-tickets/(.*).js
/wp-content/plugins/event-tickets-plus/(.*).js
/wp-content/plugins/the-events-calendar-filterbar/(.*).js
/wp-content/plugins/the-events-calendar-community-events/(.*).js
/wp-content/plugins/the-events-calendar-eventbrite-tickets/(.*).js
WP Fastest Cache
Current Status: compatible
WP Fastest Cache helps speed up your site by reducing server load from high traffic. Site speed affects Google Search rankings, so installing a plugin like WP Fastest Cache can improve your SEO.
What You Need
The Settings
Once WP Fastest Cache is installed and activated, go to WP Fastest Cache → Exclude in the WordPress Dashboard.
Exclude the /event page from being cached. Also exclude CSS and JavaScript. See the screenshot below for the exact settings to use.
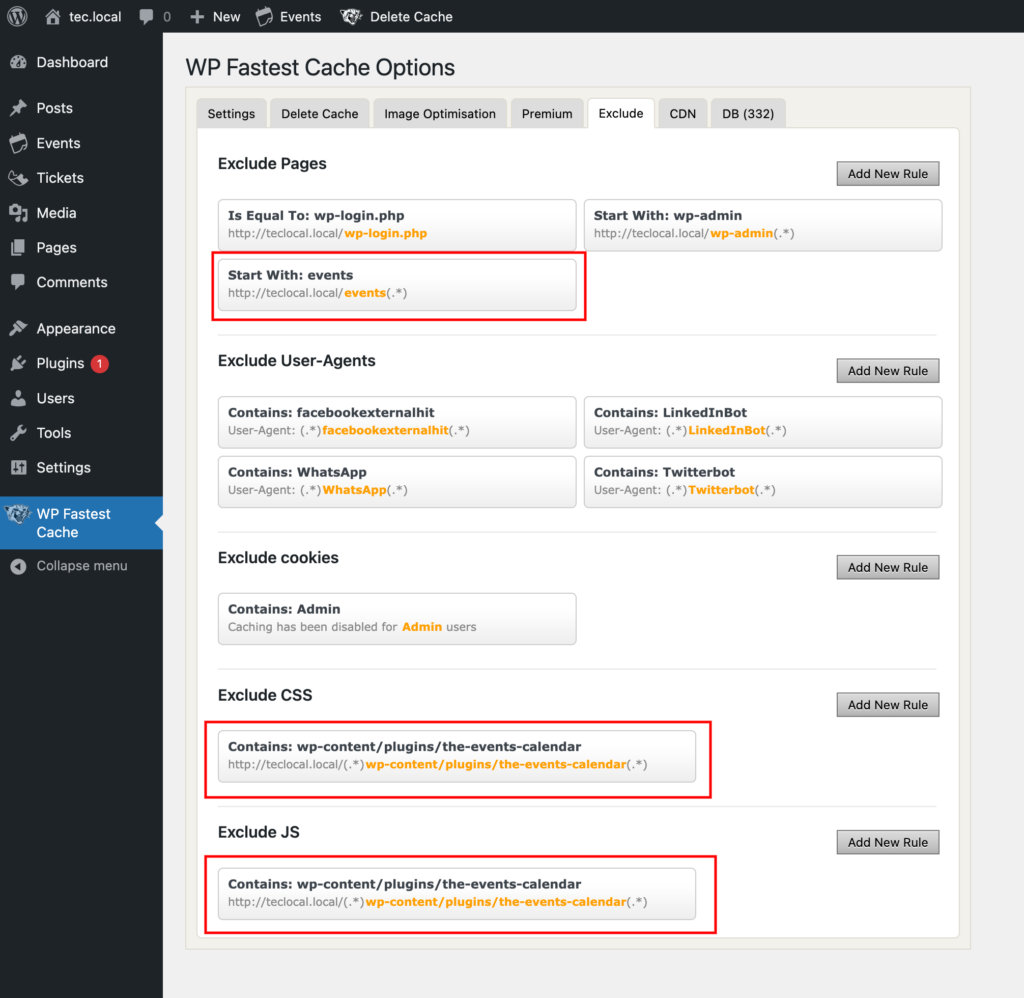
If you are using the Event Tickets plugin, add a rule to exclude pages containing tickets-checkout to avoid caching issues on the checkout page.
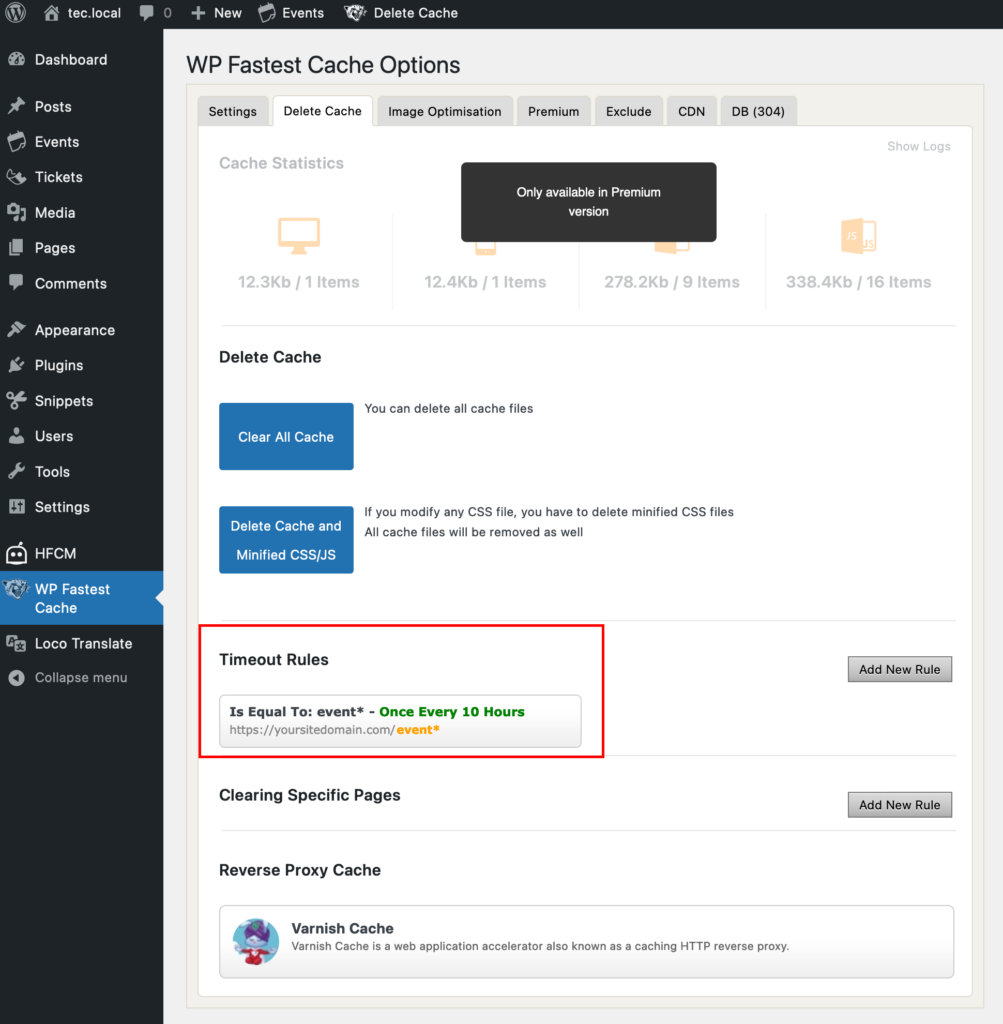
Cache Timeout
You also need to define a timeout rule to ensure the events page cache is regenerated before WordPress NONCE keys expire.
WordPress NONCEs are security tokens with a 12-hour lifetime that protect URLs and forms from malicious attacks (NONCE stands for “number used once”). If a cached page serves an expired NONCE, calendar pagination will break.
Go to WP Fastest Cache → Delete Cache → Timeout Rules and set a timeout to run at least every 10 hours.
Plugin Folders
| Plugin Name | Assets Folder |
|---|---|
| The Events Calendar | /wp-content/plugins/the-events-calendar/(.*).css/wp-content/plugins/the-events-calendar/(.*).js |
| Events Calendar Pro | /wp-content/plugins/events-calendar-pro/(.*).css/wp-content/plugins/events-calendar-pro/(.*).js |
| Event Tickets | /wp-content/plugins/event-tickets/(.*).css/wp-content/plugins/event-tickets/(.*).js |
| Event Tickets Plus | /wp-content/plugins/event-tickets-plus/(.*).css/wp-content/plugins/event-tickets-plus/(.*).js |
| Filter Bar | /wp-content/plugins/the-events-calendar-filterbar/(.*).css/wp-content/plugins/the-events-calendar-filterbar/(.*).js |
| Community Events | /wp-content/plugins/the-events-calendar-community-events/(.*).css/wp-content/plugins/the-events-calendar-community-events/(.*).js |
| Eventbrite Tickets | /wp-content/plugins/the-events-calendar-eventbrite-tickets/(.*).css/wp-content/plugins/the-events-calendar-eventbrite-tickets/(.*).js |
Copy-Paste Asset Paths
/wp-content/plugins/the-events-calendar/(.*).css
/wp-content/plugins/events-calendar-pro/(.*).css
/wp-content/plugins/event-tickets/(.*).css
/wp-content/plugins/event-tickets-plus/(.*).css
/wp-content/plugins/the-events-calendar-filterbar/(.*).css
/wp-content/plugins/the-events-calendar-community-events/(.*).css
/wp-content/plugins/the-events-calendar-eventbrite-tickets/(.*).css
/wp-content/plugins/the-events-calendar/(.*).js
/wp-content/plugins/events-calendar-pro/(.*).js
/wp-content/plugins/event-tickets/(.*).js
/wp-content/plugins/event-tickets-plus/(.*).js
/wp-content/plugins/the-events-calendar-filterbar/(.*).js
/wp-content/plugins/the-events-calendar-community-events/(.*).js
/wp-content/plugins/the-events-calendar-eventbrite-tickets/(.*).js
W3 Total Cache
Current Status: compatible
W3 Total Cache is one of the most comprehensive cache plugins for WordPress, developed by BoldGrid. It gives you granular control over different caching aspects.
What You Need
- The Events Calendar
- W3 Total Cache
- The slug for your calendar and events (e.g.
/eventsand/event)
👋 Throughout this section, we use /events and /event for the calendar and event single slugs respectively. Yours may differ depending on your plugin settings.
Minify Settings
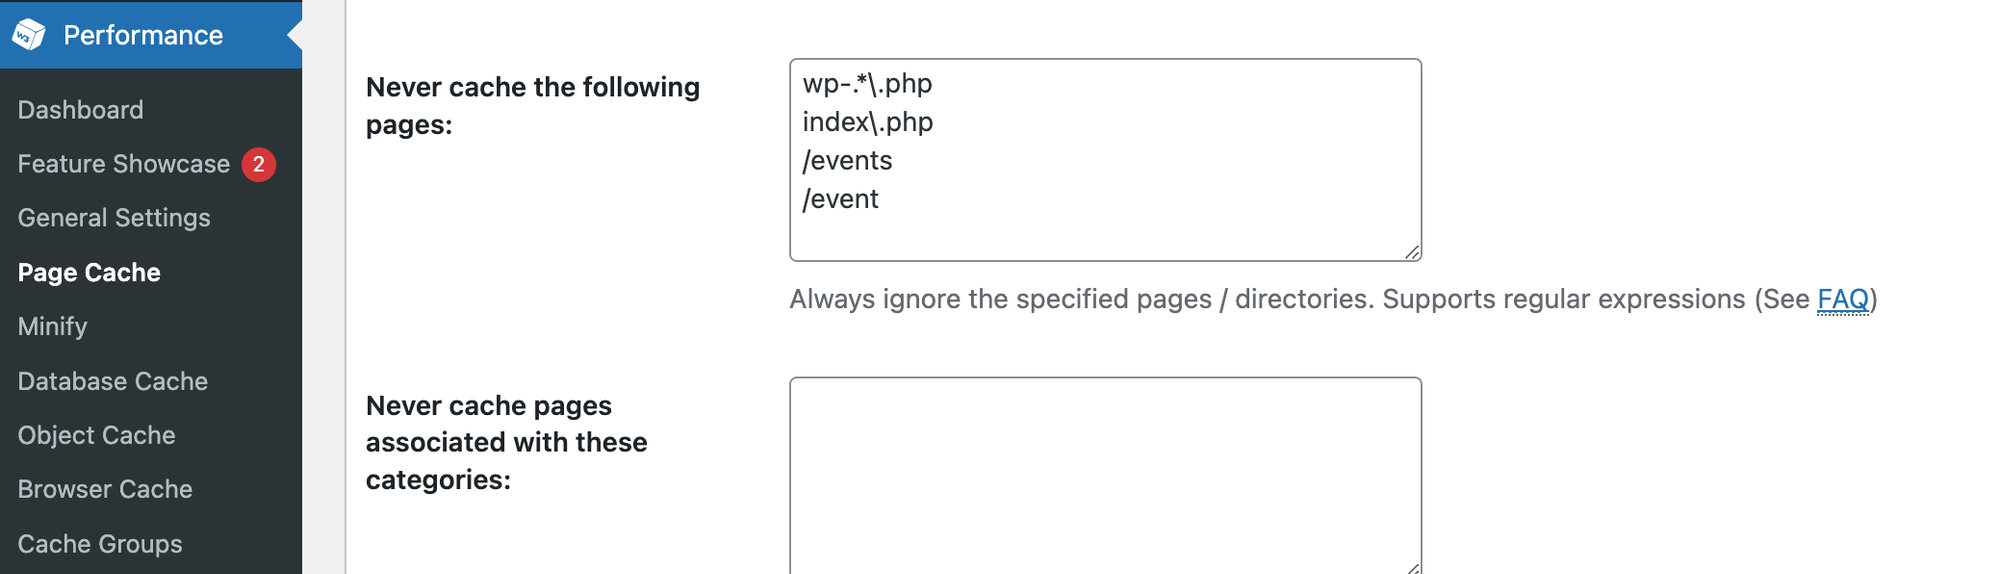
Go to Performance → Minify and find the Advanced option. Use your Events Slug and Single Event Slug for the Never minify the following pages option. Note that you can only use one slug per line. Once your slugs are added, click Save Settings & Purge Caches.
A Note on Minification
There are several minification options within this plugin. We strongly recommend you keep The Events Calendar JS files unminified. You can allow W3 Total Cache to minify Pages and CSS, but check your calendar page carefully afterwards to ensure everything looks correct.
Page Cache Settings
Under Performance → Page Cache, exclude your /event and /events pages from being cached.
Plugin Folders
Use these values in Performance → Minify → Advanced:
| Plugin Name | Assets Folder |
|---|---|
| The Events Calendar | /wp-content/plugins/the-events-calendar/(.*).css/wp-content/plugins/the-events-calendar/(.*).js |
| Events Calendar Pro | /wp-content/plugins/events-calendar-pro/(.*).css/wp-content/plugins/events-calendar-pro/(.*).js |
| Event Tickets | /wp-content/plugins/event-tickets/(.*).css/wp-content/plugins/event-tickets/(.*).js |
| Event Tickets Plus | /wp-content/plugins/event-tickets-plus/(.*).css/wp-content/plugins/event-tickets-plus/(.*).js |
| Filter Bar | /wp-content/plugins/the-events-calendar-filterbar/(.*).css/wp-content/plugins/the-events-calendar-filterbar/(.*).js |
| Eventbrite Tickets | /wp-content/plugins/the-events-calendar-eventbrite-tickets/(.*).css/wp-content/plugins/the-events-calendar-eventbrite-tickets/(.*).js |
Copy-Paste Asset Paths
/wp-content/plugins/the-events-calendar/(.*).css
/wp-content/plugins/events-calendar-pro/(.*).css
/wp-content/plugins/event-tickets/(.*).css
/wp-content/plugins/event-tickets-plus/(.*).css
/wp-content/plugins/the-events-calendar-filterbar/(.*).css
/wp-content/plugins/events-virtual/(.*).css
/wp-content/plugins/the-events-calendar-community-events/(.*).css
/wp-content/plugins/the-events-calendar-community-events-tickets/(.*).css
/wp-content/plugins/the-events-calendar-eventbrite-tickets/(.*).css
/wp-content/plugins/the-events-calendar/(.*).js
/wp-content/plugins/events-calendar-pro/(.*).js
/wp-content/plugins/event-tickets/(.*).js
/wp-content/plugins/event-tickets-plus/(.*).js
/wp-content/plugins/the-events-calendar-filterbar/(.*).js
/wp-content/plugins/events-virtual/(.*).js
/wp-content/plugins/the-events-calendar-community-events/(.*).js
/wp-content/plugins/the-events-calendar-community-events-tickets/(.*).js
/wp-content/plugins/the-events-calendar-eventbrite-tickets/(.*).js
WP Rocket
Current Status: compatible
WP Rocket is one of the easiest caching plugins to use alongside The Events Calendar. It allows you to set up exclusions so that caching operates across your whole site without interfering with the calendar. You simply add the address of the plugin asset folders in WP Rocket’s settings and it handles the rest.
File Optimization
Go to WP Rocket → Settings → File Optimization. Add the plugin asset paths (listed below) to both Excluded CSS Files and Excluded JavaScript Files.
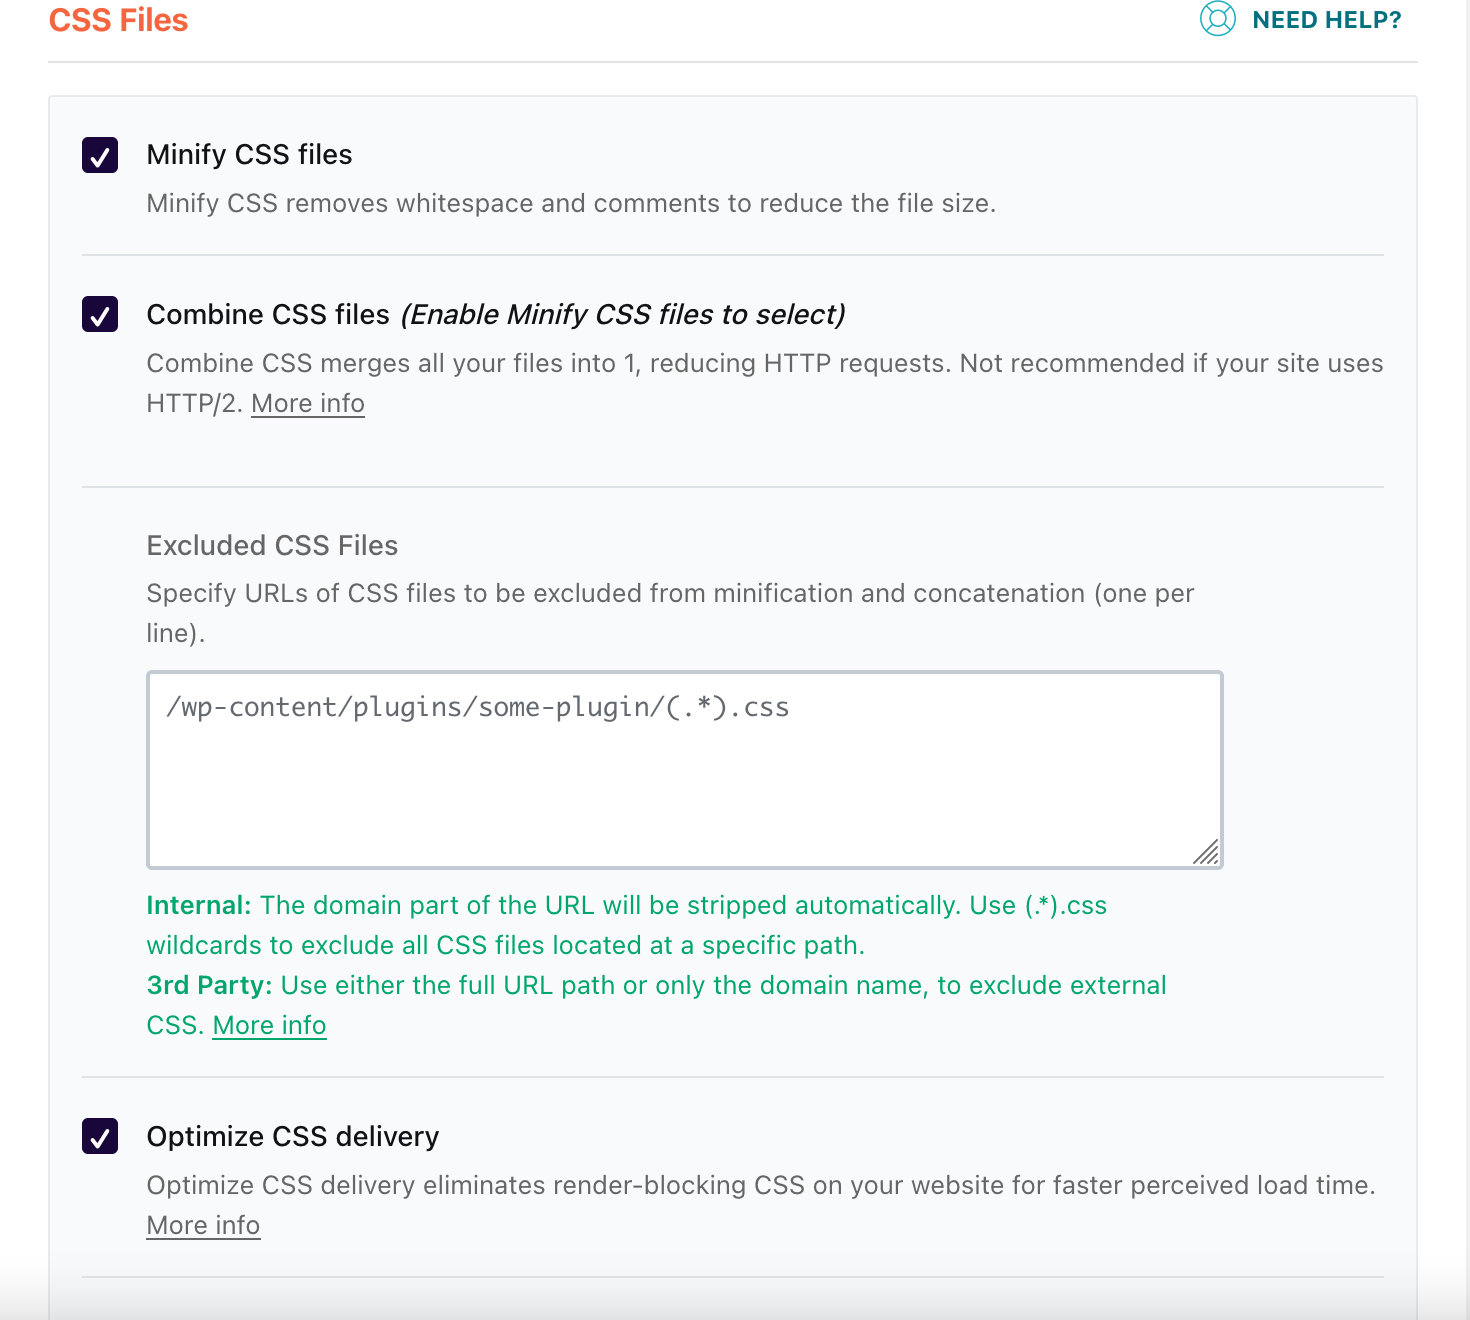
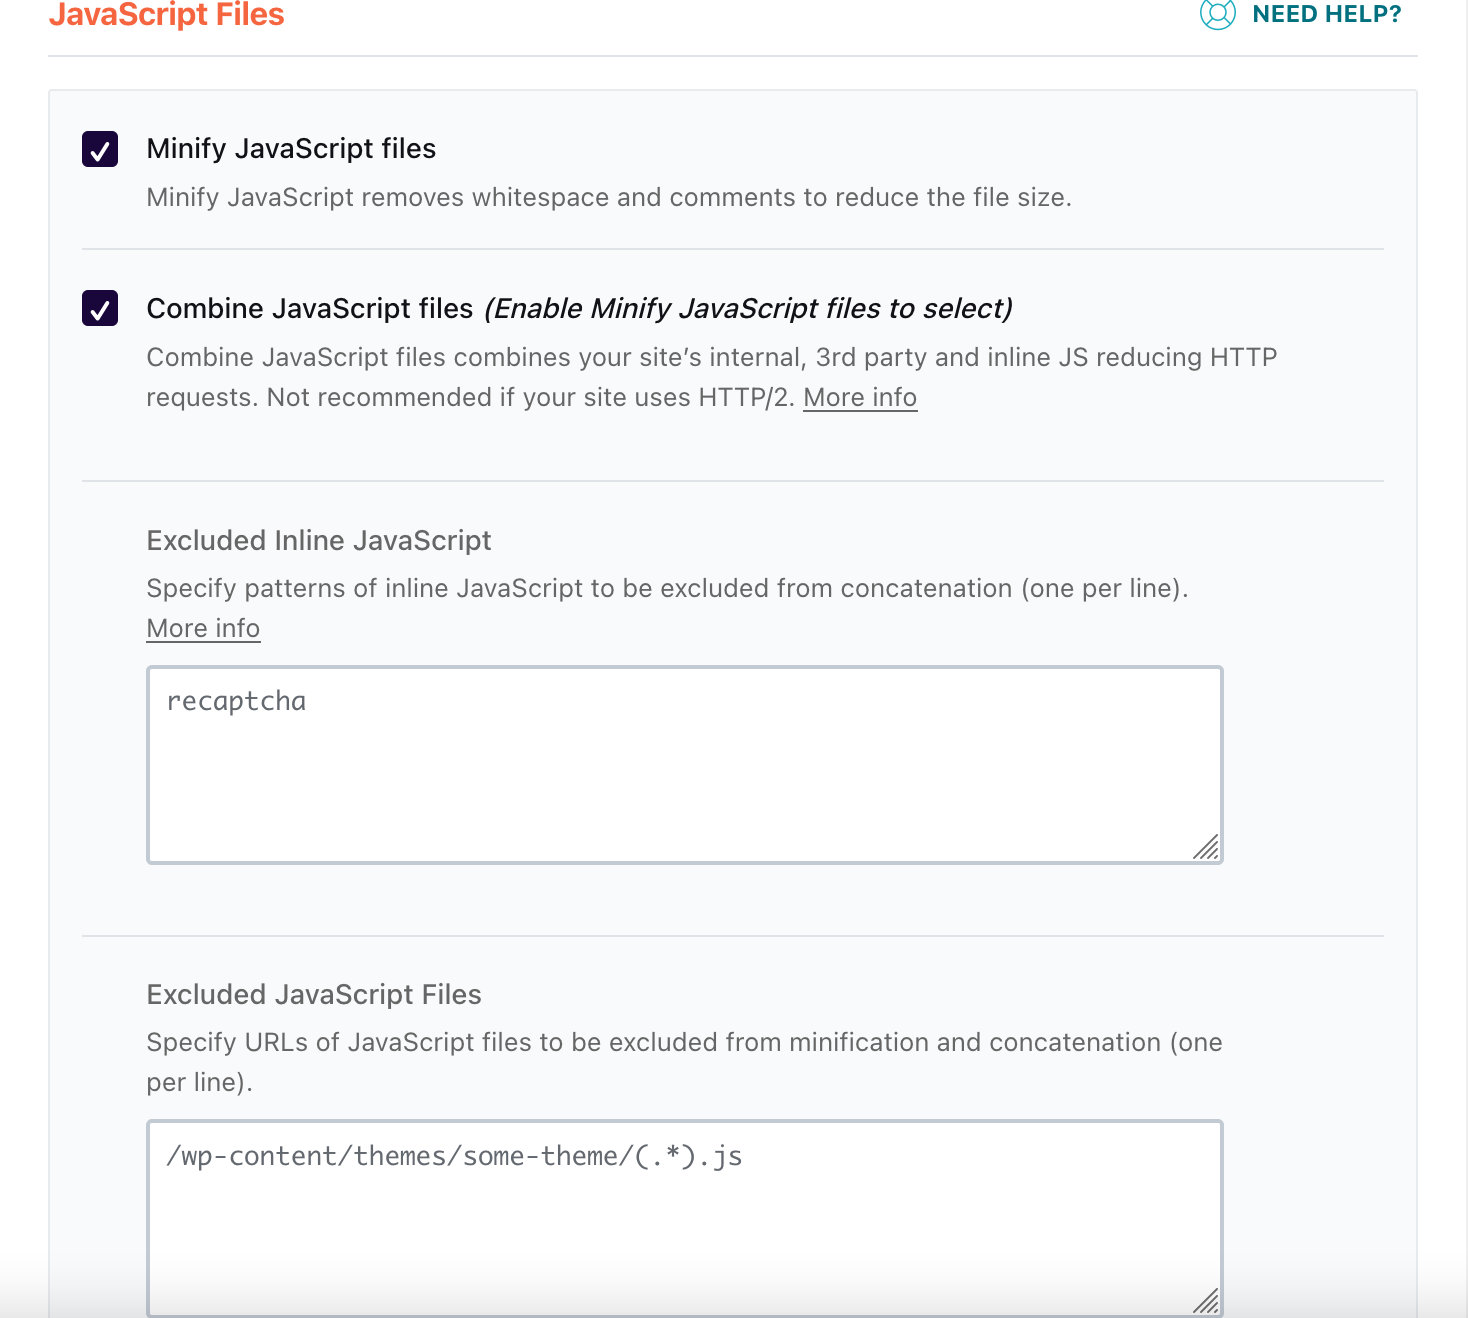
These options prevent WP Rocket from minifying and combining multiple CSS and JavaScript files into one. Our plugins already serve minified assets, and allowing any external source to re-minify them can lead to undesired behaviors on calendar pages.
Plugin Folders
Use these values in both the File Optimization and CDN tabs:
| Plugin Name | Assets Folder |
|---|---|
| The Events Calendar | /wp-content/plugins/the-events-calendar/(.*).css/wp-content/plugins/the-events-calendar/(.*).js |
| Events Calendar Pro | /wp-content/plugins/events-calendar-pro/(.*).css/wp-content/plugins/events-calendar-pro/(.*).js |
| Event Tickets | /wp-content/plugins/event-tickets/(.*).css/wp-content/plugins/event-tickets/(.*).js |
| Event Tickets Plus | /wp-content/plugins/event-tickets-plus/(.*).css/wp-content/plugins/event-tickets-plus/(.*).js |
| Filter Bar | /wp-content/plugins/the-events-calendar-filterbar/(.*).css/wp-content/plugins/the-events-calendar-filterbar/(.*).js |
| Community Events | /wp-content/plugins/the-events-calendar-community-events/(.*).css/wp-content/plugins/the-events-calendar-community-events/(.*).js |
| Eventbrite Tickets | /wp-content/plugins/the-events-calendar-eventbrite-tickets/(.*).css/wp-content/plugins/the-events-calendar-eventbrite-tickets/(.*).js |
Copy-Paste Asset Paths
/wp-content/plugins/the-events-calendar/(.*).css
/wp-content/plugins/events-calendar-pro/(.*).css
/wp-content/plugins/event-tickets/(.*).css
/wp-content/plugins/event-tickets-plus/(.*).css
/wp-content/plugins/the-events-calendar-filterbar/(.*).css
/wp-content/plugins/the-events-calendar-community-events/(.*).css
/wp-content/plugins/the-events-calendar-eventbrite-tickets/(.*).css
/wp-content/plugins/the-events-calendar/(.*).js
/wp-content/plugins/events-calendar-pro/(.*).js
/wp-content/plugins/event-tickets/(.*).js
/wp-content/plugins/event-tickets-plus/(.*).js
/wp-content/plugins/the-events-calendar-filterbar/(.*).js
/wp-content/plugins/the-events-calendar-community-events/(.*).js
/wp-content/plugins/the-events-calendar-eventbrite-tickets/(.*).js
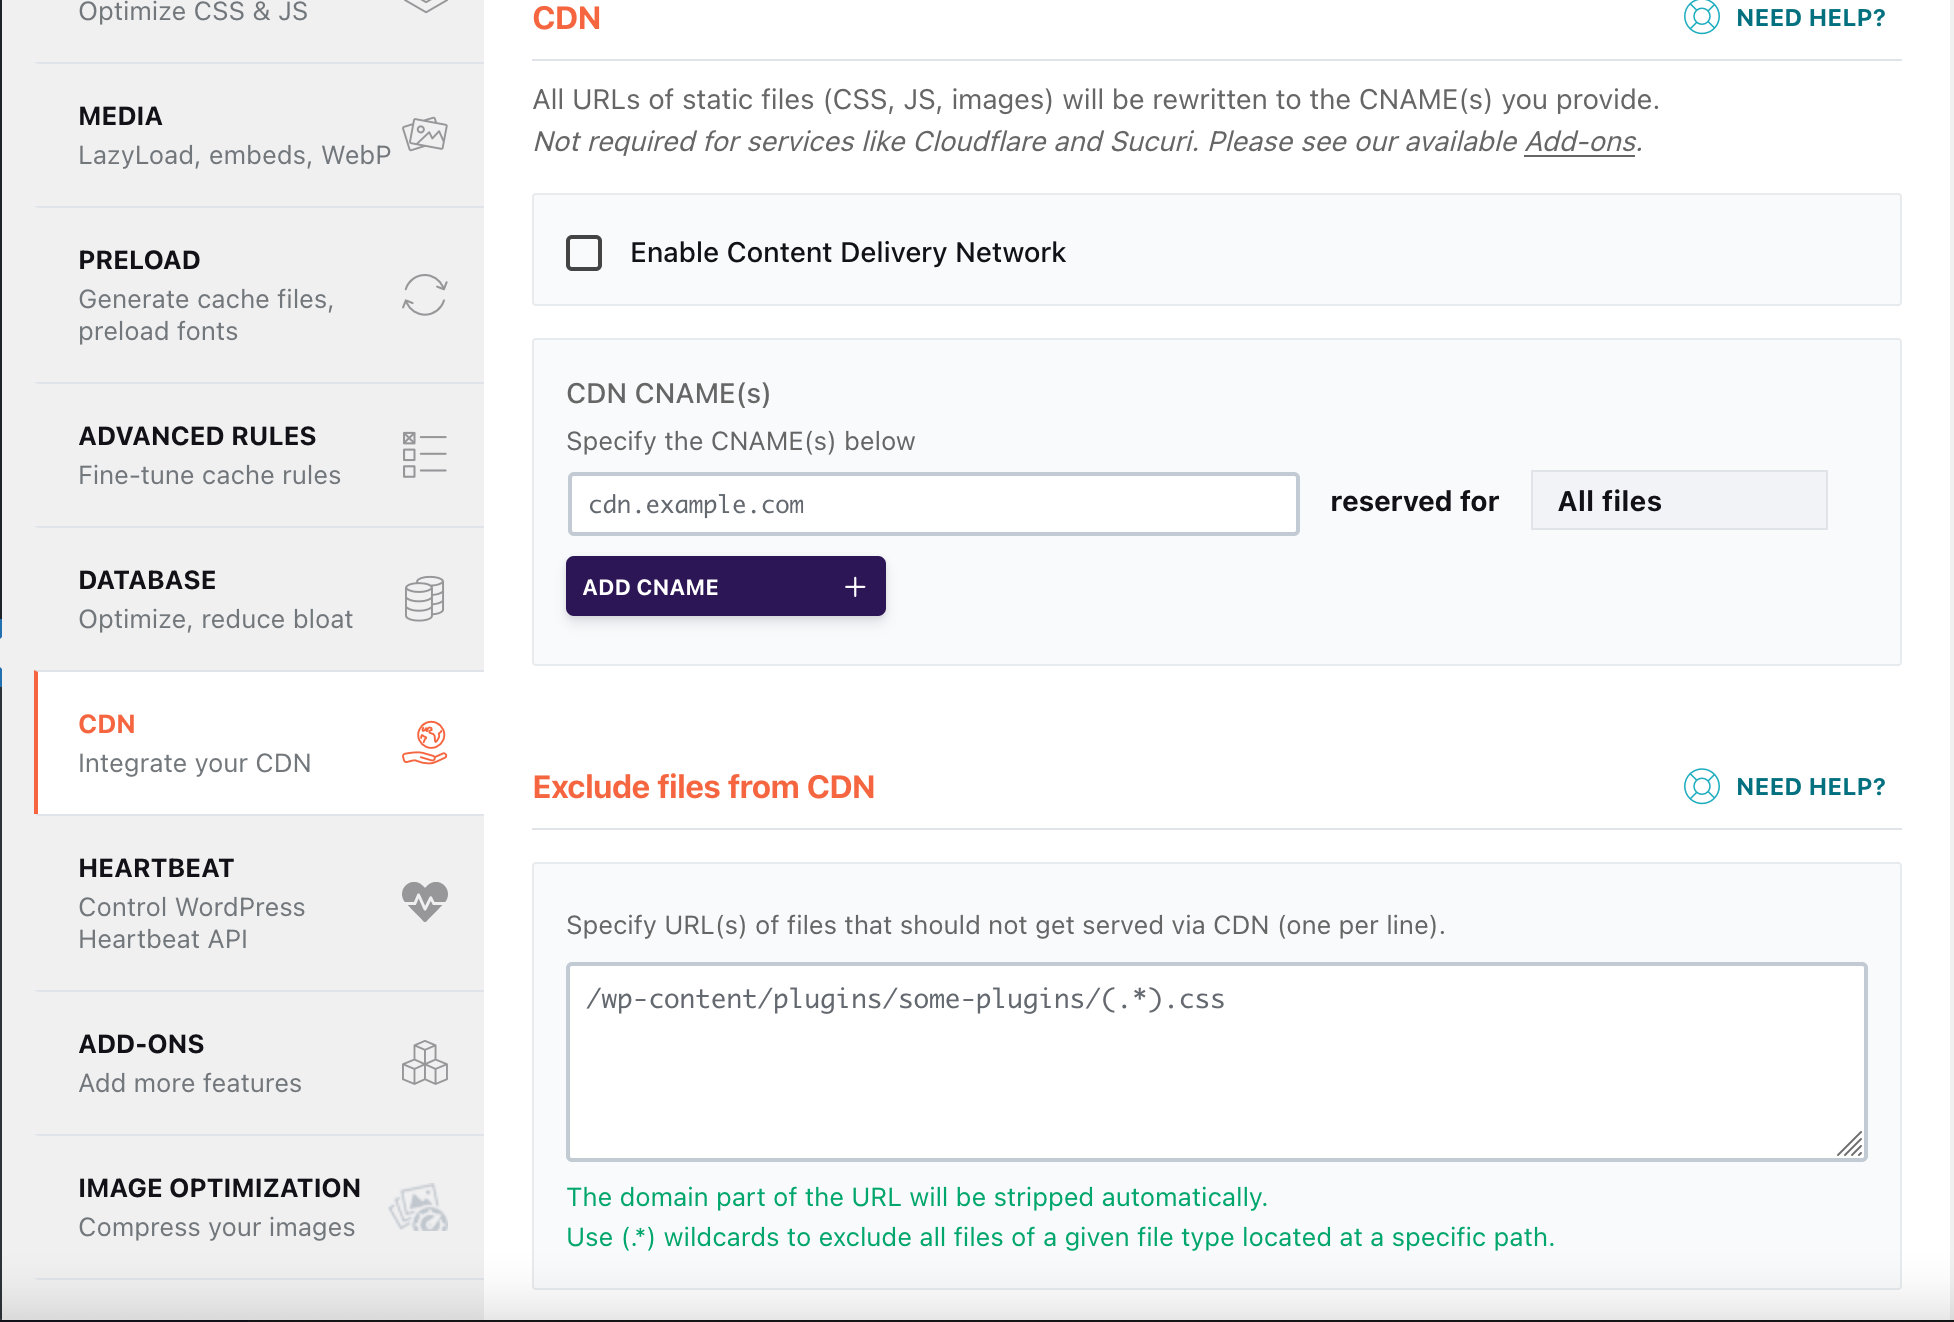
CDN
If you are using WP Rocket’s CDN feature, add the same plugin folder paths to Exclude files from CDN. This prevents differences in behavior for logged-in vs. logged-out users.
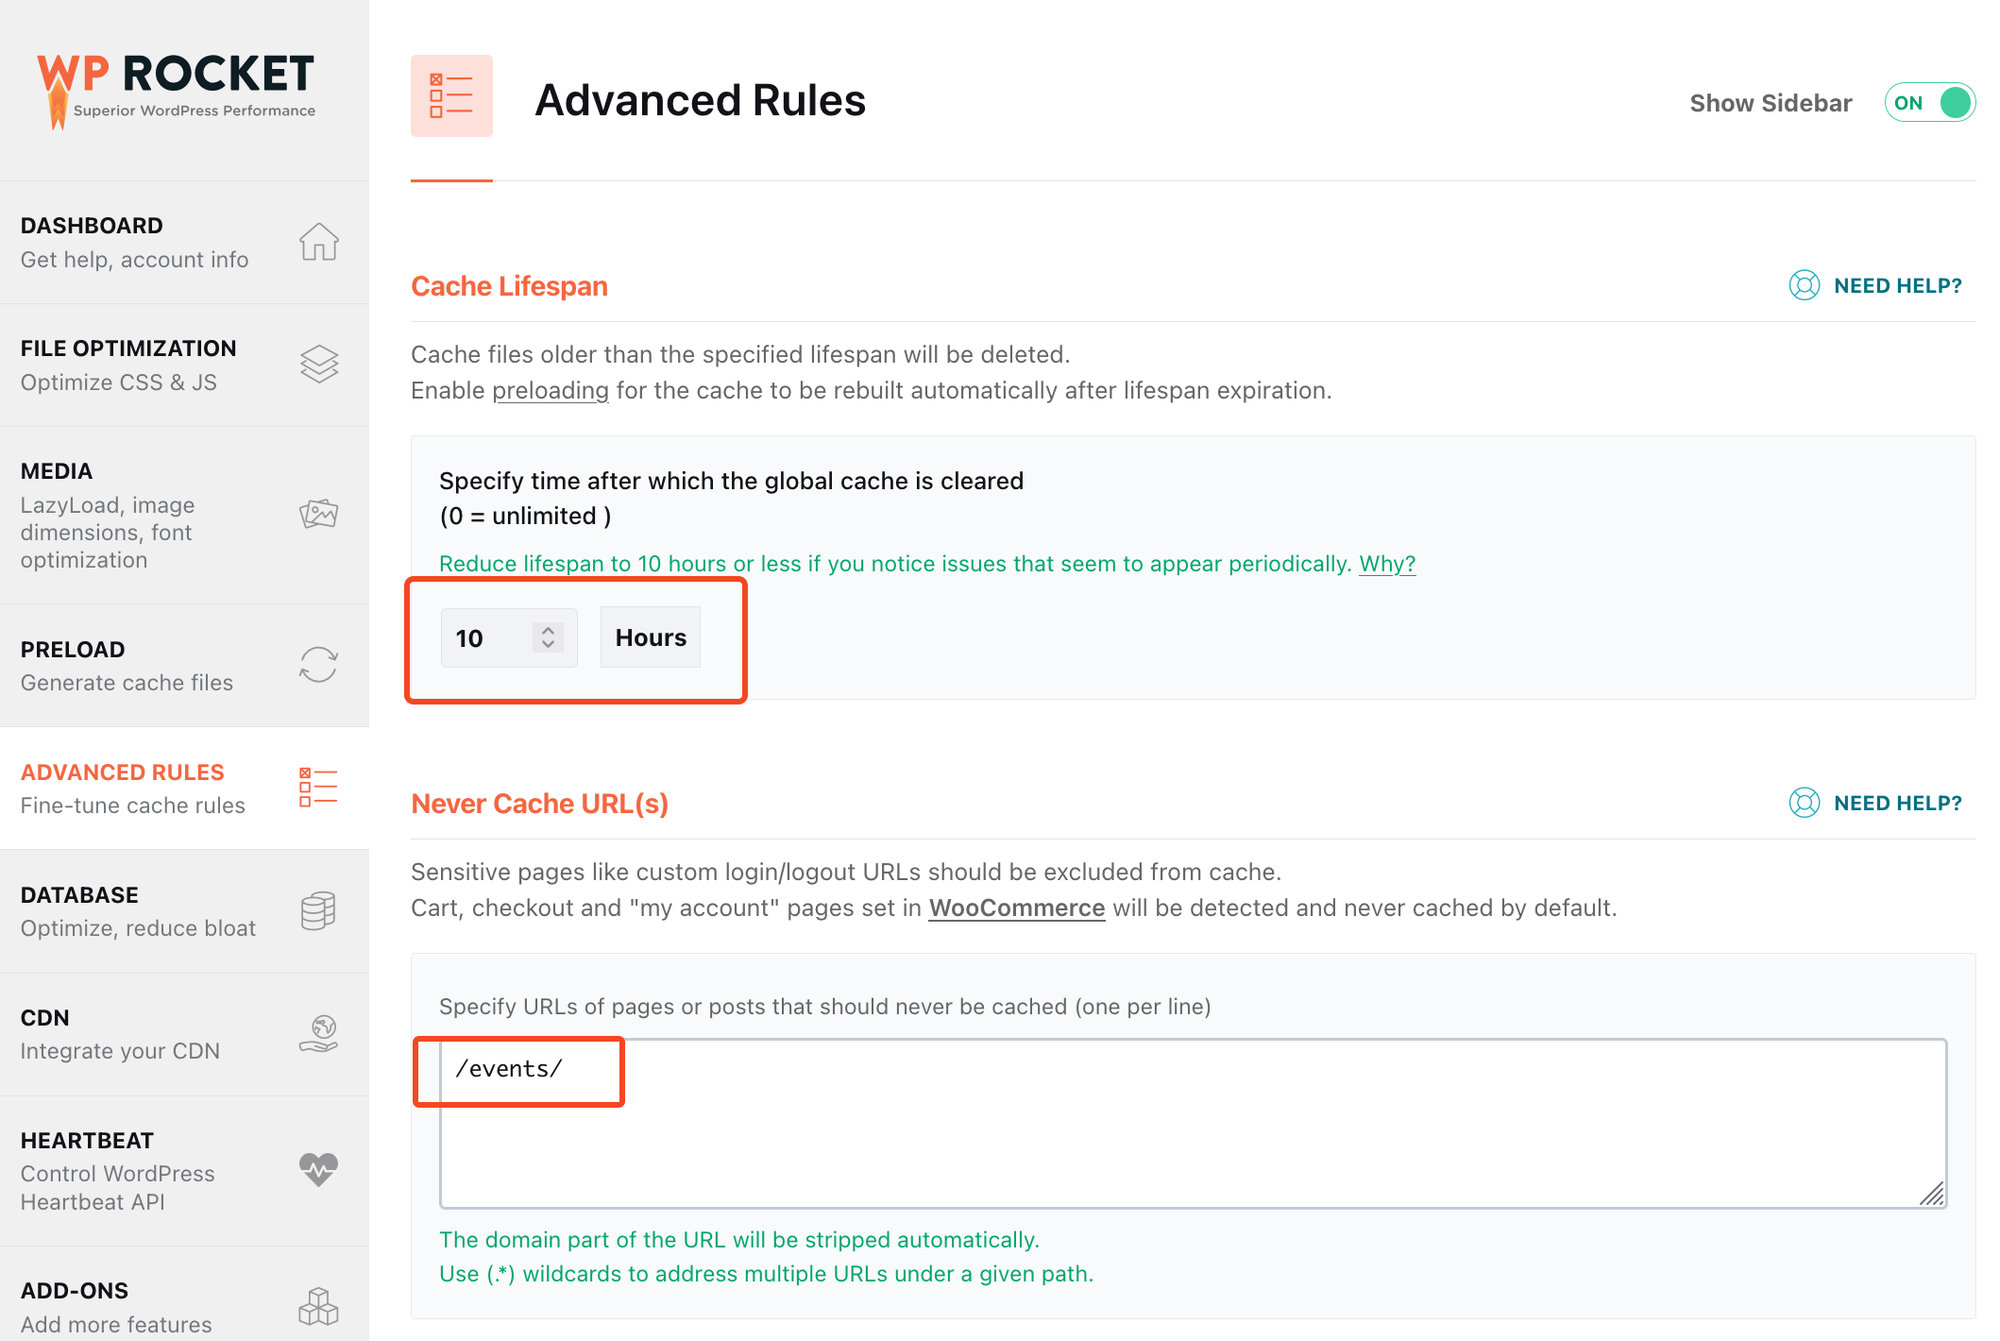
Advanced Rules
Under WP Rocket → Advanced Rules, set the Cache Lifespan to less than 12 hours. If the cache lifespan exceeds 12 hours, the calendar pagination may stop working as it will eventually request expired WordPress NONCE security keys.
Note: As stated in WP Rocket’s official documentation, the Cache Lifespan feature does not work on hosting platforms where WP Rocket caching is disabled, such as WP Engine, Kinsta, and WordPress.com. On those hosts, you will need to contact your host’s support team instead.
As a final step, ask WP Rocket to never cache the main calendar page. The example below uses the default /events/ slug — if you have changed your slug, use the updated value here. If you use Community Events, consider also adding /community-events/.
WP Super Cache
Current Status: compatible
WP Super Cache is a well-known plugin from the Automattic team focused on improving WordPress site performance. It generates static HTML files from your dynamic WordPress site to serve pages faster.
What You Need
- The Events Calendar
- WP Super Cache
- The slug for your calendar and events (e.g.
/eventsand/event)
👋 Throughout this section, we use /events and /event for the calendar and event single slugs respectively. Yours may differ depending on your plugin settings.
Advanced Settings
Navigate to Settings → WP Super Cache → Advanced. Find the Accepted Filenames & Rejected URIs option.
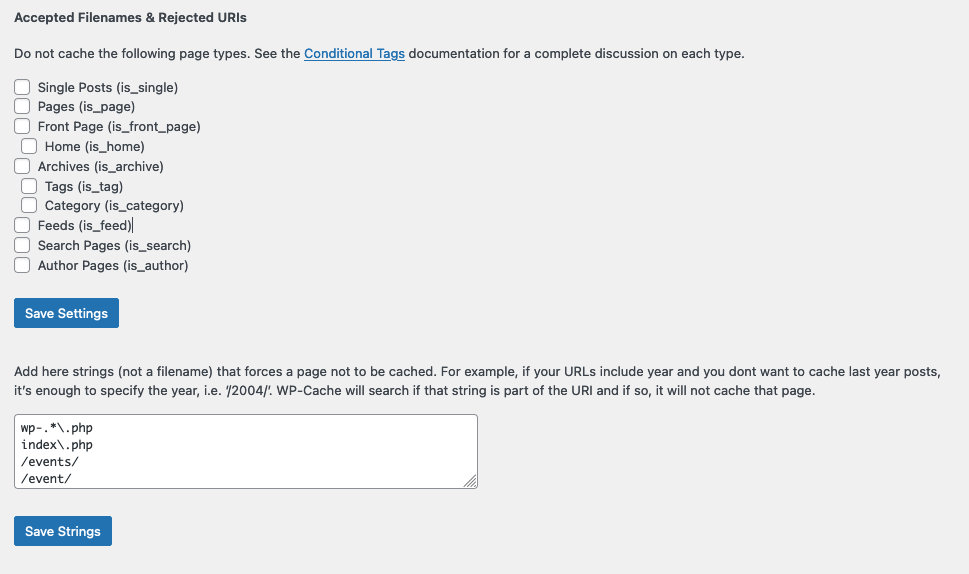
The first part of the page lets you select WordPress conditional tags to dynamically disable caching on matching pages — for example, selecting Single Posts (is_single) disables cache on all posts. This is a convenient way to exclude a set of pages rather than specifying them individually.
Below that is a textarea where you can specify strings that, when matched in a URL, also prevent caching. For example, entering /event/ will exclude all single event pages because they all contain /event/ in the URL. Enter one string per line and save your settings before proceeding.
While in the Advanced settings section, scroll down to Expiry Time & Garbage Collection. Whatever settings are in place there, ensure the cache is refreshed at least every 12 hours.
Contents Settings
After saving Advanced settings, navigate to the Contents tab to purge the cached files so your new settings take effect. Scroll down and click the Delete Expired button. Once that completes, click Delete Cache.
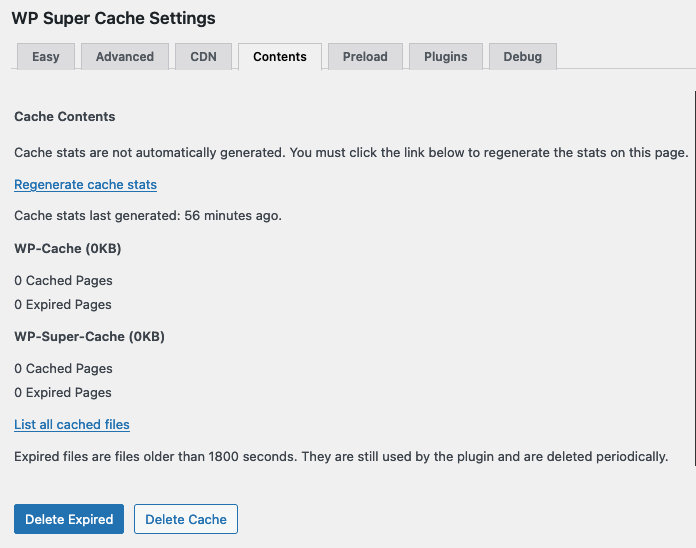
This is everything you need to do to prevent WP Super Cache from conflicting with The Events Calendar.
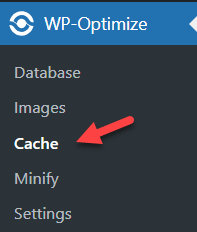
WP-Optimize
Current Status: compatible
WP-Optimize Cache is a popular all-in-one WordPress performance plugin that caches your site, cleans your database, and compresses images. This article covers the calendar-specific settings.
What You Need
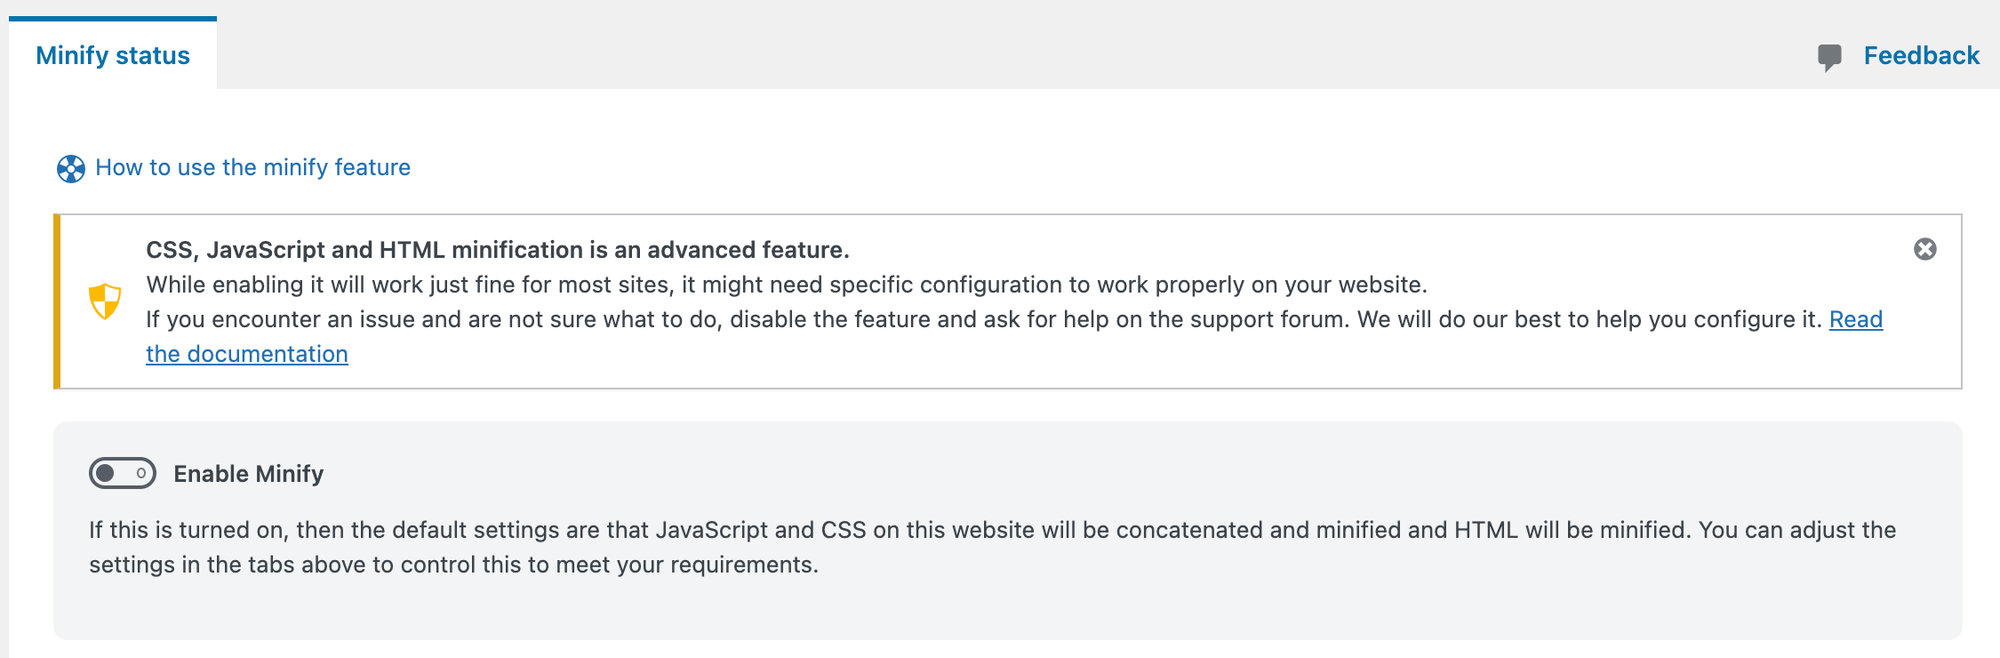
Minify Settings
To work properly with The Events Calendar, turn off minification. Go to WP-Optimize → Minify and toggle the Enable Minify button to the off position.
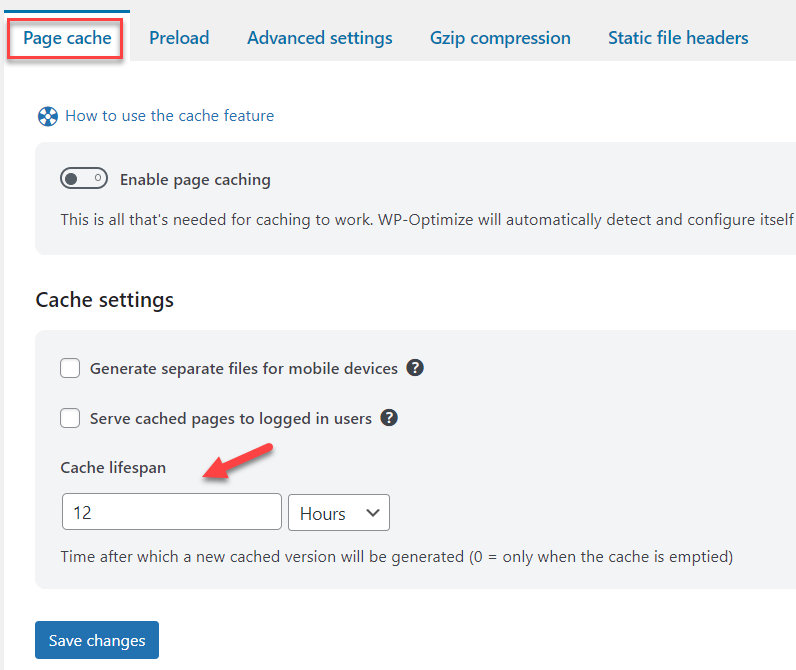
Cache Settings
1. Page Cache
Under Cache Settings, set the Cache lifespan to 12 hours.
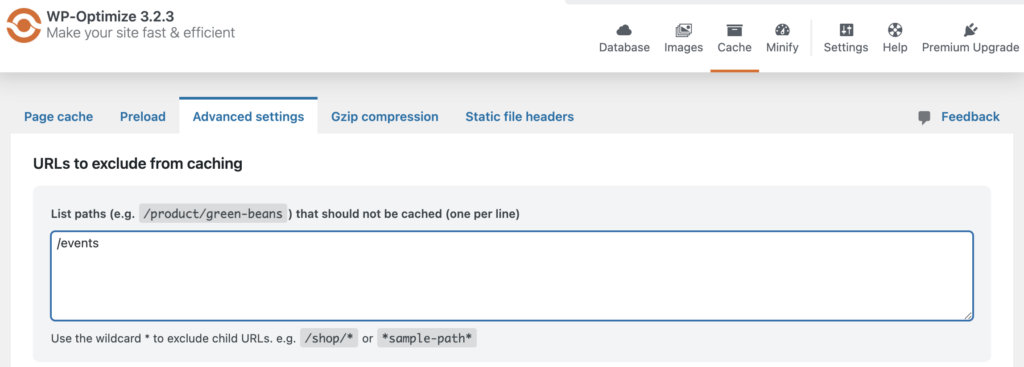
2. Advanced Settings
Under the Advanced settings, exclude your event URLs from being cached.
Plugin Folders
| Plugin Name | Assets Folder |
|---|---|
| The Events Calendar | /wp-content/plugins/the-events-calendar/(.*).css/wp-content/plugins/the-events-calendar/(.*).js |
| Events Calendar Pro | /wp-content/plugins/events-calendar-pro/(.*).css/wp-content/plugins/events-calendar-pro/(.*).js |
| Event Tickets | /wp-content/plugins/event-tickets/(.*).css/wp-content/plugins/event-tickets/(.*).js |
| Event Tickets Plus | /wp-content/plugins/event-tickets-plus/(.*).css/wp-content/plugins/event-tickets-plus/(.*).js |
| Filter Bar | /wp-content/plugins/the-events-calendar-filterbar/(.*).css/wp-content/plugins/the-events-calendar-filterbar/(.*).js |
| Community Events | /wp-content/plugins/the-events-calendar-community-events/(.*).css/wp-content/plugins/the-events-calendar-community-events/(.*).js |
| Eventbrite Tickets | /wp-content/plugins/the-events-calendar-eventbrite-tickets/(.*).css/wp-content/plugins/the-events-calendar-eventbrite-tickets/(.*).js |
Copy-Paste Asset Paths
/wp-content/plugins/the-events-calendar/(.*).css
/wp-content/plugins/events-calendar-pro/(.*).css
/wp-content/plugins/event-tickets/(.*).css
/wp-content/plugins/event-tickets-plus/(.*).css
/wp-content/plugins/the-events-calendar-filterbar/(.*).css
/wp-content/plugins/the-events-calendar-community-events/(.*).css
/wp-content/plugins/the-events-calendar-eventbrite-tickets/(.*).css
/wp-content/plugins/the-events-calendar/(.*).js
/wp-content/plugins/events-calendar-pro/(.*).js
/wp-content/plugins/event-tickets/(.*).js
/wp-content/plugins/event-tickets-plus/(.*).js
/wp-content/plugins/the-events-calendar-filterbar/(.*).js
/wp-content/plugins/the-events-calendar-community-events/(.*).js
/wp-content/plugins/the-events-calendar-eventbrite-tickets/(.*).js
SEO Press
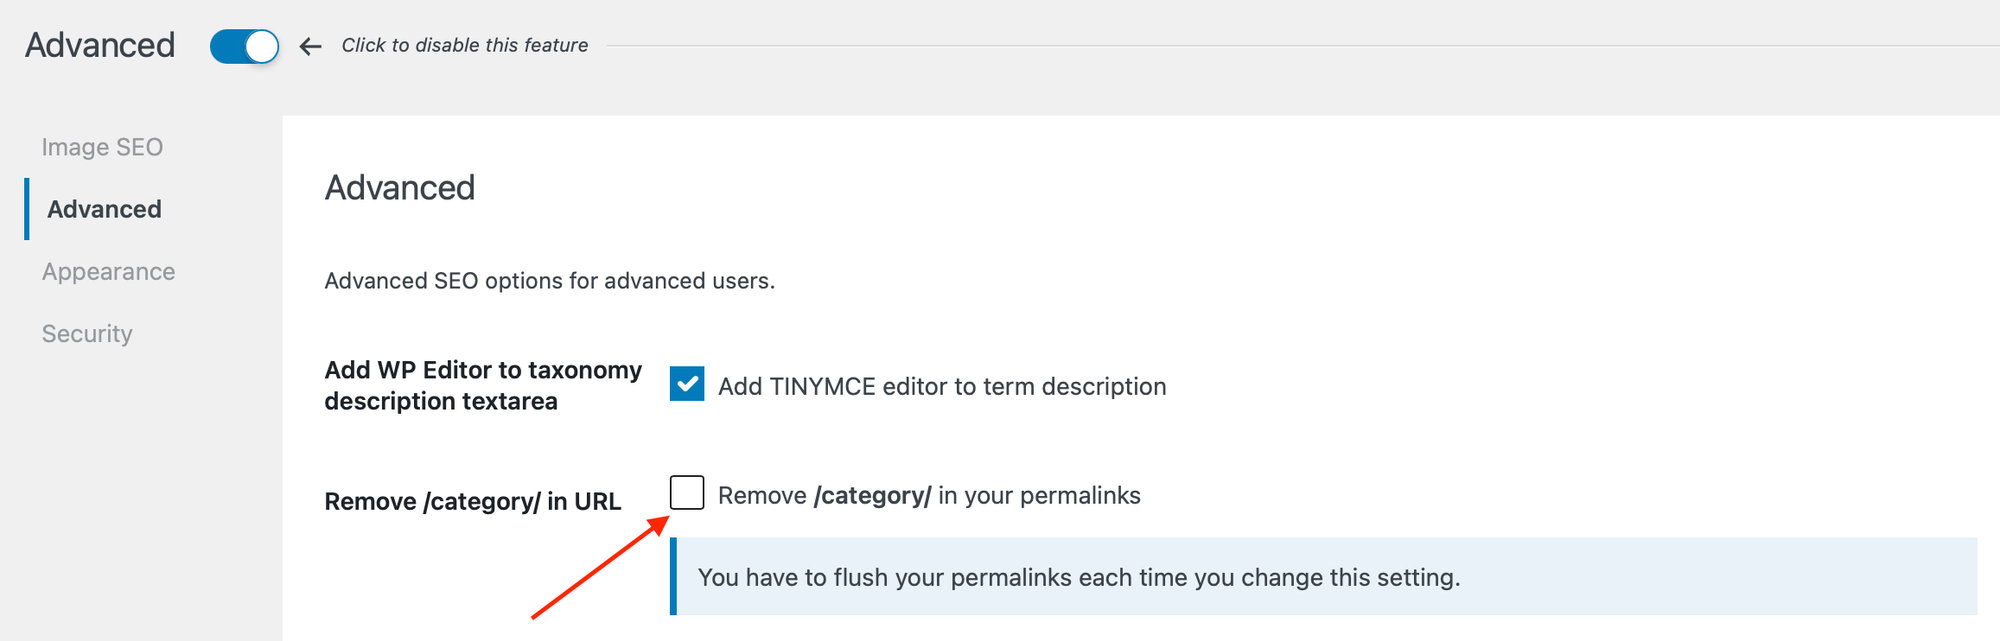
SEO Press is a plugin that helps you optimize the SEO of your WordPress site. When it is active, you may encounter a conflict that prevents Event Category pages from displaying correctly. There is an easy fix.
Fix: Event Category Pages Not Displaying
In the WordPress Dashboard, go to SEO Press → Advanced → Advanced and uncheck Remove /category/ in your permalinks.
Breeze Cache
Breeze Cache is a growing cache plugin developed by Cloudways and frequently found in WordPress websites hosted there. But it’s also easy to find them in the plugin repository. This plugin works well with The Events Calendar once you make a few adjustments, so let’s take a look at the available options that they offer.
Once Breeze Cache is installed and has been activated on your site, navigate to Settings → Breeze from the WordPress dashboard.
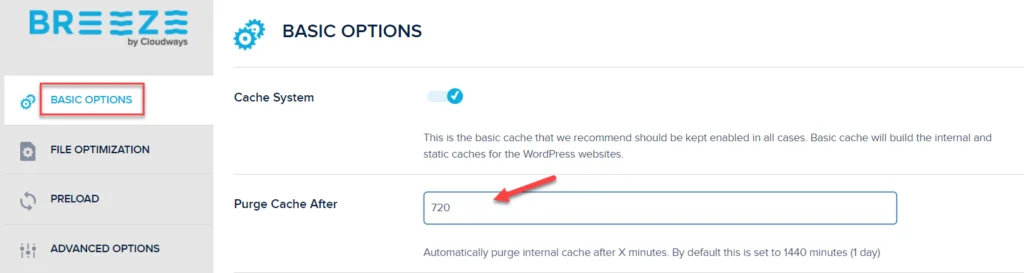
Basic Options
First, head over to the Basic Options tab and set the Purge Cache After field to 720 (12 hours).
CSS Settings
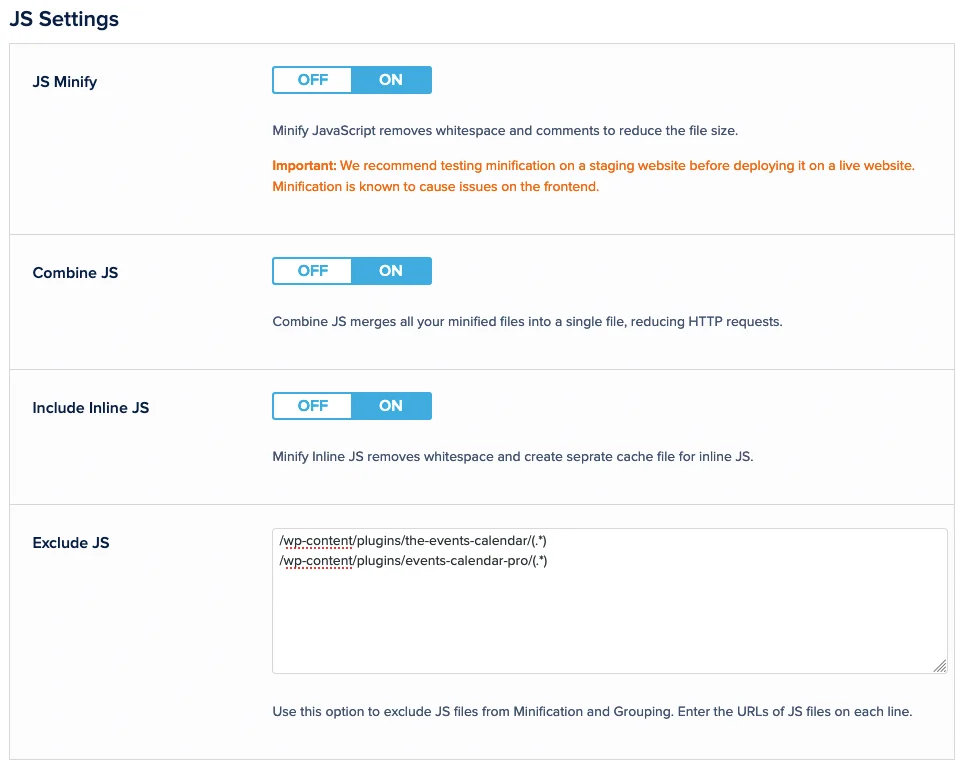
The second tab that we’ll use is File optimization. Look for the “CSS Settings” option on that page.
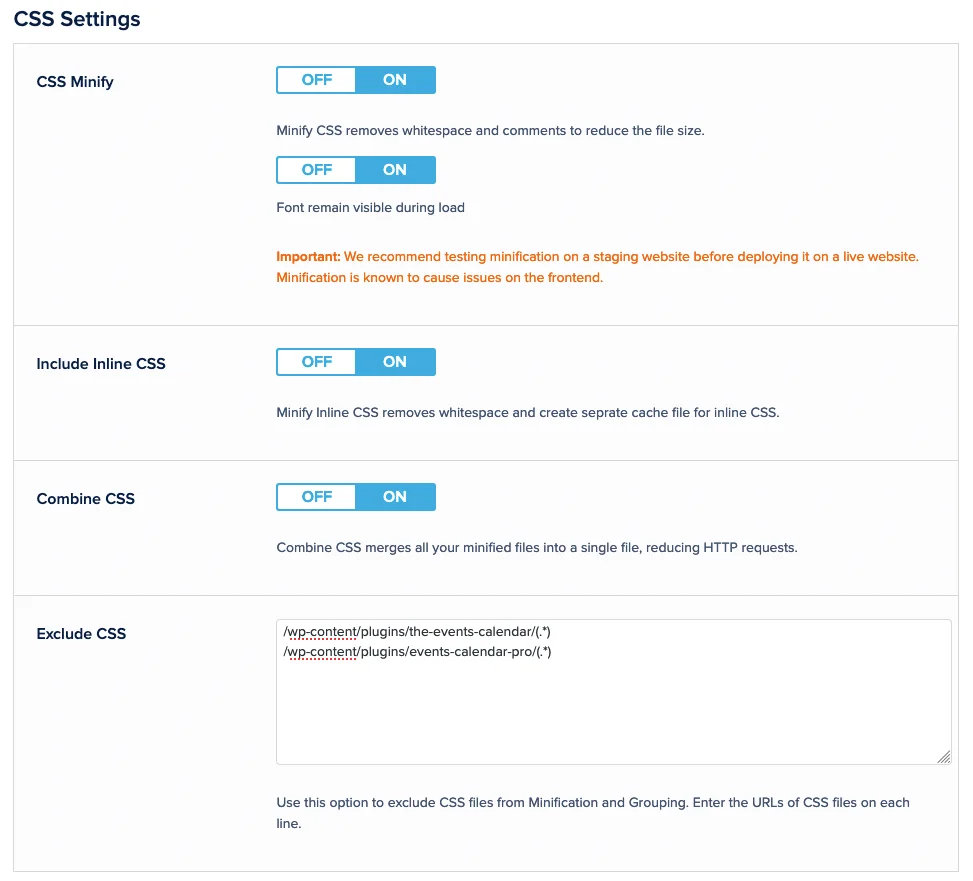
At the end of the section, you’ll find a place dedicated to “Exclude CSS” files or folders. You can use a relative path to any of our plugin folders and request the plugin to ignore all CSS files that they find there.
JS settings
The next section available on the same page is JS Settings. They work exactly like CSS, you can also use the same paths inside the “Exclude JS” area.
Advanced Options
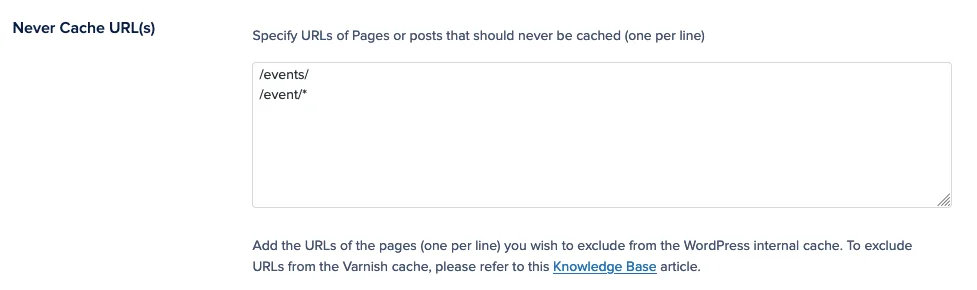
Head back to the “Settings > Breeze Cache” menu item and look for Advanced Options. There are some (optional) things that we can do there:
The first item inside Advanced Options will be Never Cache URL(s). There, it’s possible to set up specific URLs that will be ignored during the caching process. It’s a great idea to use your main calendar slugs there.
Plugin folders
Here is a list of the asset folders of each of our plugins that should be ignored.
| Plugin Name | Assets Folder |
|---|---|
| The Events Calendar | /wp-content/plugins/the-events-calendar/(.*) |
| Events Calendar Pro | /wp-content/plugins/events-calendar-pro/(.*) |
| Events Tickets | /wp-content/plugins/event-tickets/(.*) |
| Events Tickets Plus | /wp-content/plugins/event-tickets-plus/(.*) |
| Filter Bar | /wp-content/plugins/the-events-calendar-filterbar/(.*) |
| Community Events | /wp-content/plugins/the-events-calendar-community-events/(.*) |
| Eventbrite Tickets | /wp-content/plugins/the-events-calendar-eventbrite-tickets/(.*) |
To copy-paste
You can use the below to copy-paste all CSS and JavaScript asset resources easily.
/wp-content/plugins/the-events-calendar/(.*).css
/wp-content/plugins/events-calendar-pro/(.*).css
/wp-content/plugins/event-tickets/(.*).css
/wp-content/plugins/event-tickets-plus/(.*).css
/wp-content/plugins/the-events-calendar-filterbar/(.*).css
/wp-content/plugins/events-virtual/(.*).css
/wp-content/plugins/the-events-calendar-community-events/(.*).css
/wp-content/plugins/the-events-calendar-community-events-tickets/(.*).css
/wp-content/plugins/the-events-calendar-eventbrite-tickets/(.*).css/wp-content/plugins/the-events-calendar/(.*).js
/wp-content/plugins/events-calendar-pro/(.*).js
/wp-content/plugins/event-tickets/(.*).js
/wp-content/plugins/event-tickets-plus/(.*).js
/wp-content/plugins/the-events-calendar-filterbar/(.*).js
/wp-content/plugins/events-virtual/(.*).js
/wp-content/plugins/the-events-calendar-community-events/(.*).js
/wp-content/plugins/the-events-calendar-community-events-tickets/(.*).js
/wp-content/plugins/the-events-calendar-eventbrite-tickets/(.*).js
This is everything that you need to do to prevent Breeze Cache from caching any content created by The Events Calendar.
LiteSpeed Cache
LiteSpeed Cache is an all-in-one site acceleration plugin featuring an exclusive server-level cache and a collection of optimization features. It can be used on any web server and is compatible with popular plugins like WooCommerce, bbPress, and Yoast SEO.
General Settings
The first thing you’ll want to do is head over to the settings. Please go to wp-admin > LiteSpeed Cache > General > Server IP.
Entering your Server IP in LiteSpeed Cache allows the plugin to communicate directly with your website, without going through DNS or services like Cloudflare. This helps avoid delays or blocks that could happen otherwise.

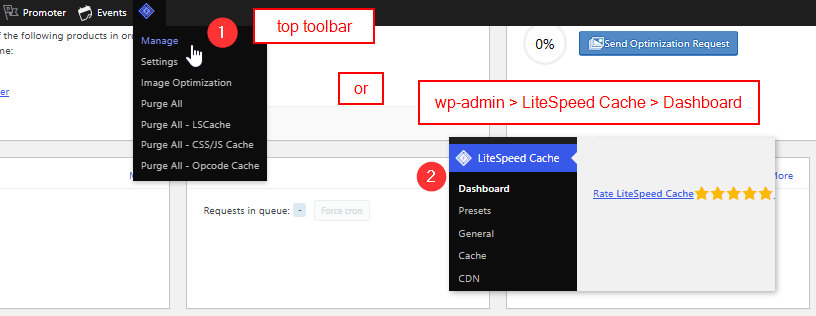
Once you’re done with the general settings, you can head over to Manage, which you can find in the top toolbar under the LiteSpeed Cache logo or by clicking Dashboard on the left sidebar under LiteSpeed Cache. Revisit this area any time you’d like to check on how your site is performing, and then make adjustments accordingly.

Other Cache Settings
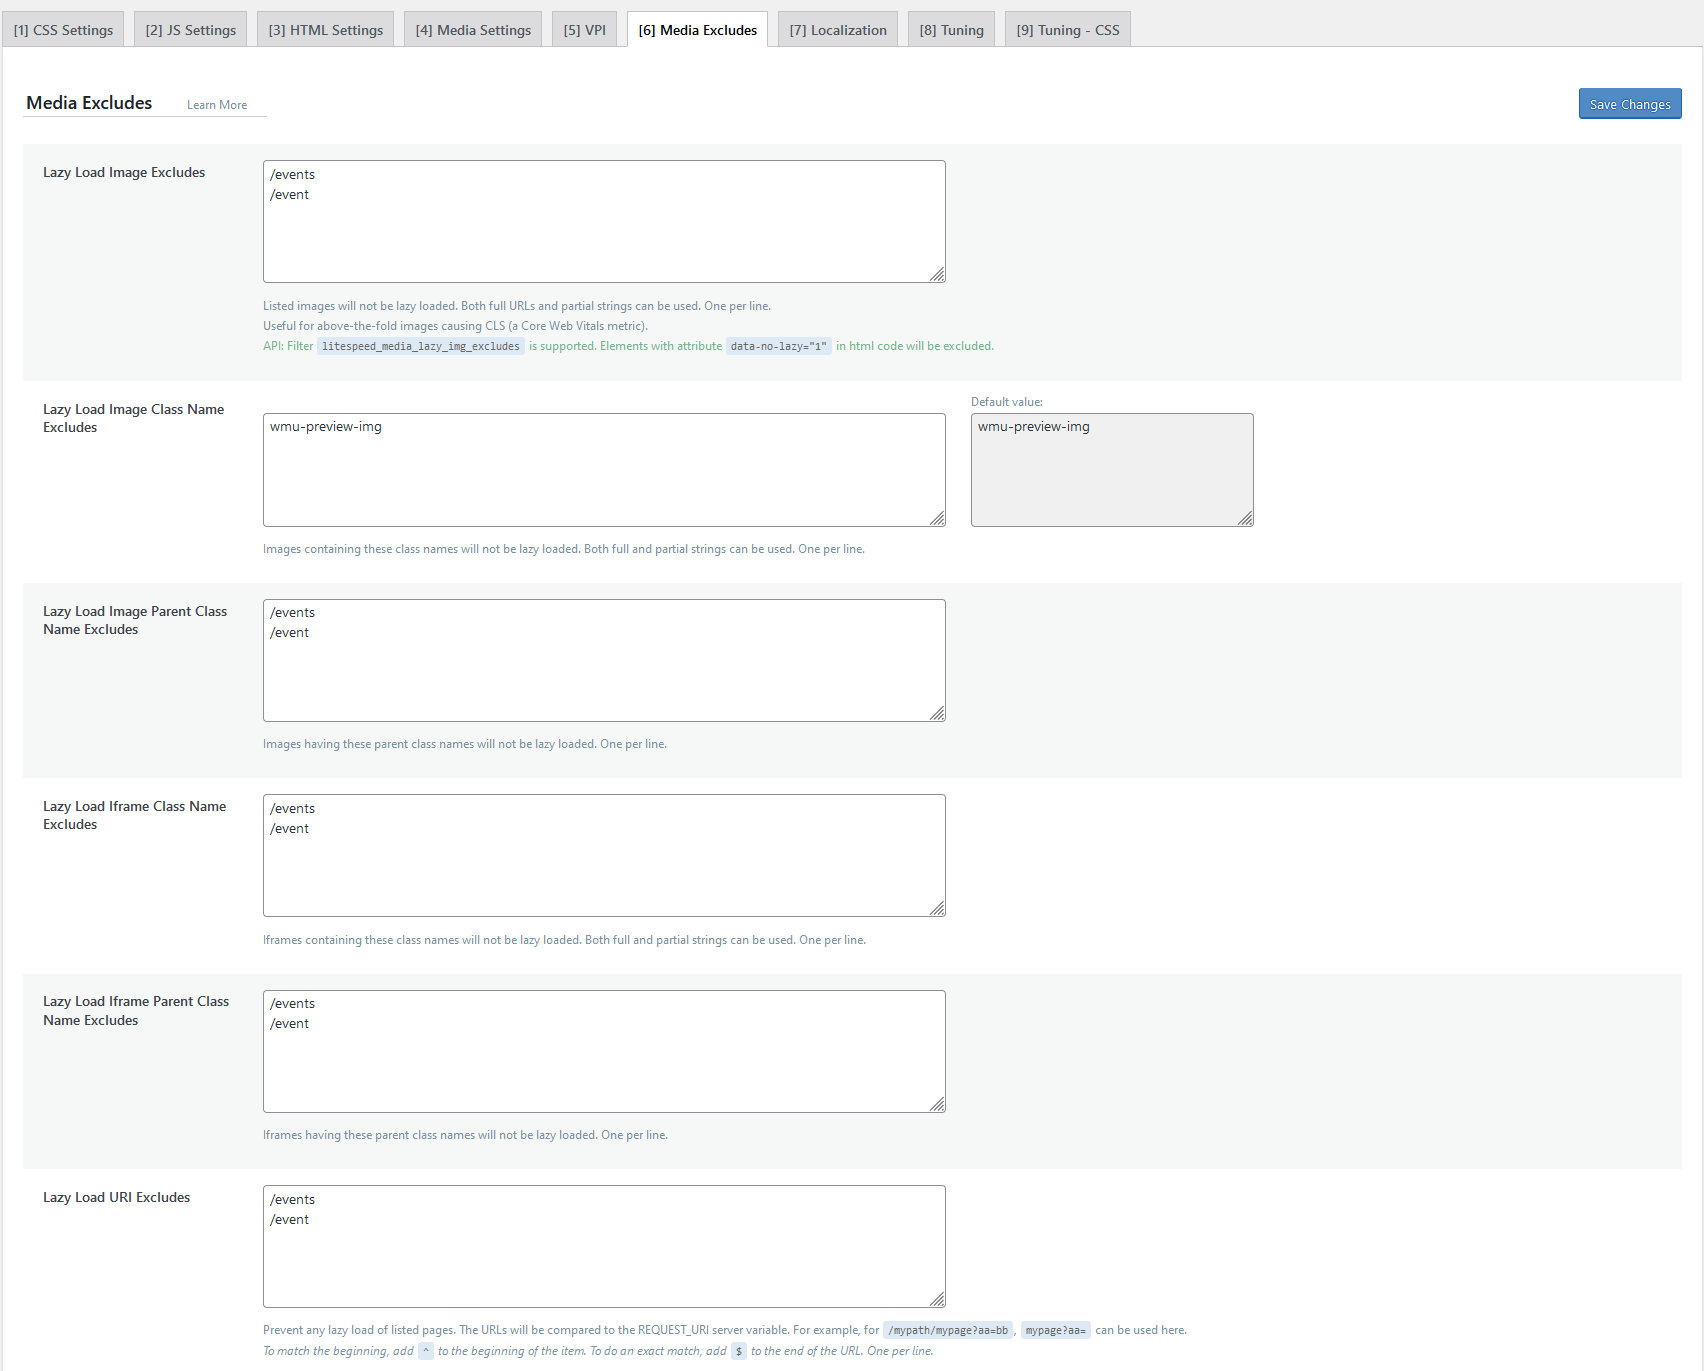
You can then head over to Page Optimization > Media Excludes and add the slugs that you’d like to make sure don’t get minified. Our plugins already minify these pages, so removing this option from LiteSpeed Cache will help them to run more smoothly. You’ll want to add your event slugs here. By default, these are your /events and /event pages.
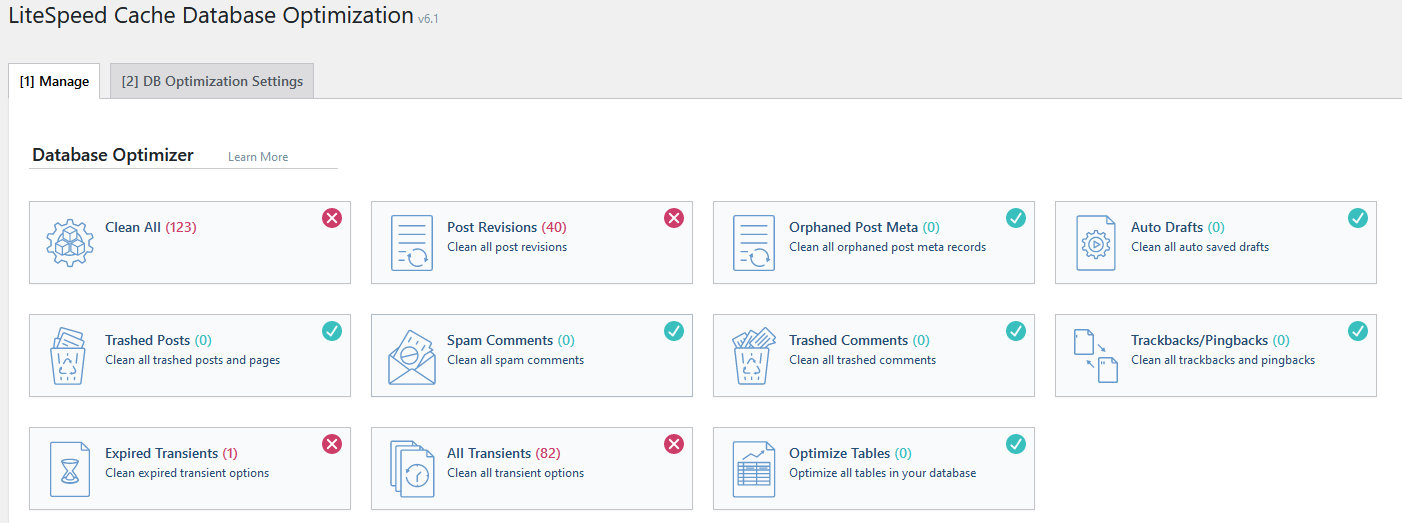
You can optimize the database under Database and manually click on the items that you’d like to clear the cache for.
Excluding Calendar Pages
LiteSpeed also allows you to utilize an external CDN to speed up your asset delivery. This shouldn’t hurt your calendar, but it can generate some differences for logged-in and logged-out users. You can exclude The Events Calendar CSS and JavaScript files to prevent this issue. Please go to CDN > Other Static CDN and scroll down to the Exclude Path field.

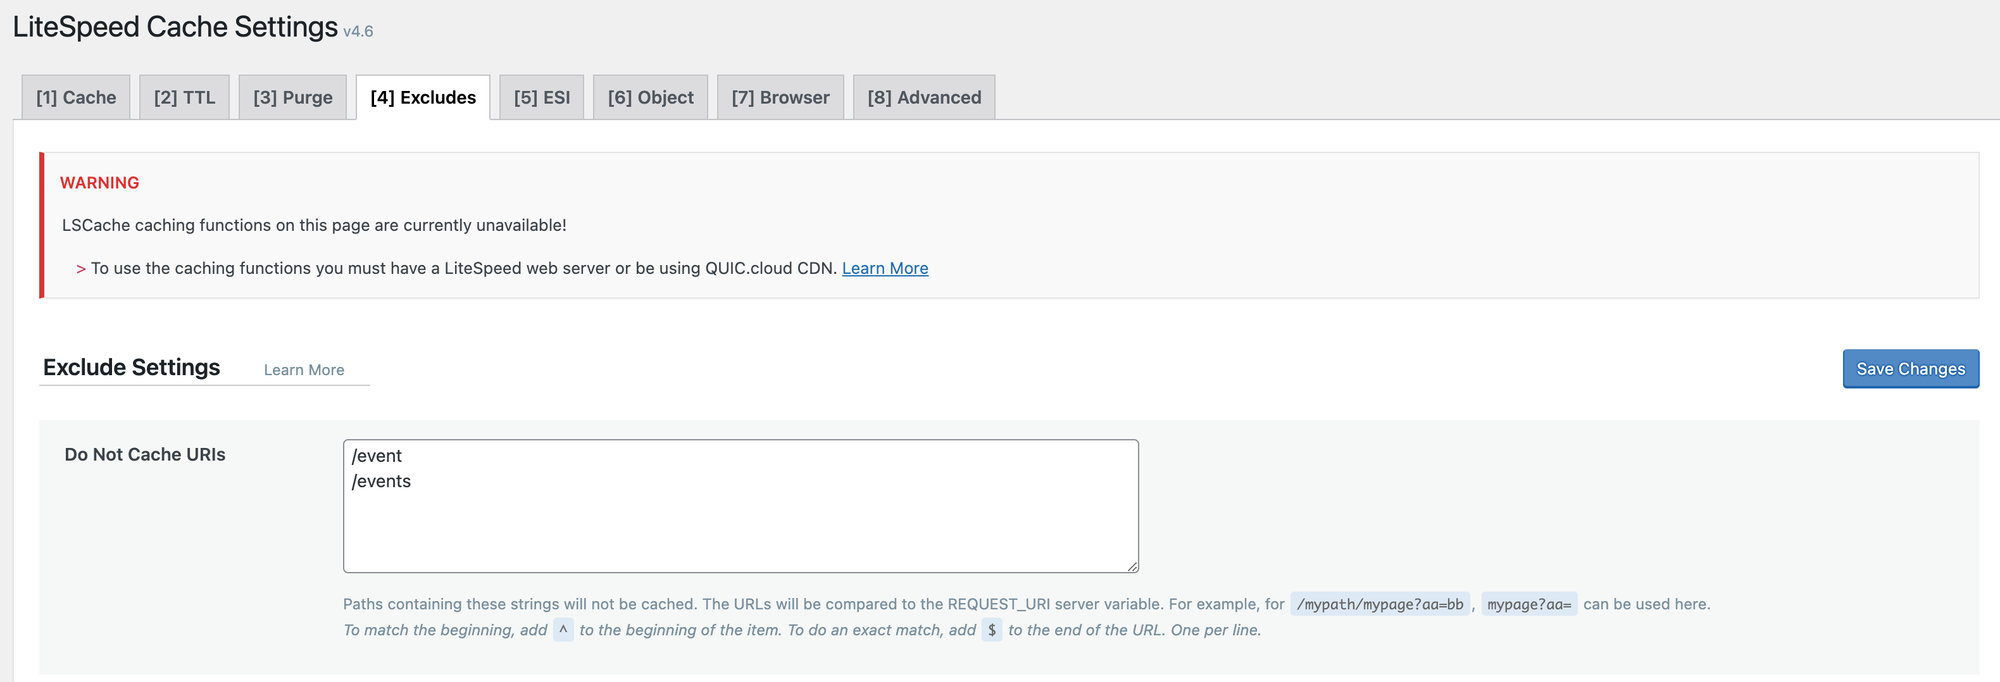
You’ll also want to exclude calendar pages under LiteSpeed > Cache > Excludes.
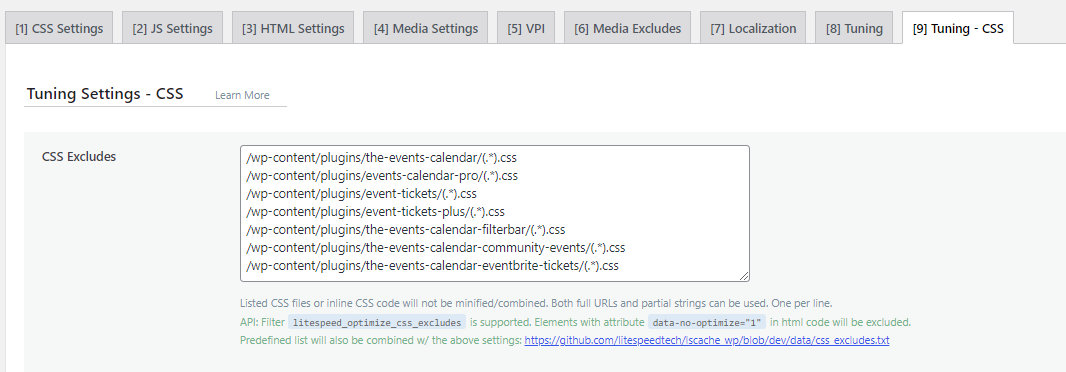
Lastly, you can use the Page Optimization > Tuning / Tuning – CSS to place your CSS and JS excludes from The Events Calendar plugins.

Plugin Folders
Here is a list of the asset folders of each of our plugins that should be ignored.
| Plugin Name | Assets Folder |
|---|---|
| The Events Calendar | /wp-content/plugins/the-events-calendar/(.*).css/wp-content/plugins/the-events-calendar/(.*).js |
| Events Calendar Pro | /wp-content/plugins/events-calendar-pro/(.*).css/wp-content/plugins/events-calendar-pro/(.*).js |
| Events Tickets | /wp-content/plugins/event-tickets/(.*).css/wp-content/plugins/event-tickets/(.*).js |
| Events Tickets Plus | /wp-content/plugins/event-tickets-plus/(.*).css/wp-content/plugins/event-tickets-plus/(.*).js |
| Filter Bar | /wp-content/plugins/the-events-calendar-filterbar/(.*).css/wp-content/plugins/the-events-calendar-filterbar/(.*).js |
| Community Events | /wp-content/plugins/the-events-calendar-community-events/(.*).css/wp-content/plugins/the-events-calendar-community-events/(.*).js |
| Eventbrite Tickets | /wp-content/plugins/the-events-calendar-eventbrite-tickets/(.*).css/wp-content/plugins/the-events-calendar-eventbrite-tickets/(.*).js |
To copy-paste
You can use the below to copy-paste all CSS and JavaScript asset resources easily.
/wp-content/plugins/the-events-calendar/(.*).css
/wp-content/plugins/events-calendar-pro/(.*).css
/wp-content/plugins/event-tickets/(.*).css
/wp-content/plugins/event-tickets-plus/(.*).css
/wp-content/plugins/the-events-calendar-filterbar/(.*).css
/wp-content/plugins/the-events-calendar-community-events/(.*).css
/wp-content/plugins/the-events-calendar-eventbrite-tickets/(.*).css/wp-content/plugins/the-events-calendar/(.*).js
/wp-content/plugins/events-calendar-pro/(.*).js
/wp-content/plugins/event-tickets/(.*).js
/wp-content/plugins/event-tickets-plus/(.*).js
/wp-content/plugins/the-events-calendar-filterbar/(.*).js
/wp-content/plugins/the-events-calendar-community-events/(.*).js
/wp-content/plugins/the-events-calendar-eventbrite-tickets/(.*).js
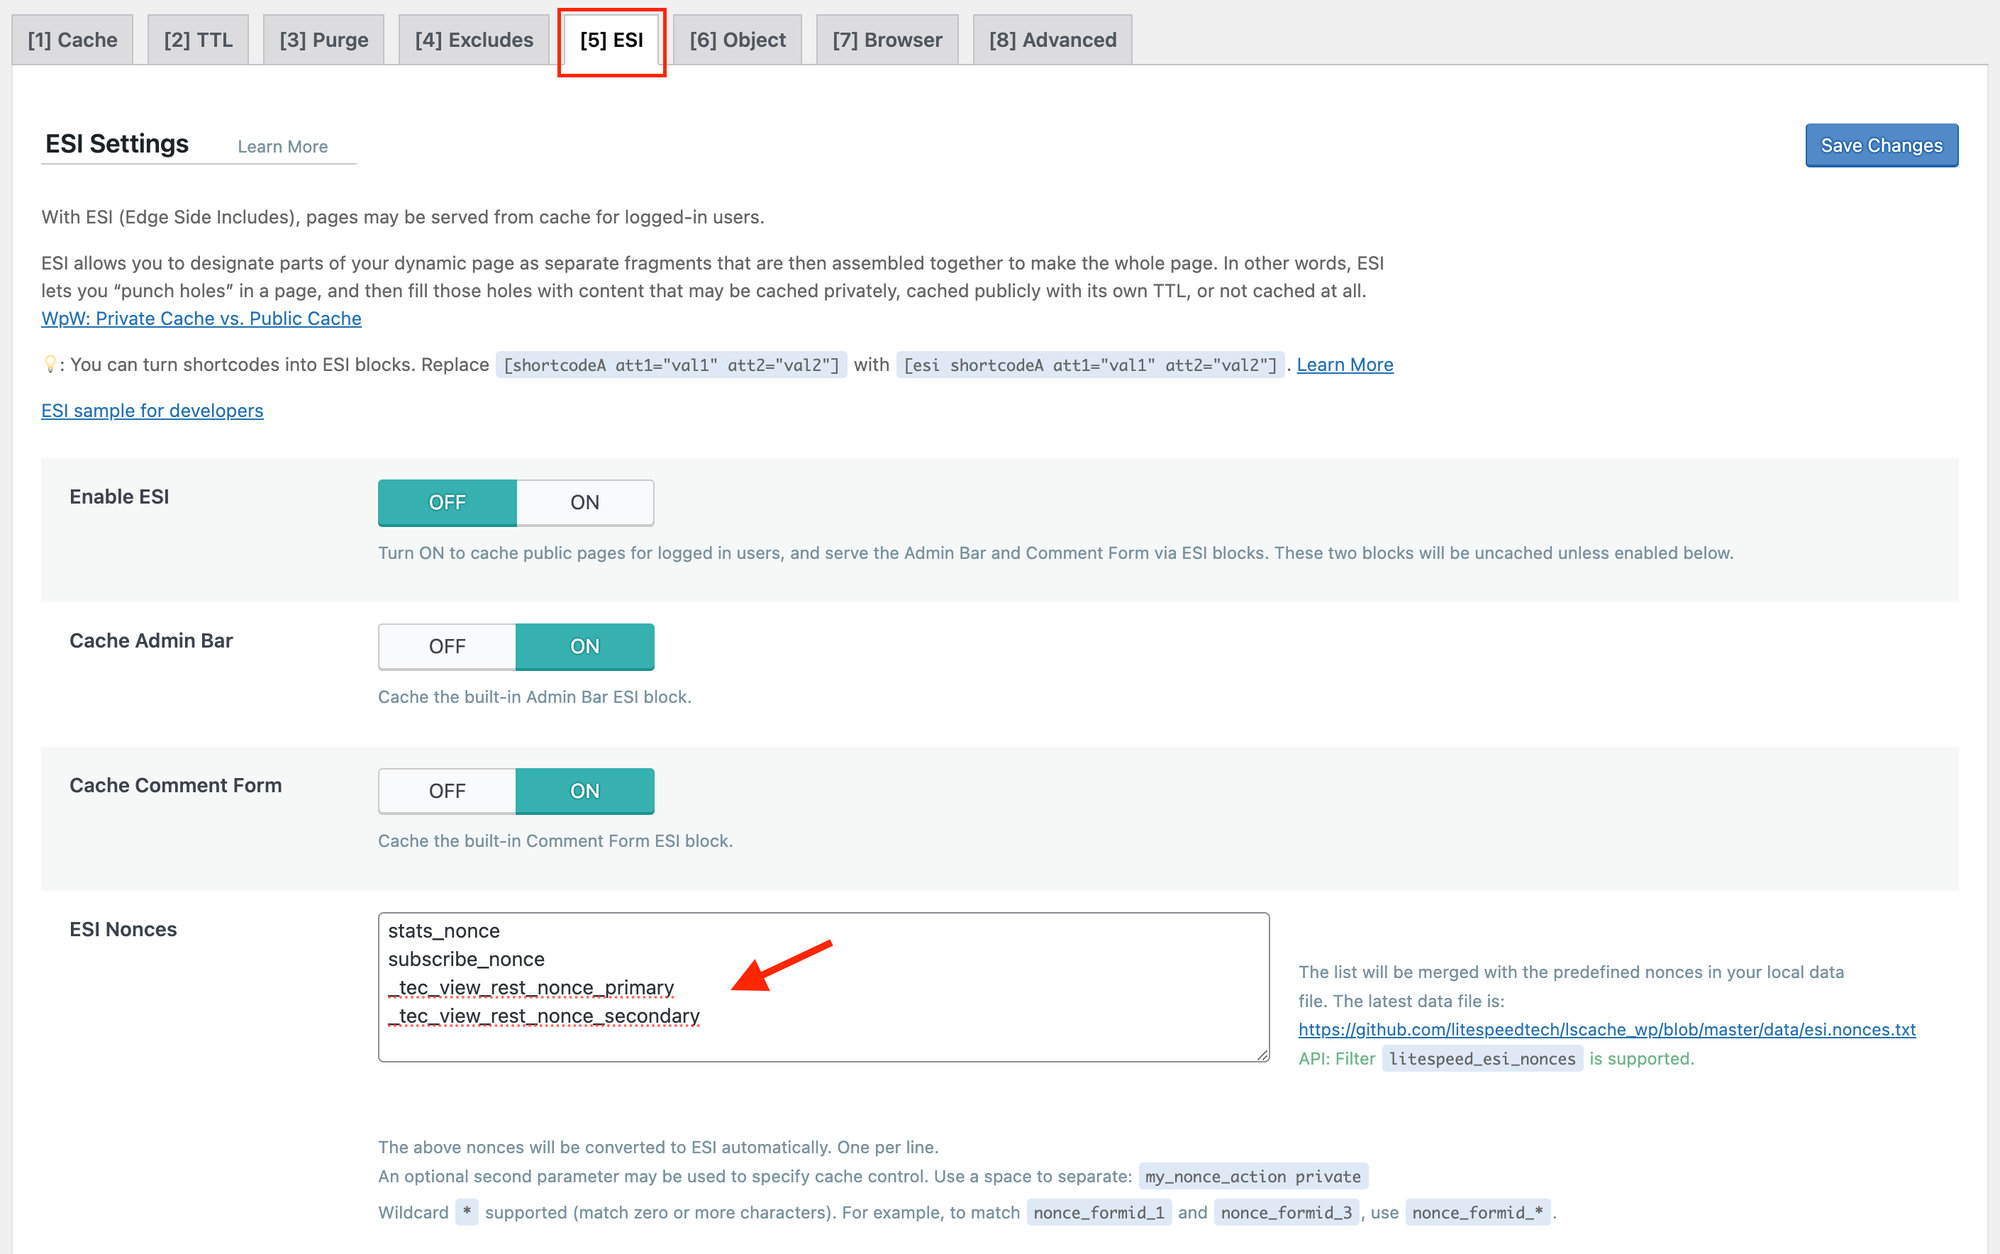
Excluding ESI nonces
Add _tec_view_rest_nonce_primary and _tec_view_rest_nonce_secondary to the list of ESI Nonces.
(wp-admin > LiteSpeed Cache > Cache > ESI)
Autoptimize
Autoptimize is a simple but well-known plugin focused on improving the performance of a WordPress site.
Let’s look at how it works with The Events Calendar and find out what we need to do to configure the plugin so that the calendar is properly cached for the fastest loading possible.
JavaScript options
Once Autoptimize is installed and activated on your site, navigate to Settings → Autoptimize from the WordPress dashboard. After that, head over to the JS, CSS & HTML sections.
Then look for the “JavaScript options” on the page.

If the “Optimize JavaScript Code” option is checked, then head down the page to the “Exclude scripts from Autoptimize” option and insert the path where The Events Calendar is installed on the server.
Assuming you are using a standard WordPress installation, these are the paths for The Events Calendar and Events Calendar Pro:
wp-content/plugins/the-events-calendar/
wp-content/plugins/events-calendar-pro/
You can enter multiple paths in this setting, but make sure they are separated by commas. For example:
wp-content/plugins/the-events-calendar/, wp-content/plugins/events-calendar-pro/
CSS options
CSS is another asset that can be optimized and cached for better performance. For example, Autoptimize provides a number of settings to make your CSS code and files load as fast as possible. Navigate to Settings → Autoptimize from the WordPress dashboard. The first tab that we’ll use is JS, CSS & HTML. Look for the “CSS Options” section on the page.
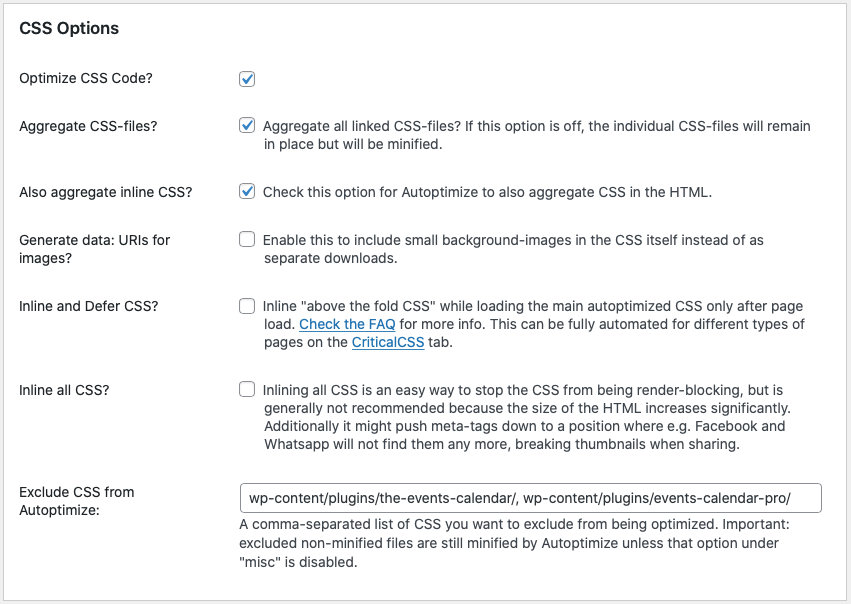
As we did with JavaScript, if the option to “Optimize CSS Code” is checked, scroll down the page to the “Exclude CSS from Autoptimize” option and insert the path where the plugins are installed. You can use the same values we used in the previous section:
wp-content/plugins/the-events-calendar/, wp-content/plugins/events-calendar-pro/
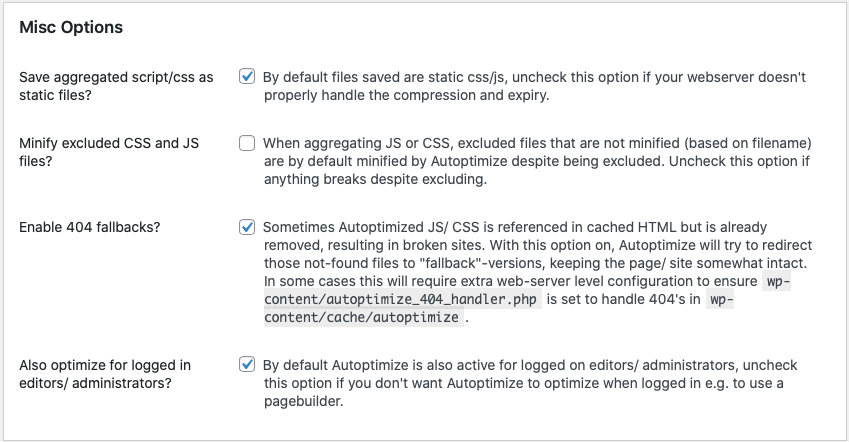
Miscellaneous options
Next is the Misc Options section, where you are able to enable the “Minify excluded CSS and JS files” option. Even if we tell Autoptimize to exclude a file when it optimizes assets, it will still minify those excluded files. It’s sort of a service they do to make sure all your code is optimized, even if it isn’t included in the compiled assets.
We generally recommend disabling that option because it can lead to unintended errors and conflicts with other code.
Plugins paths
The server paths for each of our plugins are outlined below for your reference when configuring Autopimize settings for CSS and JavaScript.
| Plugin Name | Assets Folder |
|---|---|
| The Events Calendar | /wp-content/plugins/the-events-calendar/ |
| Events Calendar Pro | /wp-content/plugins/events-calendar-pro/ |
| Events Tickets | /wp-content/plugins/event-tickets/ |
| Events Tickets Plus | /wp-content/plugins/event-tickets-plus/ |
| Filter Bar | /wp-content/plugins/the-events-calendar-filterbar/ |
| Community | /wp-content/plugins/the-events-calendar-community-events/ |
| Eventbrite Tickets | /wp-content/plugins/the-events-calendar-eventbrite-tickets/ |
To copy-paste
You can use the below to copy-paste all of our plugin folders easily.
/wp-content/plugins/the-events-calendar/,
/wp-content/plugins/events-calendar-pro/,
/wp-content/plugins/event-tickets/,
/wp-content/plugins/event-tickets-plus/,
/wp-content/plugins/the-events-calendar-filterbar/,
/wp-content/plugins/the-events-calendar-community-events/,
/wp-content/plugins/the-events-calendar-eventbrite-tickets/
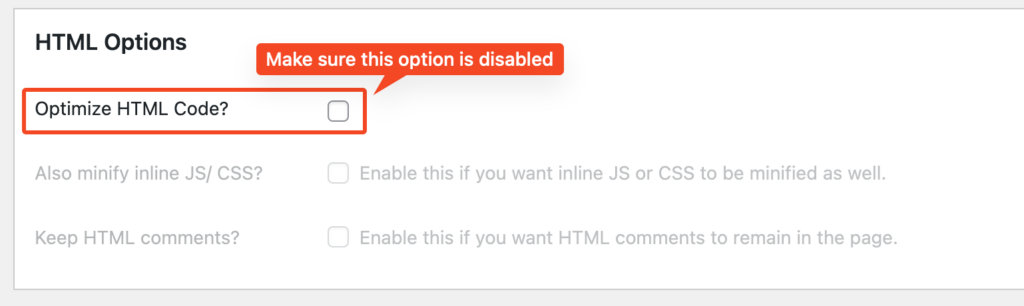
PDF Ticket issues
When the “Optimize HTML Code?” setting for Autoptimize is enabled, the PDF ticket that’s generated on the site has white text. This make it unreadable.
For plugins to work properly, all dynamic content should be excluded from caching. This applies for all The Events Calendar plugins, but also, all plugins in general.
We are currently looking into this to see if we can make this compatible with this feature, however, it’s still not something that we can control directly.
If you’re facing this issue, then please go to Settings > Autoptimize > JS, CSS & HTML and disable this option.
If you want to continue using this option and have the PDF ticket work still, you can add this custom code snippet to your site to disable this setting for our plugin.
add_filter( 'autoptimize_filter_html_noptimize', function( $return, $content ) {
	if (
		function_exists( 'tribe_get_request_var' )
		&& tribe_get_request_var( 'tec-tickets-wallet-plus-pdf' ) == 1
	) {
		return true;
	}

	return $return;
}, 10, 2 );