Conditionally Disable Ticket Emails
When using the Event Tickets plugin, tickets are automatically emailed to your customers as soon as purchase is complete. The confirmation email includes the ticket details and is essential to the attendee experience. However, there may be scenarios where you want to turn off confirmation emails, especially if you’re handling ticket distribution differently. These solutions enable you to customize email behavior, such as disabling emails for specific providers or restricting them to certain events, giving you complete control over the timing and recipients of the emails.
WooCommerce
The following PHP code snippet disables the sending of ticket confirmation emails for tickets using WooCommerce as the payment platform,
/* Disable tickets emails for Woo */
add_filter( 'tribe_tickets_plus_email_enabled', '__return_false' );
It will not, however, affect the order emails WooCommerce sends.
Disable Ticket Emails for Certain Events
The following code snippet customizes how email notifications are handled in Event Tickets by preventing emails from being sent for specific events. It works by checking if the email is related to an event and whether the event ID matches any in a list of excluded event IDs (like 123, 124, or 125). If the event is on the list, the code stops the email from being sent by returning null.
This can be useful when you want to block email notifications for certain events, such as private gatherings or internal testing events.
<?php //Do not copy this line

add_filter( 'tec_tickets_emails_dispatcher_to', function ( $to, $dispatcher ) {

	// Event IDs for which the email should not be sent.
	$excluded_event_ids = [ 123, 124, 125 ];

	if ( ! function_exists( 'tribe_is_event' ) ) {
		return $to;
	}

	$email    = $dispatcher->get_email();
	$event_id = $email->get( 'post_id' );

	// Check if it's an event and is in the excluded event list.
	if ( tribe_is_event( $event_id ) && in_array( $event_id, $excluded_event_ids, true ) ) {
		return null;
	}

	return $to;
}, 10, 2 );
Add the code snippet to the functions.php file of your theme, or use your preferred method for integrating snippets into your WordPress site, such as the free Code Snippets plugin.
Extending Event Tickets Emails Placeholders
When using Tickets Commerce as the payment method, order emails and purchase receipts are handled by Tickets Commerce itself. Although email templates include placeholders, not all are available for every type of email. You can find more information about the different types of emails and the available placeholders for each one here.
Event Tickets Emails Knowledgebase
By default, the Completed Order email from Tickets Commerce includes a limited set of placeholders and does not provide built-in support for adding custom placeholders such as the purchaser’s name or event title. However, one can extend this functionality with custom coding. This article provides a snippet that enables the use of {purchaser_name} and {event_title} placeholders in the Completed Order email.
Adding Custom Placeholders to Completed Order Email
Add the following PHP code to the site to be able to use {event_title} and {purchaser_name} placeholders in the Completed Order email.
<?php //Do not copy this line

add_filter( 'tec_tickets_emails_completed-order_placeholders', function ( $placeholders, $id, $email ) {
	// Ensure the email object contains attendees
	$attendees = $email->get( 'attendees' );

	if ( empty( $attendees ) || ! is_array( $attendees ) ) {
		return $placeholders;
	}

	// Extract the first attendee's purchaser name and event ID
	$first_attendee = reset( $attendees );
	$purchaser_name = $first_attendee['purchaser_name'] ?? '';
	$event_id       = $first_attendee['event_id'] ?? 0;
	$event_title    = '';

	// Retrieve event title if a valid event ID is available
	if ( $event_id && ( $event = tribe_get_event( $event_id ) ) ) {
		$event_title = $event->post_title ?? '';
	}

	// Add placeholders if values exist
	if ( $purchaser_name ) {
		$placeholders['{purchaser_name}'] = sanitize_text_field( $purchaser_name );
	}

	if ( $event_title ) {
		$placeholders['{event_title}'] = sanitize_text_field( $event_title );
	}

	return $placeholders;
}, 10, 3 );
Add the code snippet to the functions.php file of your theme, or use your preferred method for integrating snippets into your WordPress site, such as the free Code Snippets plugin.
The snippet retrieves attendee information from the email object. It obtains the name of the individual who made the purchase, along with the associated event ID. Using this event ID, the title of the event is then retrieved. These details are then added to the available placeholders in the email.
Add Ticket Description to Ticket Confirmation Emails
When creating tickets with the Event Tickets plugin, the Description field offers a space to incorporate extra details that pertain specifically to that ticket. This is ideal for providing context or information that may enhance the ticket’s relevance and clarity for the users.
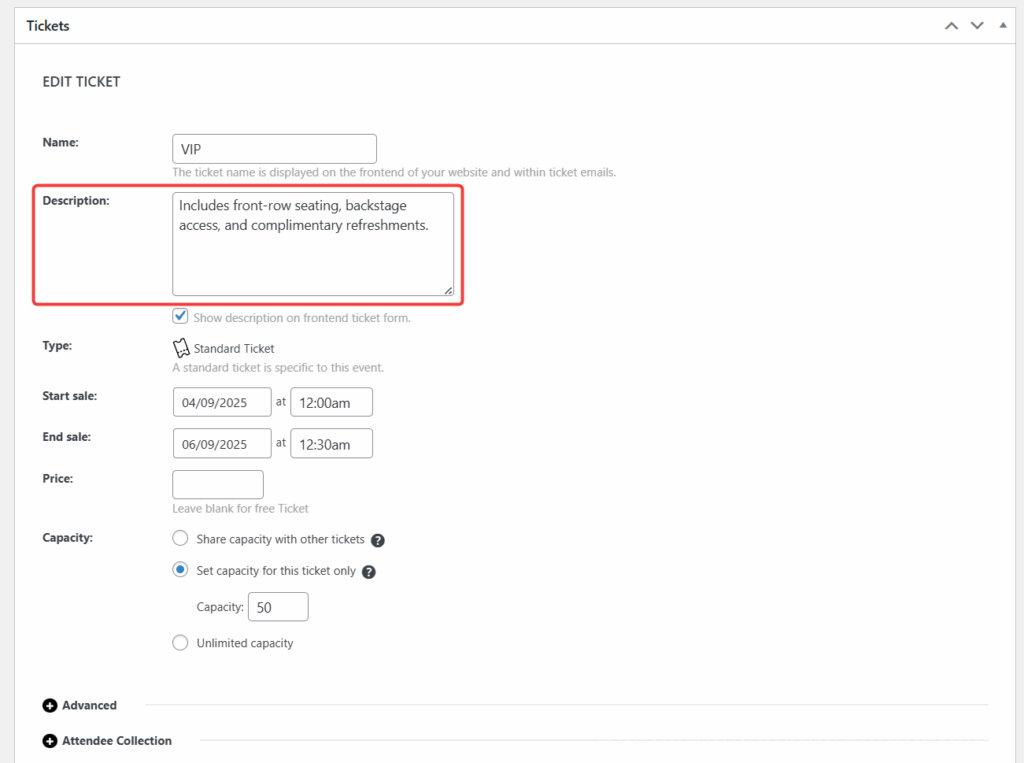
For example, you might use it to share:
- What the ticket includes (like meals, parking, or merchandise)
- Special instructions for attendees (such as arrival times or entry requirements)
- Extra information about access, or event perks
By default, this description only appears on the event page where the ticket is displayed. However, attendees often rely on their confirmation email as the main reference for event details. Including the ticket description in the email ensures that important ticket-specific information is always at hand, making the email more helpful and reducing the chances of attendees missing key instructions.
In this guide, we’ll walk you through how to customize the ticket confirmation email template so the ticket description is included alongside the ticket title.
Steps
1. Start by making a copy of the following template file:
\wp-content\plugins\event-tickets\src\views\emails\template-parts\body\tickets.php
2. Place the file in your theme at the following path. If the sub-folders don’t already exist, you’ll need to create them first:
/wp-content/themes/[your-theme]/tribe/tickets/emails/template-parts/body/tickets.php
3. Find the following lines of code in the file:
<tr>
    <?php $this->template( 'template-parts/body/ticket/security-code', [ 'ticket' => $ticket ] ); ?>
</tr>
4. Add the following lines of code right after </tr> :
<?php
$ticket_product = get_post($ticket['product_id']);
$ticket_description = $ticket_product->post_excerpt;
?>
<tr>
    <td class="ticket-details">
        <h4 style="color: <?php echo esc_attr($ticket_text_color); ?>; margin-bottom: 0;"><?php esc_html_e('Additional Details:', 'event-tickets'); ?></h4>
        <span style="color: <?php echo esc_attr($ticket_text_color); ?>;"><?php echo $ticket_description; ?></span>
    </td>
</tr>
5. Ticket confirmation emails should now display the ticket description:
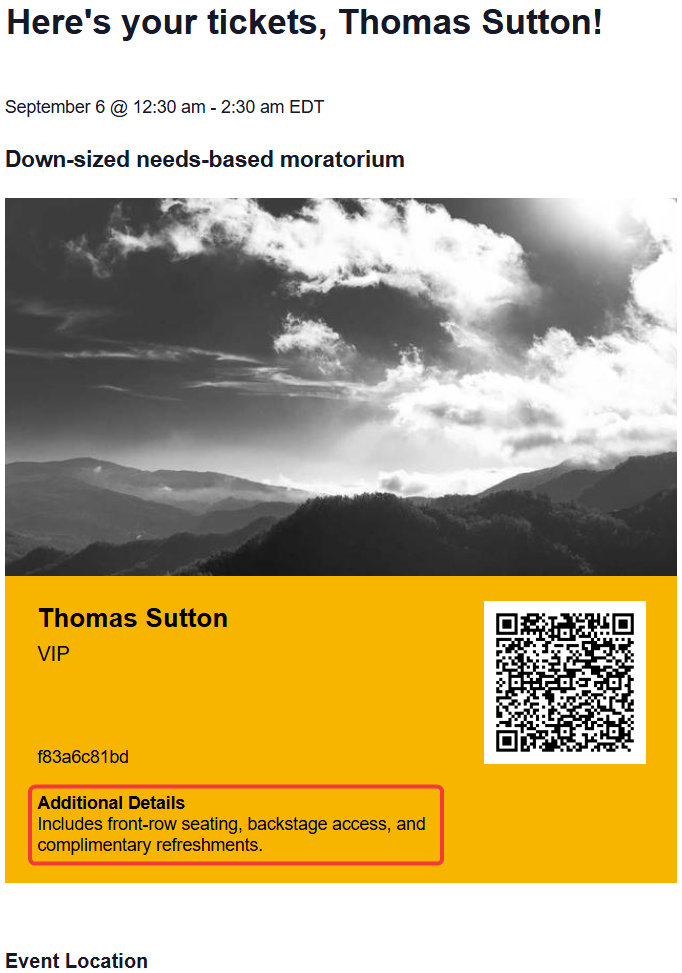
That’s all it takes! With this customization in place, your attendees will now see the ticket description directly in their confirmation emails. This helps ensure that important details, such as inclusions, instructions, or perks, aren’t missed, making your confirmation emails much more useful.
Hide Specific Attendee Fields from Event Tickets Confirmation Emails
When using Attendee Registration fields, you may sometimes include fields such as a “Privacy Policy” checkbox with HTML links.
While these fields work perfectly on the frontend registration form, they can often appear as messy, in the automated ticket confirmation emails sent to customers. To keep your emails professional, you can use a code snippet to exclude specific fields from the email while keeping them mandatory on your registration form.
The following code uses the tribe_tickets_plus_email_meta_fields filter. It searches through the list of attendee fields intended for the email and removes (unsets) any field that matches a specific “slug.”
You can add these PHP snippets to your child theme functions.php file. However, we recommend using a dedicated code snippets plugin to avoid issues with theme updates. For more information, please see our guide on the best practices for implementing custom code snippets.
/**
 * Prevents a specific attendee registration field from appearing in ticket emails.
 */
function exclude_specific_field_from_ticket_emails( $meta_fields ) {
	foreach ( $meta_fields as $index => $field ) {
		// Replace 'privacy' with the slug of the field you want to hide.
		if ( isset( $field['slug'] ) && 'privacy' === $field['slug'] ) {
			unset( $meta_fields[ $index ] );
		}
	}
	return $meta_fields;
}
add_filter( 'tribe_tickets_plus_email_meta_fields', 'exclude_specific_field_from_ticket_emails' );
How to Find Your Field Slug
To ensure the code targets the correct field, you need the “slug.”
- Navigate to Tickets > Attendee Fields in your WordPress dashboard.
- Locate the field you wish to hide (e.g., your Privacy Policy field).
- The Label is what users see, but the Slug is the internal name. If you haven’t set a custom slug, it is typically a lowercase version of your label (e.g., “Privacy Policy” becomes
privacy-policy).
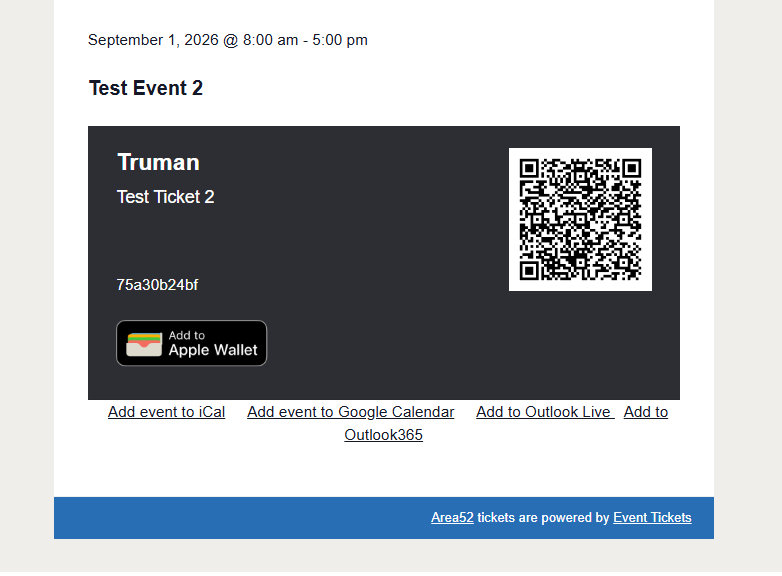
Adding Outlook link to Event Ticket Emails
The Ticket Emails sent our for Events will include Google Calendar and iCalendar export links, enabling users to add events to their calendars as soon as they receive the email.
If you want to include Outlook export links in Ticket and RSVP confirmation emails, we’ve created a solution that will allow you to add these with a Template Override. You can copy this code directly into a new file name, and name it “links.php”. Then you can place the file in your WordPress directory, in this location:[your-theme]/tribe/events/integrations/event-tickets/emails/template-parts/body/event/links.php
<?php
/**
 * Event Tickets Emails: Main template > Body > Event > Links.
 *
 * Override this template in your own theme by creating a file at:
 * [your-theme]/tribe/events/integrations/event-tickets/emails/template-parts/body/event/links.php
 *
 * See more documentation about our views templating system.
 *
 * @link https://evnt.is/tickets-emails-tpl Help article for Tickets Emails template files.
 *
 * @version 6.1.1
 *
 * @since 6.1.1
 *
 * @var WP_Post $event The event post object with properties added by the `tribe_get_event` function.
 * @var string  $event_ical_link The event iCal link.
 * @var string  $event_gcal_link The event Google Calendar link.
 *
 * @see tribe_get_event() For the format of the event object.
 */

$path = '/calendar/action/compose';
$rrv  = 'addevent';
$startdt = tribe_get_start_date($event->ID, true, 'c');
$enddt = tribe_get_end_date($event->ID, true, 'c');
$location = "";
if (tribe_get_venue($event->ID)) {
	$location .= tribe_get_venue($event->ID) . ", ";
}
if (tribe_get_address($event->ID)) {
	$location .= tribe_get_address($event->ID) . ", ";
}
if (tribe_get_city($event->ID)) {
	$location .= tribe_get_city($event->ID) . ", ";
}
if (tribe_get_state($event->ID)) {
	$location .= tribe_get_state($event->ID) . ", ";
}
if (tribe_get_country($event->ID)) {
	$location .= tribe_get_country($event->ID);
}
$subject = str_replace(' ', '%20', get_the_title($event));
$body = str_replace(' ', '%20', get_the_excerpt($event));
if (!empty($event->virtual_meeting_url)) {
	$body .= urlencode("<br/><b><a href=" . $event->virtual_meeting_url . ">Join Zoom Meeting</a></b>") ;
}
$params = [
	'path'     => $path,
	'rrv'      => $rrv,
	'startdt'  => $startdt,
	'enddt'    => $enddt,
	'location' => $location,
	'subject'  => $subject,
	'body'     => $body
];
$base_url_outlookLive = 'https://outlook.live.com/owa/';
$base_url_outlook365 = 'https://outlook.office.com/owa/';
$url_outlookLive      = add_query_arg( $params, $base_url_outlookLive );
$url_outlook365      = add_query_arg( $params, $base_url_outlook365 );


?>
<tr>
	<td class="tec-tickets__email-table-content-event-links-container">
		<table role="presentation" class="tec-tickets__email-table-content-event-links-table">
			<tr>
				<td class="tec-tickets__email-table-content-event-links-table-data" align="center">

					<?php $this->template( 'template-parts/body/event/links/ical' ); ?>

					<?php $this->template( 'template-parts/body/event/links/gcal' ); ?>

					<a
						target="_blank"
						rel="noopener noreferrer"
						href="<?php echo esc_url( $url_outlookLive ); ?>"
						class="tec-tickets__email-table-content-event-links-outlook-live-link"
						style="padding: 0 8px;"
					>
						<?php echo esc_html_x( 'Add to Outlook Live', 'Button on Ticket Email', 'the-events-calendar' ); ?>
					</a>

					<a
						target="_blank"
						rel="noopener noreferrer"
						href="<?php echo esc_url( $url_outlook365 ); ?>"
						class="tec-tickets__email-table-content-event-links-outlook-365-link"
					>
						<?php echo esc_html_x( 'Add to Outlook365', 'Button on Ticket Email', 'the-events-calendar' ); ?>
					</a>

				</td>
			</tr>
		</table>
	</td>
</tr>
Be sure to reference the guide linked above if you need help on creating an Editing Template Overrides. Here is what the additional links look like in the Ticket Email:
Add Custom BCC Emails to the RSVP Email
⚠️ Note: These snippets won’t work if RSVP emails are configured to use the Ticket email template. Disable the Use Ticket Email option under Tickets > Settings > Emails > RSVP Email.
By default, registrants will receive an email including their RSVP info upon registration. The site administrator or the organizer does not get any kind of notification. This can be achieved, however, with one of the below snippets.
Add the code snippet to the functions.php file of your theme, or use your preferred method for integrating snippets into your WordPress site, such as the free Code Snippets plugin.
With this simple snippet, you can add any email address to the BCC field of the email.
<?php
//* Do NOT include the opening php tag, if there's already one.

/**
* Add a custom email address to the BCC field on all Event Tickets' RSVP ticket emails
*/
add_filter( 'tec_tickets_emails_dispatcher_rsvp_headers', 'my_add_bcc_email_headers' );

function my_add_bcc_email_headers( $headers ) {

	$headers['Bcc'] = 'YOUR NAME <[email protected]>';

	return $headers;
}
To add event organizers to the BBC for the RSVP Email you can use this modified version.
<?php
//* Do NOT include the opening php tag, if there's already one.

/**
 * Add the event organizer to the BCC field on the Event Tickets' RSVP ticket emails.
 */
add_filter( 'tec_tickets_emails_dispatcher_rsvp_headers', 'my_add_bcc_email_organizers_headers', 10, 2 );

function my_add_bcc_email_organizers_headers( $headers, $dispatcher ) {
	$email   = $dispatcher->get_email();
	$post_id = $email->get( 'post_id' );

	if ( ! $post_id || ! function_exists( 'tribe_get_event' ) )  {
		return $headers;
	}

	$event = tribe_get_event( $post_id );

	if ( empty( $event ) ) {
		return $headers;
	}

	// Bail, if there's no organizer set.
	if ( ! tribe_has_organizer( $post_id ) ) {
		return $headers;
	}

	// Get the organizers.
	$organizers = tribe_get_organizer_ids( $post_id );

	// Loop through the organizers.
	foreach ( $organizers as $organizer_id ) {
		// Get the organizer email address.
		$organizer_email = stripslashes_deep( html_entity_decode( tribe_get_organizer_email( $organizer_id ), ENT_COMPAT, 'UTF-8' ) );

		// Add the organizer email info to our emails array.
		$emails[] = $organizer_email;
	}

	// Bail, if there are no organizer email addresses.
	if ( empty( $emails ) ) {
		return $headers;
	}

	// List the email addresses and add them to the BCC field.
	$headers['Bcc'] = implode( ",", $emails );

	return $headers;
}
The above snippets are for the RSVP ticket emails specifically. To do something similar for other (RSVP and Tickets Commerce) emails you need to use the appropriate version of the tec_tickets_emails_dispatcher_{$email_slug}_headers filter, where the $email_slug can have the following values:
- rsvp
- rsvp-not-going
- ticket
- completed-order
- purchase-receipt
So, for example, for the purchase receipt email, the filter name would be tec_tickets_emails_dispatcher_purchase-receipt_headers.