Why You Should Add RSVP to Your Free Events

A major perk of hosting free events: They’re slightly easier to manage than ticketed events. Without any tickets to sell, you don’t need to set up an eCommerce platform or make decisions about how money changes hands. But even if you’re not selling tickets, it’s worth adding an RSVP to your free events.
Why bother? Fair question, but we promise, it’s worth it: By collecting RSVPs, you can estimate attendance numbers, gather valuable attendee information, improve your marketing efforts for future events, and more.
Plus, adding an RSVP to your events on WordPress is easy! Read on to learn more about how to make the most of your free events with RSVPs.
Do I really need to ask for RSVPs on free events?
You probably wouldn’t send an invitation to a dinner party or a wedding without asking your guests to RSVP—so why would you skip this step for your events?
On the practical side, gathering RSVPs will help you estimate how many people will attend your event. This is especially important if your venue has limited space, or if you’re ordering snacks for a crowd. If you don’t plan for the right number of people, you could find yourself out of seats or hors d’oeuvres—not a good experience for your attendees.
Adding an RSVP can also help encourage attendees to actually show up for the event. By asking for a clear “yes” or “no,” attendees will be more likely to follow through. This simple tactic is one way you can stave off flakiness and increase attendance at your next event.
Finally, collecting RSVPs is a marketing opportunity for event organizers and promoters. Gather attendees’ contact information through the RSVP form and then stay in touch with event reminders and announcements for future events.
How do I add an RSVP to my free events on WordPress?
The easiest way to start collecting RSVPs is with the help of a plugin like Event Tickets. It works great with our flagship events calendar plugin, but you can use it with any WordPress page, post, or even custom post type.
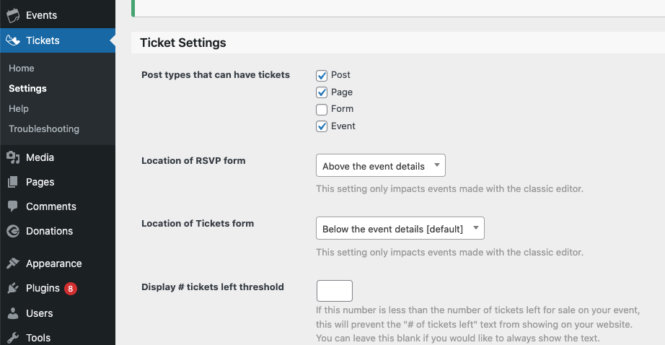
To get started, simply enable RSVP functionality under Tickets → Settings from your WordPress dashboard. You’ll see options that allow you to enable tickets on any page and post type. And, yes, even though it says “tickets” it refers to both tickets and RSVPs.
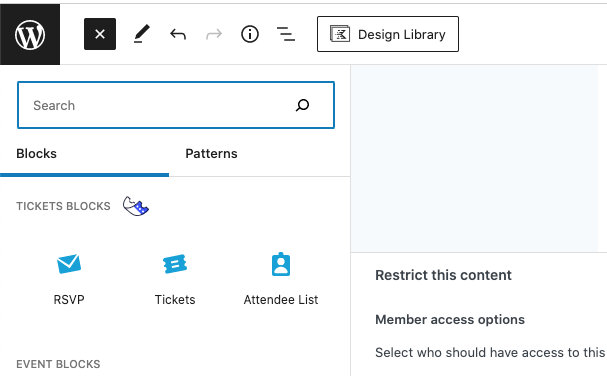
Then, head to the event, page, or post where you’d like to add RSVPs. Using the block editor, click the plus sign on the upper left corner to show the available blocks, then search for the RSVP block:
Now, you can customize your RSVP. Need to designate a maximum capacity for RSVPs? You can do that here. You can also decide whether to display “not going” responses.
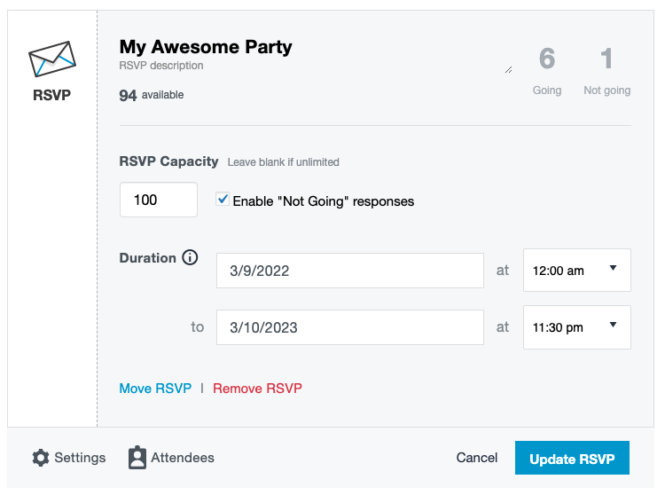
Expand the “Settings” to set a header image for this RSVP block.

Interested in more options and settings including allowing users to add attendee information? That’s a perk you get with Event Tickets Plus, which is an add-on to Event Tickets. By upgrading to Event Tickets Plus, you’ll also unlock features like custom fields, which allow you to collect additional information from your guests beyond names and email addresses. This extra feature is a huge time saver if you need to gather info such as T-shirt size, meal preference, allergies, or other details specific to your event. Check it out!