Email Communication Tips for Online Events
Creating multiple touchpoints to communicate with your attendees is key when hosting online events.
Virtual events are a lot like any other event. They both require registration. They both have attendees. There are hosts and organizers. The key difference is the address: one is virtual and one has a physical address. So what makes effective email communication in online events?
Just because an event lacks a location, it doesn’t mean it needs to be treated differently than other events. In fact, online events probably require more care and attention. That’s especially true when it comes to the way you communicate with attendees. There are certain things that someone attending an online event might expect that are taken for granted with other events.
Here are a few tips we’ve learned to communicate with guests leading up to an online event.
It all starts at registration
The first rule to communications for an online event? Set good expectations upfront. And that starts before someone has registered for the event.
That means having a solid landing page for the event that provides all the information someone needs to attend. Not sure what information to include? Start by answering the “five W’s”:
- Who is the event for? In other words, is there a specific type of person who should attend this event? It’s also a good idea to answer who will be speaking or performing at the event, especially if that’s the main draw.
- What is the event about? Is it about a particular topic? Is it a class? A performance? A training? Answering this not only helps folks know what to expect when attending, but what they should expect to walk away with as well.
- Where is the event? Remember, an online event still has an address. It’s a good idea to let guests know the event is online so they can plan accordingly. The same thing applies for finding the event: Is a link provided on the event page, or is it sent after registration? Perhaps there’s no link at all and the event is broadcast right there on the page!
- When is the event? This may seem obvious. At the same time, note that someone attending an event may live in another timezone. That’s the beauty of an online event: It’s possible for anyone to join from anywhere. Clearly state the start time and timezone, especially if you expect attendees to join from other locations.
- Why should someone come to the event? This is the money question. You’ve identified who should come and what they should expect — but why should they come? Do they get an experience they won’t find anywhere else? Do they receive some sort of credit for attending? Whatever it is, the goal is to communicate the value of the event and that can come in many forms.
Here’s a bonus tip: tell attendees what to expect during registration. Let them know what sort of payment options are accepted if it’s a paid event. Will they get something emailed to them at the end? Give ’em a heads up!

Confirm registration
Someone registered for your event — hurray! 🎉 But the party doesn’t end there. If anything, we’re just getting started!
Send an email to the attendee that confirms their registration. That’s a nice way to acknowledge you received the request. That goes a long way toward earning trust and gives an attendee the assurance that they’ve successfully registered.
Automate this, if you can. Depending on how you collect registrations, many forms will automatically send confirmations. E-commerce solutions often do the same following a completed transaction. For example, our Event Tickets plugin for WordPress sends an email immediately following a successful RSVP or ticket purchase.
Another tip? Reiterate some of the same event information in the confirmation and what to do to prepare for the event. It’s sometimes easier and more convenient for someone to dig up an email than it is to pull up a website.
Help guests prepare for the event
Will they need to take notes? Do they need to bring anything with them? Sure, someone may be attending the event from the comfort of their own computer, but it’s possible they need to do a few things leading up to the event.
Sending some sort of welcome email after registration is a good way to communicate any requirements. You could certainly include these details in your confirmation email, but sending a dedicated email helps to prevent these important details from competing with other information.
This is also a good place to stop and think about whether guests have a link to the event. If you’re using Event Tickets, we have a free extension that will include a link to the event in the email attendees receive after completing registration.
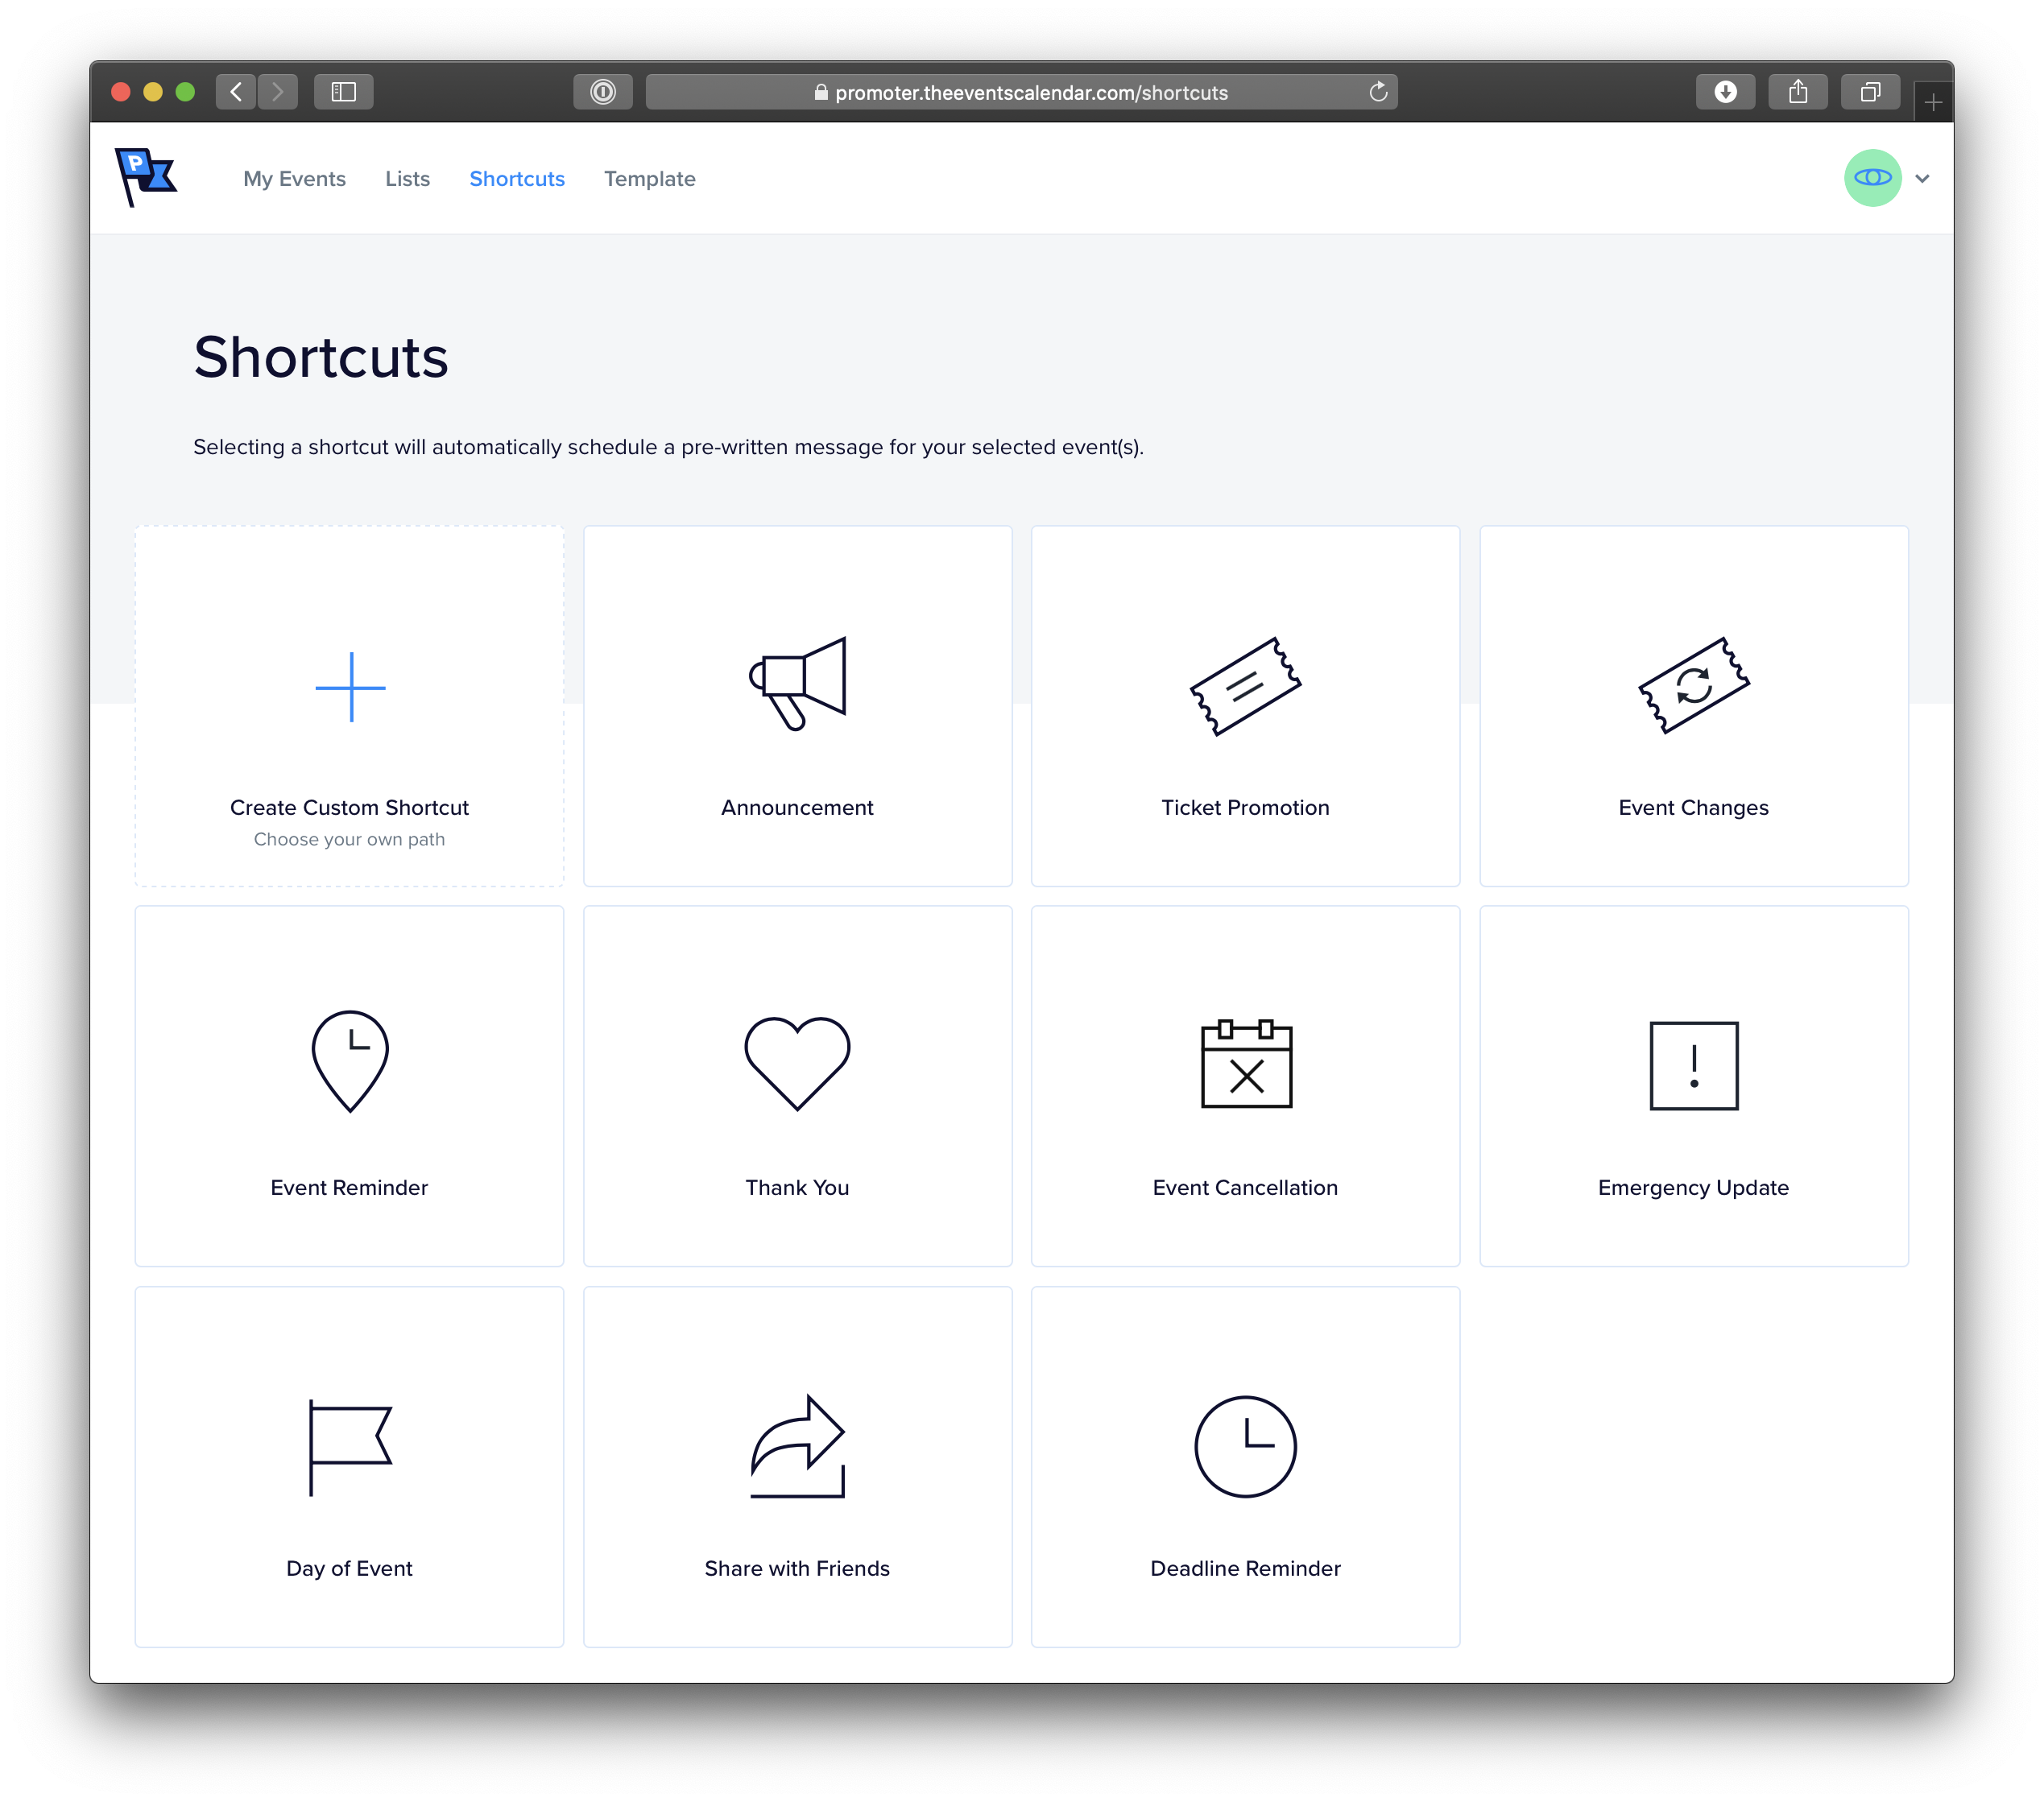
Whatever it is that someone needs to know, you should automate this email. That way, everyone gets the same information, no matter when they register. Our Promoter service has a set of pre-written email messages you can use as a starting point, as well as the option to create your own.
Send a reminder leading up to the event
People are usually busy. It’s even easy to forget what we just ate for dinner yesterday. It’s always possible that someone who registers for an online event winds up missing that event.
Send your attendees a little reminder a few days before the event. That brings the event back to the forefront and allows everyone to make last-minute preparations. Some may say this is the most important email to promote your event.
Again, this is something Promoter allows you to do right out of the box, using the Event Reminder shortcut. It even lets you schedule how far in advance to send the reminder. Set it, then you’re free to forget it. Well, you get to forget to remind people not to forget about the event. You know what I mean!
One reminder may not be enough. Also plan on sending one more reminder on the day of the event, including a link to the event.
Top things off with a thankful note
Attendees are the real stars of your event. There wouldn’t be an event without them, right?
That’s why it’s a good idea to thank everyone following the event. Let them know you were happy to see them come, that you appreciate them making time in their busy schedules, and if there’s anything else they should know.
A few things you can include:
- Links to speaker notes
- Links to videos and photos from the event
- Information about the next event, if there is one
- Coupon codes or perks for attending
If these are things you have, feel free to send them as soon as the event ends. Or, if they’re unavailable, wait until they are available. The important thing is to send something that your attendees will not only find useful, but that makes them feel good for attending,
And, yes, Promoter shortcuts are good for that as well. 🤘
Customizing emails in Event Tickets
We covered a lot in this post, especially around the topic of emails. That makes sense given that we’re talking about online events and best practices for engaging with registered attendees. But before closing out, you might be wondering how to use emails in Event Tickets if you’re using them for event registration.
The good news is that there’s not a lot to it. Someone either RSVPs for an event or purchases a ticket and the plugin automatically sends an email.
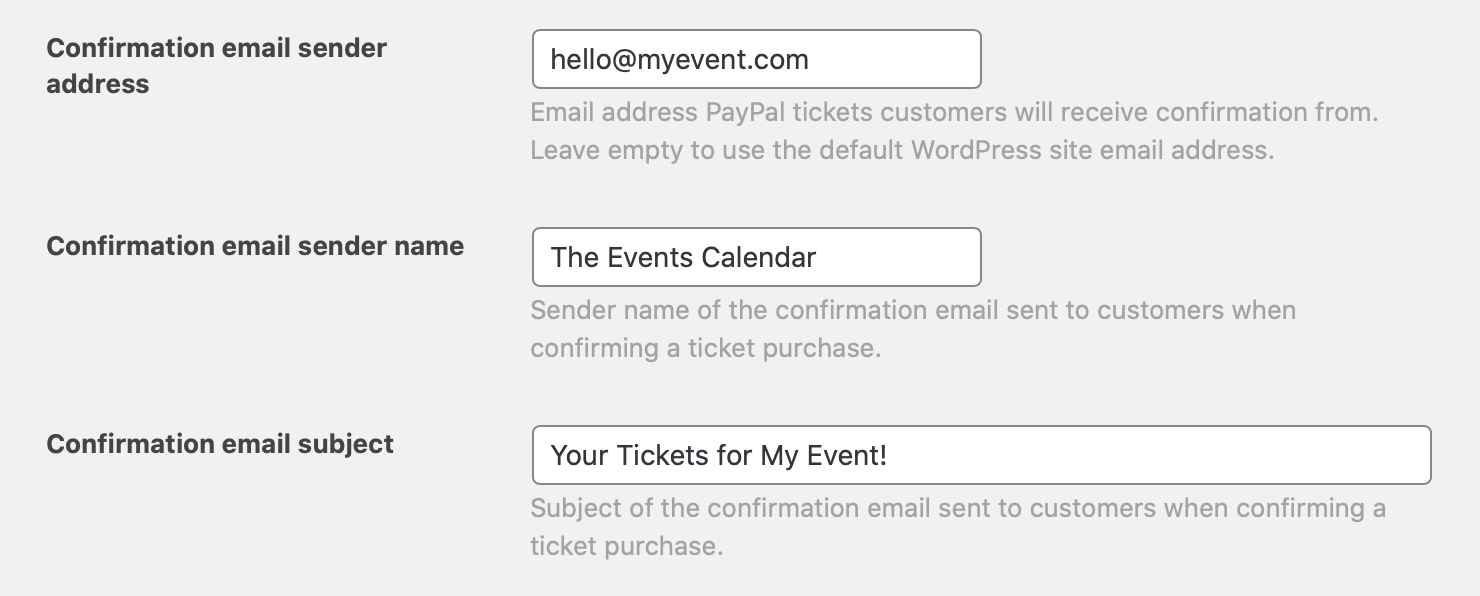
OK, great, but what if you need to customize that email? The plugin does allow you to configure how the email appears in someone’s inbox:
That’s also great, but you might want to go even further. That’s where we get into customizing the email template.
Event Tickets features a templating system that allows you to “override” any of the plugin’s templates with a template of your own by placing a copy in your theme folder. The full details are well-documented for reference. But here’s the basic rundown:
- Make a copy of the email template. It is located in the plugin folder at /wp-content/plugins/event-tickets/src/views/tickets/email.php.
- Add the copied file to your theme. Create a new folder in the top level of your theme folder called tribe-events. Inside of that, create another folder called tickets. That’s where you can drop the copied template file.
- Customize the template. You’re in full control of the code now! Add content, remove content, modify the layout, add custom class names — you name it!
- Save your work. All you gotta do is hit the save button to make sure your changes are saved.
- Bask in your awesomeness. Great work! You get a gold medal. 🏅
In short…
What you communicate for online events is equally — if not more — important than what you communicate for in-person events. The lack of physical presence means there are more details to communicate and more ways to help set good expectations to ensure a smooth, successful event.