If you’ve used Event Aggregator to import events from third-party sources such as Meetup or Google Calendar in the past, then you’re no doubt already aware of how Event Aggregator can save you time and hassle when managing events from multiple sources or users. Beginning with The Events Calendar version 4.5, we’ve taken that functionality a step further: using the Other URL import option in Event Aggregator, events can now be imported directly from other sites running The Events Calendar.
This feature is great for establishing “hub” sites that host events for a community of smaller sites–for example, a school district might promote events for individual schools in their area, or a local music site may wish to pull info on gigs and promotional events from nearby concert venues. Interested in setting up a hub site of your very own with Event Aggregator? Here’s how to set up those import tasks and begin sharing events with your community!
? When importing events from other The Events Calendar sites using the Other URL option, only single events are able to be imported at this time. Recurring events created using Events Calendar Pro will be omitted from these import tasks, even if Events Calendar Pro is activated on the target site. If one or more of your source sites includes recurring events that need to be imported into a hub site, we recommend creating a scheduled iCalendar import for bringing in these events. This will convert any recurring event instances into single events, allowing them to be imported successfully.
Getting started
Before getting started, you’ll want to make sure that you’ve configured your intended hub site properly and that you’ve gathered all the necessary information for the sites from which you’ll be importing. It’s worth double-checking to ensure that your hub site meets the following requirements before proceeding!
- The Events Calendar version 4.5 or higher must be installed and activated on your site. This plugin provides the core calendar functionality for your hub and includes Event Aggregator, which must be activated separately.
- While The Events Calendar does come with Event Aggregator preinstalled, only the CSV import option is available without activating a license key. An Event Aggregator license key must be purchased and activated in order to unlock the remaining import options, including the Other URL option that we’ll be using here. If you need help activating your license for Event Aggregator, check out our New User Primer for a quick walkthrough on the process.
- If you’ll be importing any events from sites that use Events Calendar Pro and wish to retain venue and organizer details from calendar events, you may wish to have Events Calendar Pro installed and activated on your hub site, as well. However, this step is optional–if an event with venue and/or organizer details is imported to a site that does not use Events Calendar Pro, this data will still be imported, but venue and organizer pages will not be generated on the front end.
Once your hub site is established with the necessary plugins, take a moment to review your settings to ensure that everything is set up properly for your calendar, events, and imports. You can find your plugin settings by navigating to Events → Settings from your WordPress admin’s sidebar. In particular, make sure to review the Imports tab, which contains all plugin settings related to Event Aggregator imports. You’ll find the settings relevant to the Other URL import type near the bottom of this tab.
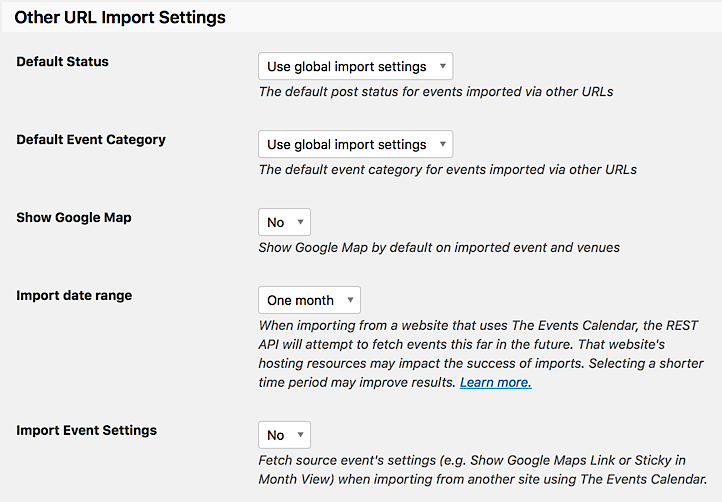
If you’ve reviewed your settings for other Event Aggregator import types at any point, you should find the first three settings in this section familiar. The Import Event Settings option is also fairly self-explanatory. However, the “Import date range” option is worth a second look.
“Import date range” allows you to specify a range of time for importing new events from sites using The Events Calendar. For example, if the option “One month” is selected, Event Aggregator will attempt to import all matching events occurring up to one month in the future each time an import is performed. When setting this option, consider the frequency of your planned imports, the needs of your users, and the hosting resources available to your source sites. Specifying a longer time period will allow you to import more events at once, but trying to import a large number of events from a limited-resource site may result in failed imports.
Lastly, ensure that you’ve collected URLs for any calendars from which you’ll be importing events. URLs for calendars created with The Events Calendar will begin with http:// or https:/ and usually end with /events, though some calendars may follow a different structure. Copying these URLs into a separate text file, one on each line, will make it easier to access them later when they’re needed. Make sure also to copy the entire address for the main calendar page, not a single event or other page.
Setting up imports
Now that you’ve confirmed that your hub site is ready to go and you’ve collected the URLs for your sites to be imported, it’s time to put it all together! For the purposes of this demonstration, let’s set up some imports to populate a simple hub calendar. We’ll pull our first selection of events from our Demo Site to start.
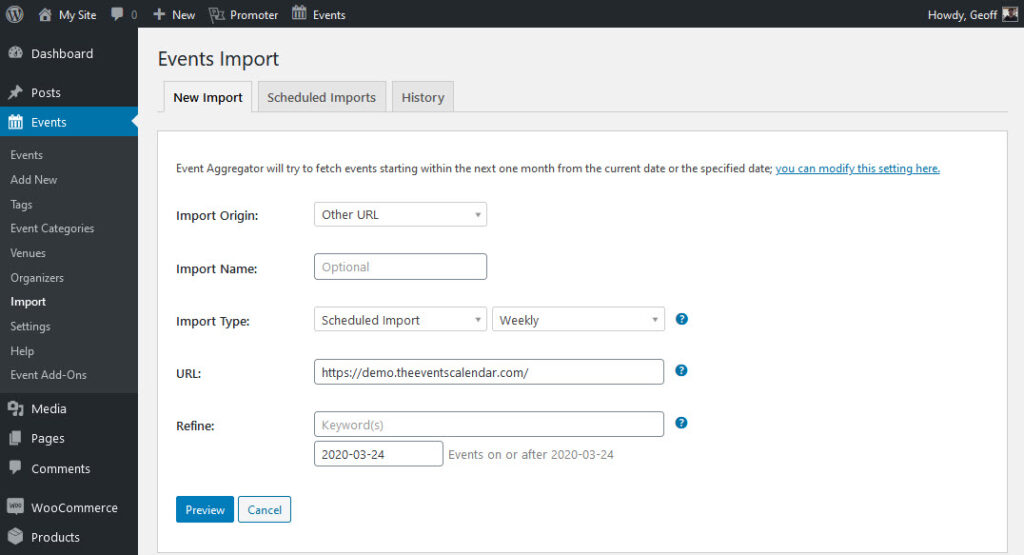
Log in to the WordPress backend for your hub site and navigate to Events → Import from your WordPress sidebar. You’ll be presented with the New Import page and prompted to select a type for your new import task.
Select the “Other URL” option for the “Import Origin” field, then select “Scheduled Import” when prompted to choose an “Import Type.” Selecting this option will display the complete selection of fields for scheduling a recurring import task.
As with any other scheduled import, you can select an interval for your scheduled imports, with options ranging from every 30 minutes to once per month. If you know how often your source sites tend to update with new events, adopting this interval for your imports may make the most sense; if you aren’t sure, a few daily or weekly imports should ensure that your hub remains up to date without using up all of your allotted daily tasks. It’s worth keeping your daily import limit in mind when making your selection here. Read more about import limits for Event Aggregator.
After you’ve chosen the appropriate interval for your import task, enter the calendar URL for your first source site in the “URL” field. You can specify any additional refinements that you’d like in the remaining fields, but typically, these won’t be used for hub sites. Click the “Preview” button once you’re finished, and Event Aggregator will display a sampling of events to be imported based on your criteria.
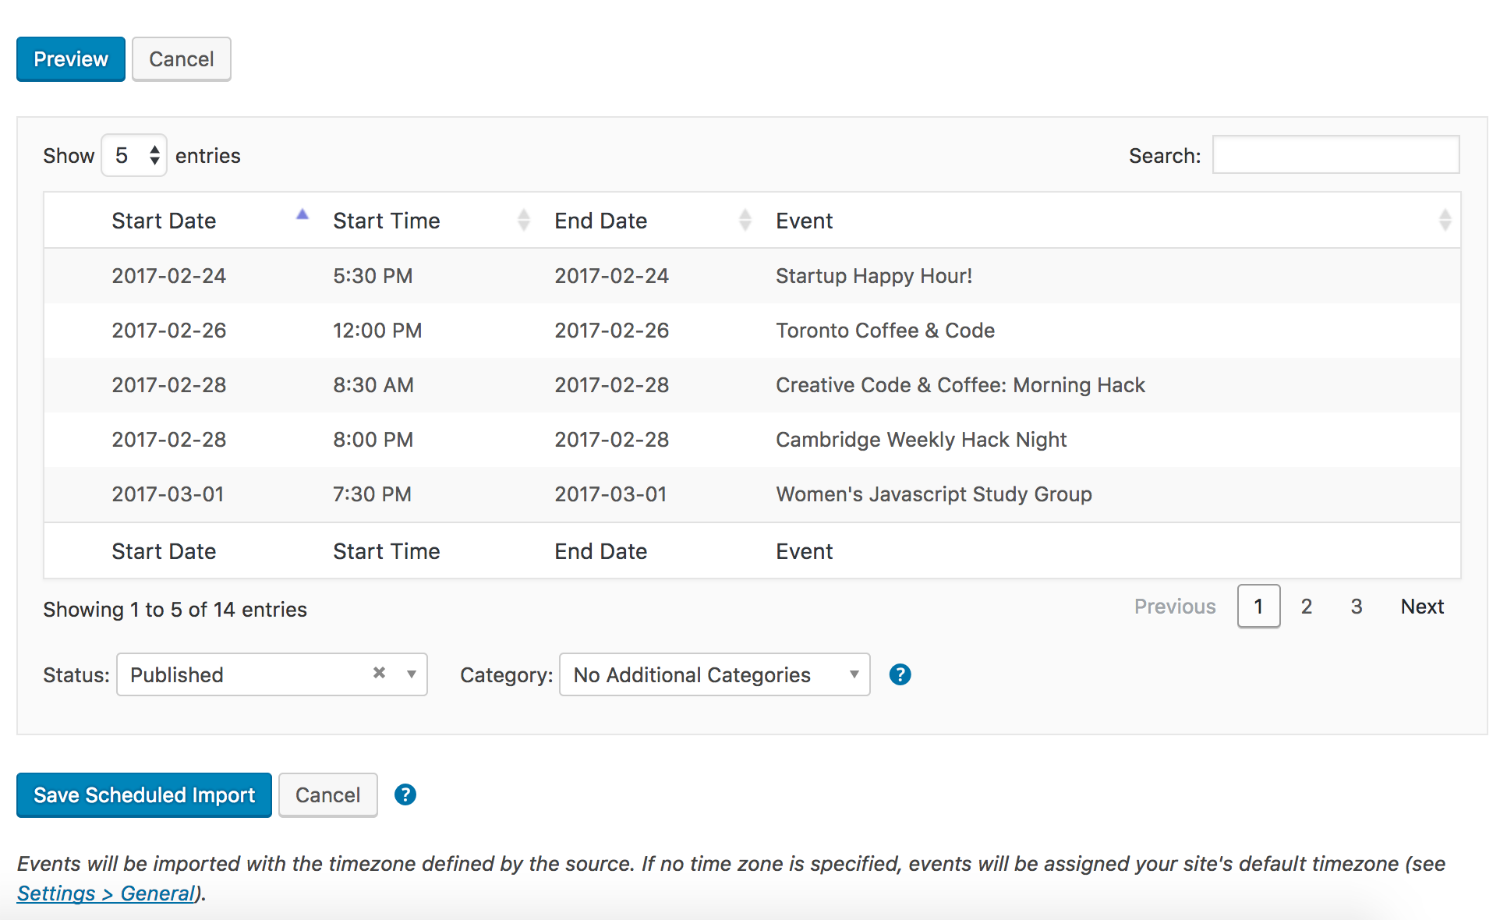
Beneath your list of previewed events, you’ll be presented with just two remaining options: Status and Category. By default, imported events are set to “Published” status and will display immediately on your calendar. If you’d prefer to have your imports set to “Draft” or another status to be reviewed before publishing, select the option that you’d prefer for the Status field.
The Category selector allows you to assign an additional category to events imported by this task. This may be useful if, for instance, you’d like your users to be able to filter events by source, or if you’d like to designate all imported events as distinct from events created on your own site. Select the category or categories that you’d like to add to events imported by this task, or feel free to skip the field entirely if you’d prefer to use only the imported categories.
As soon as you’ve made your final selections, go ahead and click the “Save Scheduled Import” button. Event Aggregator will begin importing your first batch of events, and the import task you’ve set up will be added to your list of scheduled imports. If you’d like to make any changes to this task at a later date, you can view your complete list of scheduled imports at any time by navigating to Events → Imports and clicking the “Scheduled Imports” tab.
Once your first import task is scheduled and completed, all that’s left is to repeat these steps for any remaining source URLs on your list! Any text, images, categories, venues, and organizers from the original events will be imported along with these events and added to your site for future reuse. You can also freely make changes to events after they’ve been imported to your site–if you’d like to ensure that your edits are retained for future imports, make sure that your Event Update Authority settings are configured the way you like them. Read more about this setting and its available options.
We hope that this article gives you some ideas for how you can use Event Aggregator to easily establish hub calendars and provide a diverse selection of events for your users.